
Common WordPress Troubleshooting Guide
Introduction
WordPress is a popular Content Management System (CMS) that lets you build websites, portfolios, and eCommerce applications. While it’s a user friendly platform, there are common WordPress errors that make it a hard platform to troubleshoot depending on the amount of errors displayed to either the site visitor or administrator dashboard.
Depending on the error source, most WordPress errors are a result of the underlying infrastructure that functions to deliver your application to the site visitors. In this case, if your web server configuration breaks, your WordPress site automatically shows an error to the site visitors, fix it by troubleshooting the web server functionalities.
Frontend WordPress errors are minimal warnings that don’t usually break your site structure, but greatly impact the user experience each time your site loads to a new visitor. In this case, you should scan common plugin, WordPress core, and theme errors to avoid any additional errors.
This article explains common backend and frontend WordPress errors and how you can troubleshoot them to improve your site's reliability.
Prerequisites
Before you begin, make sure you:
Have an active WordPress site. If not, deploy a OneClick WordPress server using the Vultr Marketplace application
Log in to your WordPress site as an administrative user
https://example.com/wp-adminHave SSH or terminal access to the WordPress server
Common WordPress Errors
Many WordPress errors get discovered each time a new major update rolls out. Depending on your exact error, below are 10 of the most common WordPress errors known to affect site performance, search rankings, reliability, and sometimes lead to total data loss.
- Error Establishing a Database Connection
- Your Connection is Not Private (Invalid SSL Certificate)
- WordPress White Screen of Death (Blank Screen)
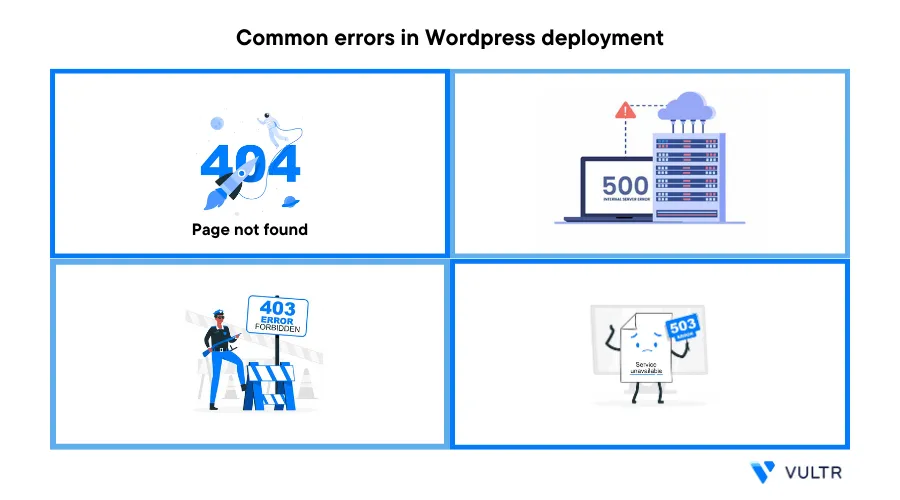
- Internal Server Error (500)
- 404 Page Not Found
- Upload: Failed to Write File to Disk” Error
- 503 Service Unavailable Error
- The Site is Experiencing Technical Difficulties
- 403 Forbidden Error
- Mixed Content Error
Troubleshoot Common WordPress Errors
To troubleshoot and fix common WordPress errors, you must know the exact source of the error before you take steps to find a solution. Commonly, you should follow the basic troubleshooting steps described in this section to fix WordPress errors.
View the WordPress Logs
WordPress logging allows you to view errors in a single output file. By default, the feature is inactive, enable it to keep track of any WordPress debugging errors that may display and affect your site performance as described below.
Navigate to your WordPress web root directory. For example
/var/www/html,/var/www/public_html,/var/www/example.com/$ cd /var/www/htmlUsing a text editor of your choice such as
nano, edit thewp-config.phpfile$ nano wp-config.phpAdd the following directive at the end of the file to activate WordPress logging
define('WP_DEBUG_LOG', true);Save and close the file
Switch to the
wp-contentdirectory$ cd /wp-content/List files and verify that a new
debug.logfile is available in the directory$ lsView the
debug.logfile to access the WordPress error logs$ cat debug.logEach time your WordPress site runs into an error. It’s logged to the
debug.logfile. Always view the file to identify the exact source of the error. For example:[2023-07-07 12:00:01] PHP Fatal error: Call to undefined function get_non_existent_function() in /var/www/example.com/wp-content/plugins/custom-plugin/plugin-file.php on line 644The above error shows that your
custom-pluginreturns an error on line 644. You can edit the plugin file to correct it, or disable the plugin to prevent any additional errors.
Activate WordPress Debugging
WordPress debugging enables the display of errors on your WordPress site for troubleshooting by an administrator. Usually, these appear when any of the installed themes or plugins are poorly coded or returns runtime errors. By default, WordPress debugging is not active, enable it as described in the steps below.
Edit the
wp-config.phpfile$ nano wp-config.phpAdd the following directives at the end of the file
 define('WP_DEBUG_DISPLAY', false);
 define('WP_DEBUG_LOG', true);
Save and close the file
The above directives turn on WordPress debugging and disable errors from appearing on your site visitor's screen. This allows you to know the exact source of a WordPress error and gives you enough details to correct it and avoid any additional errors in your application.
View the Web Server Logs
The web server is the root component of your WordPress site that keeps it running. Most WordPress deployments either use Apache, Nginx, OpenLiteSpeed, or Caddy as the web server application. Depending on your deployment, check the web server logs to identify the source of a WordPress error as described in the steps below.
Visit the
/var/log/directory$ cd /var/logSwitch to the web server logs directory. For example
Nginx$ cd /var/log/nginxView the error log
$ sudo cat error.logIf your WordPress configuration uses a custom Nginx error log such as example.com.error.log, view the file contents to display the application's specific error.
$ sudo cat example.com.error.logIf your WordPress site has a web server-related error. It should display in your log file entries
2023/08/07 12:00:00 [error] 12345#0: *6789 open() "/var/www/example.com/productabc.html" failed (2: No such file or directory), client: 192.0.2.100, server: example.com, request: "GET /missing-page.html HTTP/1.1", host: "example.com"The above error shows that the web server displays a 404 error because the
productabc.htmlfile is unreadable or unavailable in the WordPress web root directory.
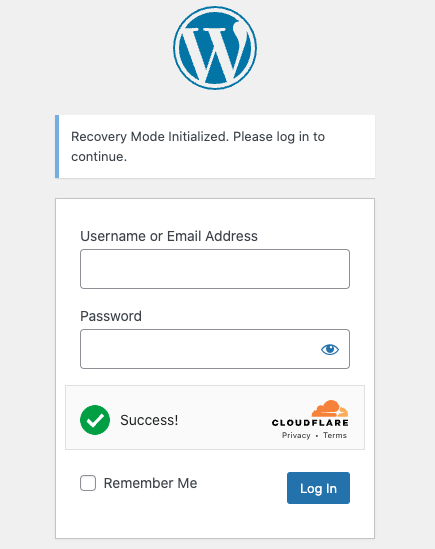
Enable WordPress Recovery Mode
WordPress recovery mode allows you to troubleshoot errors by granting you temporary access to the administrator dashboard until all issues get resolved. Usually, when a critical error occurs, the site administrator receives a recovery link through which you can access the WordPress dashboard. In case you don’t receive any WordPress email, enable recovery mode as described in the steps below.
Use the WordPress recovery link
https://example.com/wp-login.php?action=entered_recovery_modeWhen prompted, enter your WordPress administrator username and password to access recovery mode.
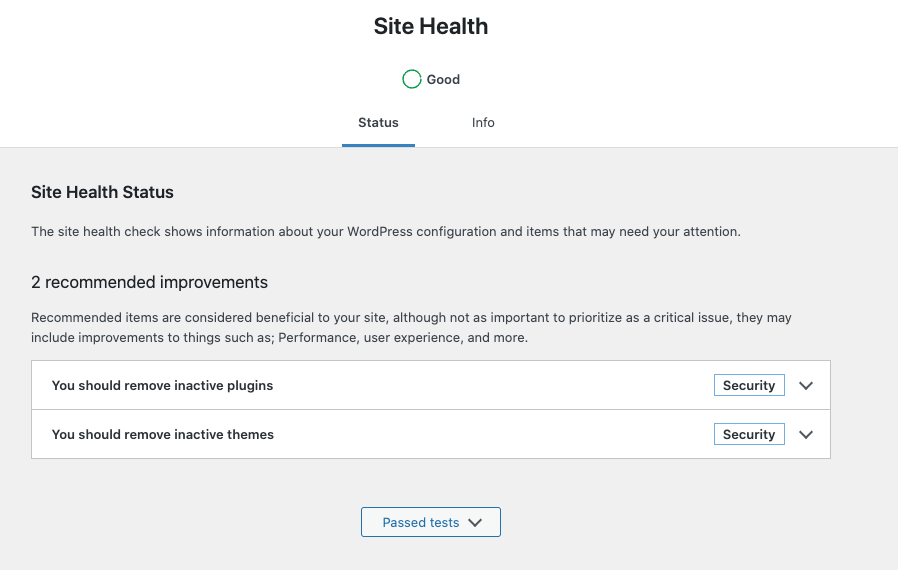
In recovery mode, navigate to Tools on the main navigation menu.
Click Site Health from the drop-down list
View the present WordPress issues on the Status page
Fix each of the WordPress issues to avoid any additional errors, and verify that your Status changes to Good
How to fix the Establish a Database Connection WordPress Error
The establishing a database connection error is common and displays when WordPress is unable to write to the database using the user and password in your wp-config.php file. Usually, the database server can run into an error, or your user can't write to the WordPress database. Fix this error as described in the steps below.
Verify that the database server is up and running
$ sudo systemctl status mysqlOutput:
 ● mariadb.service - MariaDB 10.11.4 database server
      Loaded: loaded (/lib/systemd/system/mariadb.service; enabled; vendor preset: enabled)
     Drop-In: /etc/systemd/system/mariadb.service.d
              └─migrated-from-my.cnf-settings.conf
      Active: active (running) since Sat 2023-07-15 20:19:00 UTC; 1 month 15 days ago
        Docs: man:mariadbd(8)
              https://mariadb.com/kb/en/library/systemd/
    Main PID: 25878 (mariadbd)
      Status: "Taking your SQL requests now..."
If the Database server status is Inactive (Failed). Restart it to access all databases
$ sudo systemctl restart mysqlVerify that it runs correctly with any errors. If not, view the database logs to establish the source of the error
$ sudo cat /var/log/mysql/error.logOutput:
 2023-08-07T12:00:00.123456Z 0 [Note] InnoDB: Buffer pool(s) load completed at 210707 12:00:00
 2023-08-07T12:00:01.234567Z 0 [ERROR] mysqld: Out of memory (Needed 123456 bytes)
 2023-08-07T12:00:03.456789Z 0 [ERROR] Table 'mydatabase.mytable' doesn't exist
 2023-08-07T12:00:04.567890Z 0 [ERROR] Can't start server: Bind on TCP/IP port: Address already in
As displayed in the above output, the MySQL database server is unable to start due to low server memory, and conflicts with another application on port
3306.Verify the contents of your
wp-config.phpfile$ cat /var/www/example.com/wp-config.phpOutput:
 /** The name of the database for WordPress */
 define( 'DB_NAME', 'wordpressdb' );

 /** MySQL database username */
 define( 'DB_USER', 'wpuser' );

 /** MySQL database password */
 define( 'DB_PASSWORD', 'strong-password' );

 /** MySQL hostname */
 define( 'DB_HOST', 'localhost' );

 /** Database Charset to use in creating database tables. */
 define( 'DB_CHARSET', 'utf8' );

 /** WordPress Database Table prefix. */
 $table_prefix = 'wp_';
Verify that the database name, user, and password match with actual records on your MySQL database server. Also, take note of the
$table_prefix =directive that should match your database naming style. To test your user access, log in to the MySQL database server.$ mysql -u wpuser -pWhen prompted, enter your password
View the available databases, and verify that the WordPress database displays on the list
> SHOW DATABASES;Switch to the database
> USE wordpressdb;View the database tables and verify that the naming prefix matches your
$table_prefix =value in thewp-config.phpfile> SHOW TABLES;Output:
 +----------------------------+
 | Tables_in_wordpressdb      |
 +----------------------------+
 | wp_actionscheduler_actions |
 | wp_actionscheduler_claims  |
 | wp_actionscheduler_groups  |
 | wp_actionscheduler_logs    |
 | wp_as3cf_items             |
 | wp_commentmeta             |
 | wp_comments                |
 | wp_e_events                |
 | wp_links                   |
As displayed in the output,
wpis the WordPress table prefix that should appear in yourwp-config.phpfile
How to fix the Your Connection is Not Private (Invalid SSL Certificate) Error
When your WordPress server runs with an invalid SSL certificate, an Insecure Connection or Your Connection is not Private web browser error displays to every site visitor before your site loads. To correct this error, verify that your web server points to the correct SSL certificates. When using a free Let's Encrypt certificate, use the Certbot tool to renew or re-generate SSL certificates for your domain as described below.
Navigate to the web server virtual host files directory. For example
/etc/nginx/sites-enabled$ cd /etc/nginx/sites-enabled/View your WordPress host configuration file
$ cat example.comWhen running multiple WordPress sites on the same web server, use the following command to identify your target configuration file. Replace
example.comwith your actual domain name$ grep -r "example.com" /etc/nginx/sites-enabled/Verify that the
ssl_certificateandssl_certificate_keydirectives point to the/etc/letsencrypt/live/directory# SSL certificate managed by Certbot ssl_certificate /etc/letsencrypt/live/example.com/fullchain.pem; ssl_certificate_key /etc/letsencrypt/live/example.com/privkey.pem;Using the
certbotclient tool, generate a new SSL certificate for your WordPress site. Replaceexample.comwith your actual domain name.$ sudo certbot --nginx -d example.comVerify that the certificate issuance process is successful
Test that the certificate auto-renews upon expiry
$ sudo certbot renew --dry-runOutput:
 Saving debug log to /var/log/letsencrypt/letsencrypt.log

 - - - - - - - - - - - - - - - - - - - - - - - - - - - - - - - - - - - - - - - -
 Processing /etc/letsencrypt/renewal/example.com.conf
 - - - - - - - - - - - - - - - - - - - - - - - - - - - - - - - - - - - - - - - -
 Account registered.
When successful, Certbot automatically renews your WordPress SSL certificate every 90 days.
In your web browser, visit your WordPress site to test HTTPS access, and verify that the
Invalid SSL certificateerror no longer displays to site visitorshttps://example.com
To implement different types of SSL certificates, visit the following resources:
- How to Choose an SSL/TLS Certificate: Commercial, Self-Signed, or Let's Encrypt
- Use Cloudflare and Vultr Firewall to Protect a Vultr Cloud Server
- Install Let's Encrypt SSL on Ubuntu with Apache or Nginx
How to fix the 503 Service Unavailable Error
The WordPress 503 Service unavailable error is commonly a result of resource limitations on your server. Usually, when your WordPress server hits your maximum allowed Bandwidth volume, the error displays as data requests do not complete successfully. Also, it can result from poorly coded plugins or theme files, fix the error as displayed in the steps below.
Log in to your WordPress server control panel, and verify your server has enough allocated bandwidth
Depending on your hosting provider, unlimited bandwidth may display in your control panel, but when it's indirectly limited. If you identify bandwidth caps, migrate to a predictable pricing provider such as Vultr to scale your server to your needs
View your web server error logs and verify error source
$ sudo cat /var/log/nginx/error.logVerify that PHP-FPM is running correctly on your server to handle PHP scripts
$ sudo systemctl status php-fpmDepending on your PHP version, you can rename to view the FPM status. For example
php8.1-fpmIf the error persists, navigate to your
wp-contentdirectory$ cd /wp-contentRename the directory to
plugins_old$ mv plugins plugins_oldRecreate the
pluginsdirectory and verify if the error gets resolved. If not, investigate the status of server infrastructure, web server, and WordPress error logs to find the exact source of the error.
How to fix the 404 Page Not Found Error
The HTTP 404 error displays when the web server is unable to find a requested resource on the server. For example, when the site visitor requests a file or page that's not available on the server, the web server returns the 404 error. Find and fix the error as described below.
Grant the web server ownership permissions to the WordPress web root directory
$ sudo chown -R www-data:www-data /var/www/html/Set the correct directory and file permissions
755directories:$ sudo find /var/www/html/ -type d -exec chmod 755 {} \;644on files:$ sudo find /var/www/html/ -type f -exec chmod 644 {} \;Long list the web root directory and verify the available permission values
$ ls -l /var/www/html/Output:
 drwxr-xr-x  9 www-data www-data  4096 Aug  8 20:26 wp-admin
 -rw-r--r--  1 www-data www-data   351 May  9 03:17 wp-blog-header.php
 -rw-r--r--  1 www-data www-data  2323 Aug  8 20:26 wp-comments-post.php
 -rw-r--r--  1 www-data www-data  3360 Jul 27 14:42 wp-config.php
 -rw-r--r--  1 www-data www-data  3013 May  9 03:17 wp-config-sample.php
 drwxr-xr-x 10 www-data www-data  4096 Aug 27 20:53 wp-content
 -rw-r--r--  1 www-data www-data  5638 Aug  8 20:26 wp-cron.php
 drwxr-xr-x 27 www-data www-data 16384 Aug  8 20:26 wp-includes
 -rw-r--r--  1 www-data www-data  2502 May  9 03:17 wp-links-opml.php
 -rw-r--r--  1 www-data www-data  3927 Aug  8 20:26 wp-load.php
 -rw-r--r--  1 www-data www-data 49441 Aug  8 20:26 wp-login.php
Revisit your WordPress site, verify that the requested resource is available on the server, and the error does not display again
View your WordPress web server configuration file
$ sudo cat /etc/nginx/sites-enabled/example.comVerify that the configuration points to the WordPress web root directory
root /var/www/html;Depending on your web server, the web root directive may appear different. For example
DocumentRootwhen using ApacheLog in to your WordPress administrator dashboard
https://example.com/wp-adminNavigate to Settings > Permalinks, reset your WordPress Permalinks structure to refresh your URL structure and avoid 404 errors
How to fix the HTTP 500 Internal Server Error
Verify that the web server is up and running
$ sudo systemctl status nginxVerify that PHP-FPM is active and running
$ sudo systemctl status php-fpmView the web server error logs to verify the exact source of the error
$ sudo cat /var/log/nginx/error.logAlso, view the PHP-FPM error logs to verify if the error is not caused by a PHP script
$ sudo cat /var/log/php-fpm/error.logOutput:
    2023/08/07 12:34:56 [error] 12345#0: *6789 FastCGI sent in stderr: "PHP message: PHP Fatal error:  Uncaught Error: Call to undefined function someUndefinedFunction() in /var/www/html/wp-content/custom-plugin.php:23
 Stack trace:
 #0 {main}
   thrown in /var/www/html/wp-content/custom-plugin.php on line 23" while reading response header from upstream, client: 192.168.1.1, server: example.com, request: "GET /page.php HTTP/1.1", upstream: "fastcgi://unix:/var/run/php/php7.4-fpm.sock:", host: "example.com", referrer: "http://example.com/"
How to Fix the 502 Bad Gateway Error
The HTTP 502 bad gateway error is results from a web server response time out. When a user makes a request to your WordPress site, the web server returns the 502 gateway error when it’s unable to handle the request. Usually, when the connection to PHP-FPM times out, the web server returns the error. Find the source of the error, and fix it as described below.
View the latest web server error log entries
$ sudo cat /var/log/nginx/error.log | tailFind the latest error. Usually, you may find the error
*1 connect() to unix:/var/run/php-fpm.socket failed (2: No such file or directory) while connecting to upstream. To fix it, view your web server configuration$ cat /etc/nginx/sites-enabled/example.comVerify that the correct PHP configurations are available in the
/.phpsectionlocation ~ \.php$ { include snippets/fastcgi-php.conf; fastcgi_pass unix:/run/php/php8.1-fpm.sock; }Verify that PHP-FPM (based on your version) is up and running
$ sudo systemctl status php8.1-fpmOutput:
 ● php8.1-fpm.service - The PHP 8.1 FastCGI Process Manager
      Loaded: loaded (/lib/systemd/system/php8.1-fpm.service; enabled; vendor preset: enabled)
      Active: active (running) since Wed 2023-08-30 17:55:55 UTC; 27s ago
If the error persists, view the PHP-FPM configuration
$ cat /etc/php/8.1/fpm/pool.d/www.confVerify the
user/groupand verify that it runs as the web server userwww-data; Unix user/group of processes ; Note: The user is mandatory. If the group is not set, the default user's group ; will be used. user = www-data group = www-data
Visit your WordPress site and verify that the error does not appear again. When it does, view your web server error logs again to verify the source of the error.
How to Fix the 403 Forbidden Error
HTTP 403 forbidden error displays due to improper permissions to access a specific resource on the WordPress server. Usually, if the web server does not have read privileges to a resource, the error displays on your WordPress site. Fix the error as described below.
View the web server error logs to find the exact source of the error
$ sudo cat /var/log/nginx/error.logLong list the WordPress web root directory and verify that the
www-datauser has read privileges$ ls -l /var/www/html/Output:
 drwxr-xr-x  9 www-data www-data  4096 Aug  8 20:26 wp-admin
 -rw-r--r--  1 www-data www-data   351 May  9 03:17 wp-blog-header.php
 -rw-r--r--  1 www-data www-data  2323 Aug  8 20:26 wp-comments-post.php
 -rw-r--r--  1 www-data www-data  3360 Jul 27 14:42 wp-config.php
 drwxr-xr-x 10 www-data www-data  4096 Aug 27 20:53 wp-content
 drwxr-xr-x 27 www-data www-data 16384 Aug  8 20:26 wp-includes
Grant the
www-dataweb server user full privileges to the directory$ sudo chown -R www-data:www-data /var/www/html/Set the correct WordPress directory permissions
$ sudo find /var/www/html/ -type d -exec chmod 755 {} \;Set the correct WordPress file permissions
$ sudo find /var/www/html/ -type f -exec chmod 644 {} \;Visit your WordPress site and verify that the error does not display again
https://example.com
How to Fix the Upload: Failed to Write File to Disk Error
When the web server is unable to write new files uploaded through your WordPress dashboard, the failed to write file to disk error displays. To fix the error, verify that the web server has read and write privileges to the WordPress web root directory. Verify the permissions as described below.
View the WordPress web root directory permissions
$ ls -l /var/www/html/Set the correct directory permissions
$ sudo find /var/www/html/ -type d -exec chmod 755 {} \;Set the WordPress file permissions
$ sudo find /var/www/html/ -type f -exec chmod 644 {} \;
How To Fix This Site is Experiencing Technical Difficulties WordPress Error
When WordPress upgrades to the latest version, the site is experiencing technical difficulties error may display. This is because some themes or plugin files may be incompatible with the new upgrade, find the exact WordPress resource and fix the error as described below.
Rename the
pluginsdirectory topluginsold$ sudo mv /var/www/html/wp-content/plugins /var/www/html/wp-content/pluginsoldCreate a new
pluginsdirectory$ sudo mkdir /var/www/html/wp-content/pluginsVisit your WordPress dashboard to activate the new
pluginsdirectoryhttps://example.com/wp-adminIn your terminal session, copy the old plugins one by one. For example, start with
woocommerceif available$ sudo cp /var/www/html/wp-content/plugins-old/woocommerce /var/www/html/wp-content/pluginsDepending on the number of available plugins, copy the most important plugins first, and the suspected plugins last

In your WordPress dashboard, reactivate the plugins one by one
If the error displays after activating a specific plugin, disable the plugin, and search for an updated version before reactivating it again.
In case the error is a result of a broken theme, verify that your active theme supports the latest WordPress version, if not, downgrade your WordPress to the most stable backed-up version
How to Fix the WordPress White Screen of Death (Blank Screen)
The WordPress white screen of death is a blank screen that displays no error, but does not accept any interactions on your WordPress site. Instead of a white screen, the error There has been a critical error on this website may display, both errors are the same and affect your general site performance. Usually, the error displays due to theme or plugin issues, and below are the recommended troubleshooting actions.
- Rename and Deactivate all WordPress Plugins. Then, reactivate them one by one
- Deactivate the WordPress theme and switch to the default theme
- Enable WordPress debugging and view the logs
- View the web server logs
- Increase the PHP memory limit
- Enter the WordPress recovery mode
For more information, visit Troubleshooting the WordPress White Screen of Death.
Conclusion
In this article, you implemented troubleshooting steps to fix common WordPress errors on your site. Among these, you implemented backend server actions that allow you to discover errors and work on them before they appear to your WordPress site visitors. For more information, visit the WordPress common errors page.