How to Migrate your WordPress Site to Vultr with Jetpack

Introduction
Jetpack Backup is a premium WordPress migration plugin that lets you back up, migrate, or recover your website to a specific date or time. This guide explains how you can migrate your WordPress Site to Vultr using the Jetpack Backup plugin.
Prerequisites
Before you begin, you need to:
- Have an existing WordPress server you want to migrate.
- Deploy a WordPress server from Vultr Marketplace. This will be the new server.
- Have a basic understanding of the Linux terminal and a text editor such as Nano.
This guide uses example information:
- The fully-qualified domain name of the website is www.example.com.
- The IP address of the new Vultr server is 192.0.2.123.
You should replace these example values with your information.
1. Prepare the New Server
Connect to the new Vultr Marketplace WordPress server with SSH and create a sudo user.
Change the web root directory permissions to
777, which allows Jetpack to write new files. You'll tighten the permissions later when you secure the site in section six.$ sudo chmod -R 777 /var/www/html/Grant the web server full permissions to all files in the web root directory.
$ sudo chown -R www-data:www-data /var/www/html/
2. Install the Jetpack Plugin
Using a web browser, log in to your old, existing WordPress site.
https://www.example.com/wp-adminOn the left navigation menu, navigate to Plugins.
Click Add New
Enter the keyword "Jetpack" in the search field.
Click Install to add the plugin.
Click Activate to enable it on your WordPress site.
Locate and click the Jetpack plugin on the left navigation menu.
Select your WordPress Site category, and finish setup of the Jetpack plugin.
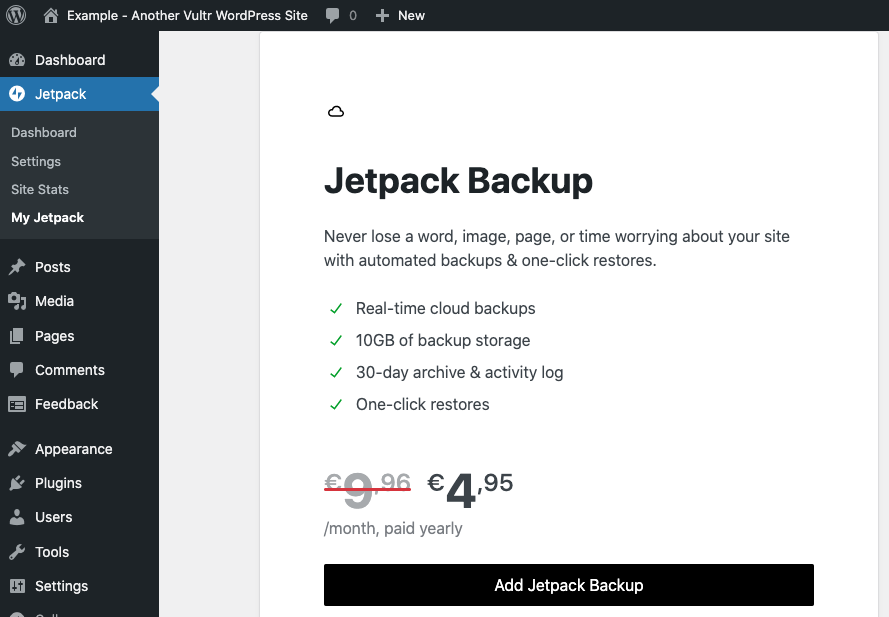
When ready, navigate to My Jetpack.
Locate the Backup option and click Purchase.

Click Add Jetpack Backup to redirect to the WordPress.com checkout page.
Enter your credit card or PayPal credentials, and confirm payment for your Jetpack Backup plan.
Your Jetpack Backup plan is now active, and backing up your website in the background.
3. Migrate your WordPress Site to the Vultr Server
Using a web browser, log in to your WordPress.com account.
Navigate to My Sites.
Click Switch Site.
Choose your WordPress site from the list.
On the left navigation bar, navigate to Settings and click General.
Scroll down to the Site tools section, and click Clone.
Verify your WordPress site information, and click Continue.
Enter your site title in the Destination site title field.
Enter your full domain URL, such as
https://www.example.com, in the Destination site URL field.Click Continue.
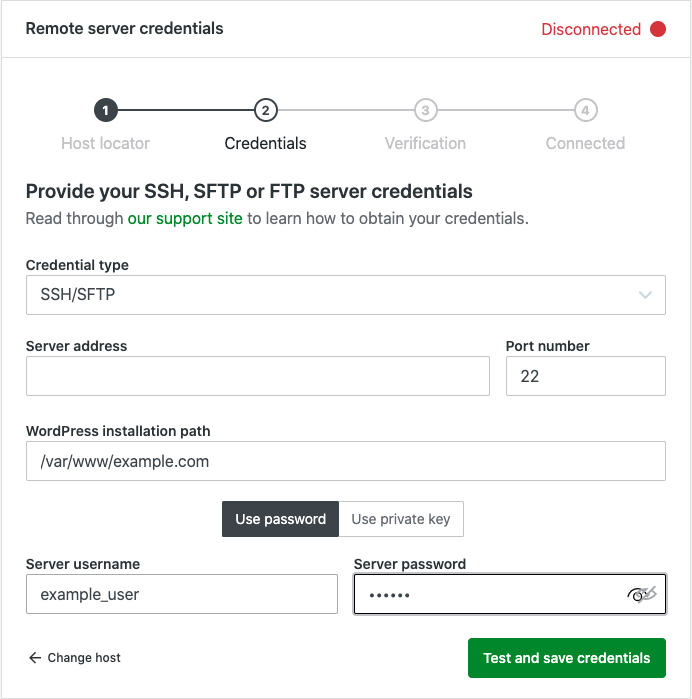
Keep the Credential Type as SSH/SFTP.
Enter your Vultr Marketplace WordPress server's IP address in the Server Address field.
Keep
22as the Port Number.Enter the sudo user you created earlier in the Server username field and its associated password in the Server password field, and click Save.

Enter
/var/www/html/in the Destination WordPress Path field.Select Clone current state to use the latest Jetpack backup of your WordPress site.
Click Begin Cloning to start the migration process.
The migration process takes a few minutes to complete depending on your site's size. You can follow the progress from the
cloud.jetpack.comActivity Log.When you receive a Your site has been successfully cloned alert, the data migration is complete.
4. Update DNS
Log in to your DNS provider and change your fully-qualified domain name to point to the IP address of the new Vultr Marketplace WordPress server. The exact steps depend on your DNS host. Use this guide if you use Vultr DNS.
Make sure your DNS has fully propagated to the new address before proceeding with the next steps. You can use a tool like dnschecker.org to check the status.
5. Install SSL/TLS Certificate
By default, the Vultr Marketplace WordPress server uses a self-signed SSL/TLS certificate. In this step you'll use the Certbot Let's Encrypt application to create a new SSL/TLS certificate and configure the site for HTTPS.
Back up the original
wordpress_https.confNginx configuration file.$ sudo mv /etc/nginx/conf.d/wordpress_https.conf /etc/nginx/conf.d/wordpress_https.ORIGUsing a text editor, edit the
wordpress_http.conffile.$ sudo nano /etc/nginx/conf.d/wordpress_http.confFind the following section.
 server {
 listen 80 default_server;
 listen [::]:80 default_server;
 server_name _;
As you can see in line 4 above, the
server_namedirective is using_as a wildcard. Change that value to your server's fully-qualified domain name, as shown in the example below.server_name www.example.com;Save and close the file.
Request a new Let’s Encrypt SSL certificate. Replace
www.example.comwith your actual domain name.$ sudo certbot -d www.example.com --agree-tosEnter your email address, and allow automatic redirects when prompted.
Test that Certbot auto-renews your SSL Certificates upon expiry.
$ sudo certbot renew --dry-runIf the above command runs without errors, Certbot will renew your SSL certificates every 90 days before it expires.
Restart Nginx to save changes.
$ sudo systemctl restart nginxUsing a web browser, test HTTPS access on your WordPress site.
https://www.example.comYou should find a Connection is secure padlock sign in the web browser URL bar.
6. Secure WordPress
To secure your WordPress site from direct IP visits, edit the main Nginx configuration file.
$ sudo nano /etc/nginx/nginx.confAdd the following configuration lines within the
http {section.server { listen 80 default_server; listen [::]:80 default_server; server_name ""; return 301 https://www.example.com; }All requests to your IP are now redirected to your configured domain name.
To avoid random installation risks, delete the WordPress installation script.
$ sudo rm /var/www/html/wp-admin/install.phpTo limit write access to your web root directory, set the file permissions to
755for directories, and644for files.$ sudo find /var/www/html/ -type d -exec chmod 755 {} \; $ sudo find /var/www/html/ -type f -exec chmod 644 {} \;
7. Test the Target WordPress Server
Now, you should be able to access your new WordPress site.
Using a web browser, visit your WordPress site, and confirm that it loads well.
https://www.example.comLog in to your WordPress administrator dashboard.
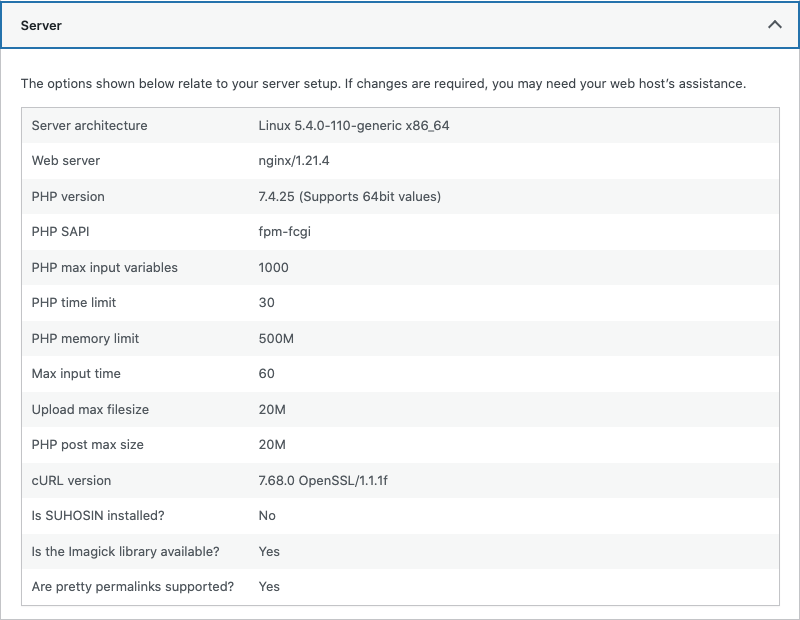
https://www.example.com/wp-adminOn the left navigation bar, navigate to Tools and select Site Health.
Next to Status, click Info.
Scroll through the list of options, and toggle Server to verify that the WordPress system information corresponds with your Vultr WordPress server packages.

Next Steps
To fine-tune and maximize the full potential of your WordPress server, please visit the following guides.
- Troubleshooting Jetpack Backup
- Best Practices when Migrating to Vultr
- How to Install WordPress on a Subdomain with Nginx