
Bring WordPress to the Edge with Vultr and GeoDNS
Introduction
WordPress is a user-friendly Content Management System (CMS) that allows you to create high-performance web applications that serve global audiences. Usually, WordPress site users come from different regions attracting performance bottlenecks in some locations.
GeoDNS (Geographical domain name system) is a traffic distribution method that returns specific DNS records depending on a client’s location. By integrating WordPress with GeoDNS, different servers deliver your WordPress site to different audiences depending on the user's location.
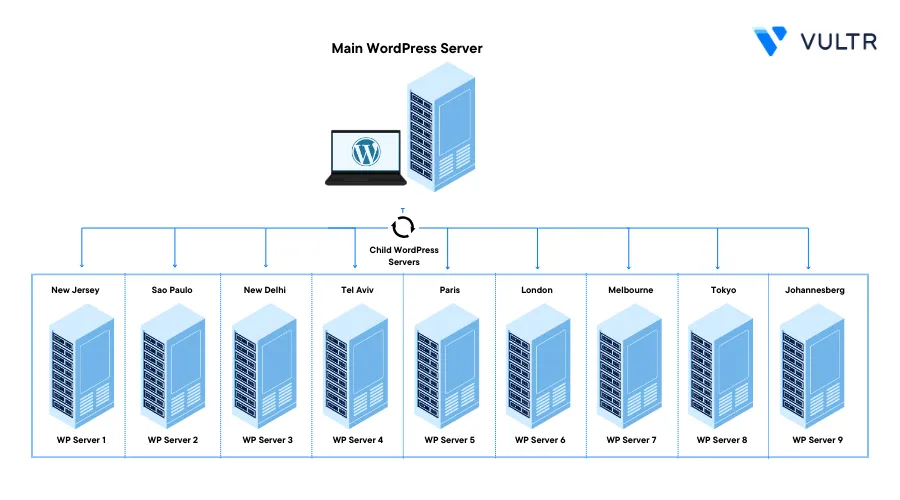
This article explains how you can bring WordPress to the edge with Vultr and GeoDNS by leveraging multiple server locations offered by Vultr. You are to deploy your WordPress site to multiple locations and serve users with the same copy of your site with different resource accessibility speeds.
Prerequisites
Before you begin:
Migrate your domain name servers to a GeoDNS-compatible provider such as CloudDNSor Cloudflare
Deploy the main WordPress server using the Vultr Marketplace application
If you have an existing WordPress server, mark it as the main server to synchronize other servers participating in your GeoDNS network. This article uses the main server address
192.0.2.1, replace it with your actual WordPress server IP address.Deploy child Ubuntu servers in different locations
This article uses 9 Ubuntu servers in the following Vultr locations:
- New Jersey - 192.0.2.100
- Sao Paulo (Brazil) - 192.0.2.101
- New Delhi (India) - 192.0.2.102
- Tel Aviv (Israel) - 192.0.2.103
- Paris (France / Central Europe) - 192.0.2.104
- London (UK / Europe North) - 192.0.2.105
- Melbourne - 192.0.2.106
- Tokyo (Japan) - 192.0.2.107
- Johannesburg (South Africa) - 192.0.2.108
Replace the example IP address class
192.0.2.0with your actual public Server IP AddressesUsing SSH, access each of the servers in separate terminal sessions
On each child server:
Create the same non-root user with sudo privileges
Switch to the new sudo user
This article uses
sysadmin, replace the user with your actual sudo user accountInstall the LEMP stack
Set Up the Main WordPress Server
The main WordPress server works as the major point of connection for all site visitors. To enable all child servers to work in the WordPress GeoDNS cluster, perform the following actions on the main WordPress server.
- Synchronize real-time MySQL database changes to all WordPress servers
- Synchronize WordPress files to all servers
- Configure Firewall rules to allow access to the MySQL port
3306 - Transfer WordPress SSL certificates to all WordPress servers
Enable MySQL Database Replication
Navigate to your WordPress web root files directory
$ cd /var/www/example.comView the
wp-config.phpfile and note the WordPress database name$ cat wp-config.phpOutput:
 /** The name of the database for WordPress */
 define( 'DB_NAME', 'wordpressdb' );
Navigate to the MySQL configuration files directory
$ cd /etc/mysql/Using a text editor such as Nano, edit the main configuration file
$ nano my.cnfAdd the following configurations to the
[mysqld]section[mysqld] server-id = 1 log_bin = /var/log/mysql/mysql-bin.log binlog-do-db = wordpressdb expire_logs_days = 5Save and close the file.
The above configuration sets the MySQL database server replication ID to
1, keeps log files in the/var/log/mysqldirectory, sets thewordpressdbdatabase as the replication database, and enables the deletion of binary log files after every5days.Navigate to the
mysql.conf.dormariadb.conf.ddirectory$ cd mariadb.conf.dEdit the
50-server.cnffile$ sudo 50-server.cnfFind the following section:
 # Instead of skip-networking the default is now to listen only on
 # localhost which is more compatible and is not less secure.
 bind-address            = 127.0.0.1
Change the
bind-addressvalue from127.0.0.1to0.0.0.0to enable connections from all server interfacesbind-address = 0.0.0.0Save and close the file.
The above address declaration allows child servers to access the main MySQL database server using the public IP Address.
Create the MySQL log files directory
$ sudo mkdir -p /var/log/mysql/Grant the
mysqluser full privileges to the directory$ sudo chown -R mysql:mysql /var/log/mysqlRestart the MySQL database server
$ systemctl restart mysqldBackup the MySQL WordPress database
$ sudo mysqldump wordpressdb > wpdb.sqlMove the
.sqldatabase file to the WordPress webroot directory$ sudo mv wpdb.sql /var/www/example.com/Log in to the MySQL console
$ sudo mysqlCreate a new WordPress replication user. For example
wpreplicawith a strong password> CREATE USER 'wpreplica'@'%' IDENTIFIED BY 'strong-password';Switch to the WordPress database
> use wordpressdb;Grant the user replication privileges on the database
> GRANT REPLICATION SLAVE ON *.* TO 'wpreplica'@'%';Refresh MySQL privileges
> FLUSH PRIVILEGES;View the database server replication status
> SHOW MASTER STATUS;Output:
 +------------------+----------+--------------+------------------+
 | File             | Position | Binlog_Do_DB | Binlog_Ignore_DB |
 +------------------+----------+--------------+------------------+
 | mysql-bin.000002 |      655 | wordpressdb  |                  |
 +------------------+----------+--------------+------------------+
 1 row in set (0.000 sec)
Keep note of the File and Position to correctly set MySQL database replication on the child servers
Enable WordPress File Synchronization
To synchronize WordPress files from the main server to the child servers, create a secure SSH connection to each of the servers using SSH keys. When enabled, use a file transfer protocol such as Rsync to transfer directory changes every 20 seconds to the destination WordPress web root directory as described below.
Generate a new SSH key
$ ssh-keygenWhen prompted, press Enter to accept all default options and keep the
passphrasefield empty to disable password authenticationRegister the public SSH key to your child WordPress server
$ ssh-copy-id 192.0.2.100When prompted, accept the remote server fingerprint, then enter the server password to enable your SSH key on the child server. When successful, your output should look like the one below:
Repeat the above process for each child WordPress server to ensure connectivity from the main server.
Establish an SSH connection to the child WordPress server to test your SSH key
$ ssh sysadmin@192.0.2.100Verify that the SSH connection starts without password authentication.
Create the WordPress webroot directory
$ sudo mkdir -p /var/www/example.comGrant the web server full privileges to the directory
$ sudo chown -R www-data:www-data /var/www/example.com/Change the non-root user's main group to the web server group
www-data. Replacesysadminwith your actual user account$ sudo usermod -g www-data sysadminGrant the
www-datagroup full privileges to the WordPress webroot directory$ sudo chmod -R 775 /var/www/example.com/Long list the parent directory to view the user and group permissions
$ ls -l /var/www/Output:
 total 8
 drwxrwxr-x 6 www-data www-data 4096 Sep 27 00:45 example.com
Verify that the group has
write,read, andexecuteprivileges on the directory.Create a new Nginx SSL directory to store SSL certificates
$ sudo mkdir -p /etc/nginx/sslGrant the web server full privileges to the directory
$ sudo chown -R www-data:www-data /etc/nginx/sslGrant the
www-datagroup full privileges to the directory$ sudo chmod 775 /etc/nginx/sslClose the SSH connection
$ exitUsing Rsync, transfer files from the main WordPress server to the child WordPress server
$ rsync -avz /var/www/example.com/ 192.0.2.100:/var/www/example.com/When successful, your transfer summary should look like the one below:
 sent 81,149 bytes received 376 bytes 10,870.00 bytes/sec
 total size is 69,002,299 speedup is 846.39
To automate the Rsync process to run every 20 seconds and keep WordPress files updated, create a new bash script in a system-wide directory such as
/opt/$ sudo nano /opt/wpsync.shAdd the following contents to the file
 #!/bin/bash

 while true; do
     rsync -avz /var/www/example.com/ 192.0.2.100:/var/www/example.com/
     sleep 20
 done
Save and close the file.
The above configuration sets the Rsync command to execute using a while loop every 20 seconds. This updates your WordPress files on the child server each time new file changes are available in the main server directory.
Grant execute privileges on the script
$ sudo chmod +x /opt/wpsync.shCreate a new system service to automate the script
$ sudo nano /etc/systemd/system/wpsync.serviceAdd the following contents to the file. Replace
sysadminwith your actual user account available on the child WordPress server[Unit] Description=WordPress Files From Main Server to Child Servers After=network.target [Service] Type=simple ExecStart=/opt/wpsync.sh Restart=always User=sysadmin Group=www-data [Install] WantedBy=multi-user.targetSave and close the file
The above configuration runs the Rsync script as a system service and transfers files using the set user and group.
Restart the systemd daemon
$ sudo systemctl daemon-reloadEnable the service to start at boot time
$ sudo systemctl enable wpsync.serviceStart the service
$ sudo systemctl start wpsync.serviceView the service status and verify that it’s actively running without any error
$ sudo systemctl status wpsync.serviceOutput:
 ● myscript.service - WordPress Files Transfer Service
      Loaded: loaded (/etc/systemd/system/wpsync.service; enabled; preset: enabled)
      Active: active (running) since Tue 2023-09-26 20:34:09 UTC; 4h 30min ago
    Main PID: 54092 (wpsync.sh)
       Tasks: 2 (limit: 1092)
      Memory: 2.2M
         CPU: 3min 55.143s
      CGroup: /system.slice/wpsync.service
              ├─54092 /bin/bash /opt/WordPress-Sync/sync.sh
              └─59570 sleep 10

 Sep 27 01:04:18 VULTR-SERVER wpsync.sh[59566]: ./
 Sep 27 01:04:20 VULTR-SERVER wpsync.sh[59566]: sent 81,187 bytes  received 376 bytes  14,829.64 bytes/sec
 Sep 27 01:04:20 VULTR-SERVER wpsync.sh[59566]: total size is 69,832,356  speedup is 856.18
You have set up Rsync to synchronize your WordPress webroot files from the main server to the child servers. Repeat the synchronization process for each child server and verify that every server has an Rsync record in the automated script to transfer WordPress files.
Configure Firewall Rules
By default, the Uncomplicated Firewall (UFW) is available on Vultr servers. Configure Firewall rules to allow trusted access to all necessary server ports as described below.
Verify the firewall status
$ sudo ufw statusWhen active, the firewall table should display. When inactive, allow the SSH port
22and enable the firewall$ sudo ufw allow 22/tcp && sudo ufw allow enableAllow access to the MySQL port
3306from trusted child WordPress servers$ sudo ufw allow from 192.0.2.100 to any port 3306 $ sudo ufw allow from 192.0.2.101 to any port 3306 $ sudo ufw allow from 192.0.2.102 to any port 3306 $ sudo ufw allow from 192.0.2.103 to any port 3306Allow the HTTP port
80through the firewall$ sudo ufw allow 80/tcpAllow the HTTPS port
443$ sudo ufw allow 443/tcpRestart the firewall to save changes
$ sudo ufw reload
Generate and Synchronize WordPress SSL Certificates
WordPress requires a valid SSL certificate to correctly handle HTTPS requests. Generate Let’s Encrypt SSL certificates on the main server and synchronize them for transfer to the child servers to use the same SSL certificate as described below.
Install the Certbot Let’s Encrypt Client Tool
$ sudo snap install certbot --classicGenerate a new SSL Certificate. Replace
example.comwith your actual domain name$ sudo certbot --nginx -d www.example.com -d example.com --agree-tosWhen prompted, enter your email address to deploy a new SSL certificate to your Nginx configuration file and save it to the
/etc/letsencrypt/live/directoryList files in the
/etc/letsencrypt/live/example.com/directory$ sudo ls /etc/letsencrypt/live/example.com/Output:
cert.pem chain.pem fullchain.pem privkey.pem READMEVerify that the private key and public key
.pemfiles are available in the directoryAllow read permissions on the
/etc/letsencrypt/archivedirectory$ sudo chmod 755 -R etc/letsencrypt/archive/The
/etc/letsencrypt/livedirectory references thearchivedirectory, to avoid any file transfer errors, the files must be readableEdit the Rsync synchronization script
$ sudo nano /opt/wpsync.shAdd the following directive within the
while {loop before thesleepdirectiversync -av --copy-links /etc/letsencrypt/live/example.com/ 192.0.2.100:/etc/nginx/ssl/Save and close the file
The above configuration checks for changes in the SSL certificate and transfers updated
.pemfiles to the child WordPress server SSL directory
Set Up the Child WordPress Servers
To enable the child WordPress servers to use the synchronized files, prepare the MySQL database, and configure the web server as described in the steps below.
Switch to the WordPress webroot directory
$ cd /var/www/example.comLong list files and verify that all WordPress files are available in the web root directory
$ ls -lOutput:
 drwxr-xr-x  9 sysadmin www-data    4096 Aug 29 14:14 wp-admin
 -rw-r--r--  1 sysadmin www-data     351 Feb  6  2020 wp-blog-header.php
 -rw-r--r--  1 sysadmin www-data    2323 Jun 14 14:11 wp-comments-post.php
 -rw-r--r--  1 sysadmin www-data    3300 Sep 26 12:22 wp-config.php
 -rw-r--r--  1 sysadmin www-data    3013 Feb 23  2023 wp-config-sample.php
 drwxr-xr-x  5 sysadmin www-data    4096 Sep 26 15:03 wp-content
 -rw-r--r--  1 sysadmin www-data    5638 May 30 18:48 wp-cron.php
 -rw-r--r--  1 sysadmin www-data  830057 Sep 27 00:44 wpdb.sql
 drwxr-xr-x 27 sysadmin www-data   12288 Aug 29 14:14 wp-includes
 -rw-r--r--  1 sysadmin www-data    2502 Nov 26  2022 wp-links-opml.php
Verify that your MySQL database backup file
wpdb.sqlis also available in the directoryView the
wp-config.phpfile$ cat wp-config.phpKeep note of the WordPress database user and password:
 /** Database username */
 define( 'DB_USER', 'wpuser' );

 /** Database password */
 define( 'DB_PASSWORD', 'strong-password' );
Log in to the MySQL database console
$ sudo mysqlRecreate the WordPress database
> CREATE DATABASE wordpressdb;Create the WordPress database user with the same password listed in the
wp-config.phpfile. For examplewpuser> CREATE USER 'wpuser'@'localhost' IDENTIFIED BY 'strong-password';Grant the user full privileges to the WordPress database
> GRANT ALL PRIVILEGES ON wordpressdb.* TO wpuser@localhost;Refresh MySQL privileges
> FLUSH PRIVILEGES;Close the MySQL console
> EXITRestore your MySQL database from the
wpdb.sqlfile to the WordPress database$ sudo mysql wordpressdb < wpdb.sqlWhen successful, delete the MySQL backup file from your WordPress files directory
$ sudo rm /var/www/example.com/wpdb.sqlNavigate to the MySQL configuration files directory
$ cd /etc/mysql/Edit the
my.cnfmain configuration file$ sudo nano my.cnfAdd the following configurations to the
[mysqld]section[mysqld] server-id = 2 log_bin = /var/log/mysql/mysql-bin.log binlog-do-db = wordpressdb expire_logs_days = 5Save and close the file
The above configuration sets the child replication ID to
2different from the main database server ID1. Every database server in the replication process must use a unique ID value.wordpressdbis the destination replication database and the binary logs expire every5daysCreate the MySQL logs directory
$ sudo mkdir -p /var/log/mysql/Grant the MySQL user full privileges to the directory
$ sudo chown -R mysql:mysql /var/log/mysqlRestart the MySQL database server
$ sudo systemctl restart mysqldAccess the MySQL console
$ sudo mysqlRun the following SQL statements. Replace
mysql-bin.00, and766with the actual file and position details you generated earlier on the main MySQL database server> CHANGE MASTER TO MASTER_HOST = '192.0.2.1', MASTER_USER = 'wpnew', MASTER_PASSWORD = 'strong-password', MASTER_LOG_FILE = 'mysql-bin.000002', MASTER_LOG_POS = 76625;Replace
192.0.2.1with your main WordPress server IP addressStart the replication process
> SLAVE SLAVE;Verify the replication status
> SHOW SLAVE STATUS\G;Output:
 *************************** 1. row ***************************
                 Slave_IO_State: Waiting for master to send event
                    Master_Host: 192.0.2.1
                    Master_User: wpreplica
                    Master_Port: 3306
                  Connect_Retry: 60
                Master_Log_File: mysql-bin.000002
            Read_Master_Log_Pos: 76950
                 Relay_Log_File: mysqld-relay-bin.000003
                  Relay_Log_Pos: 555
          Relay_Master_Log_File: mysql-bin.000002
               Slave_IO_Running: Yes
              Slave_SQL_Running: Yes
Verify that the
Slave_IO_Statefield returns aWaiting for master to send eventnotice. If the state isconnecting, view theLast_SQL_Error:field and fix the displayed error to start replicating database records from the main WordPress server.Navigate to the Nginx configuration files directory
$ cd /etc/nginx/List files in the SSL directory and verify that all WordPress SSL certificates are available
$ ls -l ssl/Output:
cert.pem chain.pem fullchain.pem privkey.pem READMEDeactivate the default Nginx host configuration file
$ sudo rm sites-enabled/defaultCreate a new Nginx host configuration file in the
sites-availabledirectory$ sudo nano sites-available/example.comAdd the following configurations to the file. Replace
example.comwith your actual domain nameserver { server_name example.com; root /var/www/example.com/; index index.php; location / { try_files $uri $uri/ /index.php?$args; } location ~ \.php$ { include snippets/fastcgi-php.conf; fastcgi_pass unix:/var/run/php/php8.2-fpm.sock; # Edit to your PHP version viewable with $ php -v } location ~* \.(js|css|png|jpg|jpeg|gif|ico)$ { expires max; log_not_found off; } access_log /var/log/nginx/example.access.log; error_log /var/log/nginx/example.error.log; error_page 404 /404.html; error_page 500 502 503 504 /50x.html; location = /50x.html { root /usr/share/nginx/html; } location ~ /\.ht { deny all; } listen 443 ssl; ssl_certificate /etc/nginx/ssl/fullchain.pem; ssl_certificate_key /etc/nginx/ssl/privkey.pem; } server { if ($host = example.com) { return 301 https://$host$request_uri; } listen 80; server_name example.com; return 404; }Save and close the file
The above configuration points to the WordPress webroot directory, and accepts HTTPS connections using your SSL certificates in the
/etc/nginx/ssl/directoryActivate the WordPress configuration file
$ sudo ln -s /etc/nginx/sites-available/example.com /etc/nginx/sites-enabled/Test the Nginx configuration for errors
$ sudo nginx -tRestart Nginx to save changes
$ sudo systemctl restart nginxVerify the UFW firewall status
$ sudo ufw statusOutput:
 Status: active

 To                         Action      From
 --                         ------      ----
 22/tcp                     ALLOW       Anywhere
 22/tcp (v6)                ALLOW       Anywhere (v6)
Allow the HTTP port
80through the firewall$ sudo ufw allow 80/tcpAllow the HTTPS port
443through the firewall$ sudo ufw allow 443/tcpRestart the Firewall to save the new rules
$ sudo ufw reload
Repeat the above process on all child WordPress servers to synchronize the latest files and MySQL database from the main server.
Configure Domain Records
To enable GeoDNS on your WordPress site, configure multiple domain A records to redirect users in different locations to the closest server. In this section, use ClouDNS to configure your domain records as described in the steps below.
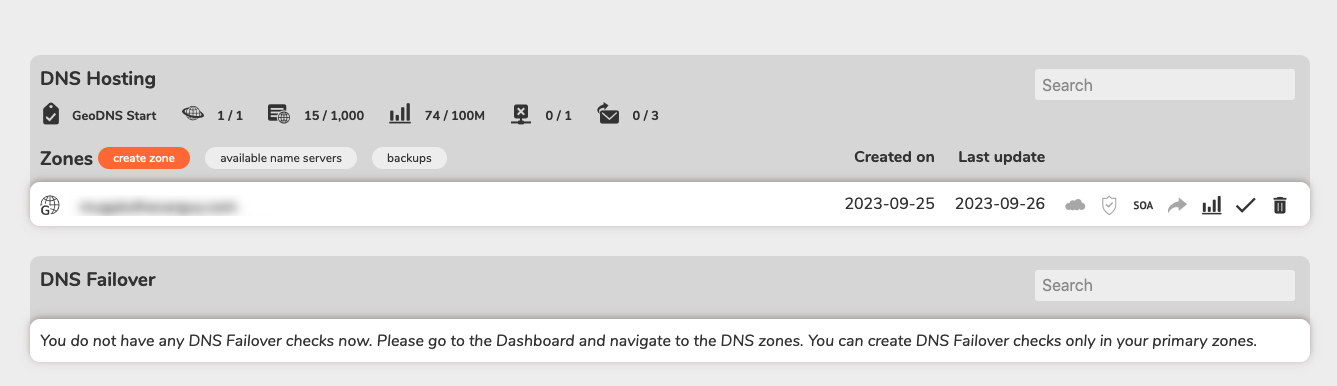
Access your ClouDNS account
In your DNS Zones section, click to open your target WordPress domain name records
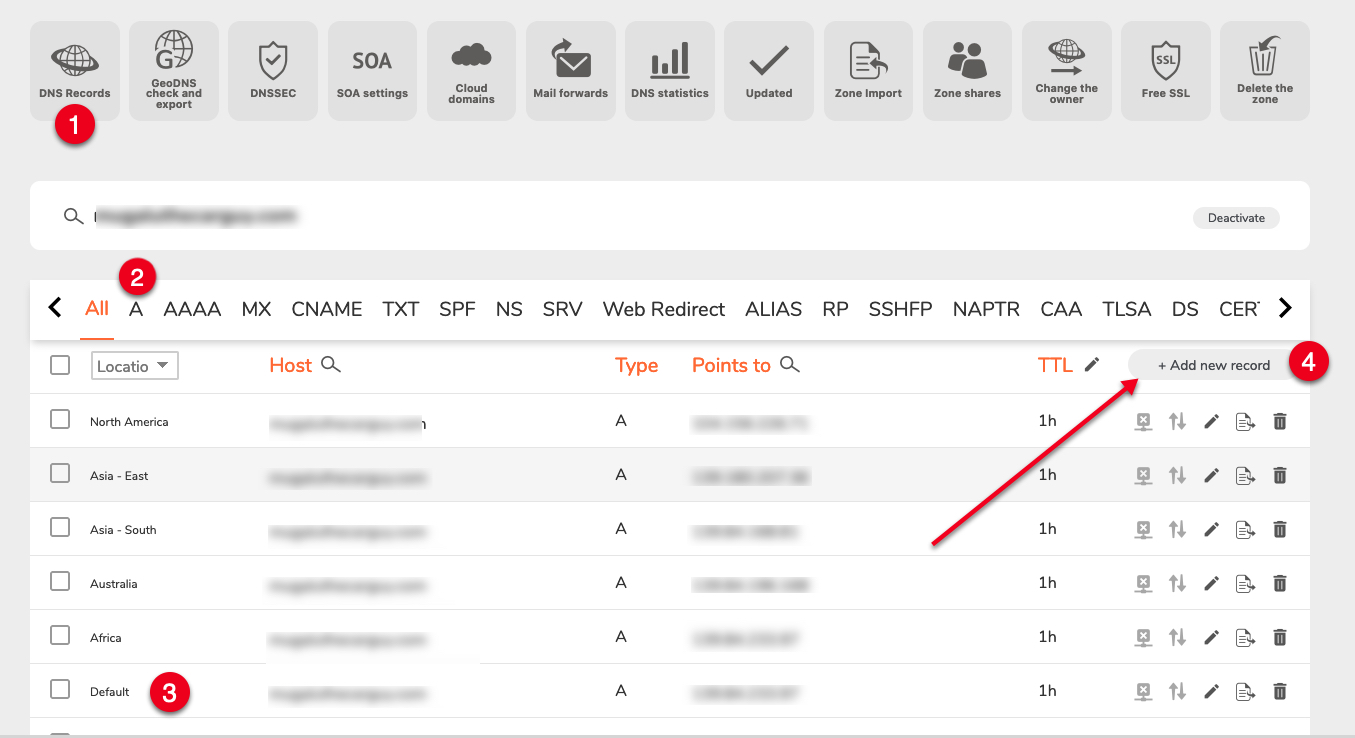
Click DNS Records
On the records page, navigate to A
Verify that a host record with the Default location tag is available on the list and points to your main WordPress server
Click + Add new record within the A section
In the Add New Record pop-up, click the Location drop-down and select your first target location. For example
EuropeNavigate to the Points to: field and enter the WordPress server IP address in your target location. For example
192.0.2.104for the Paris (France) Vultr server.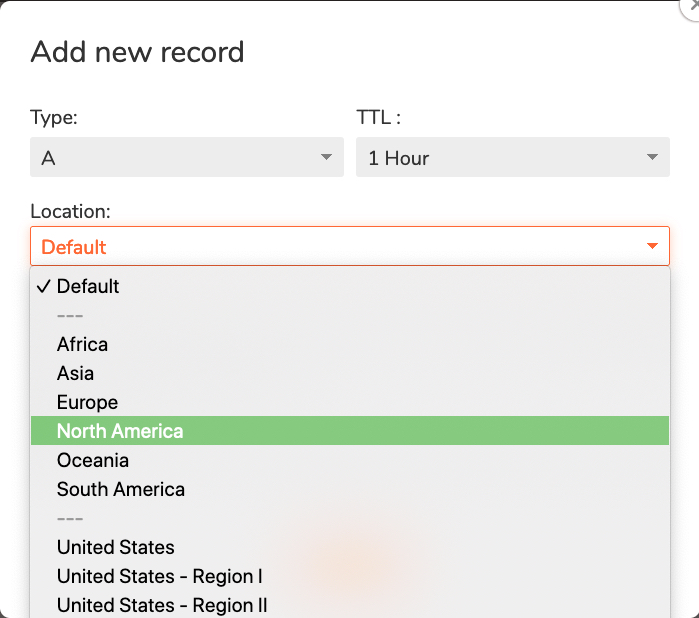
Click Save to apply your new domain A record
Repeat the above process for each domain A record and verify that every Vultr Server IP Address points to the correct target location
Test
To verify that your WordPress GeoDNS configuration works well, verify that the MySQL database replication works, and your domain returns a different IP address depending on the user location as described below.
To test the database replication process, access the MySQL console on the main WordPress server
$ sudo mysqlSwitch to the WordPress database
> use wordpressdb;Create a new table
testwith the following columns> CREATE TABLE test ( id INT AUTO_INCREMENT PRIMARY KEY, fname VARCHAR(50), lname VARCHAR(50) );Close the MySQL console
> EXITAccess the MySQL console on any of the configured WordPress child servers
$ sudo mysqlSwitch to the WordPress database
> use wordpressdb;Show tables and verify that the new
testtable is available> show tables;Output:
 +-----------------------+
 | Tables_in_wordpressdb |
 +-----------------------+
 | test                  |
 | wp_commentmeta        |
 | wp_comments           |
 | wp_links              |
 | wp_options            |
 | wp_postmeta           |
 | wp_posts              |
When successful, the main WordPress server replicates all MySQL database changes to the child server database in real-time
In a web browser such as Chrome, visit your WordPress site and verify that it loads correctly
https://example.comEnable a VPN on your device, and access the WordPress site again to simulate a new location. Verify that it displays correctly without any error
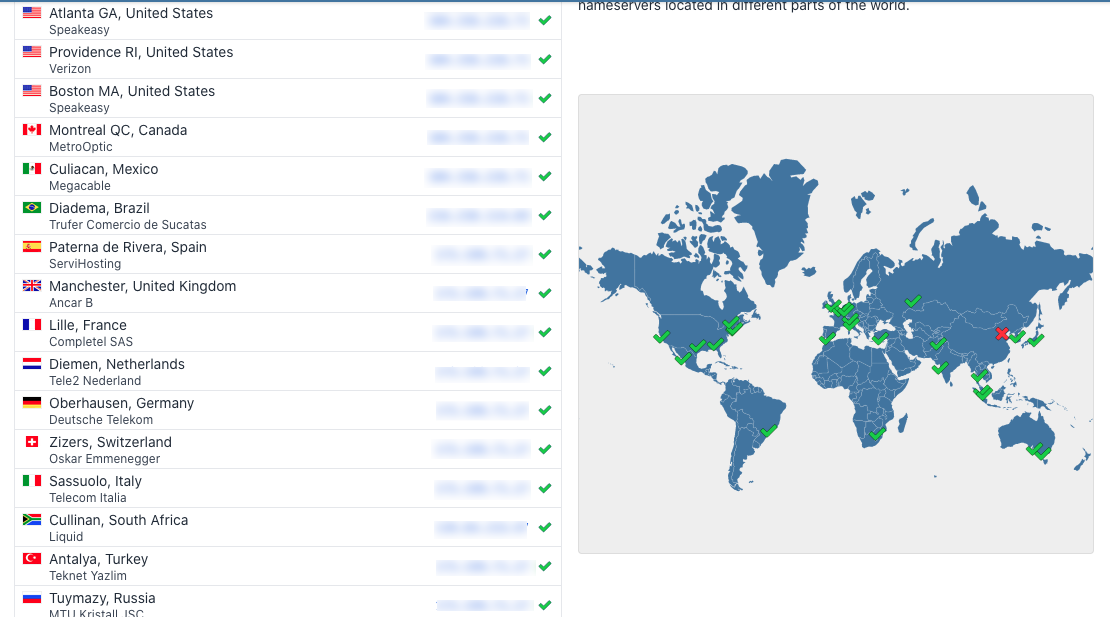
https://example.comUsing a DNS propagation checker such as WhatsMyDNS, query your domain name records to view the active IP address per location
To further test your WordPress GeoDNS configuration, use a site speed testing tool with different locations to detect the performance differences between your WordPress site. The closest server to a user’s location handles the user request which improves your site performance with no change in the functionality across all regions.
Troubleshooting
HTTP Error 500
When deploying Nginx configuration records on child WordPress servers, the web server displays a critical error 500 due to a misconfiguration in your files. Fix the error as described in the steps below.
View the WordPress host error log to view the source of the error
$ sudo cat /var/log/nginx/example.error.logOutput:
 1", upstream: "fastcgi://unix:/var/run/php/php8.2-fpm.sock:", host: "example.com.com"
 2023/09/26 19:14:27 [error] 55491#55491: *41 FastCGI sent in stderr: "PHP message: PHP Warning:  require(/var/www/example.com/wp-includes/version.php): Failed to open stream: Permission denied in /var/www/example.com/wp-settings.php on line 33; PHP message: PHP Fatal error:  Uncaught Error: Failed opening required '/var/www/example.com/wp-includes/version.php' (include_path='.:/usr/share/php') in /var/www/example.com/wp-settings.php:33
 Stack trace:
 #0 /var/www/example.com/wp-config.php(96): require_once()
 #1 /var/www/example.com/wp-load.php(50): require_once('...')
 #2 /var/www/example.com/wp-blog-header.php(13): require_once('...')
 #3 /var/www/example.com/index.php(17): require('...')
Depending on the source of the error displayed in the log, apply steps to fix it. For example, to fix the permission error displayed in the above output, delete files in the WordPress webroot directory to synchronize new files with correct permissions from the main WordPress server after 20 seconds
$ sudo rm -r /var/www/example.com/*List files in the directory after 20 seconds and verify that all WordPress files are available with the correct
www-datagroup permissions$ ls -l /var/www/example.com/Restart Nginx to apply changes
$ sudo systemctl restart nginxRevisit your WordPress site in the target location and verify that the error does not show up again
https://example.com
Error Too Many Redirects
View the installed PHP version
$ php -vOutput:
 PHP 8.2.7 (cli) (built: Jun  9 2023 19:37:27) (NTS)
 Copyright (c) The PHP Group
 Zend Engine v4.2.7, Copyright (c) Zend Technologies
Verify that the installed PHP-FPM version is active and running
$ sudo systemctl status php8.2-fpmView your WordPress host configuration file
$ cat /etc/nginx/sites-enabled/example.comVerify that the
fastcgi_passdirective points to the correct PHP-FPM versionfastcgi_pass unix:/var/run/php/php8.2-fpm.sock;If the referenced PHP-FPM version is wrong, edit the file
$ sudo nano /etc/nginx/sites-enabled/example.comChange the
factcgi_passdirective to the correct versionRestart Nginx to apply configuration changes
$ sudo systemctl restart nginx
Child WordPress Database Does not Detect Database Changes
Access the child MySQL database console
$ sudo mysqlView the Child database replication status and view the error returned in the
Last_SQL_Error:column> SHOW SLAVE STATUS\G;Output:
         Seconds_Behind_Master: NULL
 Master_SSL_Verify_Server_Cert: No
                 Last_IO_Errno: 0
                 Last_IO_Error:
                Last_SQL_Errno: 1146
                Last_SQL_Error: Error executing row event: 'Table 'wordpressdb.wp_options' doesn't exist'
   Replicate_Ignore_Server_Ids:
              Master_Server_Id: 1
                Master_SSL_Crl:
            Master_SSL_Crlpath:
                    Using_Gtid: No
                   Gtid_IO_Pos:
       Replicate_Do_Domain_Ids:
   Replicate_Ignore_Domain_Ids:
For example:
Error executing row event: 'Table 'wordpressdb.wp_options' doesn't exist'Verify that you imported the WordPress database to the child server. If not, navigate to the WordPress webroot directory
$ cd /var/www/example.com/Verify that the
.sqldatabase backup file is available$ ls *.sqlImport the WordPress database to your child MySQL database
$ sudo mysql wordpressdb < wpdb.sqlLast_SQL_Error: Could not execute Write_rows_v1 event on table wordpressdb.The MySQL database is unable to write some changes that could result from data corruption. Exclude the error and restart the replication process by running the following SQL statement
Last_IO_Error: error connecting to master 'wpreplica@192.0.2.1:3306' - retry-time: 60 maximum-retries: 100000Verify that the child server address has access to the MySQL port
3306through the main WordPress server firewall$ sudo ufw allow from 192.0.2.100 to any port 3306Verify that you entered the correct
wpreplicauser password in your child database configuration. Stop the database replication process on the child server> STOP SLAVESet the main database details using the following SQL statement
  CHANGE MASTER TO
    MASTER_HOST = '192.0.2.1',
    MASTER_USER = 'wpreplica',
    MASTER_PASSWORD = 'strong-password',
    MASTER_LOG_FILE = 'mysql-bin.000003',
    MASTER_LOG_POS = 76625;
Verify that the database user and password details are correct. Replace
192.0.2.1with the main server address to replicate database changes.Start the WordPress database replication again
> START SLAVECould not execute Write_rows_v1 event error_code: 1062; handler error HA_ERR_FOUND_DUPP_KEY; the event's master log mysql-bin.000003, end_log_posAccess the Main WordPress server database
$ sudo mysqlView the database replication status and take note of the file and position
> SHOW MASTER STATUS;Output:
  +------------------+----------+--------------+------------------+
  | File             | Position | Binlog_Do_DB | Binlog_Ignore_DB |
  +------------------+----------+--------------+------------------+
  | mysql-bin.000003 |   235367 | wordpressdb  |                  |
  +------------------+----------+--------------+------------------+
  1 row in set (0.000 sec)
Exit the MySQL console
> EXITAccess your child database server
$ sudo mysqlStop database replication
> STOP SLAVEChange the replication information with the correct
MASTER_LOG_FILEandMASTER_LOG_POSfields as displayed on the main database serverCHANGE MASTER TO MASTER_HOST = '192.0.2.1', MASTER_USER = 'wpreplica', MASTER_PASSWORD = 'strong-password', MASTER_LOG_FILE = 'mysql-bin.000003', MASTER_LOG_POS = 235367;Start the database replication process
> START SLAVEView the replication status and verify that the state changes to
Waiting for master to send event> SHOW SLAVE STATUS\G;Output:
  *************************** 1. row ***************************
                  Slave_IO_State: Waiting for master to send event
                     Master_Host: 192.0.2.1
                     Master_User: wpreplica
                     Master_Port: 3306
                   Connect_Retry: 60
                 Master_Log_File: mysql-bin.000003
Conclusion
You have implemented GeoDNS to work with your WordPress site by leveraging multiple Vultr locations. This is important when handling user requests from multiple regions across the world. Instead of a single server receiving requests, multiple servers enable redundancy which improves your resource usage while handling WordPress user requests.
Next Steps
To implement more solutions on your WordPress site, visit the following resources:
- Harden WordPress security with Vultr and Cloudflare
- Manage your WordPress website with WP-CLI
- Troubleshooting WordPress Database Errors
- How to Serve WordPress Assets using Vultr Object Storage