
Introduction
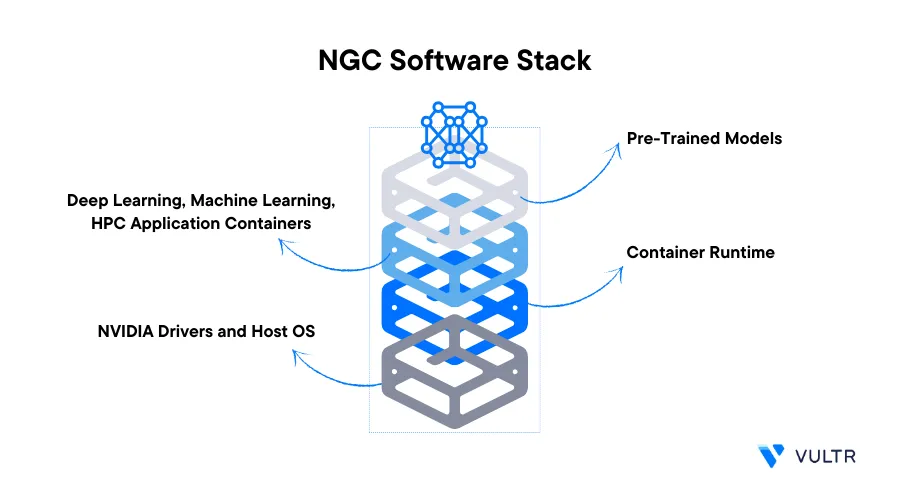
Neural Modules (NeMo) is an open-source toolkit designed to handle conversational AI tasks. It's part of NVIDIA's GPU Cloud (NGC) catalog which consists of a centralized repository of tools, frameworks, and pre-trained models. These models speed up the development, deployment, and management of Artificial Intelligence and high-performance computing workloads. NGC GPU accelerated containers are also an essential part of the NGC catalog pre-configured with optimized software and libraries to take advantage of GPU resources for accelerated performance.
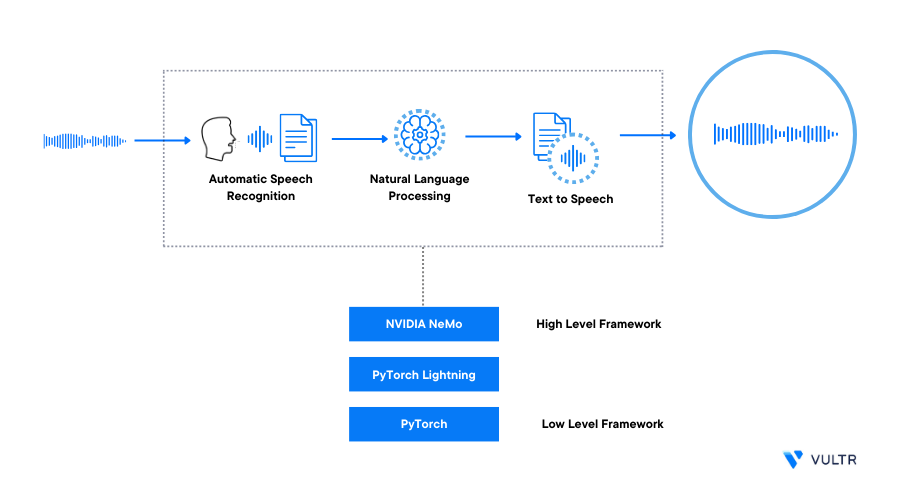
This article explains how to use the NeMo framework in a GPU-accelerated PyTorch container to perform Automatic Speech Recognition (ASR) and Text-to-Speech (TTS) tasks. You are to install and run the PyTorch container, then, use NeMo pre-trained models to convert imported French audio into English audio.
Prerequisites
Before you begin:
Deploy a fresh Ubuntu 22.04 Cloud GPU server using the Vultr marketplace application with at least:
- 1/3 GPU
- 20 GB GPU RAM
- 3 vCPUs
- 30 GB Memory
Using SSH, access the server
Create a non-root user with sudo rights
Switch to the non-root user account. Replace
sysadminwith your actual user# su sysadmin
Install PyTorch and Access Jupyter Notebook
To use the NeMo framework on a cloud GPU server, install and run the PyTorch GPU container with port binding using Docker.
Using Docker, install and run the PyTorch GPU container
$ sudo docker run --gpus all -p 9000:8888 -it nvcr.io/nvidia/pytorch:23.09-py3The above command runs the PyTorch GPU-accelerated docker container with the following configurations:
When successful, verify that your server prompt changes to the
rootcontainer shellroot@4a09da260af2:/workspace#
Run the Pre-Trained Models
To use pre-trained models and necessary NeMo functions, import the NeMo modules. Then, initialize the pre-trained models, and perform tasks like audio transcription and text-to-speech synthesis in a Jupyter Notebook session as described below.
Access the Jupyter Notebook web interface
In the middle right corner, click the New dropdown to reveal a dropdown list
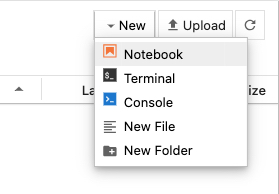
Select Python 3 (ipykernel) under the Notebook: category to open a new file
Within the new Jupyter Notebook file, add the following code in a new cell to install the necessary dependency packages
!pip install Cython nemo_toolkit[all] hydra-core transformers sentencepiece webdataset youtokentome pyannote.metrics jiwer ijson sacremoses sacrebleu rouge_score einops unidic-lite mecab-python3 opencc pangu ipadic wandb nemo_text_processing pytorch-lightningBelow is what each package represents:
Cython: A Python module that allows you to write C extensions for Python. It's often used for performance optimizationnemo_toolkit[all]: A framework for building conversational AI models. The [all] flag installs all available components and NeMo dependencieshydra-core: A framework for configuring complex applications. It's used to manage configuration settings in a clean and organized waytransformers: Works with pre-trained models in Natural Language Processing (NLP), including models like BERT, GPT-2, among otherssentencepiece: A library that performs text tokenization and segmentation, often used in NLP taskswebdataset: Performs efficient data loading and augmentation, it's particularly useful in deep learning workflowsyoutokentome: A library that performs subword tokenization and useful for language modeling taskspyannote.metrics: A toolkit for speaker diarization and audio analysis tasks that contains evaluation metrics for these tasksjiwer: A library for computing the Word Error Rate (WER), a common metric used in Automatic Speech Recognition (ASR) and other speech-processing tasksijson: A library for parsing large JSON documents incrementally. It's useful when efficiently working with large data filessacremoses: A Python library that performs tokenization, de-tokenization, and various text-processing taskssacrebleu: Evaluates machine translation quality using the BLEU metricrouge_score: A library for computing the ROUGE evaluation metric often used in text summarization and machine translationeinops: A library for tensor operations and reshaping useful when developing deep learning modelsunidic-lite: A morphological analysis dictionarymecab-python3: A tokenizer part-of-speech tagger that works in the Python binding for MeCabopencc: A library for simplified and traditional Chinese text conversionpangu: A Chinese text spacing library for adding spaces between Chinese charactersipadic: A morphological analysis dictionarywandb: Tracks and visualizes machine learning experimentsnemo_text_processing: Contains text processing utilities specific to the NVidia NeMo Toolkitpytorch-lightning: A lightweight wrapper for PyTorch that simplifies training Deep Learning models
Press Run on the main menu bar or press Ctrl + Enter to install the packages
In a new code cell, import the necessary modules
 import nemo
 import nemo.collections.asr as nemo_asr
 import nemo.collections.nlp as nemo_nlp
 import nemo.collections.tts as nemo_tts
 import IPython
The above commands import the necessary modules required to run the NeMo pre-trained models. Below is what each module represents:
nemo: Allows you to access NeMo's functionalities and classesnemo.collections.asr: Allows you to access NeMo's ASR-related functionalities and modelsnemo_nlp: Allows to use NeMo's NLP-related tools, models, and utilitiesnemo_tts: Allows you to use NeMo's TTS-related functionalities and modelsIPython: Allows you to interactively run and experiment with NeMo code interactively
Open the NGC NeMo catalog
 nemo_asr.models.EncDecCTCModel.list_available_models()
 nemo_nlp.models.MTEncDecModel.list_available_models()
 nemo_tts.models.HifiGanModel.list_available_models()
 nemo_tts.models.FastPitchModel.list_available_models()
The above command lists all available models in the following categories:
- Automatic speech recognition
- Encoder-decoder: A Natural Language Processing (NLP) collection part of the MTEnDec category
- Text-to-speech: HifiGan and FastPitch
Based on the catalog, use the following models:
stt_fr_quartznet15x5: For speech recognition, specific to the French languagenmt_fr_en_transformer12x2: Translates text from one language to another, specific to the French languagetts_en_fastpitch: Generates a spectrogram for text input to text-to-speechtts_en_lj_hifigan_ft_mixertts: Converts spectrograms into speech for TTS
Initialize the models
 asr_model = nemo_asr.models.EncDecCTCModel.from_pretrained(model_name='stt_fr_quartznet15x5').cuda()
 nmt_model = nemo_nlp.models.MTEncDecModel.from_pretrained(model_name='nmt_fr_en_transformer12x2').cuda()
 spectrogram_generator = nemo_tts.models.FastPitchModel.from_pretrained(model_name='tts_en_fastpitch').cuda()
 vocoder = nemo_tts.models.HifiGanModel.from_pretrained(model_name='tts_en_lj_hifigan_ft_mixertts').cuda()
Wait for at least 15 minutes for the initialization process to complete successfully
Perform Audio Transcription and Synthesis
Download a French audio sample. Replace the link with your desired audio source URL
 !wget 'https://lightbulblanguages.co.uk/resources/audio/bonjour.mp3'
 audio_sample = 'bonjour.mp3'
 IPython.display.Audio(audio_sample)
The above command downloads the public French MP3 sample audio file
bonjour.mp3and saves it in your Jupyter Notebook working directory. In addition, it uses IPython'sAudiowidget to display and play the audio file in your Jupyter Notebook sessionTranscribe the audio sample to text
 transcribed_text = asr_model.transcribe([audio_sample])
 print(transcribed_text)
The above command uses the speech recognition model and displays the transcribed text from the audio content
Output:
['bonjour']Translate the text to English
 english_text = nmt_model.translate(transcribed_text)
 print(english_text)
The above command uses the pre-trained model to convert the French text to English and displays the converted text
Output:
['hello']Generate a Spectogram
 parseText = spectrogram_generator.parse(english_text[0])
 spectrogram = spectrogram_generator.generate_spectrogram(tokens=parseText)
The above command converts the English text into a spectrogram, this is a preprocessing step in text-to-speech synthesis, the spectrogram represents the special characteristics of the generated audio
Convert the spectrogram to audio
 audio = vocoder.convert_spectrogram_to_audio(spec=spectrogram)
 audioOutput = audio.to('cpu').detach().numpy()
The above command processes the input text to a TTS pipeline to generate the audio output
View the transcribed audio
IPython.display.Audio(audioOutput,rate=22050)Verify that the generated transcribed audio matches your English text at a rate of
22050 Hz
Conclusion
You have built an AI Translator using the NeMo framework pre-trained models and the NGC GPU accelerated container on a Vultr Cloud GPU Server. You transcribed a French audio sample to French text, then, you converted the text to English text and transcribed the text to an English audio sample. Using NeMo modules and pre-trained models from the NGC catalog, the audio speech recognition pipeline becomes efficient and convenient to use.
More Information
For more information, visit the following documentation resources:
No comments yet.