

Introduction
Neural Modules (NeMo) is an open-source toolkit designed for users that work with conversational AI. It's part of the NVIDIA GPU Cloud (NGC) collection that includes a library of tools, and ready-to-use models designed to efficiently handle artificial Intelligence and high-performance computing projects.
This article explains how to perform voice swap using the NVIDIA NeMo framework on a Vultr Cloud GPU server. You are to perform tasks such as Automatic Speech Recognition (ASR) and Text-to-Speech (TTS) using a PyTotrch GPU accelerated container from the NGC Catalog. In addition, convert an English Male voice audio sample to an English Female voice audio sample by running the pre-trained NeMo models for Natural Processing Tasks (NLP).
Prerequisites
Before you begin, be sure to:
- Deploy a fresh Ubuntu 22.04 A100 Vultr Cloud GPU server using the Vultr Marketplace application with at least
20GBGPU RAM - Using SSH, access the server
- Create a non-root user with sudo rights and switch to the account
Deploy the PyTorch GPU Container and Access Jupyter Notebook
In this section, you are to install and run the PyTorch GPU container with port binding.
Install and run the PyTorch GPU container
$ sudo docker run --gpus all -p 9000:8888 -it nvcr.io/nvidia/pytorch:23.09-py3
Run the Pre-Trained Models
In this section, install the required libraries to use the models and necessary NeMo functions. Then, import the NeMo modules, initialize the pre-trained models, and perform voice swap tasks as described in the steps below.
Access your Jupyter Notebook web interface
On the middle right bar, click the New dropdown to reveal the options list
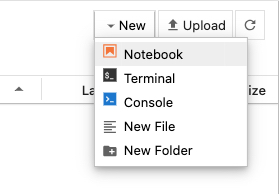
Click Notebook, and select Python 3 (ipykernel) to open a new file
In a new code cell, install dependency packages
!pip install Cython nemo_toolkit[all] hydra-core transformers sentencepiece webdataset youtokentome pyannote.metrics jiwer ijson sacremoses sacrebleu rouge_score einops unidic-lite mecab-python3 opencc pangu ipadic wandb nemo_text_processing pytorch-lightningBelow is what each package represents:
Cython: A Python superset that allows you to write C extensions for Python often used for performance optimizationnemo_toolkit[all]: A framework for building conversational AI models. The[all]flag installs all available NeMo components and dependencieshydra-core: A framework for configuring complex applications. It's used to manage configuration settings in a clean and organized waytransformers: Works with pre-trained models in Natural Language Processing (NLP), including models like BERT, GPT-2, and moresentencepiece: Handles text tokenization and segmentation, often used in NLP taskswebdataset: Enables efficient data loading and augmentation, particularly useful in deep learning workflowsyoutokentome: A subword tokenization library useful in language modeling taskspyannote.metrics: A toolkit for speaker diarization and audio analysis that contains evaluation metrics for these tasksjiwer: A Computing the Word Error Rate (WER) library commonly used in Automatic Speech Recognition (ASR) and other speech processing tasksijson: A library for parsing large JSON documents incrementally. It's useful when working with large data filessacremoses: Handles tokenization, detokenization, and various text processing taskssacrebleu: Evaluates machine translation quality using the BLEU metricrouge_score: A library for computing the ROUGE evaluation metric that is often used in text summarization and machine translationeinops: Handles tensor operations and reshaping, which can be helpful in deep learning model developmentunidic-lite: A morphological analysis dictionary, and it is a lightweight version of itmecab-python3: A tokenizer and part-of-speech tagger. This package is the Python binding for MeCabopencc: A simplified and traditional Chinese text conversion librarypangu: A Chinese text spacing library that adds spaces between Chinese charactersipadic: A morphological analysis dictionarywandb: Tracks and visualizes machine learning experimentsnemo_text_processing: Contains text processing utilities specific to the NVidia NeMo Toolkitpytorch-lightning: A PyTorch lightweight wrapper that simplifies the training of Deep Learning models
Import the necessary modules
 import nemo
 import nemo.collections.asr as nemo_asr
 import nemo.collections.nlp as nemo_nlp
 import nemo.collections.tts as nemo_tts
 import IPython
Below is what each of the imported modules represents:
nemo: Allows you to access the NeMo functionalities and classesnemo.collections.asr: Enables access to the NeMo ASR-related functionalities and modelsnemo_nlp: Allows you to use the NeMo NLP-related tools, models, and utilitiesnemo_tts: Allows you to use the NeMo TTS-related functionalities and modelsIPython: Allows you to interactively run and experiment with NeMo code
Open the NGC NeMo catalog
 nemo_asr.models.EncDecCTCModel.list_available_models()
 nemo_tts.models.HifiGanModel.list_available_models()
 nemo_tts.models.FastPitchModel.list_available_models()
The above commands output the list of available models from the following catalogs
- Automatic Speech Recognition (ASR) models that use the encode-decoder
- Test-to-Speech models from the HifiGan and FastPitch categories respectively
From the above available list, use the following models:
stt_en_quartznet15x5: To handle speech recognition tasks, specific to only the English languagetts_en_fastpitch: Generate spectrogram for text input to text-to-speech, specific to the English languagetts_en_hifigan: Converts spectrograms into speech for TTS, specific to the English language
Download and initialize the models
 quartznet = nemo_asr.models.EncDecCTCModel.from_pretrained(model_name='stt_en_quartznet15x5').cuda()
 spec_generator = nemo_tts.models.FastPitchModel.from_pretrained(model_name='tts_en_fastpitch').cuda()
 vocoder = nemo_tts.models.HifiGanModel.from_pretrained(model_name="tts_en_hifigan").cuda()
The download and initialization may take up to 15 minutes to complete.
Perform Voice Swapping
Import the audio sample. Replace the URL with your desired audio source
 Audio_sample = '2086-149220-0033.wav'
 !wget https://dldata-public.s3.us-east-2.amazonaws.com/2086-149220-0033.wav
 IPython.display.Audio(Audio_sample)
The above command downloads an English audio
.wavfile with the male voice from the provided URL. Then, it usesIPython.display.Audioto display and play the audio in your Jupyter Notebook file.Transcribe the audio sample
 files = [Audio_sample]
 raw_text = ''
 text = ''
 for fname, transcription in zip(files,quartznet.transcribe(paths2audio_files=files)):
   raw_text = transcription

 text = raw_text[0]
 print(raw_text)
The above command processes the provided audio sample using the Quartznet model for transcription.
Output:
well i don't wish to see it any more observed phoebe turning away her eyes it is certainly very like the old portraitGenerate the spectrogram
 def text_to_audio(text):
   parsed = spec_generator.parse(text)
   spectrogram = spec_generator.generate_spectrogram(tokens=parsed)
   audio = vocoder.convert_spectrogram_to_audio(spec=spectrogram)
   return audio.to('cpu').detach().numpy()
In the above command, the
text_to_audiofunction takes a transcript, parses it, and generates a spectrogram using the text-to-speech modeltts_en_hifigan. This is a preprocessing step in text-to-speech synthesis, the spectrogram represents the special characteristics of the generated audio.Generate the swapped audio
IPython.display.Audio(text_to_audio(raw_text),rate=22050)The above command displays the swapped audio sample converted from a male English voice to a female English voice.
Conclusion
You have built an AI voice swap system using the NeMo framework pre-trained models running on an NGC GPU accelerated container. You converted an English Male voice audio sample to an English Female voice audio sample. Using NeMo modules and pre-trained models from the NGC catalog, the audio speech recognition pipeline becomes more efficient and convenient to use.
More Information
For more information, visit the following resources:
No comments yet.