
How to Clone a Repository in Git
Cloning a repository is a fundamental Git command that creates a local copy of a remote repository on your machine. This allows you to work on the project offline, make changes, and contribute back without affecting the source until you are ready. While forking also creates a copy, a fork is a separate repository hosted under your account, whereas a clone is a local working copy that remains linked to the original remote repository.
This article explains how to use git clone to create a local copy of a repository, clone to a specific folder, clone a specific version tag, and work with a forked repository.
The Short Answer Version
If you're already familiar with Git and need quick reference commands to clone remote repositories, they include:
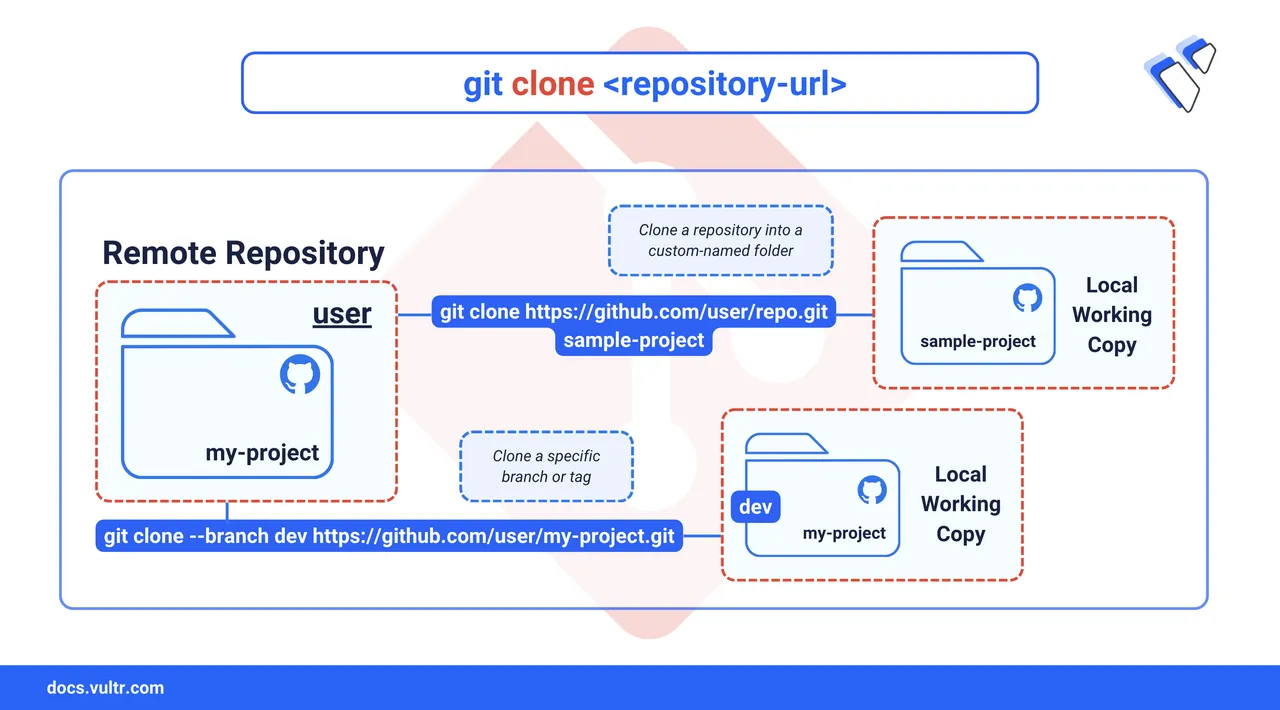
# Clone a repository into a directory of the same name
$ git clone <repository-url>

# Clone a repository into a specific custom folder
$ git clone <repository-url> <folder-name>

# Clone a specific tag or branch instead of the default
$ git clone --branch <tag-name> <repository-url>

# Create a shallow clone with only the latest commit
$ git clone --depth 1 <repository-url>
Clone to a Specific Folder
By default, git clone creates a directory with the same name as the repository. You can override this by providing a target directory name, which helps organize your local workspace.
Command Syntax
git clone [OPTIONS] <repository-url> <target-directory><repository-url>: The HTTPS or SSH URL of the remote repository.<target-directory>: The name for the local folder where the repository will be cloned. Git creates this directory if it doesn't exist.[OPTIONS]Optional switches that fine-tune the clone:--branch <name>Check out a specific branch or tag after cloning.--depth <n>Create a shallow clone that stores only the most recent commits, reducing download size.-o <name>Assign a custom name to the remote instead of the defaultorigin.
Command Demonstration
Clone a repository into a custom folder. Replace
<desired-folder>with your desired folder name.console$ git clone https://github.com/username/project.git <desired-folder>
The command above clones the repository from the specified URL and places it inside a new folder.
Clone and check out a specific branch or tag right away. Replace
<branch-or-tag>and<desired-folder>with your own values.console$ git clone --branch <branch-or-tag> https://github.com/username/project.git <desired-folder>
--branch <branch-or-tag>points your working directory at that branch or tag instead of the default branch.<desired-folder>can be an absolute or relative path of the destination folder.
Create a shallow clone.
console$ git clone --depth 1 https://github.com/username/project.git <desired-folder>
--depth 1downloads only the newest commit reachable from the default branch (or the branch specified by--branch), saving time and bandwidth.
Clone a specific tag
Tags in Git mark specific release points, such as v1.0.0. You can clone a specific tag to get the exact code for a particular version, which is ideal for testing or deploying a stable release.
Command Syntax
git clone --branch <tag-name> <repository-url>--branch <tag-name>or-b <tag-name>: This flag tells Git to check out a specific tag (or branch) instead of the repository's default branch.
Command Demonstration
Clone the
v1.2.0tag from a repository.console$ git clone --branch v1.2.0 https://github.com/username/project.git
This command clones the repository and checks out the specific commit associated with the
v1.2.0tag.Navigate into the directory and check the status.
console$ cd project $ git status
Output:
Not currently on any branch
...
The output shows that you are not on any branch, which means your
HEADis in a detached state—pointing directly to the commit associated with the tag, rather than to a branch.If you need to make changes based on this version, create a new branch from the tag.
console$ git switch -c new-feature-from-v1.2.0
The command above creates and switches to a new branch from the detached
HEADstate, allowing you to commit your work.
Clone a Fork from GitHub
Forking on GitHub gives you a personal copy of a repository, letting you experiment without affecting the original project. Cloning that fork brings the code to your local machine so you can develop, commit, push and then open a pull request whenever you are ready.
Command Demonstration
To fork a repository, open the repository URL in a browser and click Fork to create a copy under your GitHub account.
Clone your forked repository to your local machine.
console$ git clone https://github.com/username/forked-project.git
Replace the above repository URL with the URL of your forked repository.
Navigate into the cloned directory and list the items.
console$ cd forked-project $ ls
The above command will list all the files and folders present in the forked project.
Configuring Remotes to Sync with Upstream
To keep your fork updated with the latest changes from the original project, you must configure a second remote, conventionally named upstream.
Add the original repository as the
upstreamremote.console$ git remote add upstream https://github.com/org-name/ori-project.git
This command establishes a connection to the original repository, which you can now refer to with the alias
upstream.Verify that both
origin(your fork) andupstreamare configured as expected.console$ git remote -v
Output:
origin    https://github.com/username/project.git (fetch)
origin    https://github.com/username/project.git (push)
upstream  https://github.com/org-name/ori-project.git (fetch)
upstream  https://github.com/org-name/ori-project.git (push)
The output shows both remotes, confirming that both
origin(your fork) andupstream(the original) are configured.To update your fork with changes from the original project, fetch from
upstreamandmergeorrebasethe changes into your local branch.console$ git fetch upstream $ git rebase upstream/main
These commands sync your local repository with the latest changes from the original
upstreamproject, ensuring your fork does not fall behind.
Conclusion
In this article, you learned how to use git clone to create a local copy of a repository. You now know how to clone into a specific directory, check out a specific release tag, and manage a forked repository by configuring a upstream remote to sync changes. These skills are essential for collaborating on projects and managing different versions of your code effectively. For more information, visit the official Git documentation on cloning.