
How to Create Remote MCP Server with MCP Proxy

The Model Context Protocol (MCP) is a new standard for organizing contextual data used by Large Language Models (LLMs). Instead of relying only on plain prompts, MCP structures key information—like user identity, goals, memory, and tools—so models can act more consistently across sessions, apps, and environments. By encoding context in a formal way, MCP makes it easier to integrate LLMs into intelligent, tool-aware workflows.
In this article, we’ll take you through the steps of running a sample MCP (Model Context Protocol) server built with FastMCP, hosted on a Vultr cloud instance. The server is backed by an SQLite database and exposes natural-language-powered endpoints that you can interact with using your local Claude Desktop application. By setting up a local mcp-proxy, you’ll be able to bridge Claude with your remote MCP server, allowing seamless queries and database operations directly from your desktop environment.
Get Started Right Away
The code for the MCP server and the sample SQLite database is available in this GitHub repository. To set up the server remotely, follow the steps below in your system terminal.
Deploy an Ubuntu Server on Vultr.
Clone the Github Repository
console$ git clone https://github.com/vultr-marketing/code-samples.git
Navigate into the
mcp_sqlite_ssedirectory.console$ cd code-samples/mcp/mcp_sqlite_sse
Create a
.envfile.console$ nano .env
Add the following variables in the file.
DB_PATH=sample.db MCP_PORT=8080 READ_ONLY=trueDB_PATH: Path to your SQLite database file.MCP_PORT: Port used by the MCP server (not used in stdio mode, but good to define).READ_ONLY: Set to true to block insert/update/delete queries for safety. Save and close the file.
Install dependencies.
console$ pip3 install -r requirements.txt
Allow incoming connections to port
8080.console$ ufw allow 8080
Run the MCP Server.
console$ python3 server.py
Understand the Sample MCP Server
The server script launches a Model Context Protocol (MCP) server using FastMCP and connects it to a local SQLite database. It enables structured interaction with the database using natural language, typically via an LLM interface.
Transport Layer http with Server-Sent Events (SSE)
The server uses the http transport layer to communicate over standard web protocols—ideal for remote deployment on platforms like Vultr. It supports Server-Sent Events (SSE), a crucial feature that enables real-time, streamed responses from the server to your local Claude Desktop via mcp-proxy.
SSE is a core part of live interaction between Claude and your remote MCP server. It ensures that streamed responses (like query results or multi-step outputs) arrive smoothly and in real-time.
This design allows Claude Desktop to interact with your database seamlessly, as if the server were running locally. The SSE implementation is lightweight and handled within the FastAPI-based backend exposed by FastMCP.
For an overview of the server's features and tools, see the How to Create MCP Server Using FastMCP in Python article on Vultr Docs.
Use Claude Desktop to Interact
Download the Claude Desktop application, it automatically detects MCP servers defined in its configuration file and makes them accessible for use within any conversation.
Install the
mcp-proxydependency on your local system.console$ uv tool install mcp-proxy
Get the path to the installed dependency.
console$ where mcp-proxy
Copy the path to be used later.
Start the Claude Desktop application.
Locate the settings option in the application.
Select Developer settings.
Click on Edit Config.
Add the following configuration snippet to your Claude Desktop config file.
json{ "mcpServers": { "vultr-fastmcp": { "command": "<MCP_PROXY_PATH>", "args": [ "http://<VULTR_SERVER_IP>:8080/sse" ], "env": { "API_ACCESS_TOKEN": "" } } } }
Once the new configuration is in place, restart the Claude desktop application.
To confirm the server is running, go to the Developer settings in Claude Desktop and check if the status next to the JSON file shows as running.
Make sure the MCP server tools are available to the application.

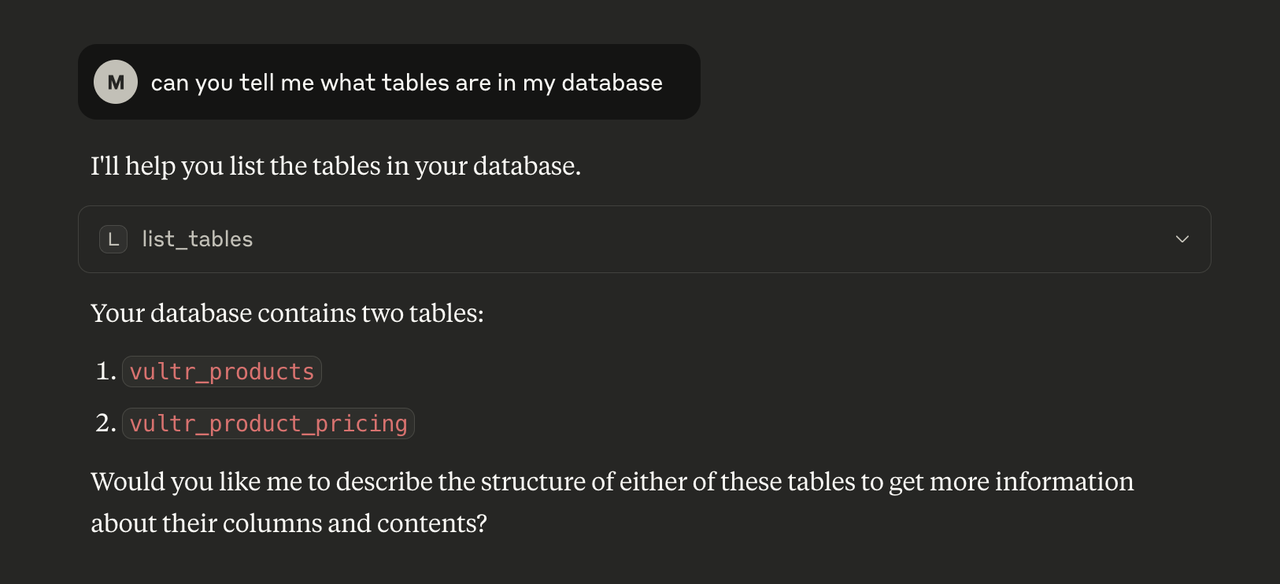
Ask Questions and Perform Operations
You can run interactive queries by chatting naturally. Using the available tools, the LLM will translate your requests into SQL queries, execute them on the sample database, and respond in plain language.
Conclusion
By following this article, you've learned how to deploy a FastMCP-based MCP server on a Vultr cloud instance and connect it with Claude Desktop using a local mcp-proxy. This setup transforms your desktop into a natural language interface for remote structured data, allowing you to issue queries and commands effortlessly. It also highlights the power of MCP in creating persistent, context-aware systems that can scale across different environments. With this foundation in place, you can now explore building more advanced agents, integrating additional tools, or expanding your MCP server to support collaborative multi-agent workflows.