
How to Deploy Bolt.new Projects on Vultr Using Coolify
Bolt.new is a browser-based AI agent by StackBlitz that generates, executes, and previews full-stack web applications directly in the browser without requiring any local development setup. Coolify is an open-source, self-hosted platform-as-a-service that manages Docker container builds, Traefik reverse proxy routing, and automated Let's Encrypt certificate provisioning.
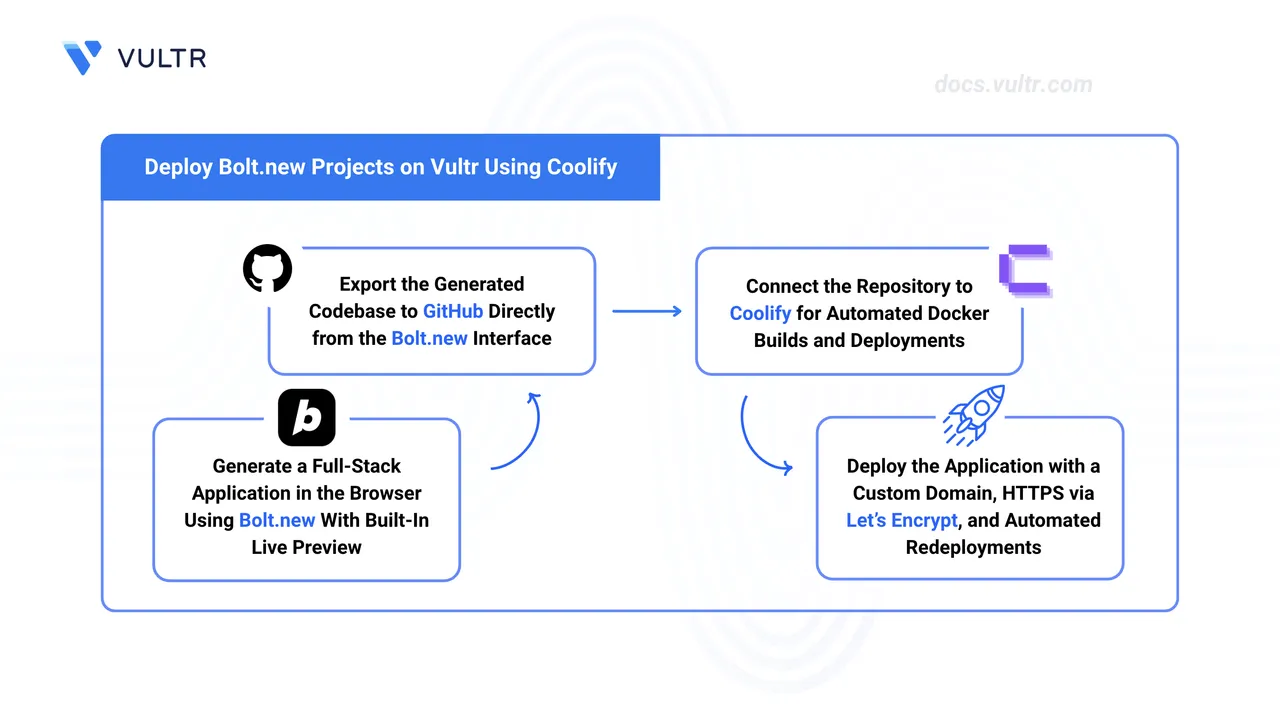
This guide explains how to generate a full-stack application with Bolt.new, export the codebase to GitHub, and deploy it on Vultr using Coolify.
Prerequisites
Before you begin, you need to:
- Have a Bolt.new account.
- Have a GitHub account.
- Deploy the Vultr Marketplace Application for Coolify with at least 2 GB RAM and 1 CPU core.
- Configure a DNS A record pointing to your server's IP address (for example,
app.example.com).
Create an Application Using AI
Bolt.new runs entirely in the browser and can generate a working application from a single prompt. The generated project requires a Dockerfile at minimum so Coolify can containerize and deploy it. For applications with multiple services, such as a separate backend and database, include a docker-compose.yml in your prompt.
Navigate to Bolt.new in a web browser and log in with your account.
Enter a detailed description of your application in the prompt field. Specify the technology stack, required features, and request a Dockerfile for containerized deployment. For multi-service projects, also request a
docker-compose.ymlfile. Bolt.new generates the complete source code, directory structure, and container configuration.Click Build Now to start generating the application.
Wait for the Bolt agent to finish creating the application.
Test the application in the live preview panel. Confirm that all requested features work as expected.
Click the GitHub icon in the top right corner.
Click Log in to GitHub and authorize Bolt.new to access your repositories.
Enter a name for your repository.
Click Create Repository.
Bolt.new pushes the complete source code to the new GitHub repository. The repository includes all generated files, including the Dockerfile or
docker-compose.yml.
Access the Coolify Dashboard
Coolify runs as a Vultr Marketplace application and exposes a web-based control panel on port 8000. The first login creates the administrator account that manages all subsequent deployments.
Open your instance's Management Page in the Vultr Console and scroll down to App Instructions. The Coolify endpoint URL appears there in the format
http://SERVER_IP:8000.Open the URL in a browser. The first-run wizard asks for an email address and password. Enter the credentials for your administrator account.
Coolify opens the dashboard after the account is created. The administrator account controls all deployments, team members, and server settings.
Connect GitHub Repository
Linking a GitHub account gives Coolify permission to clone your repositories during each build. The connection is established through GitHub's OAuth flow and persists across all projects.
Click Sources in the Coolify dashboard.
Click Add Source and select GitHub.
Coolify redirects to GitHub for OAuth authorization. Click Authorize to grant access.
GitHub redirects back to Coolify after successful authorization. Coolify displays your GitHub account in the Sources list.
Create a New Project
Coolify organizes deployments into projects. Each project can contain multiple applications, databases, and services that share a common network and configuration namespace.
Click Projects in the Coolify dashboard.
Click Add Project.
Enter a project name, such as
my-bolt-app.Click Create. Coolify displays the project details page.
Deploy the Application
Coolify clones the repository, builds a Docker image from the Dockerfile or docker-compose.yml, and launches the containers on the server. Traefik handles incoming traffic routing automatically.
Click Add Resource in the project details page.
Select Application as the resource type.
Choose GitHub as the source.
Select your Bolt.new application repository from the dropdown.
Enter the branch name, typically
main.Coolify scans the repository and identifies the container configuration. Select Docker Compose as the build pack for multi-container applications.
Click Continue.
Coolify generates a temporary domain in the format
RANDOM_ID.SERVER_IP.sslip.iofor immediate testing. Configure a custom domain later for production use.Click Save. Coolify redirects to the application configuration page.
Configure Environment Variables
Environment variables allow you to pass runtime configuration and secrets to your application without committing sensitive data to the repository. Coolify encrypts stored values and injects them into containers during startup.
Open the application details page.
Click Environment Variables.
Click +Add to create a new variable.
Enter the variable name and value. Common variables for Bolt.new applications include:
DATABASE_URL: PostgreSQL connection string, such aspostgresql://user:pass@db:5432/dbnameAPI_KEY: External service API key, such assk_live_abc123NODE_ENV: Runtime environment, such asproductionNEXT_PUBLIC_API_URL: Frontend API endpoint, such ashttps://api.example.com
Click Save after adding all required variables.
Start the Deployment
After configuring the repository and environment variables, start the build process to compile and launch the application.
Click Deploy to trigger the deployment process.
Coolify queues the build. Open Logs to stream the output as each stage runs.
The build pipeline executes the following steps in order:
- Cloning the repository
- Building Docker images for each service
- Starting containers
- Configuring Traefik routing rules
- Requesting TLS certificates
The pipeline duration depends on application size and server resources.
When deployment completes successfully, the application status changes to Running.
Verify Deployment
Confirm that the application responds correctly before configuring a production domain.
Click Links in the application details page to view accessible URLs.
Click the Coolify-generated domain link to open your application.
Your application loads at
http://RANDOM_ID.SERVER_IP.sslip.io. Verify that all features function correctly.
Configure Custom Domain with HTTPS
Replace the temporary sslip.io domain with your custom domain for production use. Coolify automatically provisions Let's Encrypt TLS certificates.
Go to the application details page.
Click Configuration in the left sidebar.
Locate the Domains field and replace the Coolify-generated domain with your custom domain. Enter
https://app.example.comin the field.Enable Automatic HTTPS to provision Let's Encrypt certificates.
Click Save.
Click Redeploy to apply the domain configuration.
Coolify triggers a new build, registers the domain with Traefik, and fetches a certificate.
Visit the domain in a browser. A padlock in the address bar confirms the certificate is active and HTTPS is working.
Add a Database
Coolify provisions managed database containers that run alongside your application on the same internal Docker network. This keeps the database credentials and traffic isolated from the public internet.
Return to the project details page.
Click Add Resource.
Select Database.
Choose PostgreSQL as the database type.
Provide a name for the database instance, such as
app-db.Click Create. Coolify provisions the container and generates access credentials.
Locate and copy the internal connection string on the database details page.
Navigate to the Environment Variables tab of your application.
Create or update the
DATABASE_URLentry and paste the connection string as its value.Click Restart to reconnect the application with the new database.
Configure CI/CD Pipeline
Coolify provides continuous deployment capabilities through GitHub webhooks. Configure automatic deployments to rebuild and redeploy your application whenever you push changes to the repository.
Enable Automatic Deployments
Open the application details page.
Click Settings.
Toggle on Automatic Deployment.
Coolify generates and displays a webhook URL. Copy it.
Switch to your GitHub repository and open Settings.
Select Webhooks from the sidebar and click Add webhook.
Paste the webhook URL into the Payload URL field.
Choose application/json as the content type.
Under events, select Just the push event.
Click Add webhook.
GitHub sends a test payload to Coolify. Verify that the webhook shows a green checkmark.
Test the CI/CD Pipeline
Verify that Coolify triggers a new build when code changes are pushed to the repository.
Edit any file in your application code.
Stage the changes.
console$ git add .
Commit the changes.
console$ git commit -m "Update application feature"
Push to GitHub.
console$ git push origin main
Coolify detects the push event and starts a new deployment automatically.
Open the application details page in Coolify.
Click Deployments to view the deployment history.
The most recent entry appears at the top with a Building status.
Click Logs to follow the build output in real time.
When the build completes, the deployment status changes to Finished and the application restarts with the updated code.
Configure GitHub Actions for Testing
Run automated tests before deployment by adding a GitHub Actions workflow. The webhook fires only after all workflow checks pass, ensuring that broken code never reaches production.
Create the GitHub Actions workflow directory.
console$ mkdir -p .github/workflows
Open a new workflow file in a text editor.
console$ nano .github/workflows/ci.yaml
Paste the following configuration into the file. Update the test commands to match your application stack.
yamlname: CI on: push: branches: [ main ] pull_request: branches: [ main ] jobs: test: runs-on: ubuntu-latest steps: - uses: actions/checkout@v4 - name: Run tests run: | # Add your test commands here # Example for Node.js: # npm install && npm test # Example for Go: # go test ./... echo "Tests passed"
Save and close the file.
Stage the workflow file.
console$ git add .github/workflows/ci.yaml
Commit the changes.
console$ git commit -m "Add CI workflow"
Push to GitHub.
console$ git push origin main
GitHub Actions runs the tests on every push. Coolify deploys the application only after the workflow completes successfully.
Conclusion
You have successfully built a full-stack application with Bolt.new, pushed the codebase to GitHub, and deployed it on Vultr using Coolify. The application now runs behind a custom domain with automatic HTTPS and redeploys whenever you push new code. For more information, visit the official Coolify documentation.