
How to Deploy MinIO - An Opensource Object Storage Solution
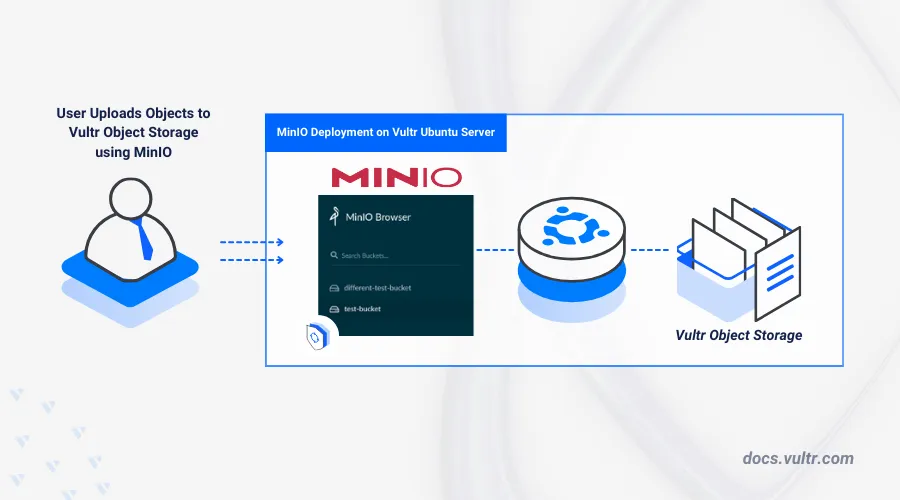
MinIO is an open-source, high-performance object storage server that offers S3-compatible API for managing and sharing files as objects. It uses a server and console-based architecture, providing multiple access methods, including a web interface, the mc command-line tool, and other S3-compatible clients such as S3 Browser, Cyberduck, and s3cmd.
This article explains how to deploy MinIO on Ubuntu 24.04 to share and manage files on your server. You will install and configure the MinIO server using a Single Node Single Drive (SNSD) architecture, and configure MinIO to use a Block Storage device for storing objects.
Prerequisites
Before you begin, you need to:
- Have access to an Ubuntu 24.04 instance as a non-root user with sudo privileges.
- Create a domain A record pointing to the instance's IP address such as
minio.example.com. - Have an existing block storage volume provisioned, attached and mounted at
/mnt/minio-data.
Install MinIO
MinIO is not available in the default Ubuntu APT repositories. To install MinIO, you need to manually download the official debian package (.deb) from the MinIO website and install it using the dpkg package manager.
Download the latest MinIO Debian package from the release page.
console$ wget https://dl.min.io/server/minio/release/linux-amd64/minio_20250422221226.0.0_amd64.deb -O minio.deb
The above command downloads the MinIO
.debrelease package and saves it asminio.deb. To check the latest version, visit the official releases page.Install the downloaded MinIO package using the
dpkgcommand.console$ sudo dpkg -i minio.deb
View the installed MinIO version.
console$ minio --version
Your output should be similar to the one below:
minio version RELEASE.2025-04-22T22-12-26Z (commit-id=0d7408fc9969caf07de6a8c3a84f9fbb10a6739e)
Runtime: go1.24.2 linux/amd64
...
Configure MinIO
MinIO uses the minio command to run and manage the application server. It supports multiple options to define the listening port, storage volumes, and default administrator user details on your server. These options do not persist after the session ends unless configured as expected. Follow the steps below to configure MinIO with the required options and enable it to start automatically at boot.
Create a new MinIO configuration file to define the required MinIO options.
console$ sudo nano /etc/default/minio
Add the following configurations to the file.
iniMINIO_VOLUMES="/mnt/minio-data" MINIO_OPTS="-C /etc/minio --address :9000 --console-address :9001" MINIO_ROOT_USER="minio_admin" MINIO_ROOT_PASSWORD="strong-password"
Replace
minio_adminwith your administrator username andstrong-passwordwith the administrator password (which must be at least 8 characters long).Save and close the file.
This configuration ensures that MinIO runs on the API port
9000and the console web interface port9001. It sets the storage path to/mnt/minio-data, where you can mount a block device with a high storage. Storing data on a separate block device is the recommended way to handle large amounts of data, as it ensures greater durability. If you encounter server issues, your data remains safe on a different drive.Create a new
minio-userwithout login privileges on the server.console$ sudo useradd -m -s /usr/sbin/nologin minio-user
The MinIO system service runs under the
minio-userandminio-usergroup. You need to create this user and assign the privileges to access the necessary directories for MinIO to function as expected.Grant the user and group ownership privileges on your data storage directory
/mnt/minio-datato theminio-user.console$ sudo chown minio-user:minio-user /mnt/minio-data
Enable the MinIO system service so that it starts automatically when your server boots.
console$ sudo systemctl enable minio
Start the MinIO system service.
console$ sudo systemctl start minio.service
View the status of the MinIO service and verify that it is in a running state.
console$ sudo systemctl status minio.service
Your output should be similar to the one below:
● minio.service - MinIO
     Loaded: loaded (/lib/systemd/system/minio.service; enabled; vendor preset: enabled)
     Active: active (running) since Sun 2025-04-27 08:20:43 UTC; 3s ago
       Docs: https://docs.min.io
   Main PID: 16105 (minio)
      Tasks: 8
        CPU: 637ms
     CGroup: /system.slice/minio.service
             └─16105 /usr/local/bin/minio server -C /etc/minio --address :9000 --console-address :9001 /mnt/minio-data
Secure MinIO
By default, MinIO listens for API connections on port 9000 and web console access on port 9001. To securely run and expose MinIO, you can set up a domain name and configure it to run on secure ports, such as HTTPS port 443. Using Let's Encrypt, you can generate trusted SSL certificates to enable HTTPS connections and secure access to the API using S3 client tools. Follow the steps below to generate SSL certificates and configure MinIO to run securely on your domain.
Generate Let's Encrypt SSL Certificates to use with MinIO
MinIO supports HTTP connections by default when the --certs-dir option is not passed. When configured, MinIO uses your SSL certificate public.crt file and the private key private.key for secure communication. Follow the steps below to generate Let's Encrypt certificates and enable secure connections for MinIO.
Allow the HTTP port
80through the default firewall to allow Let's Encrypt domain validation.console$ sudo ufw allow 80/tcp
Install the Certbot Let's Encrypt client.
console$ sudo apt install certbot -y
Request a new SSL certificate for your domain.
console$ sudo certbot certonly --standalone -d minio.example.com -m hello@example.com --agree-tos
Replace
minio.example.comandhello@example.comwith your actual domain and email address. When successful, you will receive a message stating "Successfully received certificate."Test that Certbot will auto-renew your SSL certificate when it expires.
console$ sudo certbot renew --dry-run
This command performs a dummy SSL certificate renewal to simulate the process without making any actual changes.
Create a new directory to store the SSL certificate files for MinIO to use, such as
/opt/minio-certs.console$ sudo mkdir -p /opt/minio-certs
Copy your SSL certificate and private key to the
/opt/minio-certsdirectory.console# Copy the SSL certificate as public.crt $ sudo cp /etc/letsencrypt/live/minio.example.com/fullchain.pem /opt/minio-certs/public.crt # Copy the private key as private.key $ sudo cp /etc/letsencrypt/live/minio.example.com/privkey.pem /opt/minio-certs/private.key
Grant the
minio-userfull privileges to the/opt/minio-certsdirectory.console$ sudo chown -R minio-user:minio-user /opt/minio-certs/
Check the path of MinIO binary.
console$ which minio
Your output should be similar to the one below:
/usr/local/bin/minioTo enable SSL and bind MinIO to the HTTPS port
443, which is a privileged port under1024, you must grant additional permissions.console$ sudo setcap cap_net_bind_service=+ep /usr/local/bin/minio
This allows MinIO to bind to port
443for secure HTTPS connections.Open your MinIO configuration file to apply the SSL certificate settings.
console$ sudo nano /etc/default/minio
Replace the MinIO console address port
:9001with the HTTPS port443.iniMINIO_OPTS="-C /etc/minio --address :9000 --console-address :443"
Add the
--certs-dir /opt/minio-certsoption to yourMINIO_OPTSdirective.iniMINIO_OPTS="-C /etc/minio --address :9000 --console-address :443 --certs-dir /opt/minio-certs"
Add a new
MINIO_DOMAINwith your domain URL at the end of your configuration file.iniMINIO_DOMAIN="minio.example.com"
Save and close the file.
Your modified MinIO configuration should look like the one below:
iniMINIO_VOLUMES="/mnt/minio-data" MINIO_OPTS="-C /etc/minio --address :9000 --console-address :443 --certs-dir /opt/minio-certs" MINIO_ROOT_USER="minio_admin" MINIO_ROOT_PASSWORD="strong-password" MINIO_DOMAIN="minio.example.com"
Restart MinIO service to apply your configuration changes.
console$ sudo systemctl restart minio
Check the status of MinIO service.
console$ sudo systemctl status minio
● minio.service - MinIO
     Loaded: loaded (/lib/systemd/system/minio.service; enabled; vendor preset: enabled)
     Active: active (running) since Sun 2025-04-27 08:18:01 UTC; 1min 4s ago
       Docs: https://docs.min.io
   Main PID: 19913 (minio)
      Tasks: 10
        CPU: 780ms
     CGroup: /system.slice/minio.service
             └─19913 /usr/local/bin/minio server -C /etc/minio --address :9000 --console-address :443 --certs-dir /opt/minio-certs /mnt/minio-data
Allow connections to the HTTPS port
443through the firewall.console$ sudo ufw allow 443/tcp
Allow S3 connections to the MinIO API port
9000.console$ sudo ufw allow 9000/tcp
Reload the firewall to apply the changes.
console$ sudo ufw reload
View the firewall status.
console$ sudo ufw status
Make sure the status is active and all required rules (such as ports 80, 443, and 9000) are listed and applied.
Access MinIO
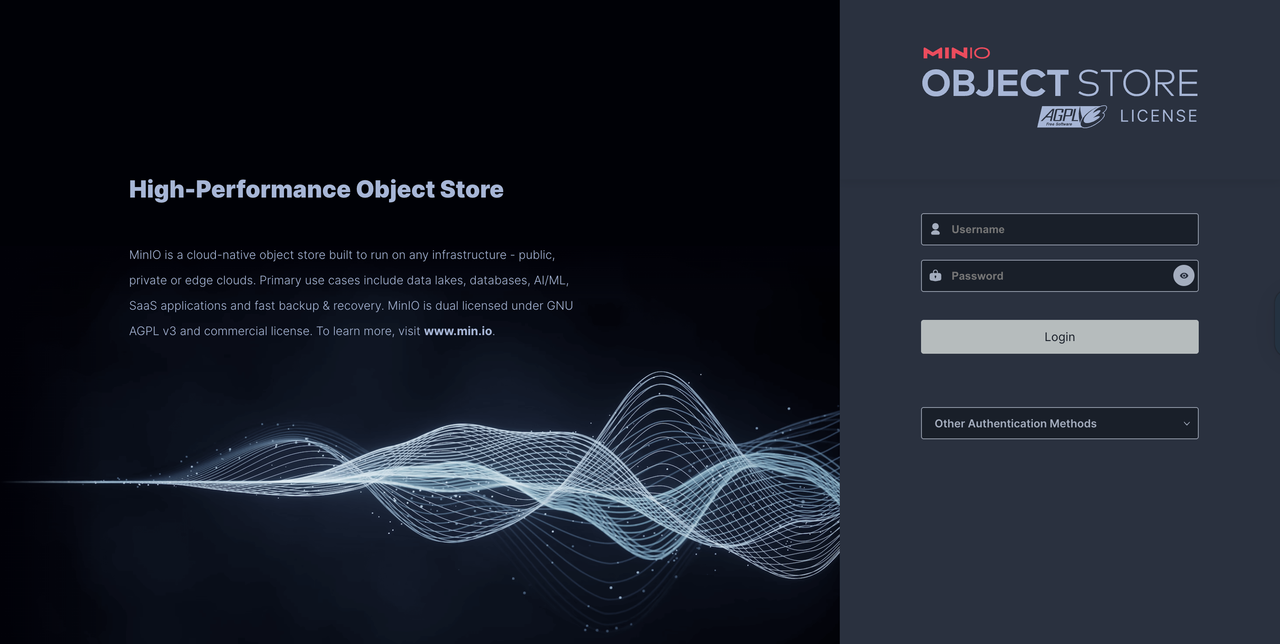
Open your web browser and navigate to your MinIO domain using the following URL.
https://minio.example.comVerify that the MinIO web interface displays in your web browser. Then, log in to the MinIO console using the administrator credentials defined in the
/etc/default/minioconfiguration file.- USERNAME:
minio_admin - PASSWORD:
strong-password
- USERNAME:
After you have logged in, click Buckets from the main navigation menu to begin setting up a new object storage bucket.
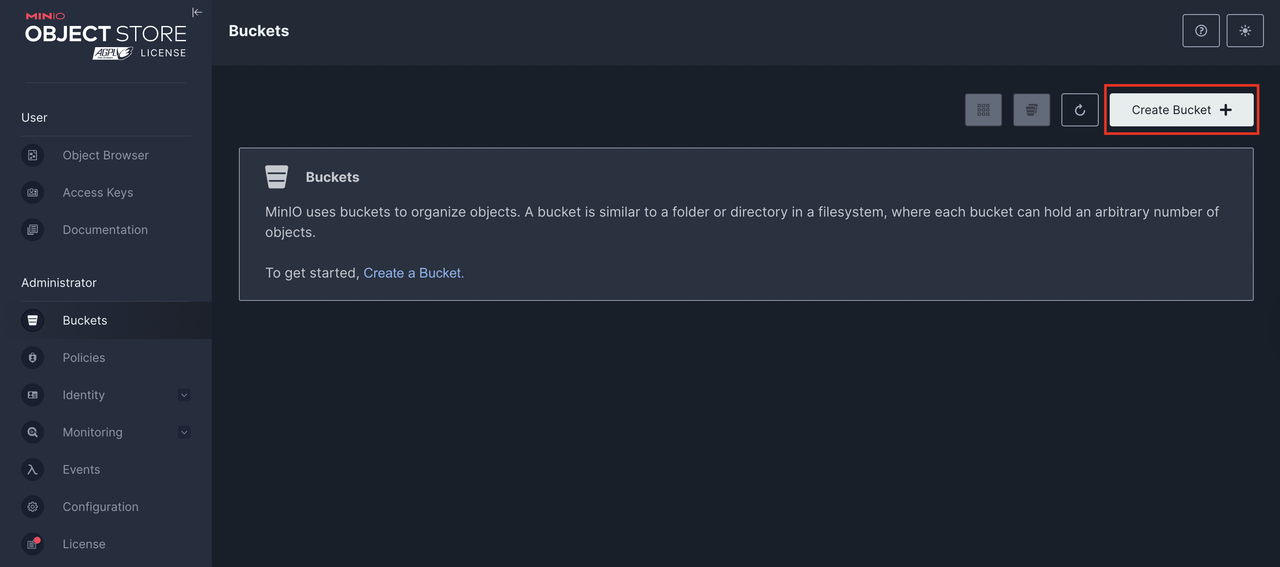
Click Create a Bucket to proceed with creating a new bucket. Enter your desired bucket name in the Bucket Name field. For example,
vultr-test.Bucket Name Convention Rules:
- Length: Bucket names must be between 3 (minimum) and 63 (maximum) characters long.
- Allowed Characters: Bucket names can only consist of lowercase letters, numbers, dots (.), and hyphens (-).
- No Adjacent Periods: Bucket names must not contain two adjacent periods (..), or a period next to a hyphen (-. or .-).
- No IP Address Formatting: Bucket names must not be formatted as an IP address (for example, 192.168.5.4).
- No xn-- Prefix: Bucket names must not start with the prefix xn--.
- No -s3alias Suffix: Bucket names must not end with the suffix -s3alias, as this is reserved for access point alias names.
- Uniqueness: Bucket names must be unique within a partition.
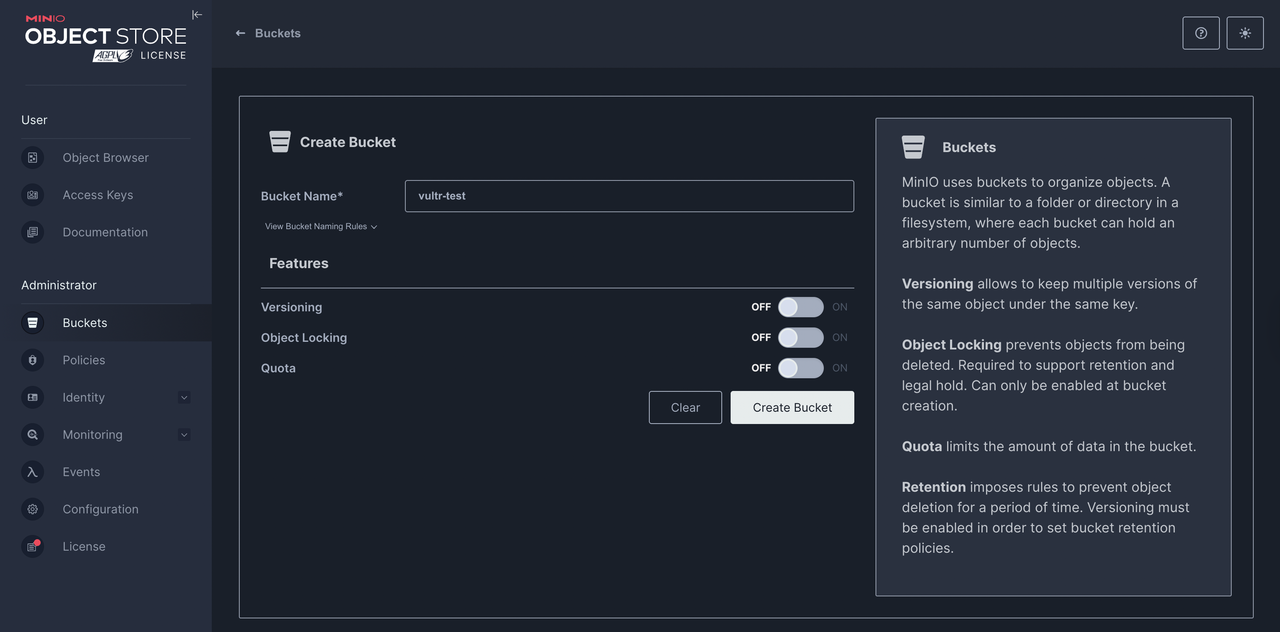
Enable additional bucket features.
- Versioning: Keeps multiple versions of the same object under the same key.
- Object Locking: Prevents objects from being deleted, necessary for retention and legal hold (can only be enabled during bucket creation).
- Quota: Limits the amount of data in the bucket.
- Retention: Prevents deletion of objects for a defined period. Versioning must be enabled to set retention policies.
After configuring your options, click Create Bucket to create the MinIO Object Storage bucket.
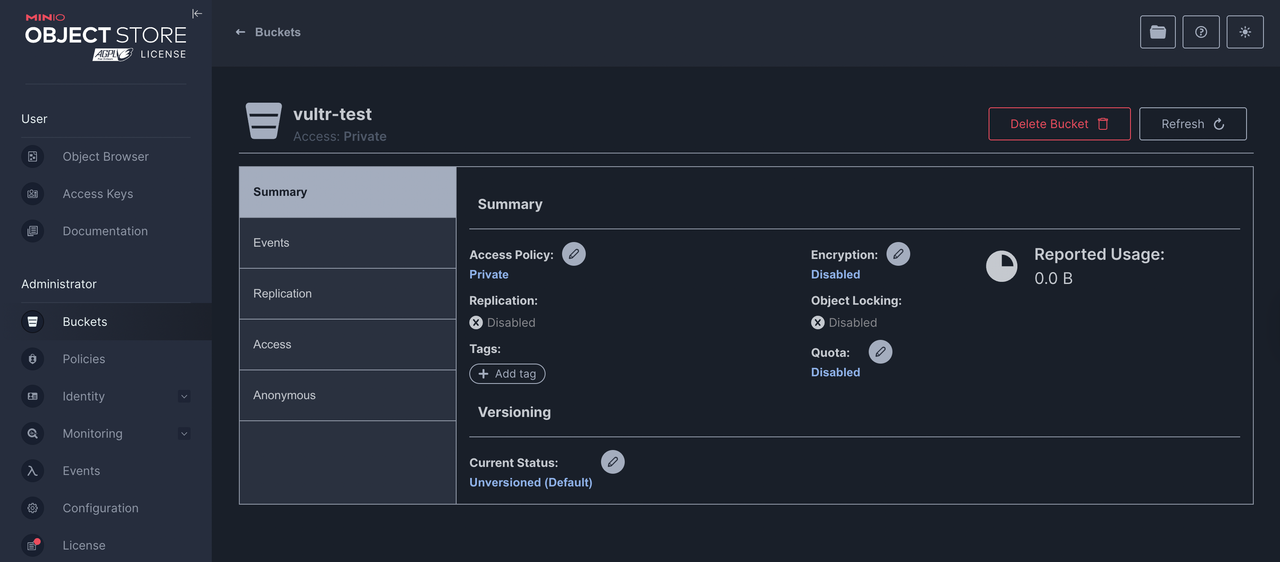
After the bucket is created, confirm it appears in your Buckets list. Click the bucket name to view and configure its properties.
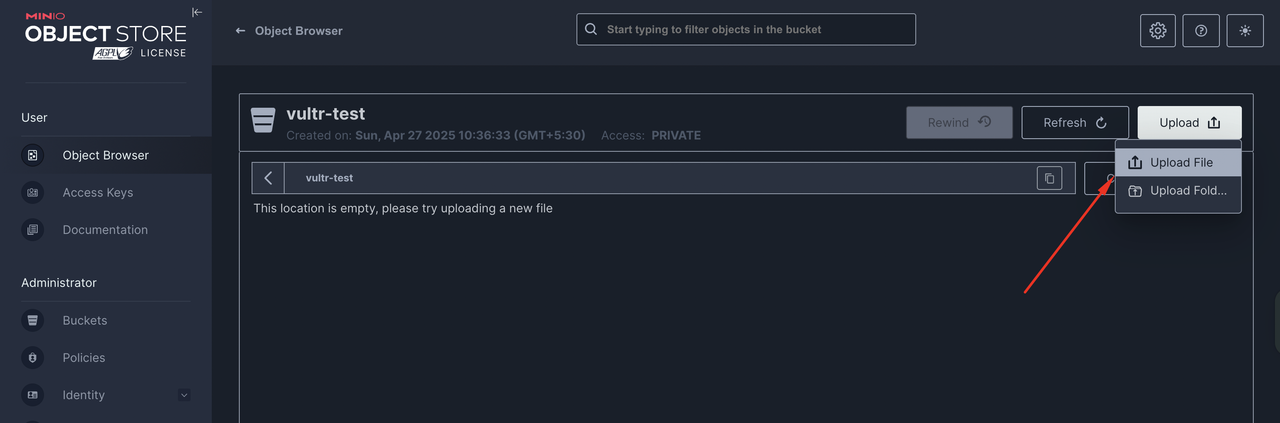
To upload files to the bucket, navigate to Object Browser in the main navigation menu.
Select the newly created bucket to open the object browser. Then, click Upload and choose Upload File from the options to upload new files from your device.
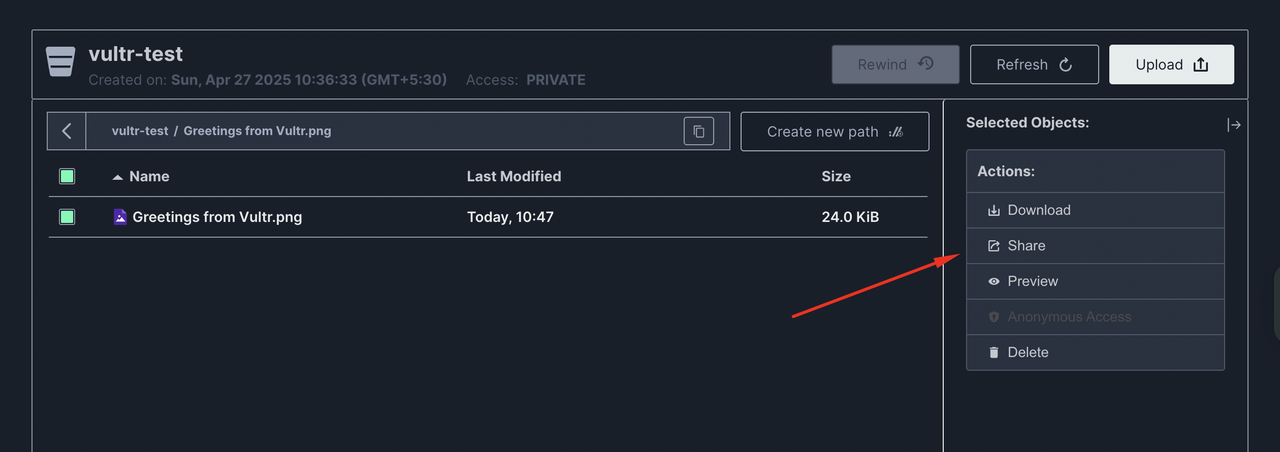
Verify that your upload is complete and the new file is available in your bucket. To share the file, click it and select Share to generate an encrypted URL of downloading the file.
Set the desired expiration for the link and click the copy icon to share the link for downloading the file.
Access MinIO using an S3 Browser
S3 client applications offer a secure method to upload and manage object storage files. The MinIO API runs on port 9000 and accepts S3 connections on your server to create and manage files. Follow the steps below to use an S3 client application such as S3 Browser to establish a connection and upload files on your server.
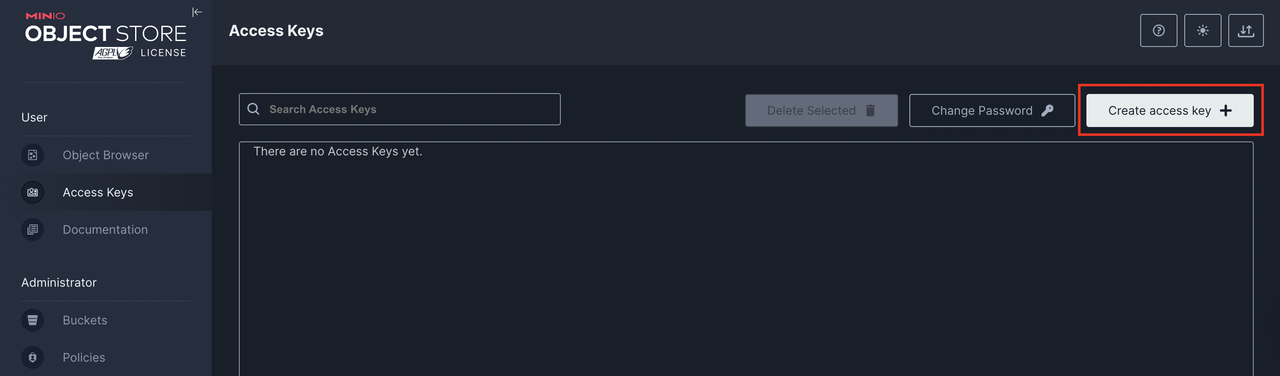
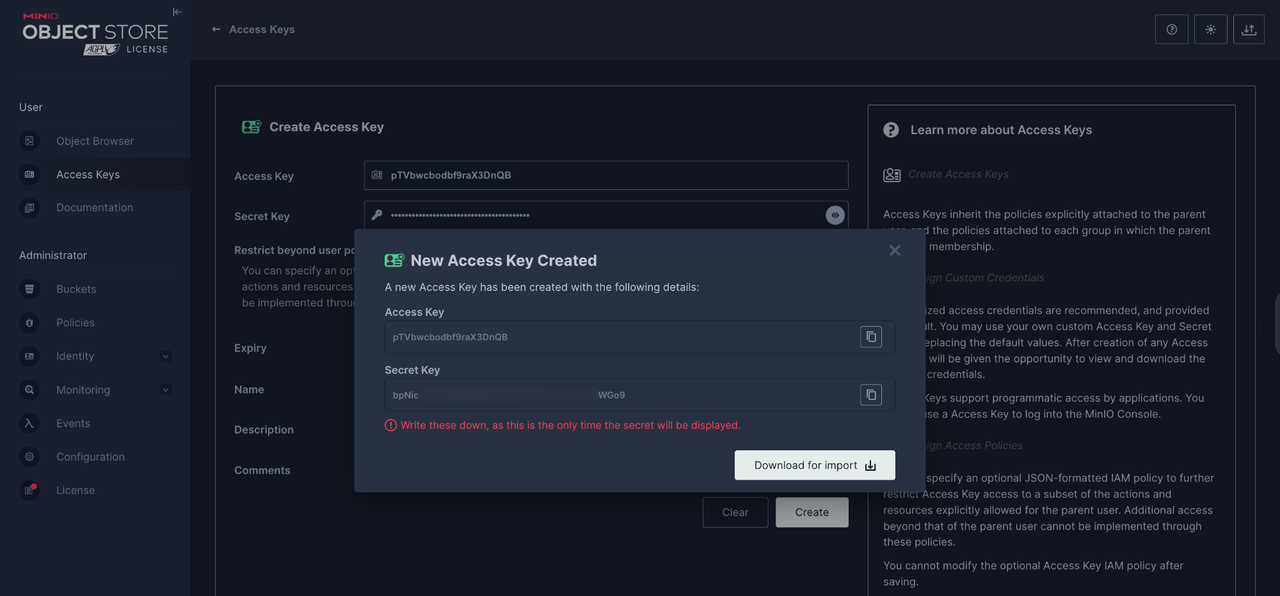
Navigate to Access Keys in the MinIO console interface to create new authentication keys.
Click Create access key to generate new access and secret keys.
Set your desired expiry date and name. Then, click Create to apply the new keys on your server.

Copy the generated keys or click Download for Import to save the keys to a file on your device.
Download and install an S3 Browser application on your device.
Open the S3 Browser application on your device and click Add new account within the Accounts menu.
In the Add New Account window, enter the following details:
- Display Name: Define a name for your MinIO account.
- Account Type: Select S3 Compatible Storage.
- API Endpoint: Enter your MinIO API URL (for example, minio.example.com:9000).
- Access Key ID: Paste the Access Key ID you generated earlier.
- Secret Access Key: Paste the Secret Access Key you generated earlier.
- Use Secure Transfer: Check this option to enable encryption during data transfers.
Your configuration should look like below:
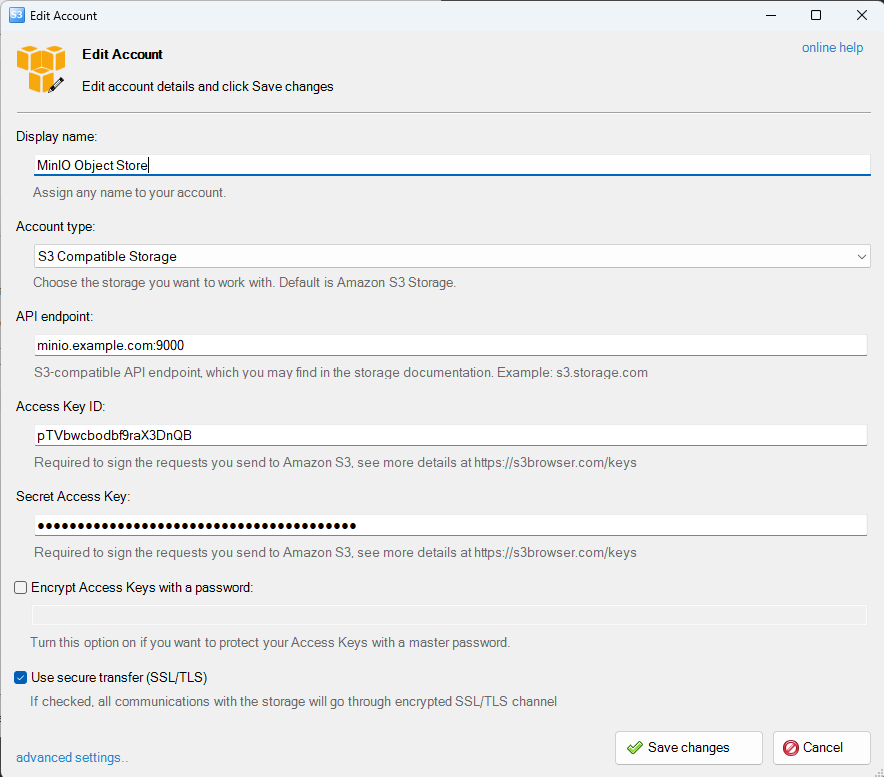
Click Save Changes to save the new S3 storage account and establish a connection with your MinIO server.
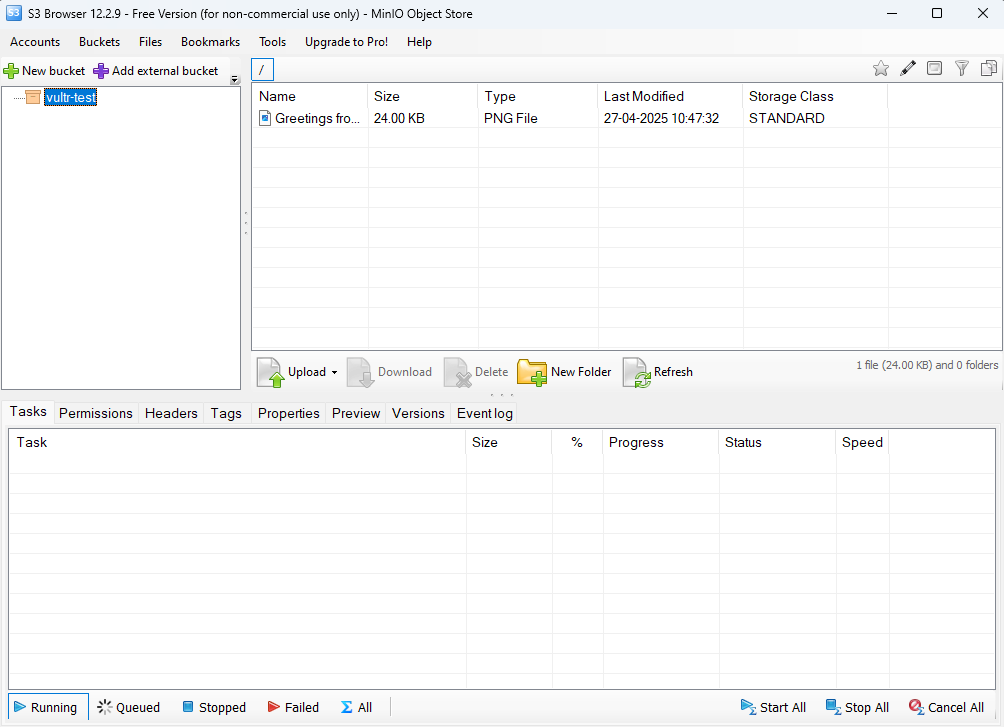
Verify that your MinIO buckets display in the S3 Browser application. Then, click any bucket to view the available objects.
Access MinIO using an S3CMD
S3cmd is a command-line tool used for managing data in an S3-compatible storage service like MinIO. It allows you to perform various tasks such as listing, creating, and removing buckets, also uploading and downloading objects. Follow the steps below to use s3cmd to interact with your MinIO server.
Install
s3cmdCLI utility on your system.Ubuntu/Debian:
Update the APT server package index.
console$ sudo apt update
Install the
s3cmdCLI package.console$ sudo apt install -y s3cmd
RHEL/RockyLinux:
Update the DNF server package index.
console$ sudo dnf makecache
Install the
s3cmdCLI package.console$ sudo dnf install -y s3cmd
macOS (using Homebrew):
Update the BREW server package index.
console% brew update
Install the
s3cmdCLI package.console% brew install s3cmd
After installing s3cmd, you need to configure the AccessKeys to connect to your MinIO server.
console$ s3cmd --configure
Follow the prompts to enter the following details.
- Access Key: Enter the access key generated in the MinIO console.
- Secret Key: Enter the secret key generated in the MinIO console.
- Default Region: Press Enter to accept the default.
- S3 Endpoint: Enter your MinIO API URL (for example,
minio.example.com:9000). - DNS-style bucket+hostname:port: Enter
minio.example.com:9000. - Encryption password: Optionally, enter a password to encrypt the saved configuration.
- Use HTTPS protocol: Answer Yes to secure the connection.
- HTTP Proxy server name: Leave this blank if you don’t use a proxy.
After you’ve entered all the details, the settings will appear as follows for verification.
New settings:
  Access Key: Your Access Key
  Secret Key: Your Secret Access Key
  Default Region: US
  S3 Endpoint: minio.example.com:9000
  DNS-style bucket+hostname:port template for accessing a bucket: minio.example.com:9000
  Encryption password:
  Path to GPG program: /usr/bin/gpg
  Use HTTPS protocol: True
  HTTP Proxy server name:
  HTTP Proxy server port: 0
Test access with supplied credentials? [Y/n]
Press
Yto test the connection and ensure everything is set up as expected.To list all the available buckets on your MinIO server.
console$ s3cmd ls
This command will display a list of all buckets currently available on your MinIO server.
Your output should be similar to the one below:
2025-04-27 05:06 s3://vultr-testTo create a new bucket, use the following command.
console$ s3cmd mb s3://my-new-bucket
Replace
my-new-bucketwith your desired bucket name.View the list of available buckets again and verify that the new bucket exists.
console$ s3cmd ls
Your output should be similar to the one below:
2025-04-27 09:52  s3://my-new-bucket
2025-04-27 05:06  s3://vultr-test
To upload a file to your bucket, use the following command.
console$ s3cmd put myfile.txt s3://my-new-bucket/
Your output should be similar to the one below:
upload: 'myfile.txt' -> 's3://my-new-bucket/myfile.txt'  [1 of 1]
 2611218 of 2611218   100% in    0s    11.14 MB/s  done
To view the list of objects present in a MinIO bucket, use the following command.
console$ s3cmd ls s3://my-new-bucket
Your output should be similar to the one below:
2025-04-27 10:03 2611218 s3://my-new-bucket/myfile.txtRemove the already present test file in the directory.
console$ rm myfile.txt
To download a file from your MinIO bucket.
console$ s3cmd get s3://my-new-bucket/myfile.txt
Your output should be similar to the one below:
download: 's3://my-new-bucket/myfile.txt' -> './myfile.txt'  [1 of 1]
 2611218 of 2611218   100% in    0s   107.92 MB/s  done
To delete a file (object) from your bucket, use the following command.
console$ s3cmd del s3://my-new-bucket/myfile.txt
Your output should be similar to the one below:
delete: 's3://my-new-bucket/myfile.txt'To delete a bucket from your MinIO server, use the following command.
console$ s3cmd rb s3://my-new-bucket
Your output should be similar to the one below:
Bucket 's3://my-new-bucket/' removedView the list of available buckets again and verify that the bucket is deleted.
console$ s3cmd ls
Your output should be similar to the one below:
2025-04-27 05:06 s3://vultr-test
Conclusion
You have deployed MinIO on your Ubuntu 24.04 server using a Single Node Single Drive (SNSD) architecture backed by a mounted block storage device. With MinIO configured as a system service and secured using Let's Encrypt SSL certificates, your object storage server is now ready for production use. You can manage and share files through the secure web interface, command-line tools like s3cmd, and desktop applications such as S3 Browser. For further configuration options and additional details, please visit the official MinIO documentation.