Introduction
Cyberduck is a graphical file manager for Windows and Mac that supports Vultr Object Storage. Vultr Object Storage is compatible with a subset of the S3 API. See our compatibility matrix for details.
Gather your Login Information
Select the Objects menu at the top of the Vultr customer portal.
Navigate to the object storage subscription listing.

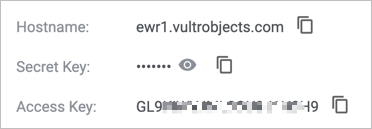
Make a note of your Hostname, Secret Key, and Access Key.
Create a Cyberduck Bookmark
Open Cyberduck.
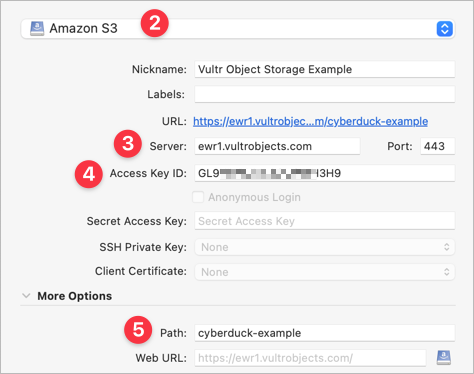
On the main menu, click Bookmark > New Bookmark.

Select Amazon S3 from the protocol dropdown.
Enter the Hostname in the Server field.
Enter the Access Key in the Access Key ID field.
(Optional) You can enter the bucket name in the Path field or leave it blank if you work with multiple buckets.
Connect with Cyberduck
Double-click your new bookmark.

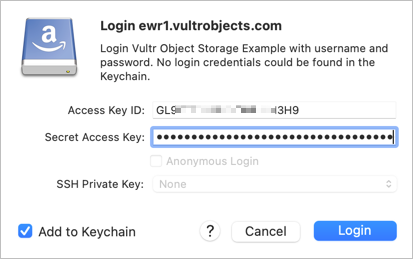
You'll be prompted for the secret key.

Click Login to connect.
Create Bucket
Navigate to the root, then choose "File, New Folder" from the menu, or right-click in the file area and select "New Folder". The folder name is the bucket name.
Remove Bucket
Right-click on a bucket, then click Delete.
Upload File
Drag and drop a file from your computer onto the bucket.
Download File
Right-click on a file, then click Download As....
Delete File
Right-click on a file, then click Delete.
Make a File Public
- Right-click on a file, then click Info.
- Go to the Permissions tab.
- Click the gear on the lower-left corner.
- Choose Everyone from the menu.
- Set the Permission dropdown to READ for the Everyone ACL table entry.
- Close the Info window.
Make a File Private
- Right-click on a file, then click Info.
- Go to the Permissions tab.
- If Everyone appears in the Access Control List (ACL), click the gear on the lower-left corner and remove the entry.
- Close the Info window.
Enable Directory Listing on a Bucket
- Right-click on a bucket, then click Info.
- Go to the Permissions tab.
- Click the gear on the lower-left corner, and choose Everyone from the menu.
- Set the Permission dropdown to READ for the Everyone ACL table entry.
- Close the Info window.
Disable Directory Listing on a Bucket
- Right-click on a bucket, then click Info.
- Go to the Permissions tab.
- If Everyone appears in the Access Control List (ACL), click the gear on the lower-left corner and remove the entry.
- Close the Info window.