Introduction
Joplin Server is a free, self-hosted open-source note-taking and to-do application that captures ideas as notes, organizes them and synchronizes them to devices. This article explains how to host a Joplin Server with Docker on a Vultr Ubuntu server and synchronize it with a Joplin client application.
Prerequisites
Before you begin, you'll need to do the following steps:
- Deploy a new Ubuntu 22.04 server at Vultr.
- Create a Fully-qualified domain name in your DNS that points to the server's IP address. This guide uses
joplin.example.com. - Log in to the server as a non-root user with sudo privileges using SSH.
- Install Docker Compose.
- Install Nginx.
1. Install Joplin Server
Create a new directory to store Joplin docker files in the
/optdirectory.$ sudo mkdir /opt/joplinSwitch to the directory.
$ cd /opt/joplin/Use a text editor to create a new Joplin Docker Compose file.
$ sudo nano joplin-docker-compose.ymlAdd the following contents to the file.
The values
5434and8080are examples. You can change these if required.Replace
https://joplin.example.comwith your fully-qualified domain name.Replace the values for
POSTGRES_PASSWORD,POSTGRES_DATABASE, andPOSTGRES_USERwith your preferred values.version: '3' services: db: image: postgres:13 volumes: - ./data/postgres:/var/lib/postgresql/data ports: - "5432:5432" restart: always environment: - POSTGRES_PASSWORD=Your-Password-here - POSTGRES_USER=joplin-user - POSTGRES_DB=joplindb app: image: joplin/server:latest container_name: joplin-server depends_on: - db ports: - "8080:8080" restart: always environment: - APP_PORT=8080 - APP_BASE_URL=https://joplin.example.com - DB_CLIENT=pg - POSTGRES_PASSWORD=Your-Password-here - POSTGRES_DATABASE=joplindb - POSTGRES_USER=joplin-user - POSTGRES_PORT=5432 - POSTGRES_HOST=db
This Docker Compose configuration creates a new Postgres database container and a Joplin Server listening on port
8080.Save and close the file.
Start the Joplin Server.
$ sudo docker-compose -f joplin-docker-compose.yml up -dVerify that Joplin Server is up and running.
$ sudo docker psYou should see an output similar to the example below.
 CONTAINER ID   IMAGE                  COMMAND                  CREATED         STATUS         PORTS                                       NAMES
 143a9e9cdaa5   joplin/server:latest   "tini -- node dist/a…"   2 minutes ago   Up 4 seconds   0.0.0.0:8080->8080/tcp, :::8080->8080/tcp   joplin-server
 1e55ccad2d52   postgres:13            "docker-entrypoint.s…"   2 minutes ago   Up 2 minutes   0.0.0.0:5432->5432/tcp, :::5432->5432/tcp   joplin_db_1
2. Configure Nginx as a Reverse Proxy
Create a new Nginx configuration file.
$ sudo nano /etc/nginx/conf.d/joplin-server.confAdd the following contents to the file.
 server {
   listen 80;
   listen [::]:80;
   server_name joplin.example.com;

   error_log /var/log/nginx/joplin-server.error;

   location / {
     proxy_pass http://127.0.0.1:8080;
     proxy_set_header Host $host;
     proxy_set_header X-Real-IP $remote_addr;
     proxy_set_header        X-Forwarded-For $proxy_add_x_forwarded_for;
   }
 }
Save and close the file.
Verify the syntax and test Nginx for configuration errors.
$ sudo nginx -tRestart Nginx to load changes.
$ sudo service nginx restart
3. Security
By default, UFW is active on Ubuntu. Here's how to configure the firewall to allow HTTP and HTTPS access on the server.
Allow HTTP access on port
80.$ sudo ufw allow 80/tcpAllow HTTPS access on port
443.$ sudo ufw allow 443/tcpReload the Firewall rules to apply the changes.
$ sudo ufw reload
4. Configure HTTPS Access
Install the Certbot Let's Encrypt client.
$ sudo apt install python3-certbot python3-certbot-nginx -yRequest a free SSL certificate. Replace
joplin.example.comwith your fully-qualified domain name, andadmin@example.comwith your email address.$ sudo certbot -d joplin.example.com -m admin@example.comCertbot will request a new certificate, install it for your Nginx server, and set up an automatic renewal event. See our Certbot guide to learn more.
Restart Nginx to apply the changes.
$ sudo service nginx restart
5. Access the Joplin Server
Using a web browser, visit your subdomain to test the Joplin server.
https://joplin.example.comLog in to the Joplin server with the following default email and password.
- Email:
admin@localhost - Password:
admin
- Email:
Click your username, Admin, in the top right corner.
Edit your Administrator profile by filling in the Full name, Email, and Password fields. To ensure Joplin server security, enter a strong, hard-to-guess password and click Update Profile.
Click Admin on the main top bar navigation menu.
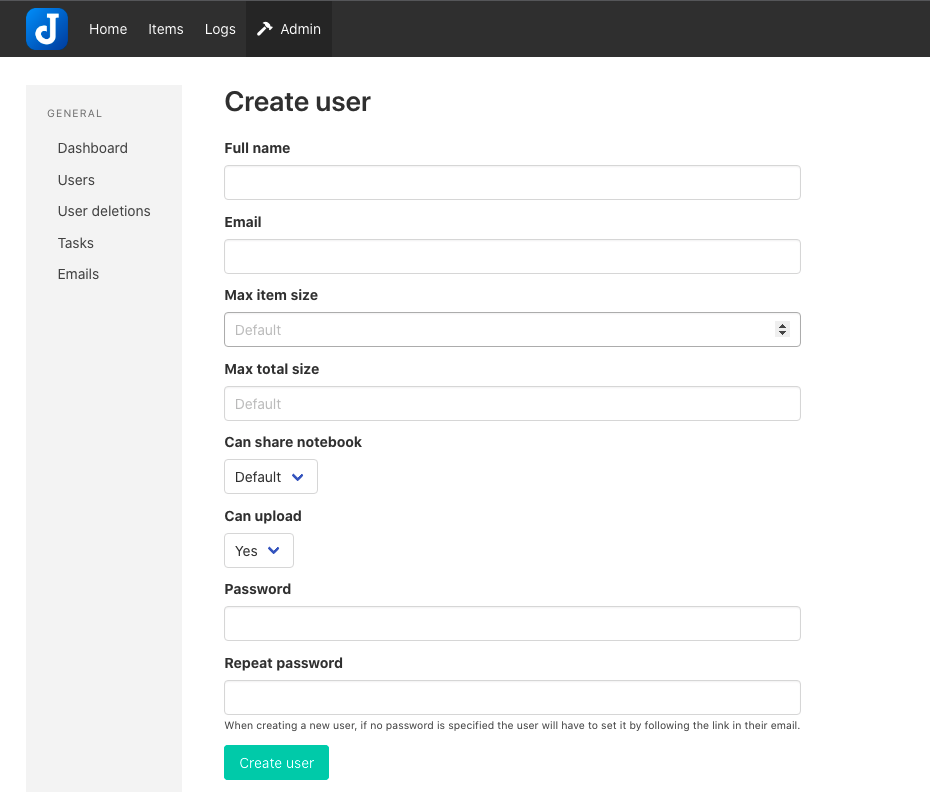
Navigate to Users, then click Add user to set up a new non-administrative account to sync with your Joplin Client.
Complete the user form and click Create user to save the new account.

6. Connect Joplin Clients to the Joplin Server
Joplin has clients available for desktop and mobile devices.
Install the Joplin client application from the official website.
Launch the Joplin client.
- Mac users should select the Preferences menu.
- Windows users select the Settings menu.
- Mobile users select the Configuration menu.
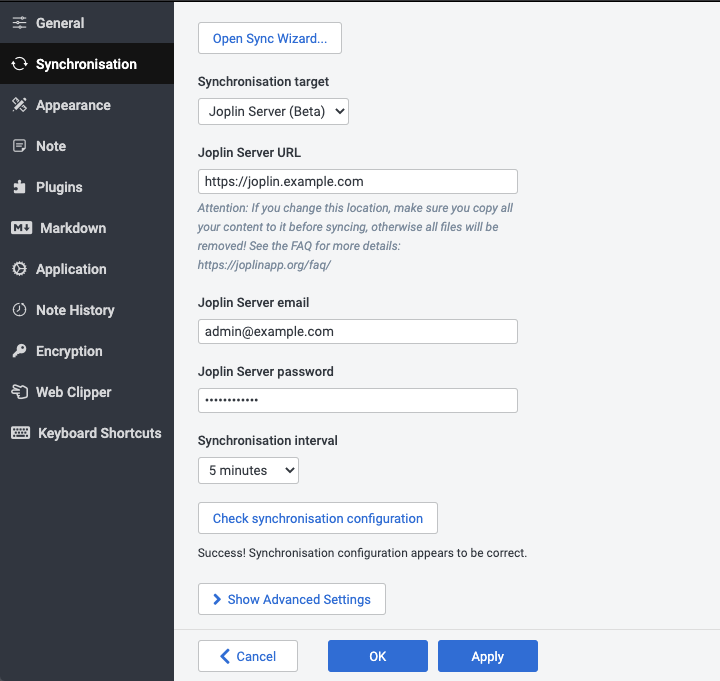
Navigate to the Synchronisation section.
Click the Synchronisation target dropdown.

Select Joplin Server from the list.
Enter your fully-qualified domain name in the Joplin Server URL field.
Enter your account email address in the Joplin Server email field.
Enter your password in the Joplin Server password field.
Set your preferred timing in the Synchronisation interval field.
Save your changes.
- Desktop users click Apply.
- Mobile users tap Check Synchronization Configuration.
7. Troubleshooting
You can test the Joplin Server host port from the command line with curl.
$ curl 127.0.0.1:8080Here are some common issues you may encounter, and how to handle them.
Bad Gateway
You may see this error:
502 Bad GatewayConfirm that the Joplin Server container is running and listening on the port assigned in your Docker Compose file. As an example, this article uses port 8080. Make sure Joplin Server is running on Docker and listening on the host port.
Invalid origin on 127.0.0.1
You may see an error message such as:
Invalid origin: http://127.0.0.1:8080Check the Docker logs for issues if you see this error.
$ sudo docker logs joplin-serverNot a valid URL
Another error you may see from the Joplin client is:
Error. Please check that URL, username, password, etc. are correct and that the sync target is accessible. The reported error was:
Not a valid URL: joplin.example.com/api/sessions
To fix this error, add https:// at the beginning of the URL, and verify you've used the correct username and password.
Invalid origin on fully-qualified domain name
Another error you may see is:
Invalid origin: https://joplin.example.comCheck the - APP_BASE_URL= environment variable in the Joplin Docker Compose file and verify the correct domain name is used to access the application. The correct variable should look like the one below. Replace joplin.example.com with your fully-qualified domain name.
- APP_BASE_URL=https://joplin.example.comMore Information
Conclusion
You have successfully hosted Joplin Server with Docker on Ubuntu and synchronized it with a Joplin Client application. You can set up several user accounts and keep them in sync with the server.