
How to Install Docker on Ubuntu 24.04
Docker is an open-source platform designed to automate application deployment, scaling, and management using containers. Containers are lightweight and portable executable packages that contain all the necessary resources required to run an application. A container includes the application code, runtime, libraries, and dependencies that ensure consistency when running the application.
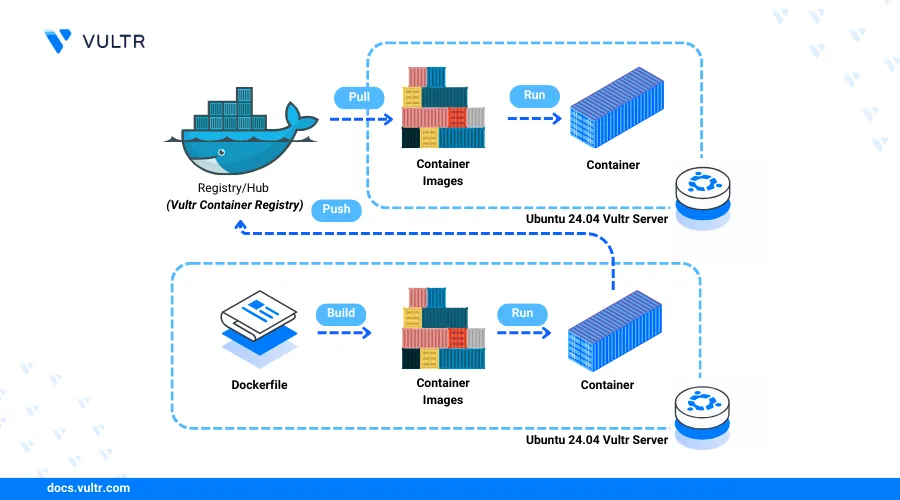
This article explains how to install Docker on an Ubuntu 24.04 server, run a containerized application, and deploy it to the Vultr Container Registry.
Prerequisites
Before you begin:
- Deploy an Ubuntu 24.04 server instance on Vultr.
- Access the server using SSH as a non-root user with sudo privileges.
- Update the server.
- Create a Vultr Container Registry subscription to store your Docker images.
Install Docker
Install all required dependency packages.
console$ sudo apt install apt-transport-https ca-certificates curl software-properties-common -y
Add the Docker GPG key to your server's keyring.
console$ sudo curl -fsSL https://download.docker.com/linux/ubuntu/gpg -o /etc/apfvt/keyrings/docker.asc
Add the latest Docker repository to your APT sources.
console$ echo "deb [arch=$(dpkg --print-architecture) signed-by=/etc/apt/keyrings/docker.asc] https://download.docker.com/linux/ubuntu $(. /etc/os-release && echo "$VERSION_CODENAME") stable" | sudo tee /etc/apt/sources.list.d/docker.list > /dev/null
Update the server package index.
console$ sudo apt update
Install Docker.
console$ sudo apt-get install docker-ce docker-ce-cli containerd.io docker-buildx-plugin docker-compose-plugin
The above command installs the latest Docker version with the following plugins:
docker-ce: The Docker engine community edition package.docker-ce-cli: Enables the Docker command line interface (CLI).containerd.io: A container runtime that monitors the lifecycle of Docker containers.docker-buildx-plugin: Improves Docker's image-building capabilities for multi-platform builds.docker-compose-plugin: Enables the management of multi-container Docker applications using YAML files.
View the installed Docker version on your server.
console$ sudo docker --version
Output:
Docker version 26.1.4, build 5650f9b
Manage the Docker System Service
Enable the Docker system service to start automatically at boot time.
console$ sudo systemctl enable docker
View the Docker service status and verify that it's running.
console$ sudo systemctl status docker
Output:
● docker.service - Docker Application Container Engine
     Loaded: loaded (/usr/lib/systemd/system/docker.service; enabled; preset: enabled)
     Active: active (running) since Mon 2024-06-17 21:07:25 UTC; 1min 2s ago
TriggeredBy: ● docker.socket
       Docs: https://docs.docker.com
   Main PID: 120312 (dockerd)
      Tasks: 8
     Memory: 34.5M (peak: 35.3M)
        CPU: 281ms
     CGroup: /system.slice/docker.service
             └─120312 /usr/bin/dockerd -H fd:// --containerd=/run/containerd/containerd.sock
Run the following command to stop Docker.
console$ sudo systemctl stop docker
Restart the Docker service.
console$ sudo systemctl restart docker
Add your non-root user to the
dockergroup to run Docker CLI commands without sudo privileges. Replacelinuxuserwith your actual username.console$ sudo usermod -aG docker linuxuser
Enable the new user group changes in your active session.
console$ newgrp docker
Run a Containerized Application
Docker runs containerized applications using local or remote container images from registries such as Docker Hub. Follow the steps below to run a sample Nginx containerized application to test Docker on your server.
Pull the latest Nginx image from Docker Hub.
console$ docker pull nginx:latest
View all Docker images on the server and verify that the Nginx image is available.
console$ docker images
Output:
REPOSITORY   TAG       IMAGE ID       CREATED       SIZE
nginx        latest    dde0cca083bc   2 weeks ago   188MB
Run a new Docker container using the image.
console$ docker run --name mynginx -d -p 80:80 nginx:latest
The above command runs a new Docker container on the server using your Nginx image with the following values:
--name mynginx: Sets the container name tomynginx.-d: Starts the container in detached mode as a background process on the server.-p 80:80: Maps the host port80to the container port80. This allows you to access the container using the host port on your server.nginx:latest: Sets the Docker image to use when creating the container.
List all the running containers on the server and verify that the new container is up.
console$ docker ps
Output:
CONTAINER ID   IMAGE          COMMAND                  CREATED         STATUS         PORTS                               NAMES
d79cad9ea8d2   nginx:latest   "/docker-entrypoint.…"   5 seconds ago   Up 4 seconds   0.0.0.0:80->80/tcp, :::80->80/tcp   mynginx
Allow the HTTP port
80through the firewall to enable connections to the port.console$ sudo ufw allow 80/tcp
Access your server IP address using a web browser such as Chrome to test access to the Docker container.
http://SERVER-IP
Deploy a Containerized Application to Vultr Container Registry
Docker supports public and private registries to build and deploy container images on your server. The Vultr Container Registry allows you to build Docker images, manage multiple versions, and distribute the images to different environments. Follow the steps below to tag and deploy your local Nginx image to the Vultr Container Registry using Docker.
Open the Vultr Console.
Access your Vultr Container Registry management panel and note the credentials to use when accessing the registry.
Access your server terminal session and run the following Docker command to login to the Vultr Container Registry. Replace
REGISTRY-NAME,REGISTRY-USERNAME, andREGISTRY-API-KEYwith your actual registry details.console$ docker login https://sjc.vultrcr.com/REGISTRY-NAME -u REGISTRY-USERNAME -p REGISTRY-API-KEY
Output:
Login SucceededTag your Nginx Docker image with your Vultr Container Registry.
console$ docker tag nginx:latest sjc.vultrcr.com/REGISTRY-NAME/mynginx:latest
View all Docker images on the server and verify that the new image is available.
console$ docker images
Output:
REPOSITORY                                       TAG       IMAGE ID       CREATED       SIZE
nginx                                             latest    dde0cca083bc   2 weeks ago   188MB
sjc.vultrcr.com/REGISTRY-NAME/mynginx             latest    dde0cca083bc   2 weeks ago   188MB
Push the tagged image to your Vultr Container Registry.
console$ docker push sjc.vultrcr.com/REGISTRY-NAME/mynginx:latest
Output:
The push refers to repository [sjc.vultrcr.com/REGISTRY-NAME/mynginx]
latest: digest: sha256:2bcabc23b45489fb583a2c1cb4a9dbb1f902fb08 size: 1234
Access your Vultr Container Registry management panel.
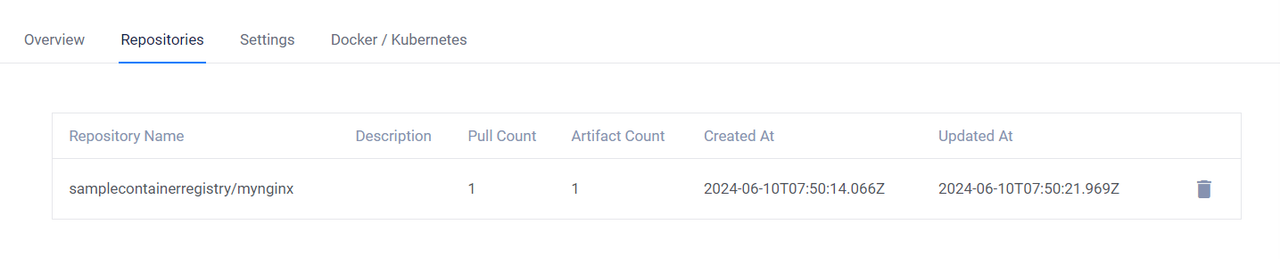
Navigate to the Repositories tab and verify that the new Docker image is available.
Run the following command to pull the image from the Vultr Container Registry.
console$ docker pull sjc.vultrcr.com/REGISTRY-NAME/mynginx:latest
Conclusion
You have installed Docker on Ubuntu 24.04, run a containerized application, and deployed local container images to the Vultr Container Registry. You can run multiple Docker images on your server and securely access them on your server without accessing the container environment directly. For more information, visit the Docker reference documentation.