
How to Install Caddy Webserver on FreeBSD 14.0
Introduction
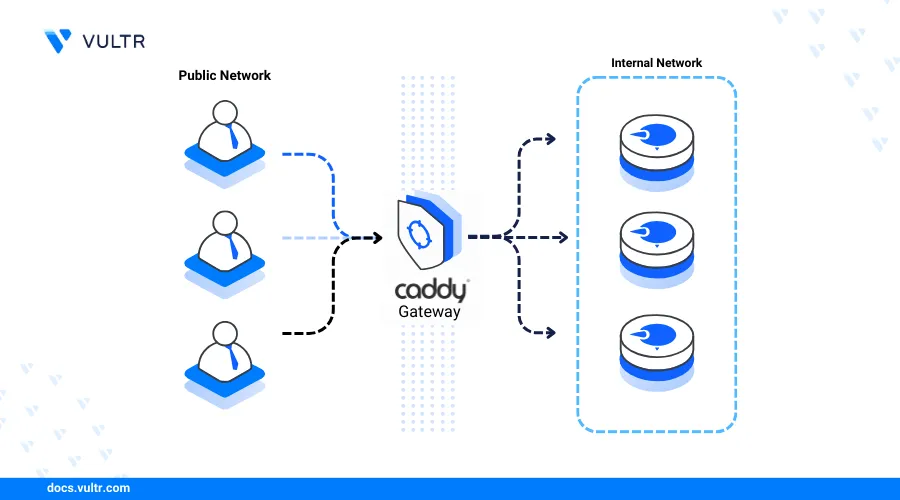
Caddy is an open-source modern web server application that enables the delivery of static sites, services or web applications with automatic SSL termination. Caddy can function as a web server, load balancer, or reverse proxy to deliver web applications or services using site blocks. A Caddyfile configuration contains directives with specific site blocks that use ports, IP addresses, or domains.
This article explains how to install the Caddy web server on FreeBSD 14.0 and create virtual hosts using site blocks to securely deliver web applications.
Prerequisites
Before you begin:
- Deploy a FreeBSD 14.0 instance on Vultr.
- Create a domain A record pointing to the instance's IP address. For example,
app.example.com. - Access the server using SSH.
- Create a non-root user with sudo privileges and switch to the user.
Install Caddy
Caddy is available in the default FreeBSD 14.0 package repositories with the latest version information. You can also install a specific version using the FreeBSD ports collection or build and compile the application's source code. Follow the steps below to install Caddy using the default pkg package manager on your server.
Update the server's package index.
console$ sudo pkg update
Install Caddy.
console$ sudo pkg install -y caddy
View the installed Caddy version on your server.
console$ caddy -v
Your output should be similar to the one below:
v2.7.6
Manage the Caddy System Service
The Caddy system service does not automatically start on your FreeBSD server after installation. Follow the steps below to enable Caddy to start at system boot and manage the web server processes.
Enable the Caddy service to automatically start at system boot.
console$ sudo service caddy enable
Start the Caddy service.
console$ sudo service caddy start
View the Caddy service status to verify that the application is running.
console$ sudo service caddy status
Output:
caddy is running as pid 1476.Stop the Caddy service.
console$ sudo service caddy stop
Restart the Caddy service.
console$ sudo service caddy restart
Create a new Caddy Virtual Host
Caddy uses a Caddyfile configuration to store virtual hosts as site blocks on your server. The default /usr/local/etc/caddy/Caddyfile configuration contains virtual host directives that serve web applications using the default web root directory /usr/local/www/Caddy. Follow the steps below to create a new Caddy virtual host to deliver web application files on your server.
Back up the default Caddyfile configuration on your server.
console$ sudo mv /usr/local/etc/caddy/Caddyfile /usr/local/etc/caddy/Caddyfile.ORIG
Create a new Caddyfile configuration using a text editor such as
vi.console$ sudo vi /usr/local/etc/caddy/Caddyfile
Add the following configurations to the file. Replace
app.example.comwith your actual domain.iniapp.example.com { root * /usr/local/www/app.example.com file_server }
Save and close the file.
The above Caddy site block configuration creates a new virtual host that listens for connection requests using your domain
app.example.comto deliver web application files from the/usr/local/www/app.example.comdirectory. Within the configuration:app.example.com: Creates a new site block using your virtual host domainapp.example.com.root: Sets the web root directory to deliver web application files.file_server: Enables the built-in file server to deliver static files from the web root directory.
Validate the Caddy configuration to test for syntax errors.
console$ sudo caddy validate --config /usr/local/etc/caddy/Caddyfile
Your output should be similar to the one below when successful:
.....
2024/06/30 13:25:01.292 INFO    tls.cache.maintenance   started background certificate maintenance      {"cache": "0x1dc0003b0000"}
2024/06/30 13:25:01.293 INFO    tls.cache.maintenance   stopped background certificate maintenance      {"cache": "0x1dc0003b0000"}
Valid configuration
Create the virtual host's web root directory
/usr/local/www/app.example.comto store your web application files.console$ sudo mkdir -p /usr/local/www/app.example.com
Create a new sample HTML application file
index.html.console$ sudo vi /usr/local/www/app.example.com/index.html
Add the following contents to the file.
html<html> <head><title>Greetings from Vultr</title></head> <body> <h1 style="margin: 100px auto; text-align: center"> Hello World! Greetings from Vultr </h1> </body> </html>
Save and close the file.
The above HTML application displays a
Greetings from Vultrmessage when accessed in a web browser.Reload the Caddy service to apply your configuration changes.
console$ sudo service caddy reload
Access your domain using a web browser such as Chrome and verify that your HTML application displays.
https://app.example.com
Secure the Caddy Web Server
Caddy automatically enables HTTPS using trusted Let's Encrypt SSL certificates for all valid domain site blocks in your Caddyfile configuration. Follow the steps below to use the FreeBSD ipfw firewall utility to enable connections to the Caddy HTTP port 80, and HTTPS port 443 on your server.
Enable the
ipfwfirewall service to automatically start at system boot.console$ sudo sysrc firewall_enable="YES"
Output:
firewall_enable: NO -> YESSet the
ipfwfirewall debug messages mode to quiet.console$ sudo sysrc firewall_quiet="YES"
Output:
firewall_quiet: NO -> YESSet the firewall mode to
workstationto use stateful rules.console$ sudo sysrc firewall_type="workstation"
Output:
firewall_type: UNKNOWN -> workstationAllow connections to the SSH, HTTP, and HTTPS ports through the firewall configuration.
console$ sudo sysrc firewall_myservices="ssh/tcp http/tcp https/tcp"
Output:
firewall_myservices: -> ssh/tcp http/tcp https/tcpAllow connection requests from any IP address.
console$ sudo sysrc firewall_allowservices="any"
Output
firewall_allowservices: -> anyStart the
ipfwfirewall service.console$ sudo service ipfw start
Output:
SSH, HTTP, and HTTPS ports.
Conclusion
You have installed the Caddy web server on FreeBSD 14.0 and created a virtual host to deliver web applications on your server. Caddy automatically enables automatic HTTPS connections using valid SSL certificates that auto-renew every 90 days. You can host multiple web applications, set up a reverse proxy, or load balance between multiple applications using Caddy on your server. For more information and configuration options, visit the Caddy documentation.