
How to Install Jupyter Notebook on Ubuntu 24.04

Jupyter Notebook is a popular open-source web interface that allows used to create and share documents containing live code, visualizations, and narrative text. It's widely used in data science, machine learning, and academic research for its ease of use and interactive capabilities.
This article explains how to install Jupyter Notebook on Ubuntu 24.04. You will configure the Jupyter notebook for remote access and set it up to run automatically as a systemd service on boot.
Prerequisites
Before you begin, you need to:
- Have access to an Ubuntu 24.04 instance as a non-root user with
sudoprivileges.
Install Jupyter Notebook on Ubuntu 24.04
There are multiple ways to install Jupyter Notebook on Ubuntu 24.04. You can install Jupyter Notebook with methods, including the following.
- Pip.
- APT package manager.
- Anaconda.
This method uses Python’s pip package manager to install Jupyter Notebook in an isolated virtual environment. It allows you to manage dependencies without interfering with system packages. Follow the steps below to install Jupyter Notebook using Pip.
Update APT package index..
console$ sudo apt update
Install the
virtualenvpackage:console$ sudo apt install python3-virtualenv -y
Create a new virtual environment named
jupyter_env.console$ virtualenv jupyter_env
Activate the virtual environment.
console$ source jupyter_env/bin/activate
Install Jupyter Notebook using
pip.console$ pip install jupyter
Verify the installed Jupyter Notebook version.
console$ jupyter-notebook --version
You can deactivate the virtual environment anytime by running
deactivate.
This method installs Jupyter Notebook using Ubuntu's default APT package manager. The version available through APT may be outdated and may not include newer features. If you require the latest tools or extensions, consider using Pip or Anaconda instead. Follow the steps below to install Jupyter Notebook using APT.
Update the package list.
console$ sudo apt update
Install Jupyter Notebook.
console$ sudo apt install jupyter-notebook -y
Verify the installed Jupyter Notebook version.
console$ jupyter-notebook --version
Anaconda is a popular Python distribution designed for data science and machine learning. It includes Jupyter Notebook along with many pre-installed libraries and tools. This method is ideal if you already use Anaconda or want a complete data science environment out of the box. Follow the steps below to install Jupyter Notebook using Anaconda.
Install Anaconda if it's not installed on your workstation.
Create a new
jupyter_envConda environment with Python.console$ conda create -n jupyter_env python=3.10
Press
yandENTERwhen prompted to proceed.Proceed ([y]/n)? y
Activate the
jupyter_envenvironment.console$ conda activate jupyter_env
Install Jupyter Notebook.
console$ conda install jupyter notebook
Confirm when prompted.
Proceed ([y]/n)? y
Verify the installed Jupyter Notebook version
console$ jupyter-notebook --version
Access Jupyter Notebook Locally
To access Jupyter Notebook from your local machine, first configure the application, then establish an SSH tunnel to securely forward the port. Follow the steps below to configure Jupyter Notebook and set up port forwarding to access the application locally.
Generate a Jupyter configuration file.
console$ jupyter notebook --generate-config
The above command generates a configuration file
~/.jupyter/jupyter_notebook_config.py.Open the configuration file.
console$ nano ~/.jupyter/jupyter_notebook_config.py
Add the following configuration below the line
c = get_config() #noqato thejupyter_notebook_config.pyfile depending on your installation method.If you installed Jupyter using
pipor Anaconda, use:pythonc.ServerApp.open_browser = False # Prevent it from opening a browser on the server c.ServerApp.allow_remote_access = True # Allow external access
Save and exit (Ctrl + X, then Y, then hit Enter).
If you installed Jupyter using
apt, use:pythonc.NotebookApp.open_browser = False # Prevent it from opening a browser on the server c.NotebookApp.allow_remote_access = True
Launch Jupyter Notebook.
console$ jupyter notebook
Output:
.........................................
[I 2025-04-02 16:25:34.253 ServerApp] Jupyter Server 2.15.0 is running at:
[I 2025-04-02 16:25:34.253 ServerApp] http://localhost:8888/tree?token=65e7d4f05956703d40b2d01e1e43fa89da8df82e1824e711
[I 2025-04-02 16:25:34.253 ServerApp]     http://127.0.0.1:8888/tree?token=65e7d4f05956703d40b2d01e1e43fa89da8df82e1824e711
[I 2025-04-02 16:25:34.253 ServerApp] Use Control-C to stop this server and shut down all kernels (twice to skip confirmation).
[C 2025-04-02 16:25:34.256 ServerApp]
Copy the full tokenized URL and paste it into your local browser to access the Jupyter interface. The token provides secure access to the Notebook server without a password.
http://127.0.0.1:8888/tree?token=xxxxxxxxxxxxxxxxxxxxxxxxxxxxRun the following command to create an SSH tunnel on your local workstation to forward traffic from the remote server port
8888to your localhost port8888.console$ ssh -M -f -N -L 8888:localhost:8888 linuxuser@<SERVER-IP>
Replace
linuxuserwith your sudo username and<SERVER-IP>with your server's IP address. Within the above command.-M: Enables SSH connection monitoring.-f: Runs the command in the background after authentication.-N: Prevents remote command execution.-L 8888:localhost:8888: Binds local port8888to the remote server’s port8888.
Open Jupyter Notebook using the access token you generated earlier.
http://127.0.0.1:8888/tree?token=xxxxxxxxxxxxxxxxxxxxxxxxxxxxxxxxxxxxxClick New and select Python 3 (ipykernel) to start a new notebook.
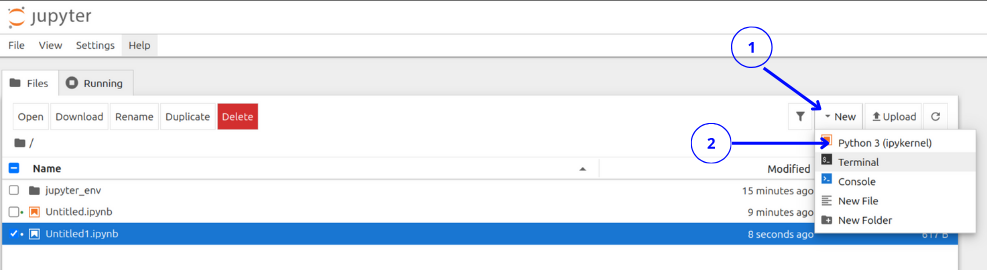
Click Select to confirm the Python kernel.
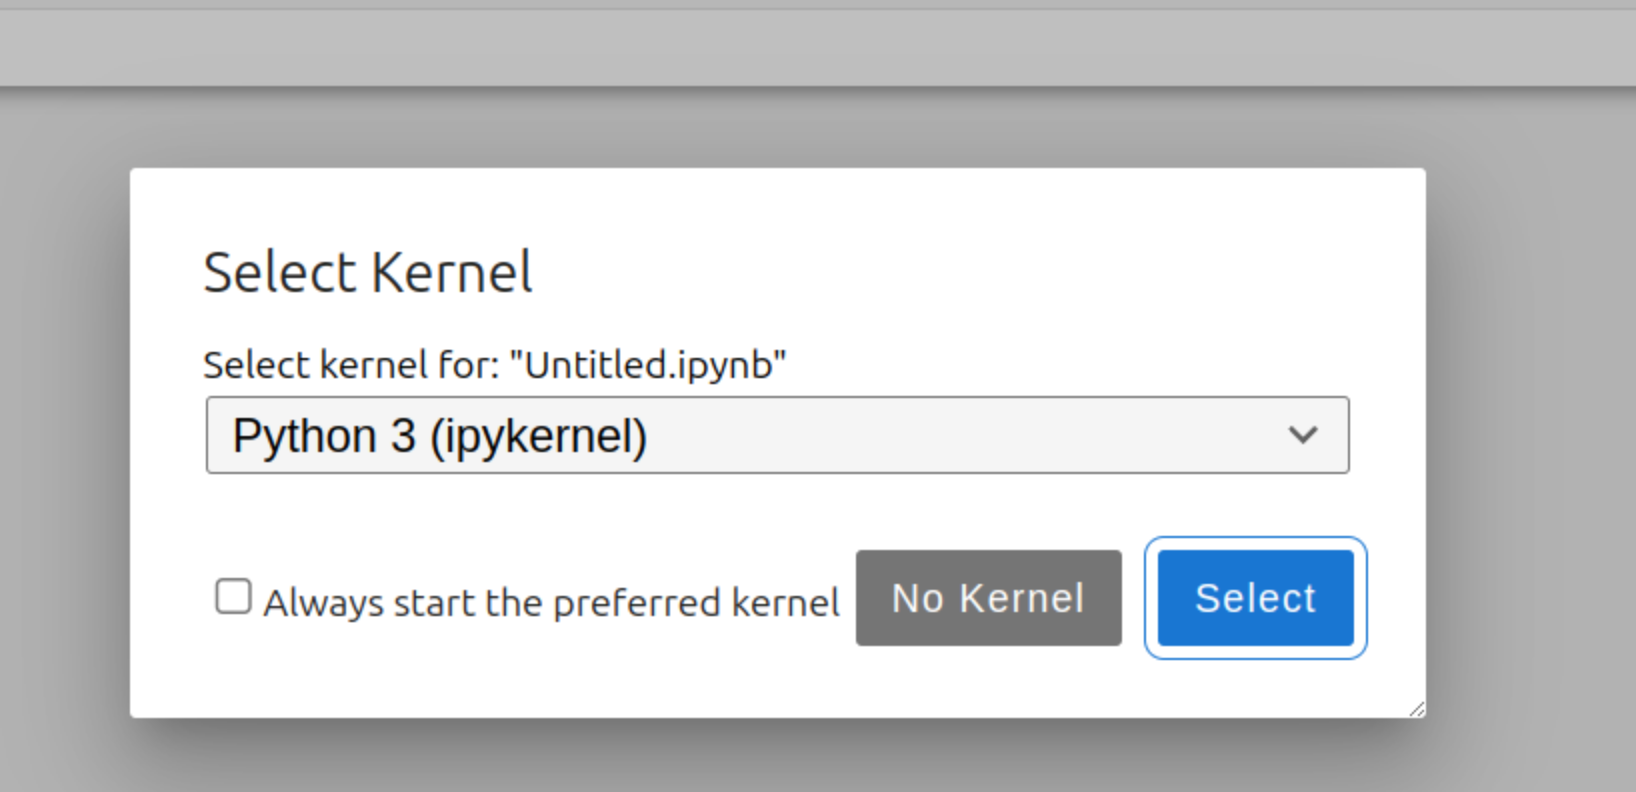
Test the Notebook by typing a simple arithmetic operation (like 100 + 20) and press Shift + Enter to run the cell.
 Note
Note
This article uses SSH tunneling, which doesn’t require opening ports. However, if you plan to expose Jupyter directly without tunneling, run thejupyter notebook --ip=0.0.0.0command open and manually allow the port using thesudo ufw allow 8888/tcpcommand.
Create a Jupyter Notebook System Service
You can configure Jupyter Notebook to launch automatically on system startup using a systemd service. The setup differs slightly based on how you installed Jupyter. Follow the steps below to set up a new Jupyter Notebook system service to automatically start it at boot.
Create a new
jupyter.servicesystem service file usingnano.console$ sudo nano /etc/systemd/system/jupyter.service
Add the appropriate configurations to the file depending on your installation method. Replace
linuxuserwith your actual sudo user and adjust any paths as needed.For pip (virtual environment) installation.
ini[Unit] Description=Jupyter notebook (pip Virtual Environment) After=network.target [Service] Type=simple User=linuxuser Group=linuxuser WorkingDirectory=/home/linuxuser ExecStart=/home/linuxuser/jupyter_env/bin/python -m jupyter notebook Restart=always RestartSec=10 [Install] WantedBy=multi-user.target
For Anaconda installation.
ini[Unit] Description=Jupyter Notebook (Anaconda Installation) After=network.target [Service] Type=simple User=linuxuser Group=linuxuser WorkingDirectory=/home/linuxuser ExecStart=/bin/bash -c ". /home/linuxuser/anaconda3/etc/profile.d/conda.sh && conda activate jupyter_env && exec jupyter-notebook --config=/home/linuxuser/.jupyter/jupyter_notebook_config.py" Restart=always RestartSec=10 [Install] WantedBy=multi-user.target
For APT-based installation.
ini[Unit] Description=Jupyter Notebook (apt Installation) After=network.target [Service] Type=simple User=linuxuser Group=linuxuser WorkingDirectory=/home/linuxuser ExecStart=/usr/bin/jupyter-notebook --config=/home/linuxuser/.jupyter/jupyter_notebook_config.py Restart=always RestartSec=10 [Install] WantedBy=multi-user.target
Save and close the file.
Reload
systemdto apply the new service changes.console$ sudo systemctl daemon-reload
Enable the service so it runs at boot.
console$ sudo systemctl enable jupyter
Start the Jupyter Notebook service.
console$ sudo systemctl start jupyter
Check the service status and verify that it's running.
console$ sudo systemctl status jupyter
Your output should be similar to the one below.
● jupyter.service - Jupyter notebook (pip Virtual Environment)
    Loaded: loaded (/etc/systemd/system/jupyter.service; enabled; preset: enab>
    Active: active (running) since Thu 2025-04-03 11:32:11 UTC; 8s ago
Main PID: 9961 (jupyter-notebook)
    Tasks: 1 (limit: 1057)
    Memory: 64.5M (peak: 64.7M)
        CPU: 1.791s
    CGroup: /system.slice/jupyter.service
            └─9961 /home/linuxuser/jupyter_env/bin/python /home/linuxuser/jupyte>
If you run Jupyter as
root, it can create files that are only accessible by root. If the systemd service fails to start or throws permission errors, check the ownership of these files and change them back to your non-root sudo user.
Conclusion
You have installed Jupyter Notebook on Ubuntu 24.04 using three different methods: pip, APT, and Anaconda. Each method serves a different use case, so you can choose the one that best fits your workflow. You also configured Jupyter Notebook for local browser access using SSH port forwarding and set it up to run on boot with a systemd service. Use pip if you want a lightweight, isolated environment, APT for system-managed installations, and Anaconda if you're working with data science tools out of the box.