
How to Install Longhorn on Kubernetes
Introduction
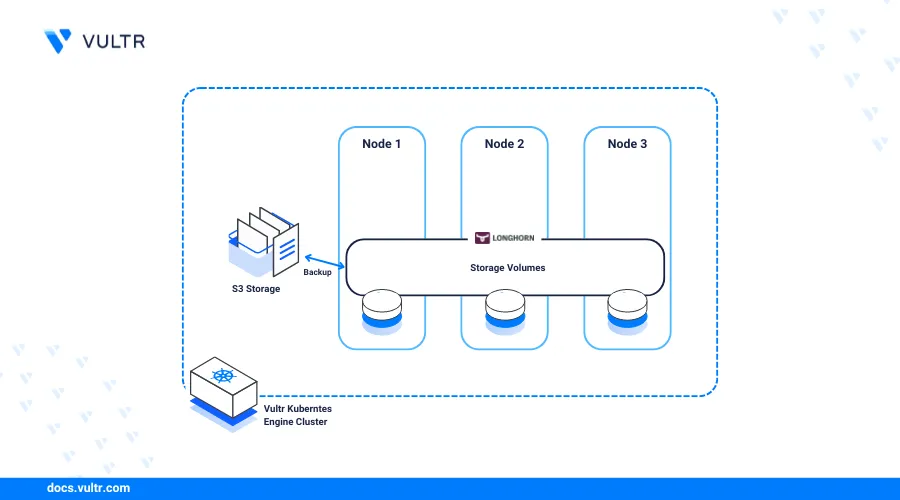
Longhorn is an open-source lightweight distributed block storage system for Kubernetes that provides persistent storage for stateful applications in a cluster. Longhorn volumes offer scalable and highly available block storage attached to your worker nodes with support for multiple access modes in your Kubernetes cluster.
In a Kubernetes cluster, Longhorn runs with the following major components:
- Longhorn UI: A graphical web interface you can use to view, create, manage, and back up Longhorn volumes in a Kubernetes cluster.
- Longhorn Instance Manager: Runs on each node within the Kubernetes cluster and enables functions such as replication, snapshots, instance management, node failure detection, and scheduling.
- Longhorn Engine: The data plane component that reads and writes data to the dedicated storage controller on each block device volume. Every Longhorn volume has a corresponding engine instance that replicates data and creates backups or snapshots on multiple nodes.
- Longhorn CSI (Container Storage Interface) Driver: Enables Longhorn as a storage provider in a Kubernetes cluster and translates volume operations into Longhorn actions. It uses the value
driver.longhorn.ioreferenced by resources such as StorageClasses to handle volume requests.
This article explains how to deploy Longhorn on Kubernetes and create a distributed storage system available to multiple resources such as Pods within your cluster. You will also backup Longhorn volumes to Vultr Object Storage to enable data recovery or create new disaster recovery volumes.
Prerequisites
Before you begin:
- Deploy a Vultr Kubernetes Engine cluster with at least
3nodes and4 vCPUsper node. - Deploy Vultr Object Storage and create a new bucket
longhornto store your volume backups. - Deploy an instance running Debian on Vultr to use as the cluster management workstation.
- Access the server using SSH as a non-root user with sudo privileges.
- Install and configure Kubectl with your VKE configuration to access the cluster on your server.
Install Longhorn on Kubernetes
You can install Longhorn on your Kubernetes cluster using the Helm package manager or Kubectl. To install the latest version compatible with most Kubernetes cluster versions, use Kubectl to specify a target version number and modify any configuration information in your cluster. Follow the steps below to install the latest Longhorn version using Kubectl and verify all available cluster resources.
Download the latest Longhorn release file using
wget.console$ wget https://github.com/longhorn/longhorn/releases/download/v1.6.1/longhorn.yaml
The above command downloads the Longhorn version
1.6.1, visit the official project GitHub repository to verify the latest version to deploy in your Kubernetes cluster.List files and verify that a new
longhorn.yamlfile is available in your working directory.console$ lsOutput:
longhorn.yamlDeploy Longhorn to your Kubernetes cluster using the latest
longhorn.yamlfile.console$ kubectl apply -f longhorn.yaml
When the installation is successful, your output should look like the one below.
customresourcedefinition.apiextensions.k8s.io/systemrestores.longhorn.io created
customresourcedefinition.apiextensions.k8s.io/volumes.longhorn.io created
customresourcedefinition.apiextensions.k8s.io/volumeattachments.longhorn.io created
clusterrole.rbac.authorization.k8s.io/longhorn-role created
clusterrolebinding.rbac.authorization.k8s.io/longhorn-bind created
clusterrolebinding.rbac.authorization.k8s.io/longhorn-support-bundle created
service/longhorn-backend created
service/longhorn-frontend created
service/longhorn-conversion-webhook created
service/longhorn-admission-webhook created
service/longhorn-recovery-backend created
service/longhorn-engine-manager created
service/longhorn-replica-manager created
daemonset.apps/longhorn-manager created
deployment.apps/longhorn-driver-deployer created
deployment.apps/longhorn-ui created
View all Longhorn resources deployed in the new
longhorn-systemnamespace and verify that they are running correctly in your cluster.console$ kubectl get all -n longhorn-system
Output:
NAME                                                    READY   STATUS    RESTARTS      AGE
pod/csi-attacher-57689cc84b-tlzpb                       1/1     Running   0             73s
pod/longhorn-csi-plugin-lp562                           3/3     Running   1 (15s ago)   73s
pod/longhorn-ui-655b65f7f9-lgllp                        1/1     Running   0             98s

NAME                                  TYPE        CLUSTER-IP       EXTERNAL-IP   PORT(S)    AGE
service/longhorn-admission-webhook    ClusterIP   10.100.203.235   <none>        9502/TCP   103s
service/longhorn-backend              ClusterIP   10.110.4.220     <none>        9500/TCP   104s

NAME                                      DESIRED   CURRENT   READY   UP-TO-DATE   AVAILABLE   NODE SELECTOR   AGE
daemonset.apps/engine-image-ei-5cefaf2b   3         3         3       3            3           <none>          84s
daemonset.apps/longhorn-csi-plugin        3         3         3       3            3           <none>          74s
daemonset.apps/longhorn-manager           3         3         3       3            3           <none>          100s

NAME                                       READY   UP-TO-DATE   AVAILABLE   AGE
deployment.apps/csi-attacher               3/3     3            3           74s
deployment.apps/csi-provisioner            3/3     3            3           74s
deployment.apps/csi-resizer                3/3     3            3           74s

NAME                                                  DESIRED   CURRENT   READY   AGE
replicaset.apps/csi-attacher-57689cc84b               3         3         3       74s
replicaset.apps/csi-provisioner-6c78dcb664            3         3         3       74s
replicaset.apps/csi-resizer-7466f7b45f                3         3         3       74s
Install the latest Longhorn NFS package to enable the creation of ReadWriteMany (RWX) volumes in your cluster.
console$ kubectl apply -f https://raw.githubusercontent.com/longhorn/longhorn/v1.6.1/deploy/prerequisite/longhorn-nfs-installation.yaml
Verify that the Longhorn NFS pods are created and running in your cluster.
console$ kubectl get pods | grep longhorn-nfs-installation
Output:
longhorn-nfs-installation-2kd6d   1/1     Running   0          43s
longhorn-nfs-installation-52kgg   1/1     Running   0          43s
longhorn-nfs-installation-qsst9   1/1     Running   0          43s
Create a Longhorn Storage Class
Longhorn uses the default longhorn StorageClass to deploy volumes in your Kubernetes cluster. Depending on your cluster workloads, create a new StorageClass to use when applying new PVCs to communicate with the Longhorn CSI driver and deploy new volumes using the Longhorn manager. In the following sections, create separate StorageClasses to use when attaching different access modes to PVCs in your cluster.
ReadWriteOnly (RWO) StorageClass
Persistent Volume Claims (PVCs) use the ReadWriteOnly (RWO) access mode to mount a volume with read-write privileges on a single pod at a time. RWO does not support volume sharing and restricts all read-write privileges to a single pod at a time. It's suitable for applications that require data consistency such as databases that consistently write data on shared volumes. Follow the steps below to create a new RWO StorageClass to use in your cluster.
Create a new StorageClass file
rwo-storageclass.yamlusing a text editor such as Nano.console$ nano rwo-storageclass.yaml
Add the following configurations to the file.
yamlkind: StorageClass apiVersion: storage.k8s.io/v1 metadata: name: longhorn-prod provisioner: driver.longhorn.io allowVolumeExpansion: true parameters: numberOfReplicas: "3" staleReplicaTimeout: "2880" # 48 hours in minutes fromBackup: "" fsType: "ext4" reclaimPolicy: Retain
Save and close the file.
The above configuration creates a new expandable StorageClass
longhorn-prodwith aretainpolicy that keeps a storage volume active even when the associated PVC is deleted. Within the configuration:provisioner: Sets the persistent volume (PV) provisioning driver. The valuedriver.longhorn.iouses the required Longhorn engine to deploy and manage volumes while a value such asblock.csi.vultr.comdeploys PVs with Vultr Block Storage that are not compatible with the Longhorn manager.allowVolumeExpansion: Enables capacity modification of Longhorn volumes in a cluster. For example, a10 GBvolume can expand to20 GBor more depending on your needs.numberOfReplicas: Sets the number of Longhorn volume replicas to deploy and attach to your cluster nodes.staleReplicaTimeout: Creates a time-out value to mark a Longhorn volume as dormant when the specified activity time expires.fromBackup: Recovers a Longhorn volume from your backup source such as Vultr Object Storage.fsType: Sets the Longhorn volume file system format.reclaimPolicy: Specifies the Longhorn volume action to apply when a PVC or PV associated with the class is deleted. Longhorn volumes supportdeleteandretainpolicies.
Apply the StorageClass to your cluster.
console$ kubectl apply -f rwo-storageclass.yaml
View all StorageClasses in your cluster and verify that your new RWO class is available.
console$ kubectl get storageclass
Output:
NAME                                PROVISIONER           RECLAIMPOLICY   VOLUMEBINDINGMODE   ALLOWVOLUMEEXPANSION   AGE
longhorn (default)                  driver.longhorn.io    Delete          Immediate           true                   35m
longhorn-prod                       driver.longhorn.io    Retain          Immediate           true                   4s
vultr-block-storage                 block.csi.vultr.com   Delete          Immediate           true                   46m
ReadWriteMany (RWX) StorageClass
ReadWriteMany (RWX) allows multiple pods to simultaneously mount a volume with read-write privileges in your Kubernetes cluster. It supports volume sharing and enables pods to access shared data making it suitable for most applications in your cluster. Follow the steps below to create a new StorageClass you can use with ReadWriteMany (RWX) PVCs in your cluster.
Create a new StorageClass file
rwx-storageclass.yaml.console$ nano rwx-storageclass.yaml
Add the following configurations to the file.
yamlkind: StorageClass apiVersion: storage.k8s.io/v1 metadata: name: longhorn-rwx provisioner: driver.longhorn.io allowVolumeExpansion: true reclaimPolicy: Delete volumeBindingMode: Immediate parameters: numberOfReplicas: "3" staleReplicaTimeout: "2880" fromBackup: "" fsType: "ext4" nfsOptions: "vers=4.2,noresvport,softerr,timeo=600,retrans=5,rw,hard" reclaimPolicy: Retain
Save and close the file.
The above configuration creates a new ReadWriteMany (RWX) StorageClass
longhorn-rwxthat uses Longhorn NFS to mount share-manager pods and enable simultaneous read-write privileges for multiple pods in your cluster.nfsOptionsis the major specification difference that enables additional Longhorn NFS options when creating ReadWriteMany (RWX) volumes.Apply the StorageClass configuration to your Kubernetes cluster.
console$ kubectl apply -f rwx-storageclass.yaml
View the cluster StorageClasses and verify that the new RWX class is available.
console$ kubectl get storageclass
Output:
NAME                                PROVISIONER           RECLAIMPOLICY   VOLUMEBINDINGMODE   ALLOWVOLUMEEXPANSION   AGE
longhorn (default)                  driver.longhorn.io    Delete          Immediate           true                   36m
longhorn-prod                      driver.longhorn.io    Retain          Immediate           true                   46s
longhorn-rwx                        driver.longhorn.io    Retain          Immediate           true                   9s
vultr-block-storage                 block.csi.vultr.com   Delete          Immediate           true                   47m
Create Persistent Volume Claims (PVCs)
Longhorn manager dynamically creates new Longhorn volumes as Persistent Volumes (PVs) whenever new Persistent Volume Claims (PVCs) reference your StorageClass. Follow the sections below to create new PVCs with the Read Write Once (RWO) or Read Write Many (RWX) access mode to mount as the storage volumes for Pods in your cluster.
Read Write Once (RWO) PVC
Create a new PVC resource configuration file
rwo-pvc.yaml.console$ nano rwo-pvc.yaml
Add the following configurations to the file.
yamlapiVersion: v1 kind: PersistentVolumeClaim metadata: name: test-rwo spec: accessModes: - ReadWriteOnce storageClassName: longhorn-prod resources: requests: storage: 10Gi
Save and close the file.
The above configuration creates a new PVC
test-rwothat references thelonghorn-prodStorageClass to create a10 GBLonghorn volume when the PVC is mounted by a Pod in the cluster.Apply the PVC to your cluster.
console$ kubectl apply -f rwo-pvc.yaml
View all cluster PVCs and verify that the new resource is available with a
Boundstatus.console$ kubectl get pvc
Output:
NAME       STATUS   VOLUME                                     CAPACITY   ACCESS MODES   STORAGECLASS    VOLUMEATTRIBUTESCLASS   AGE
test-rwo   Bound    pvc-4026f8d2-873c-429b-8068-208b26a75692   10Gi       RWO            longhorn-prod   <unset>                 4s
Based on the above output, a
Boundstate means the PVC storage request is successful and a Longhorn volumepvc-4026f8d2-873c-429b-8068-208b26a75692is successfully created. The CAPACITY column includes the Longhorn volume capacity while ACCESS MODES includes the access mode the volume supports.View all PVs in your cluster and verify that a new Longhorn volume is available.
console$ kubectl get pv
Output:
NAME                                       CAPACITY   ACCESS MODES   RECLAIM POLICY   STATUS   CLAIM              STORAGECLASS    VOLUMEATTRIBUTESCLASS   REASON   AGE
pvc-4026f8d2-873c-429b-8068-208b26a75692   10Gi       RWO            Retain           Bound    default/test-rwo   longhorn-prod   <unset>                          8s
Based on the above output, a new Longhorn volume
pvc-4026f8d2-873c-429b-8068-208b26a75692is available with10Gicapacity and RWO access based on the PVC specifications.You have created a ReadWriteOnce PVC in your cluster and provisioned a new Longhorn volume. Based on the configuration, Pods in your cluster can mount the PVC as a storage volume but only a single pod can mount, read and write data on the Longhorn volume at a time.
Read Write Many (RWX) PVC
Create a new RWX PVC resource file
rwx-pvc.yaml.console$ nano rwx-pvc.yaml
Add the following configurations to the file.
yamlapiVersion: v1 kind: PersistentVolumeClaim metadata: name: rwx-pvc spec: accessModes: - ReadWriteMany storageClassName: longhorn-rwx resources: requests: storage: 20Gi
Save and close the file.
The above configuration creates a ReadWriteMany (RWX) PVC
rwx-pvcthat references thelonghorn-rwxStorageClass to provision a new20 GBLonghorn volume when a Pod mounts the PVC as the storage volume.Apply the resource to your cluster.
console$ kubectl apply -f rwx-pvc.yaml
View all PVCs in your cluster and verify that the new RWX PVC is available with a
Boundstatus.console$ kubectl get pvc
Output:
NAME       STATUS   VOLUME                                     CAPACITY   ACCESS MODES   STORAGECLASS    VOLUMEATTRIBUTESCLASS   AGE
rwx-pvc    Bound    pvc-509f254e-255d-4aee-bdc1-8c10c6cc49f5   20Gi       RWX            longhorn-rwx    <unset>                 7s
test-rwo   Bound    pvc-4026f8d2-873c-429b-8068-208b26a75692   10Gi       RWO            longhorn-prod   <unset>                 3m10s
View all PVs in your cluster and verify that a new Longhorn volume is available.
console$ kubectl get pv
Output:
NAME                                       CAPACITY   ACCESS MODES   RECLAIM POLICY   STATUS   CLAIM              STORAGECLASS    VOLUMEATTRIBUTESCLASS   REASON   AGE
pvc-4026f8d2-873c-429b-8068-208b26a75692   10Gi       RWO            Retain           Bound    default/test-rwo   longhorn-prod   <unset>                          3m31s
pvc-509f254e-255d-4aee-bdc1-8c10c6cc49f5   20Gi       RWX            Retain           Bound    default/rwx-pvc    longhorn-rwx    <unset>                          28s
You have created a ReadWriteMany (RWX) PVC in your cluster. All Pods that mount the PVC as the storage volume can simultaneously read and write data to the Longhorn volume in your Kubernetes cluster.
Test the Persistent Volume Claims (PVCs)
Deploy sample application Pods in your cluster to test your ReadWriteOnce (RWO) and ReadWriteMany (RWX) access modes by mounting the respective PVCs as storage volumes. Follow the sections below to create new Pods that reference your PVCs and verify that new Longhorn volumes are created in your cluster.
Read Write Once (RWO)
Follow the steps below to create a new Nginx Pod that reads and writes web application files using the /usr/nginx/ mount directory using your ReadWriteOnce PVC as the storage volume.
Create a new Pod resource file
nginx-rwo-pod.yaml.console$ nano nginx-rwo-pod.yaml
Add the following configurations to the file.
yamlapiVersion: v1 kind: Pod metadata: name: nginx-webserver spec: containers: - name: rwo-container image: nginx:latest volumeMounts: - name: rwo-volume mountPath: /data volumes: - name: rwo-volume persistentVolumeClaim: claimName: test-rwo
Save and close the file.
The above configuration creates a new
nginx-webserverPod that serves content from the read-write-once PVC mounted to the/usr/share/nginx/htmldirectory within the application container.Apply the resource to your Kubernetes cluster.
console$ kubectl apply -f nginx-rwo-pod.yaml
View all Pods in your cluster and verify that a new
nginx-webserverpod is running.console$ kubectl get pods
Output:
NAME                              READY   STATUS    RESTARTS   AGE
nginx-webserver                   1/1     Running   0          41s
Access the Nginx pod environment using Kubectl.
console$ kubectl exec -it nginx-webserver -- /bin/bash
The
-- /bin/bashactivates the Bash shell within the pod environment with support for common Linux commands and utilities. When the above command is successful, your terminal environment should change to the following shell.consoleroot@nginx-webserver:/#
Write a new HTML configuration to replace the default
/usr/share/nginx/html/index.htmlfile contents using the echo utility.console$ echo "<html><body><h1> Hello World! Nginx Writes to the RWO Longhorn Volume </h1></body></html>" > /usr/share/nginx/html/index.html
Test access to the Nginx localhost IP
127.0.0.1using Curl.console$ curl 127.0.0.1
Verify that your
Hello Worldweb page contents display in your output similar to the one below.html<html><body><h1> Hello World! Nginx Writes to the RWO Longhorn Volume </h1></body></html>
Based on the above output, the
nginx-webserverpod has read and write access to the ReadWriteOnce Longhorn volume mounted with the/usr/share/nginx/htmldirectory. However, only a single pod can read or write to the storage at a time.Based on the storage configuration, other pods may be able to mount the PVC with read-only privileges, but not write files at the same time with the
nginx-webserverapplication.Exit the Nginx Pod environment.
console# exit
Read Write Many (RWX)
The Read Write Many (RWX) access mode is suitable for cluster applications with front-end and back-end communication interfaces. Follow the steps below to create new application Pods that simultaneously read and write data to a mounted ReadWriteMany PVC storage volume.
Create a new Pod configuration file
log-backend.yamlthat writes data to a mounted storage directory.console$ nano log-backend.yaml
Add the following configurations to the file.
yamlapiVersion: v1 kind: Pod metadata: name: log-writer spec: containers: - name: log-writer-container image: busybox:latest command: ["/bin/sh", "-c", "while true; do echo $(date) >> /var/log/app.log; sleep 1; done"] volumeMounts: - name: shared-storage mountPath: /var/log volumes: - name: shared-storage persistentVolumeClaim: claimName: rwx-pvc
Save and close the file.
The above configuration creates a new application pod
log-writerthat continuously writes the Kubernetes cluster date and time to a log filelonghorn-date.logwithin the shared directory/var/log/. The ReadWriteMany PVC volume is mounted asshared-storagevolume using the shared directory/var/logas the mount path accessible to all attached resources.Create another Pod configuration file
log-frontend.yamlto read data from the mounted storage directory.console$ nano log-frontend.yaml
Add the following configurations to the file.
yamlapiVersion: v1 kind: Pod metadata: name: log-viewer spec: containers: - name: log-reader-container image: busybox:latest command: ["/bin/sh", "-c", "tail -f /var/log/app.log"] volumeMounts: - name: shared-storage mountPath: /var/log volumes: - name: shared-storage persistentVolumeClaim: claimName: rwx-pvc
Save and close the file.
The above configuration creates a new Pod
log-viewerthat reads data from theapp.logfile created by the backendlogs-writerPod in the shared directory/var/log/.Create a new backend Pod configuration file
updatelog-backendthat continuously writes data to the shared file.console$ nano updatelog-backend.yaml
Add the following configurations to the file.
yamlapiVersion: v1 kind: Pod metadata: name: updatelog spec: containers: - name: log-writer-container image: busybox:latest command: ["/bin/sh", "-c", "while true; do echo Update from backend pod $(date) >> /var/log/app.log; sleep 1; done"] volumeMounts: - name: shared-storage mountPath: /var/log volumes: - name: shared-storage persistentVolumeClaim: claimName: rwx-pvc
Save and close the file.
The above configuration creates a new Pod
updatelogthat writes updates to the sharedapp.logfile within the/var/log/directory. The Pod adds a new messageUpdate from backend podand the cluster date to the log file.Apply the pod configurations to your cluster.
console$ kubectl apply -f log-backend.yaml $ kubectl apply -f log-frontend.yaml $ kubectl apply -f updatelog-backend.yaml
View all pods in your cluster and verify that the new test pods are running.
console$ kubectl get pods
Output:
NAME                              READY   STATUS    RESTARTS      AGE
log-viewer                        1/1     Running   1 (37s ago)   59s
log-writer                        1/1     Running   0             64s
updatelog                         1/1     Running   0             51s
View the
log-viewerPod logs and verify that both backend Pods are actively writing data to the shared/var/log/app.logfile.console$ kubectl logs log-viewer
Output:
Update from backend pod Tue Apr 30 18:48:19 UTC 2024
Tue Apr 30 18:48:20 UTC 2024
Update from backend pod Tue Apr 30 18:48:20 UTC 2024
Tue Apr 30 18:48:21 UTC 2024
Update from backend pod Tue Apr 30 18:48:21 UTC 2024
Tue Apr 30 18:48:22 UTC 2024
Update from backend pod Tue Apr 30 18:48:22 UTC 2024
Tue Apr 30 18:48:23 UTC 2024
Update from backend pod Tue Apr 30 18:48:23 UTC 2024
Tue Apr 30 18:48:24 UTC 2024
Update from backend pod Tue Apr 30 18:48:24 UTC 2024
Tue Apr 30 18:48:25 UTC 2024
Update from backend pod Tue Apr 30 18:48:25 UTC 2024
Tue Apr 30 18:48:26 UTC 2024
Update from backend pod Tue Apr 30 18:48:26 UTC 2024
Tue Apr 30 18:48:27 UTC 2024
Update from backend pod Tue Apr 30 18:48:27 UTC 2024
Tue Apr 30 18:48:28 UTC 2024
Update from backend pod Tue Apr 30 18:48:28 UTC 2024
Based on the above output, the backend Pods
log-writeandupdatelogsimultaneously write data to the sharedapp.logfile whilelog-viewactively reads data from the file. As a result, the ReadWriteMany access method enables multiple pods to share data, read, and write files to the same storage volume at a time.
Configure Longhorn for External Access
The Longhorn user interface (UI) is a graphical web application that lets you monitor the status of Longhorn volumes and all mounted PVCs. Follow the steps below to install an Ingress controller and securely access the Longhorn UI in your Kubernetes cluster by forwarding external requests to the Longhorn UI port.
Install the latest Nginx Ingress Controller version to your Kubernetes cluster using Kubectl.
console$ kubectl apply -f https://raw.githubusercontent.com/kubernetes/ingress-nginx/controller-v1.10.1/deploy/static/provider/cloud/deploy.yaml
Output:
namespace/ingress-nginx created
serviceaccount/ingress-nginx created
serviceaccount/ingress-nginx-admission created
role.rbac.authorization.k8s.io/ingress-nginx created
role.rbac.authorization.k8s.io/ingress-nginx-admission created
clusterrole.rbac.authorization.k8s.io/ingress-nginx created
clusterrole.rbac.authorization.k8s.io/ingress-nginx-admission created
rolebinding.rbac.authorization.k8s.io/ingress-nginx created
rolebinding.rbac.authorization.k8s.io/ingress-nginx-admission created
clusterrolebinding.rbac.authorization.k8s.io/ingress-nginx created
clusterrolebinding.rbac.authorization.k8s.io/ingress-nginx-admission created
configmap/ingress-nginx-controller created
service/ingress-nginx-controller created
service/ingress-nginx-controller-admission created
deployment.apps/ingress-nginx-controller created
job.batch/ingress-nginx-admission-create created
job.batch/ingress-nginx-admission-patch created
ingressclass.networking.k8s.io/nginx created
validatingwebhookconfiguration.admissionregistration.k8s.io/ingress-nginx-admission created
View all created Nginx Ingress Controller Pods and verify that the
ingress-nginxpod is actively running.console$ kubectl get pods --all-namespaces -l app.kubernetes.io/name=ingress-nginx
Output:
NAMESPACE       NAME                                        READY   STATUS      RESTARTS   AGE
ingress-nginx   ingress-nginx-admission-create-n2gvf        0/1     Completed   0          98s
ingress-nginx   ingress-nginx-admission-patch-vqfhn         0/1     Completed   0          98s
ingress-nginx   ingress-nginx-controller-57b7568757-ctk5z   1/1     Running     0          99s
Wait at least
3minutes for the Nginx Ingress Controller to deploy a Vultr Load Balancer. Then, view all services in theingress-nginxnamespace to verify the external public IP address assigned to yourLoadBalancerservice.console$ kubectl get services ingress-nginx-controller --namespace=ingress-nginx
Output:
NAME                       TYPE           CLUSTER-IP       EXTERNAL-IP      PORT(S)                      AGE
ingress-nginx-controller   LoadBalancer   10.106.252.171   203.0.113.5   80:30886/TCP,443:32107/TCP   4m25s
Based on the above output, your external load balancer IP is
203.0.113.5. Access your domain registrar and set up a new DNS A record that points to the external IP address to forward all requests to your Kubernetes cluster.Create a new Ingress resource file
longhorn-ingress.yaml.console$ nano longhorn-ingress.yaml
Add the following configurations to the file. Replace
longhorn.example.comwith your actual domain name.yamlapiVersion: networking.k8s.io/v1 kind: Ingress metadata: name: longhorn-production44 namespace: longhorn-system spec: ingressClassName: nginx rules: - host: vultrtest.ddns.net http: paths: - pathType: Prefix path: "/" backend: service: name: longhorn-frontend port: number: 80
Save and close the file.
The above configuration creates a new Ingress resource
longhorn-productionthat exposes the Longhorn UI using your domain namelonghorn.example.comand forwards all external requests HTTP requests to the internallonghorn-frontendapplication on port80.Apply the Ingress configuration to your cluster.
console$ kubectl apply -f longhorn-ingress
View all Ingress resources in the
longhorn-systemnamespace and verify that your Longhorn Ingress configuration is available.console$ kubectl get ingress
Output:
NAME                    CLASS   HOSTS                ADDRESS          PORTS   AGE
longhorn-production   nginx   longhorn.example.com  203.0.113.5      80      2m20s
You have installed the Nginx Ingress Controller and created a new Longhorn Ingress configuration that forwards all external requests to the internal
longhorn-frontendapplication. As a result, you can securely access the Longhorn UI to create and manage volumes in your Kubernetes cluster using your domain name.
Access the Longhorn UI
Access your Longhorn domain name using a web browser such as Firefox.
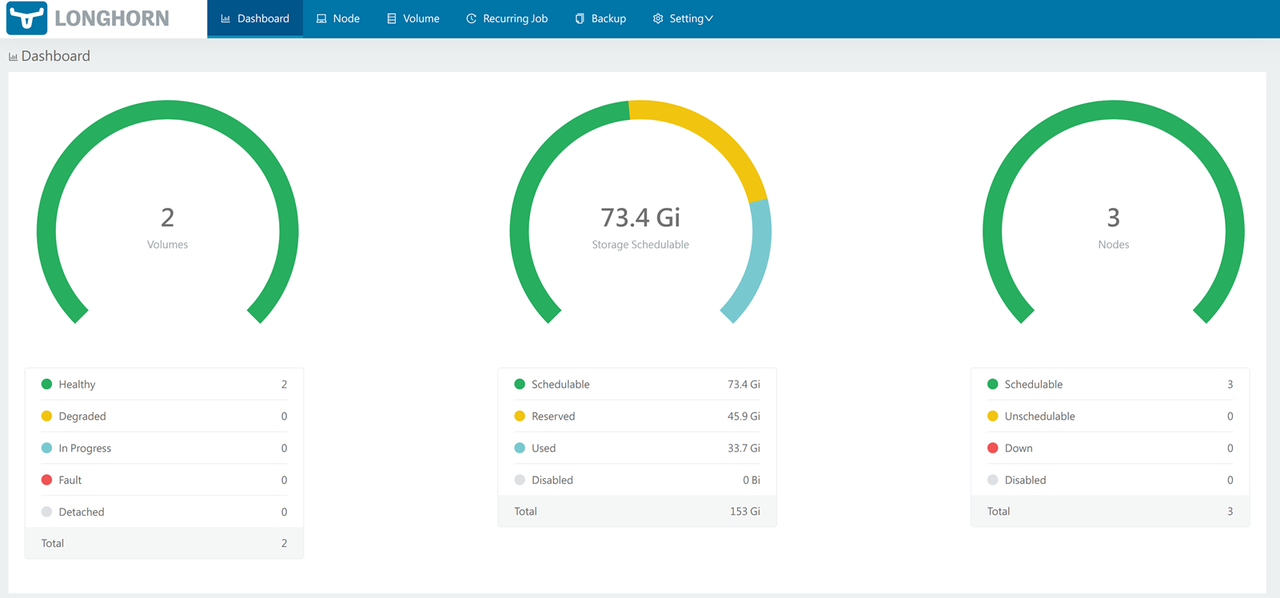
http://longhorn.example.comVerify your Kubernetes cluster volumes, nodes, and storage summary within the Longhorn dashboard. In addition, the volumes area includes information about the status of all Longhorn volumes available in your cluster.
Click Volume on the top navigation menu to access Longhorn volumes available in your Kubernetes cluster.
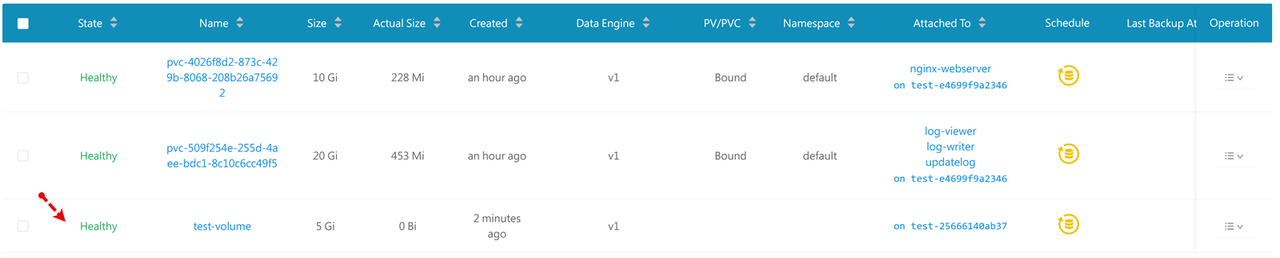
Verify that your ReadWriteOnce (RWO) and ReadWriteMany (RWX) volumes are available in a healthy state.
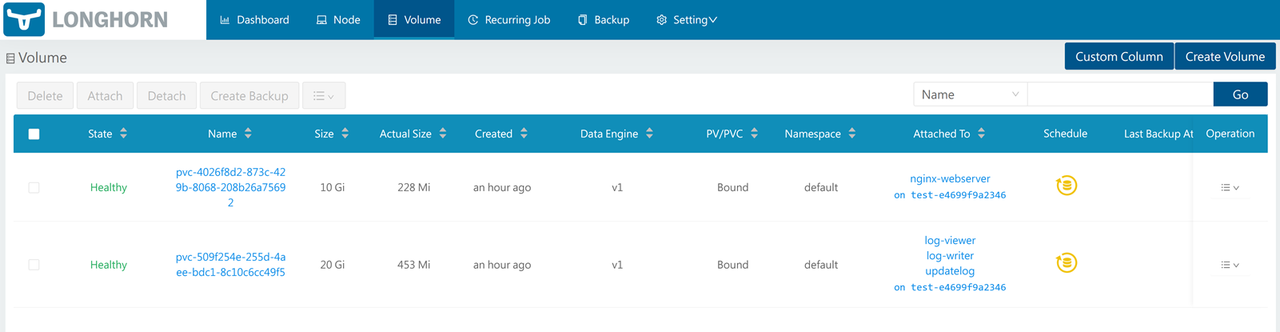
Click any of the Longhorn volumes to view additional information such as the number of replicas, volume details, snapshots and backups.
Navigate back to the Longhorn volumes list and click Create Volume to set up a new Longhorn volume using the Longhorn UI.
Enter your desired volume information and click the Access Mode dropdown to select either the ReadWriteOnce or ReadWriteMany volume access method.

Click OK to apply the new volume and verify that it’s available on your Longhorn volumes list.
Select the volume and click Attach to assign the new Longhorn volume to any of your cluster nodes with enough storage space.
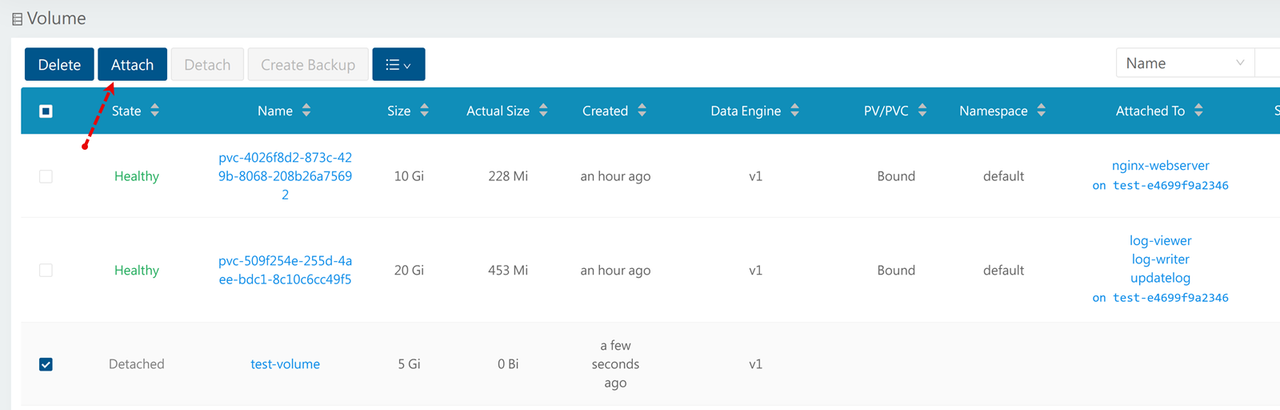
Click the Node dropdown, select your target worker node and click Attach to provision the new volume using your node storage.
Verify that the new Longhorn volume state is healthy and the Attached To field includes your selected cluster node.
You have created a new Longhorn volume within the Longhorn UI. You can create a new PVC that references the new Longhorn volume name to mount the new volume in your cluster depending on its access method.
Back Up Longhorn Volumes on Vultr Object Storage
Longhorn backups are compatible with S3 storage such as Vultr Object Storage for recovery and the creation of Disaster Recovery Volumes (DR volume) in case of node failures within your cluster. Follow the steps below to apply new Vultr Object Storage configurations in your cluster and set up the Longhorn to back up volumes to your destination bucket.
- Access your Vultr Object Storage instance and copy the Hostname, Secret Key, and Access Key to use within your cluster.
Create a new Secret resource file
vultrobj-secret.yamlto store your Vultr Object Storage credentials.console$ nano vultrobj-secret.yaml
Add the following configurations to the file. Replace
examplekey,examplesecretandewr1.vultrobjects.comwith your actual Vultr Object Storage credentials.yamlapiVersion: v1 kind: Secret metadata: name: longhorn-vultr-backups namespace: longhorn-system type: Opaque stringData: AWS_ACCESS_KEY_ID: examplekey AWS_ENDPOINTS: https://ewr1.vultrobjects.com AWS_SECRET_ACCESS_KEY: examplesecret
Save and close the file.
The above configuration creates a new Secret
longhorn-vultr-backupsthat contains your Vultr Object Storage access credentials in thelonghorn-systemnamespace. Longhorn references the secret when creating backups depending on the target bucket in your configuration.Apply the configuration to your Kubernetes cluster.
console$ kubectl apply -f vultrobj-secret.yaml
View all Secrets in the
longhorn-systemnamespace and verify that your new Vultr Object Storage resource is available.console$ kubectl get secrets -n longhorn-system
Output:
NAME                     TYPE                DATA   AGE
longhorn-vultr-backups   Opaque              3      35s
Access the Longhorn UI in your web browser session.
Click the Setting dropdown on the main navigation menu and select General from the list of options.
Scroll to the Back Up section and set the Backup Target to your Vultr Object Storage bucket using the
s3://URI, your bucket name and the Vultr Object Storage URL.s3://example-bucket@ewr1.vultrobjects.com/Enter your Vultr Object Storage Secret resource name
longhorn-vultr-backupsin theBackup Target Credential Secretfield.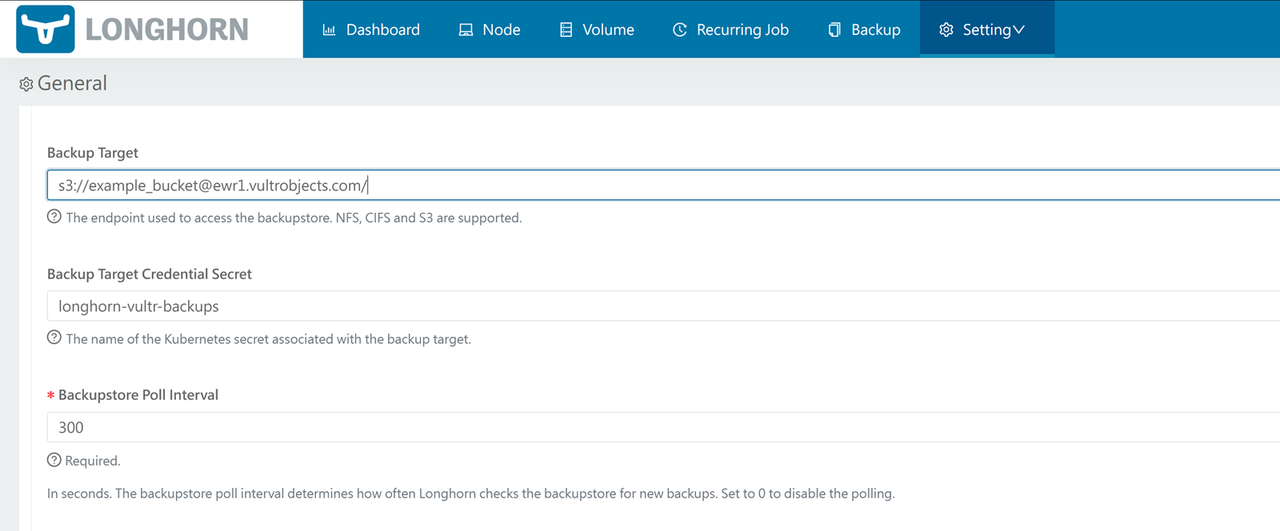
Press Enter to save the changes and apply your new Longhorn backup configuration.
Click Volume on the main navigation menu to access your Longhorn volumes.
Select a target volume to back up. For example,
test-volume.Click Create Backup on the top navigation menu to enter the new backup details.
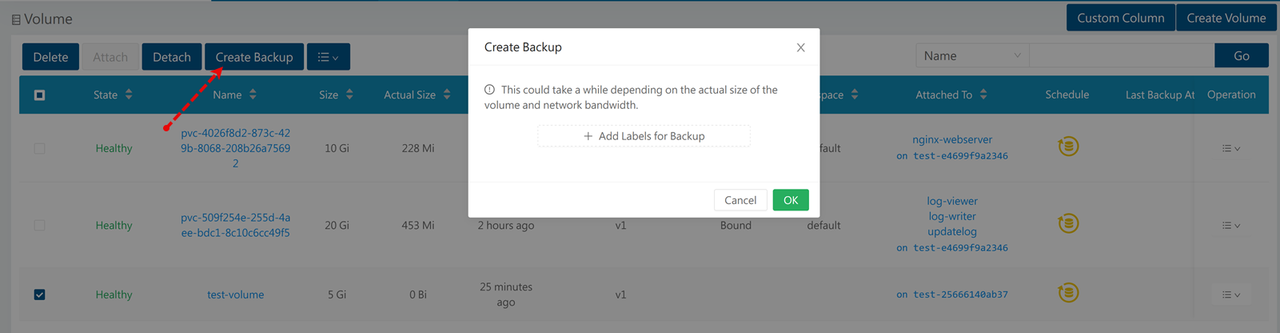
Click Add Labels for Backup and enter your desired backup label details. For example,
longhorn-backupandlatest-backupas the label key and value respectively.Wait for the backup process to complete depending on your volume size and click Backup on the main navigation menu to access all available backups.
Verify that your new Longhorn backup is available on the list.

Access your Vultr Object Storage bucket and verify that a new
backupstoredirectory is created by Longhorn with your volume backup objects.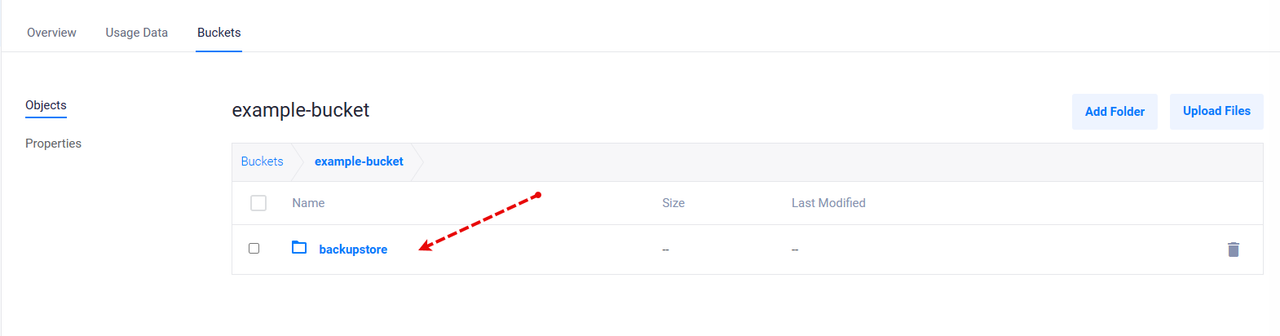
You have backed up your Longhorn volume to Vultr Object Storage, you can create a new disaster recovery volume or use the recovery data to roll back any cluster changes. Navigate to Recurring Job on the main Longhorn UI navigation menu to automate your Longhorn volume backups or create manual backups to consistently back up volume data to your destination bucket.
Conclusion
You have deployed Longhorn on Kubernetes using a Vultr Kubernetes Engine (VKE) cluster. You created Longhorn volume and set up multiple PVCs with ReadWriteOnce and ReadWriteMany access modes to use with your cluster applications that mount the PVCs as storage volumes. In addition, you created Longhorn backups using the Longhorn UI to externally store volume data for recovery purposes in case of cluster failures. For more information and configuration options, visit the Longhorn documentation.