
How to Install Nginx UI on Ubuntu 24.04- An Opensource WebUI for Nginx
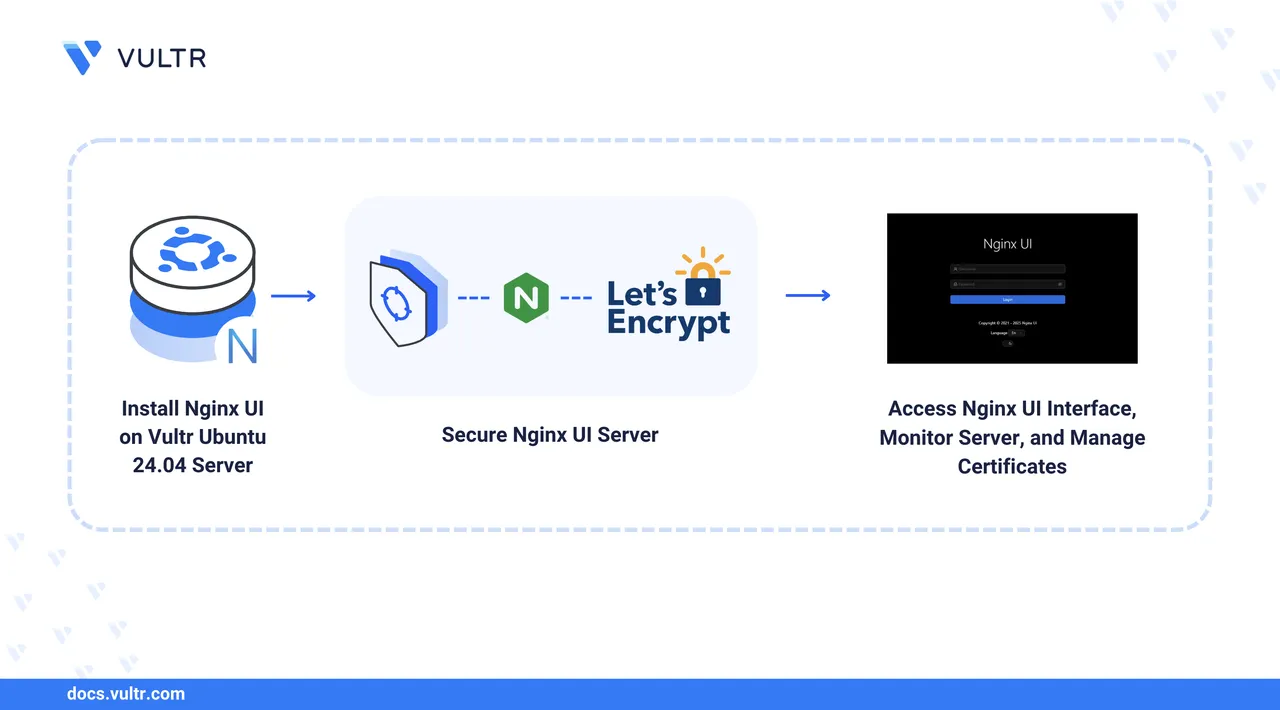
Nginx UI is an open-source web-based configuration management GUI for Nginx. It supports single-node and cluster node configurations with real-time server statistics, automatic TLS certificates with Let's Encrypt, Nginx performance monitoring, and integration with large language models (LLMs) to manage configurations on a server.
In this article, you will install Nginx UI on Ubuntu 24.04 to create and manage Nginx web server configurations using a web-based management interface. You will create virtual host configurations and configure Nginx UI to use a trusted certificate authority (CA) such as Let's Encrypt to manage TLS certificates for secure connections on your server.
Prerequisites
Before you start, you need to:
- Access an Ubuntu 24.04 instance as a non-root user with sudo privileges.
- Create a new domain A record pointing to the instance's public IP address. For example,
nginx-ui.example.com. - Install Docker on your server if you want to install Nginx UI using Docker.
Install Nginx UI
Nginx UI is not available in the default package repositories on Ubuntu. You can install Nginx UI using Docker or the latest stable release script. Choose one of the two methods covered in this section.
Update your system package index.
console$ sudo apt update
Install Nginx.
console$ sudo apt install nginx -y
Follow the steps below to download the latest installation script and install Nginx UI to manage web server configurations. This method installs Nginx UI as a system service.
Download the latest Nginx UI installation script.
console$ curl -O https://cloud.nginxui.com/install.sh
Execute the script using Bash with the
installoption.console$ sudo bash install.sh install
Verify the installed Nginx UI version.
console$ nginx-ui --version
Output:
nginx-ui 2.1.17 1(468) 876213ad (go1.24.5 linux/amd64)
Yet another Nginx Web UI
Start the Nginx UI service.
console$ sudo systemctl start nginx-ui
Check the Nginx UI service status and verify it's active.
console$ sudo systemctl status nginx-ui
Output:
● nginx-ui.service - Yet another WebUI for Nginx
     Loaded: loaded (/etc/systemd/system/nginx-ui.service; enabled; preset: enabled)
     Active: active (running) since Fri 2025-08-29 00:42:49 UTC; 2min 22s ago
...
The Nginx UI Docker image is based on the latest Nginx image and works as a standalone web server solution for containerized applications. If Nginx UI is installed using Docker, you cannot modify the host's Nginx web server configurations. Follow these steps to install Nginx UI using Docker Compose.
Create a directory for the Nginx UI Docker deployment in your home and switch to it.
console$ mkdir -p ~/nginx-ui-docker $ cd ~/nginx-ui-docker
Create the persistent data directory for NGINX config files.
console$ sudo mkdir -p /opt/nginx-ui/nginx
Create the persistent directory for Nginx UI configuration.
console$ sudo mkdir -p /opt/nginx-ui/config
Create the persistent directory for website files.
console$ sudo mkdir -p /opt/nginx-ui/www
Create a Docker Compose configuration file.
console$ nano docker-compose.yml
Add the following Docker Compose configuration.
yamlversion: '3.8' services: nginx-ui: image: uozi/nginx-ui:latest container_name: nginx-ui restart: always environment: - TZ=UTC volumes: - /opt/nginx-ui/nginx:/etc/nginx - /opt/nginx-ui/config:/etc/nginx-ui - /opt/nginx-ui/www:/var/www ports: - "127.0.0.1:9000:80" networks: - nginx-ui-net networks: nginx-ui-net: driver: bridge
Save and close the file.
The above configuration:
- Uses the official Nginx UI Docker image.
- Maps the container port 80 to localhost port 9000.
- Persists data in
/opt/nginx-ui/directories. - Configures automatic restart on failure.
Start the Nginx UI container using Docker Compose.
console$ sudo docker compose up -d
Verify the container is running.
console$ sudo docker compose ps
Test the Nginx UI container accessibility.
console$ curl -X GET http://localhost:9000
You should see HTML output containing Nginx UI resources.
Configure Nginx Reverse Proxy
Nginx UI listens on localhost port 9000 by default. Follow these steps to create a reverse proxy configuration with HTTPS using Let's Encrypt.
Navigate to the Nginx sites-available directory.
console$ cd /etc/nginx/sites-available
Create a new Nginx UI virtual host configuration.
console$ sudo nano nginx-ui.conf
Add the following reverse proxy configuration. Replace
nginx-ui.example.comwith your domain.inimap $http_upgrade $connection_upgrade { default upgrade; '' close; } server { listen 80; listen [::]:80; server_name nginx-ui.example.com; location / { proxy_set_header Host $host; proxy_set_header X-Real-IP $remote_addr; proxy_set_header X-Forwarded-For $proxy_add_x_forwarded_for; proxy_set_header X-Forwarded-Proto $scheme; proxy_http_version 1.1; proxy_set_header Upgrade $http_upgrade; proxy_set_header Connection $connection_upgrade; proxy_pass http://127.0.0.1:9000; } }
Save and close the file.
Remove the default configuration from sites-enabled.
console$ sudo rm -f /etc/nginx/sites-enabled/default
Enable the Nginx UI virtual host configuration.
console$ sudo ln -s /etc/nginx/sites-available/nginx-ui.conf /etc/nginx/sites-enabled/
Test the Nginx configuration for errors.
console$ sudo nginx -t
Output:
nginx: the configuration file /etc/nginx/nginx.conf syntax is ok
nginx: configuration file /etc/nginx/nginx.conf test is successful
Restart Nginx to apply the configuration.
console$ sudo systemctl restart nginx
Secure Nginx UI with Let's Encrypt TLS
Install Certbot and the Nginx plugin.
console$ sudo apt install certbot python3-certbot-nginx -y
Configure the firewall to allow HTTP and HTTPS traffic.
console$ sudo ufw allow 80,443/tcp
Reload the firewall.
console$ sudo ufw reload
Generate a Let's Encrypt TLS certificate. Replace
nginx-ui.example.comwith your domain andadmin@example.comwith your email.console$ sudo certbot --nginx -d nginx-ui.example.com -m admin@example.com --agree-tos --no-eff
Restart the nginx-ui service.
console$ sudo systemctl restart nginx-ui
Access Nginx UI
You can now access the Nginx UI web interface using HTTPS on your domain. Follow these steps to complete the initial setup.
Access your domain using a web browser.
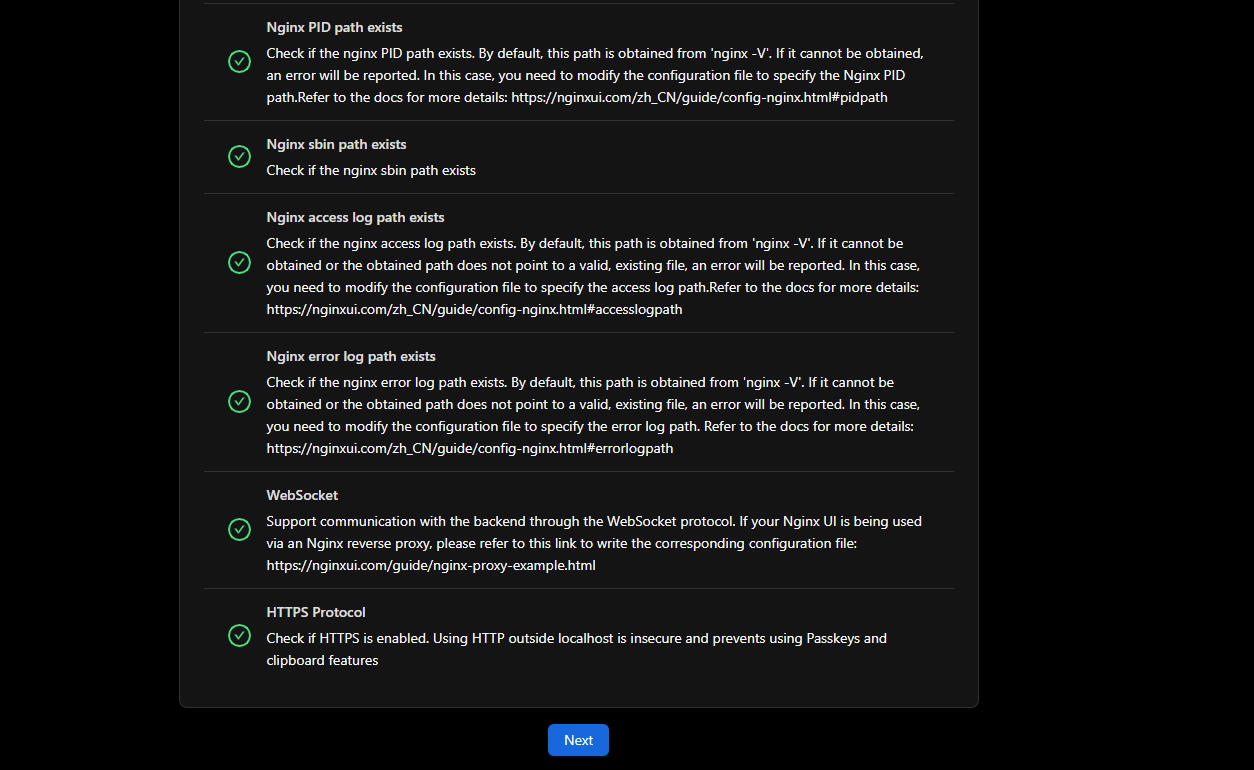
https://nginx-ui.example.comVerify the system information page displays without errors, then click Next.
Create an administrator account by entering:
- Your email address
- A username
- A strong password
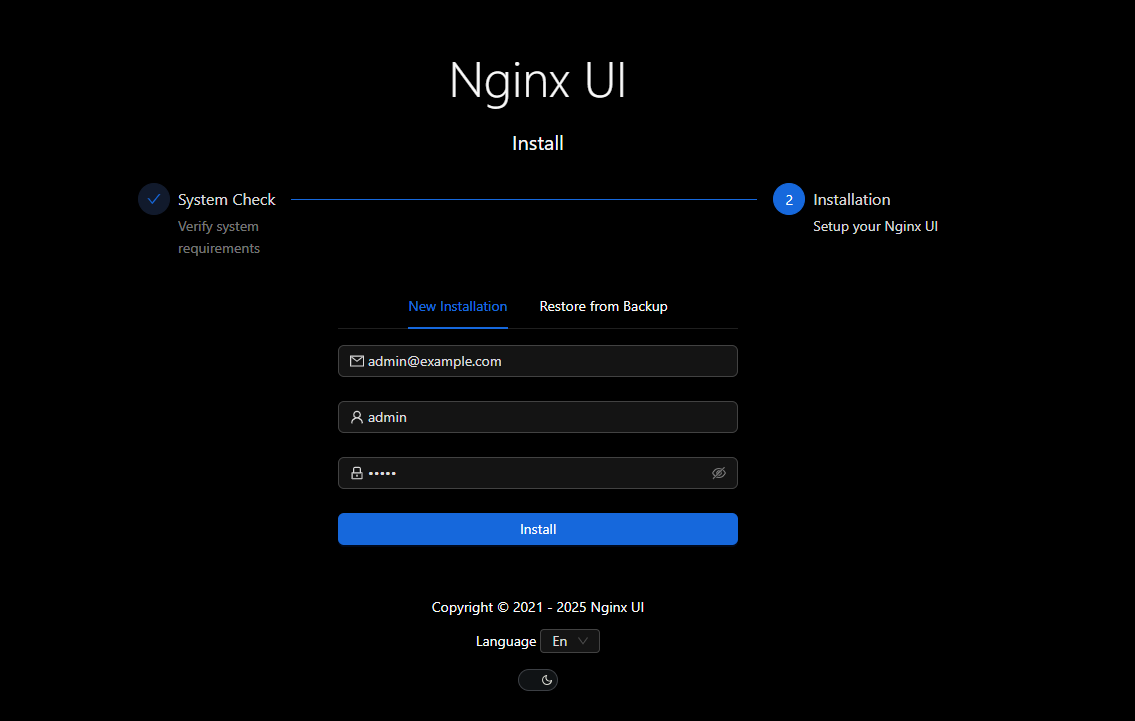
Click Install to apply the configuration.
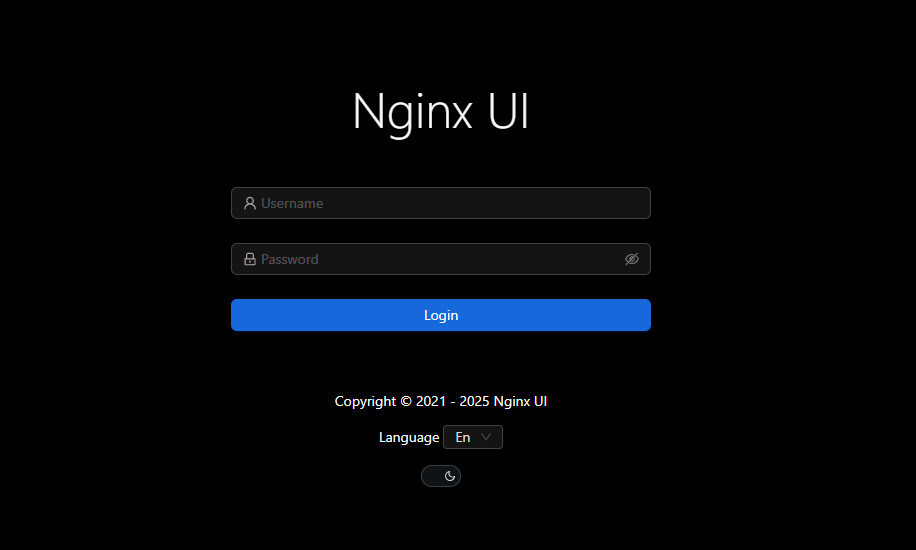
Log in with your administrator credentials.
Verify the dashboard displays server statistics, including uptime, memory, storage, and network information.
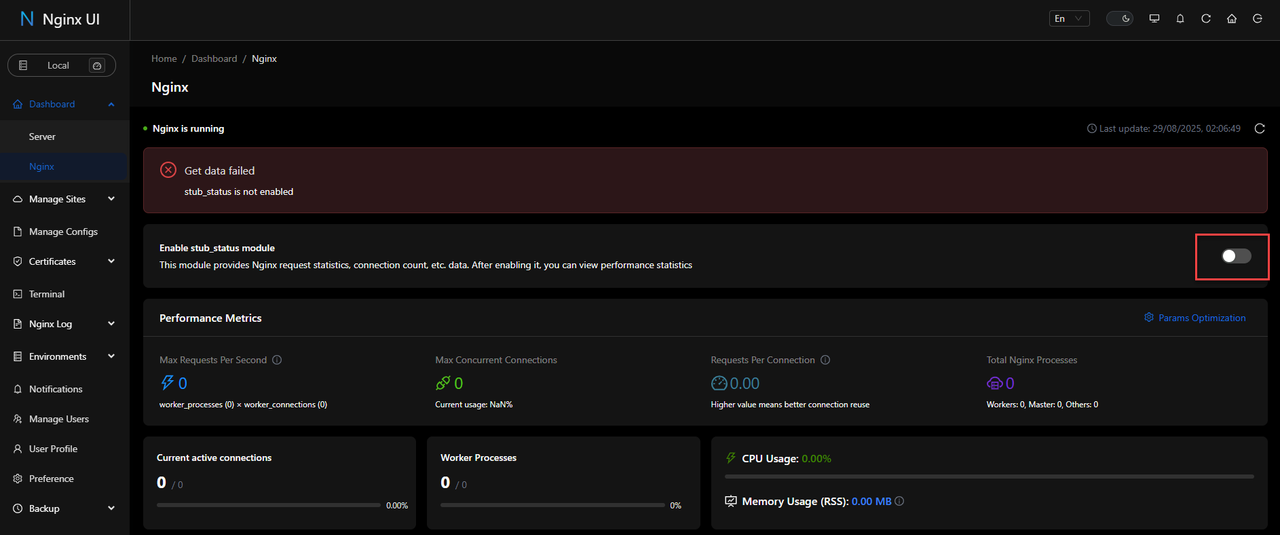
Click Nginx in the navigation menu to monitor web server performance.
Toggle Enable stub_status module to enable Nginx monitoring.
Manage TLS Certificates
Nginx UI supports automatic TLS certificate management with Let's Encrypt and other certificate authorities. To configure certificate management, follow these steps.
Navigate to Certificates in the main menu.
Click Certificates List to view existing certificates.

Click Import to add existing certificates or Issue Certificate to generate new ones.
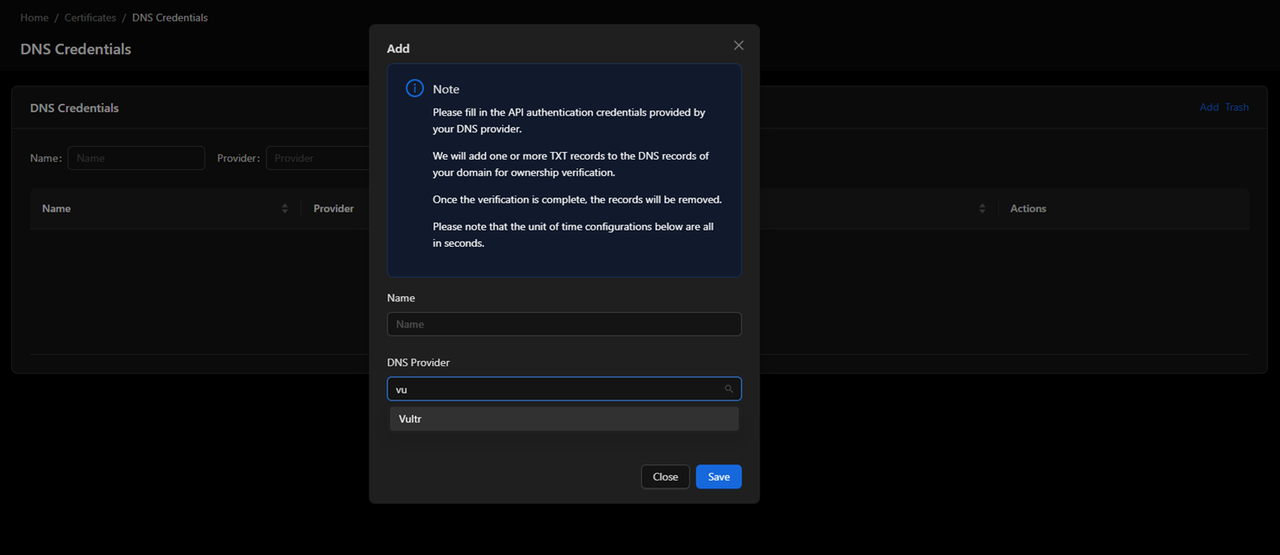
Navigate to DNS Credentials to configure DNS provider APIs for wildcard certificates.
Click Add to configure your DNS provider.
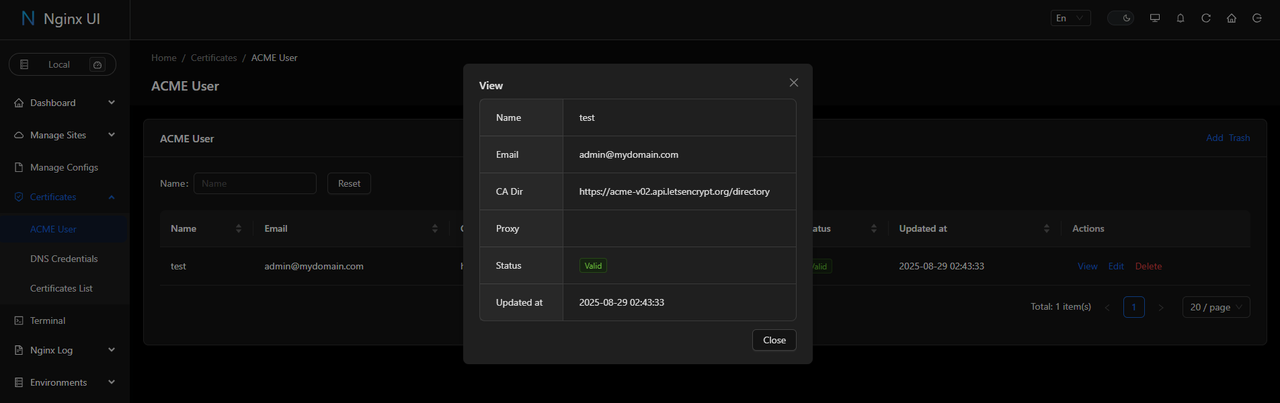
Navigate to ACME User to manage certificate authority accounts.
Click Add to create an ACME user:
- Enter a username
- Enter your email address
- Select
https://acme-v02.api.letsencrypt.org/directoryfrom the CA Dir dropdown - Keep Proxy and EAB fields empty

Toggle Register on Startup to enable automatic registration.
Click Save to create the ACME user.
Verify the ACME user status shows Valid.
Click View to check the ACME user details.
Create Virtual Host Configurations
Follow these steps to create new virtual host configurations using Nginx UI.
Create a new subdomain DNS record pointing to your server's IP address. For example,
app.example.com.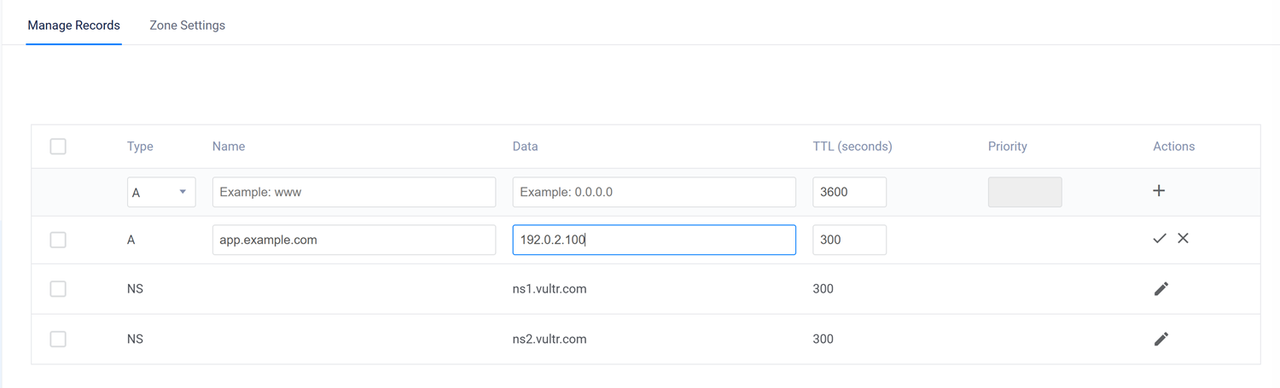
Navigate to Terminal in Nginx UI.
Create a directory for your web application.
console$ sudo mkdir -p /var/www/app.example.com
Create a sample HTML file.
console$ sudo nano /var/www/app.example.com/index.html
Add the following HTML content.
html<html> <head> <title>Sample Nginx Virtual Host Application</title> </head> <body> <h1 align="center">Greetings from Vultr!</h1> </body> </html>
Save and close the file.
Set proper ownership permissions.
console$ sudo chown -R www-data:www-data /var/www/app.example.com
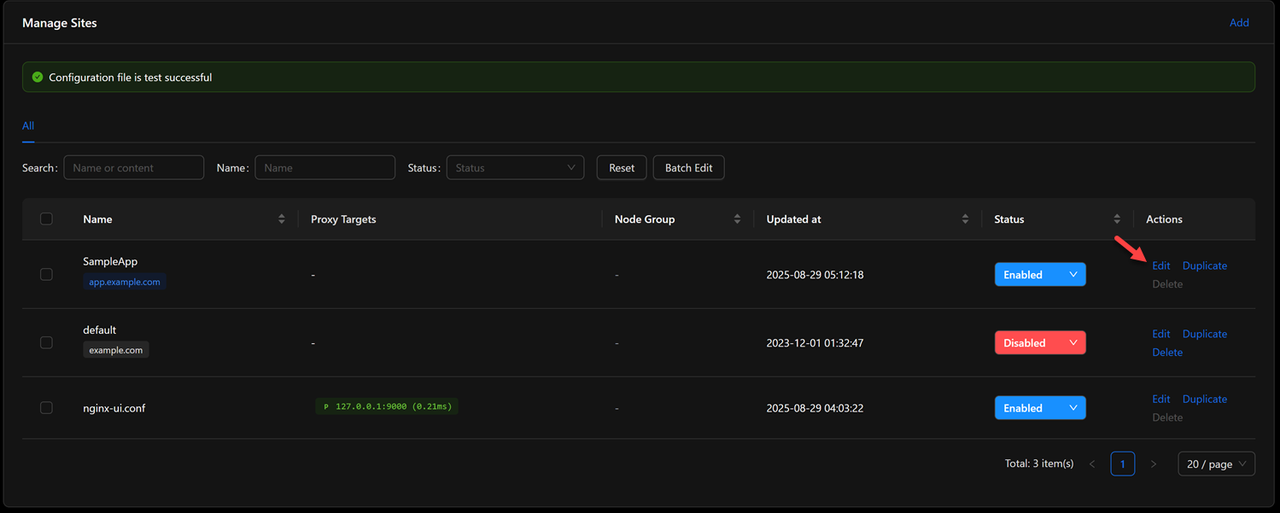
Navigate to Manage Sites in the main menu.
Click Sites List to view existing configurations.
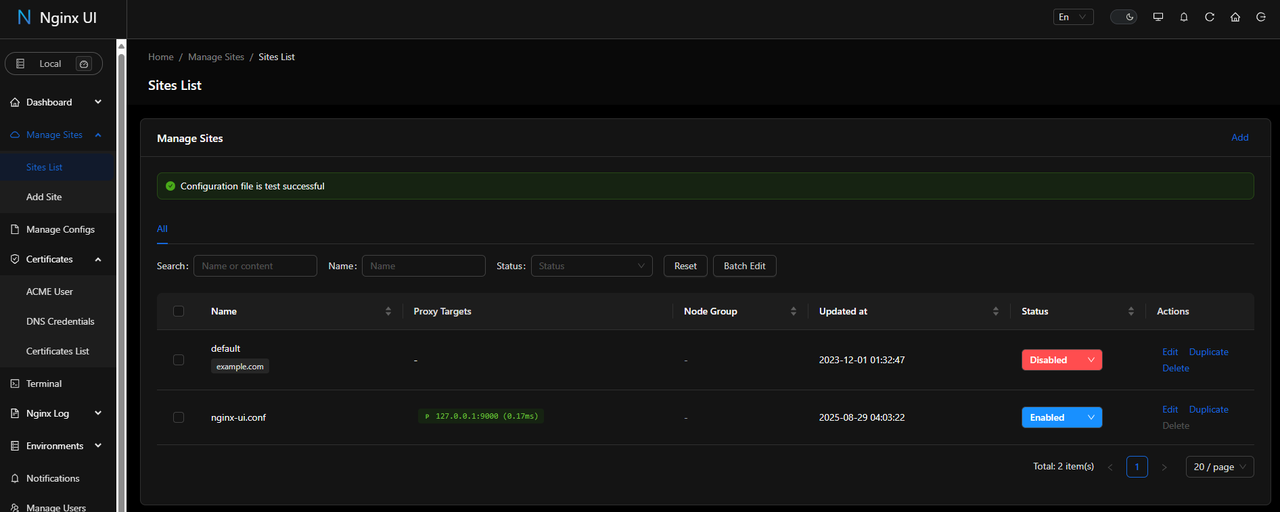
Click Add to create a new virtual host.
Configure the virtual host:
- Enter a configuration name
- Verify IPv4 and IPv6 listening ports (80)
- Enter your domain in the
server_namefield - Enter
/var/www/app.example.comin therootfield
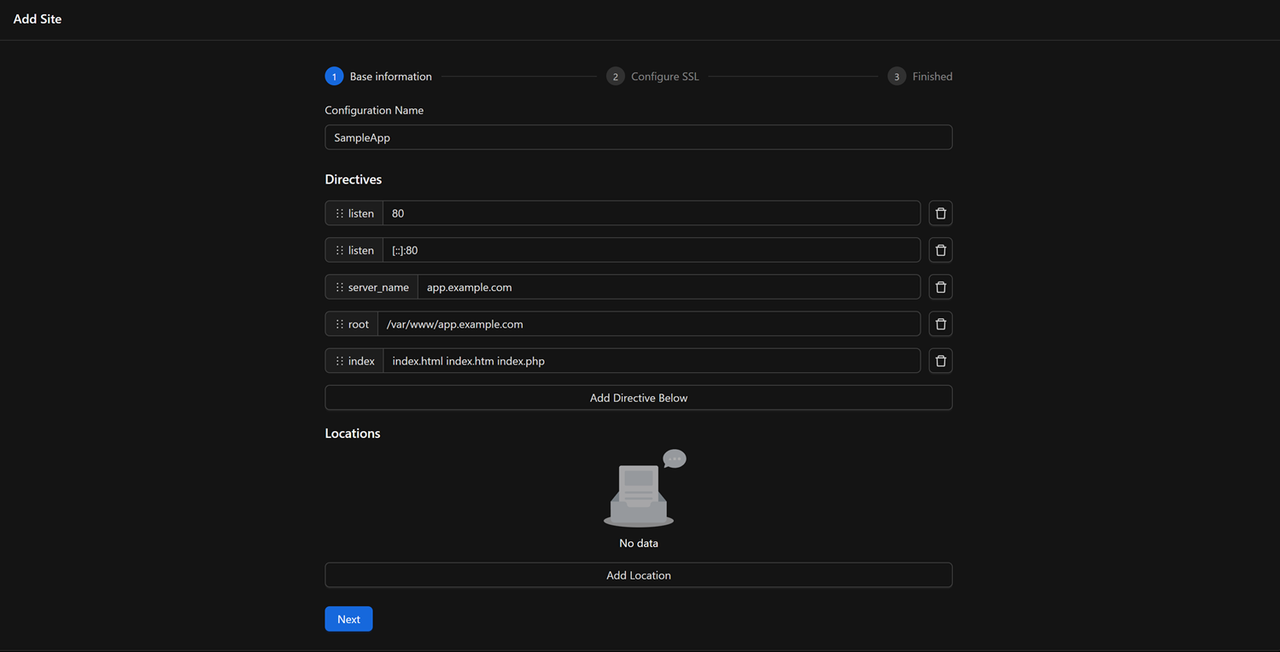
Set the index file order:
index.html,index.htm,index.php.Click Next to configure TLS.
Toggle Enable TLS and click OK.
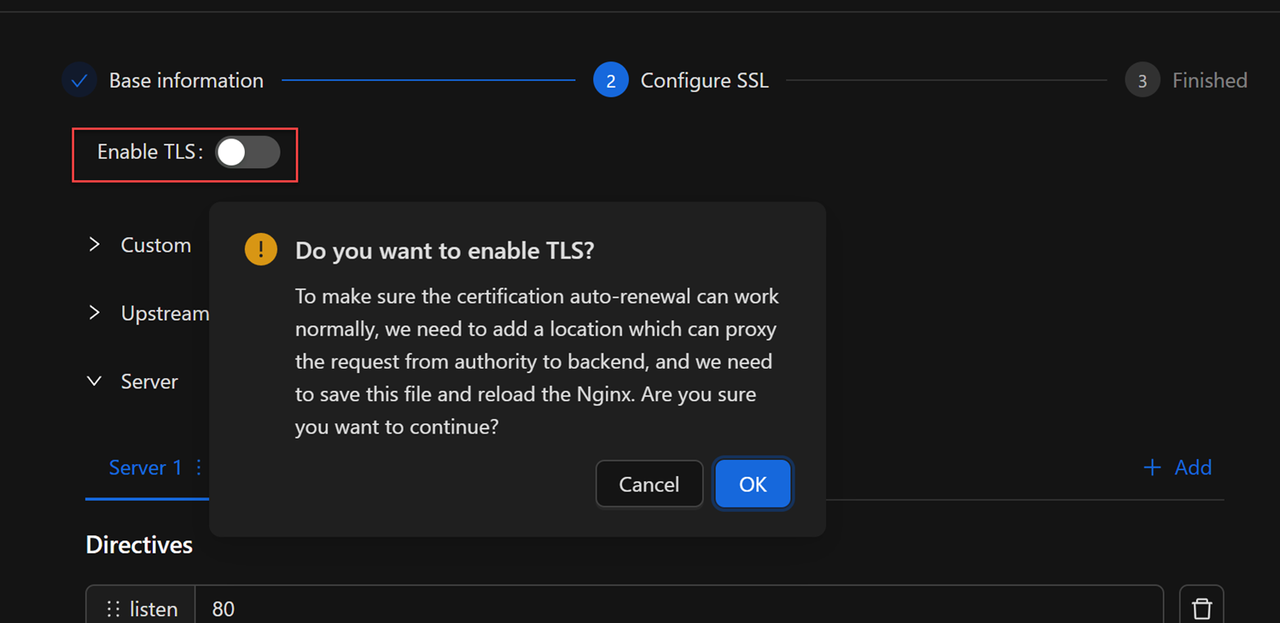
Toggle Encrypt website with Let's Encrypt and click OK.
Configure Let's Encrypt settings:
- Keep HTTP01 as the challenge method
- Select EC256 as the key type
- Select your ACME user
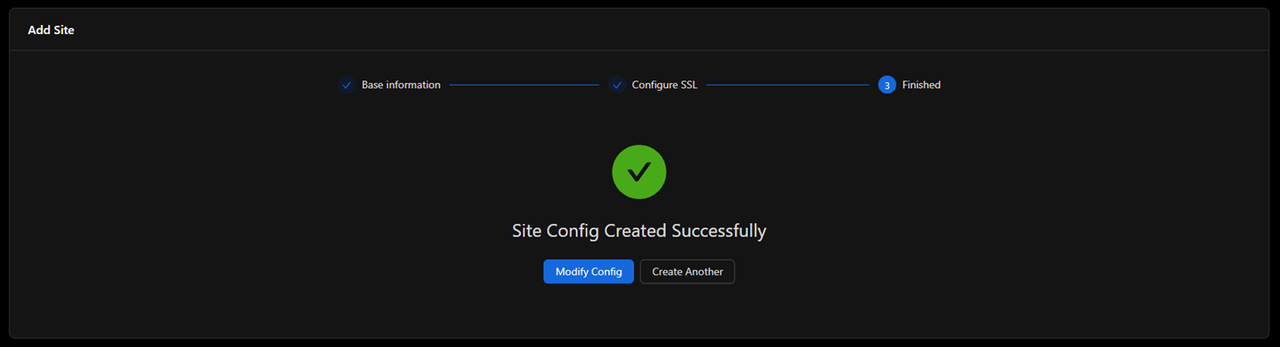
Click Next and monitor the certificate generation.

Close the Let's Encrypt dialog and verify the certificate details.
Click Next to apply the configuration.
Verify the virtual host status shows Enabled.
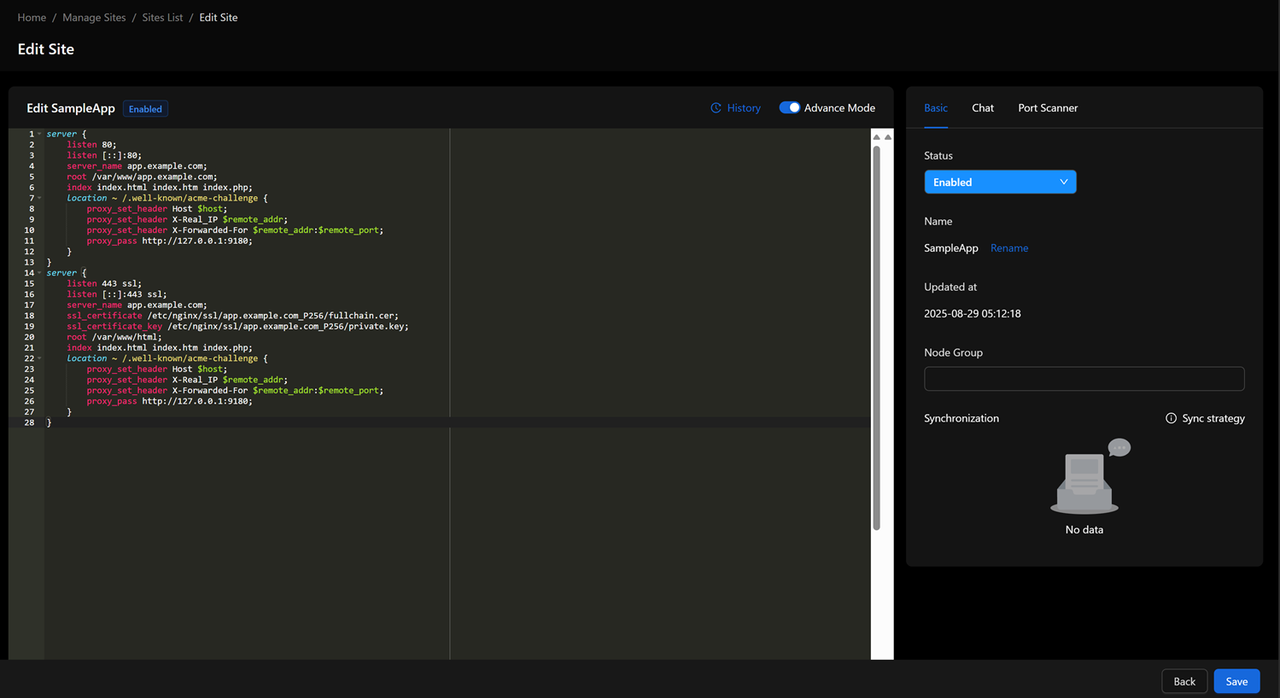
Click Edit to modify the configuration if needed.
Toggle Basic Mode to switch to Advanced Mode for raw configuration access.
Access your virtual host domain to verify the configuration.
https://app.example.com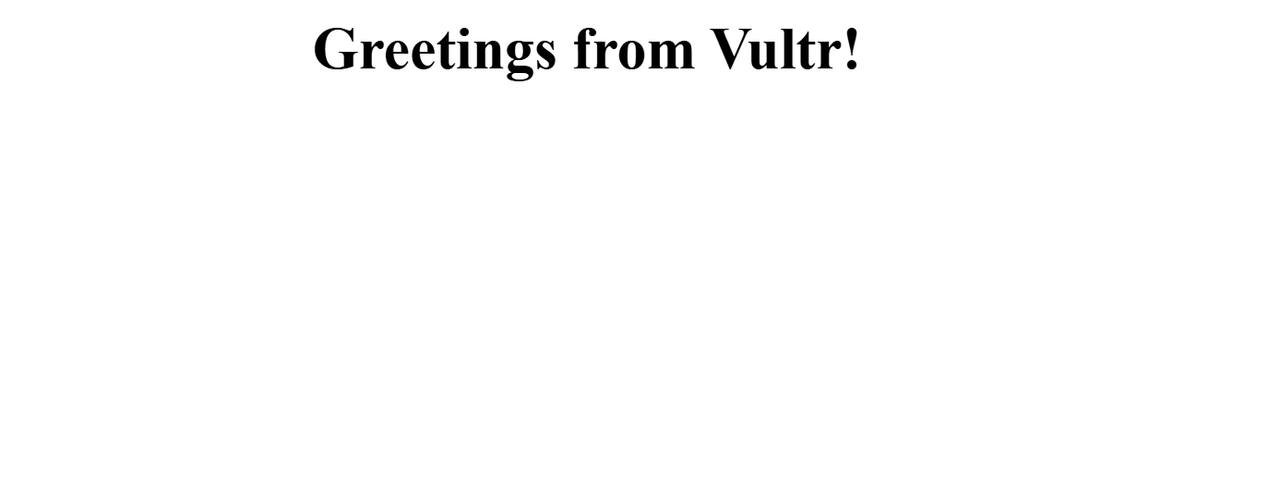
Conclusion
In this article, you have installed Nginx UI on Ubuntu 24.04 and managed Nginx configurations on your server. You can use Nginx UI to manage users, advanced Nginx configurations, virtual host configurations, create backups, and monitor the Nginx web server performance using logs. In addition, you can integrate Nginx UI with MCP and use large language models (LLMs) to manage your configurations using the chat feature within the web dashboard. For more information and configurations, visit the Nginx UI documentation.