
How to Install NVIDIA cuDNN on Ubuntu 22.04
Introduction
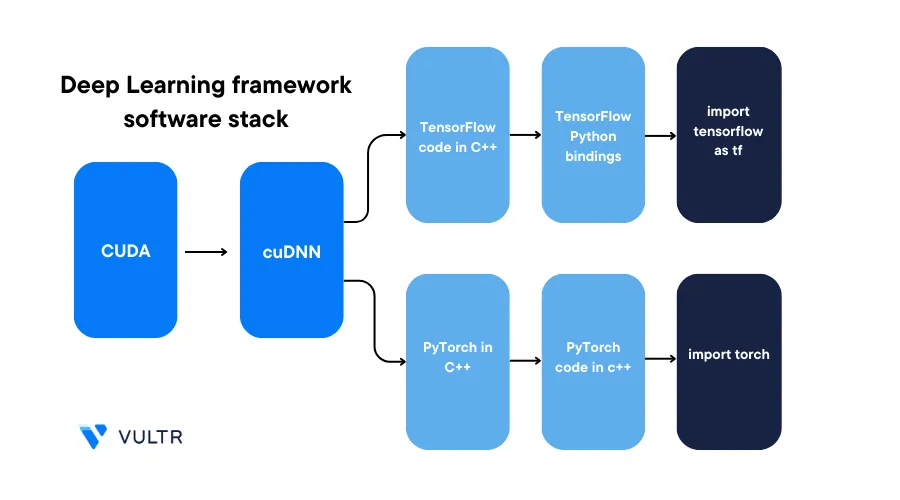
CUDA Deep Neural Network (cuDNN) is an NVIDIA library that enables GPU-accelerated computations for deep neural networks. By installing cuDNN on Ubuntu, developers can directly invoke functions to train and run inference on neural networks without having to write the base functions. Neural networks are the building blocks of most modern deep learning applications, such as generative AI models.
This guide explains how to install the NVIDIA cuDNN library on a Ubuntu 22.04 server.
Prerequisites
Before you begin:
Deploy a fresh Ubuntu 22.04 Server on Vultr
Create an NVIDIA developer account to download the cuDNN package
Using SSH, access the server
Create a non-root user with sudo privileges
Switch to the new non-root user account. Replace
pythonuserwith your desired username# su pythonuser
Install cuDNN on Ubuntu
To install cuDNN on Ubuntu, you can either use an archived release file or Conda. It's recommended to use the release file as it offers more stability and does not overwrite any system files. Depending on your choice, install cuDNN as described in the steps below.
Install cuDNN Natively (Recommended)
In this section, install cuDNN version 8.9.4 for the CUDA version 12.x natively using the official release file.
Using a web browser such as Chrome, visit the cuDNN download page
Agree to the cuDNN license agreement
Click the Download cuDNN, for CUDA resource link
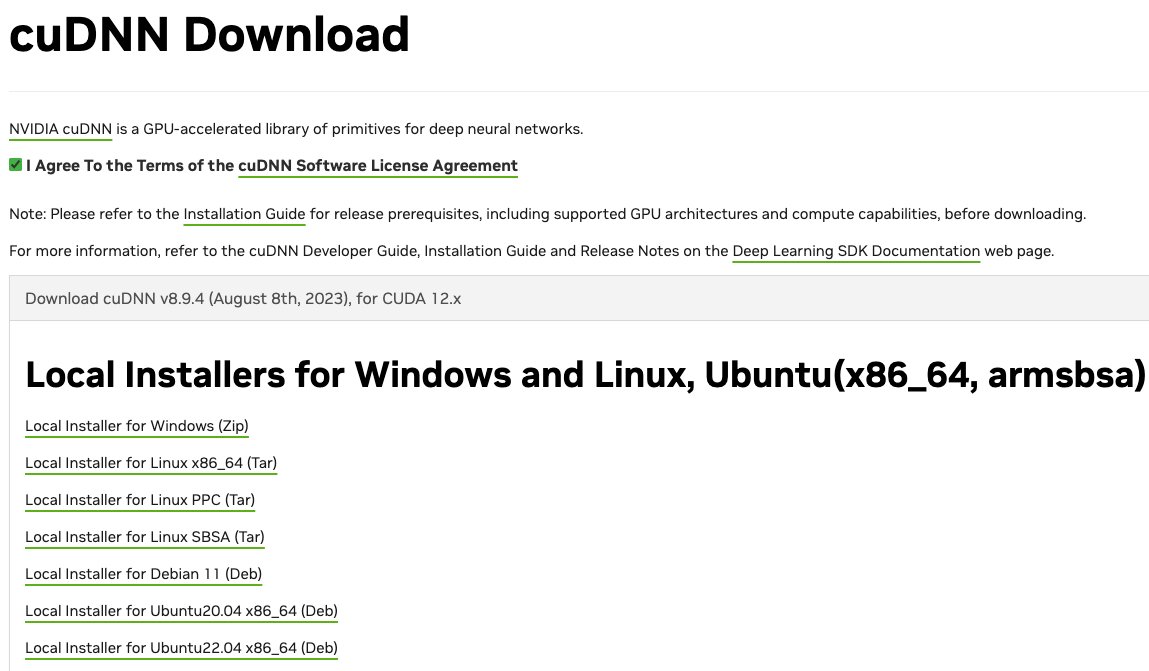
In the open dropdown dialog, click the Local Installer for Linux x86_64 (Tar) link to download the latest release file to your computer
You can download a
.debrelease file, but it may overwrite system files upon installationThis article uses the cuDNN version
8.9.4for CUDA12.xwith the following filenamecudnn-linux-x86_64-8.9.4.25_cuda12-archive.tar.xz
In a new terminal window, switch to your downloads directory
$ cd Downloads/Using a secure transfer protocol such as
SCP, upload the cuDNN release file to your remote server$ scp cudnn-linux-x86_64-8.9.4.25_cuda12-archive.tar.xz pythonuser@SERVER-IP:/home/pythonuser/Replace
pythonuserandSERVER-IPwith your actual Vultr server detailsWhen the transfer is successful, navigate to your SSH session and switch to your user home directory
$ cd /home/pythonuser/Long list files in the directory
$ ls -lOutput:
-rw-rw-r-- 1 pythonuser pythonuser 887509908 Sep 9 07:42 cudnn-linux-x86_64-8.9.4.25_cuda12-archive.tar.xzVerify that the cuDNN release file is available
Extract files from the cuDNN release file
$ tar -xf cudnn-linux-x86_64-8.9.4.25_cuda12-archive.tar.xzCopy the cuDNN header files to the CUDA
includedirectory$ sudo cp cudnn-linux-x86_64-8.9.4.25_cuda12-archive/include/cudnn*.h /usr/local/cuda/include/Copy the cuDNN library files to the CUDA library
$ cp -P cudnn-linux-x86_64-8.9.4.25_cuda12-archive/lib/libcudnn* /usr/local/cuda/lib64/Change the library files directory permissions to grant all system users read access to the directory
$ sudo chmod a+r /usr/local/cuda/include/cudnn*.h /usr/local/cuda/lib64/libcudnn*
Install cuDNN using Conda
To install cuDNN using Conda on Ubuntu, verify the latest supported version that matches the CUDA version number. In this section, install cuDNN version 8.9.2.26 for CUDA 11.x using Conda as described below.
Using Conda, install the CUDA toolkit version
11.8.0$ conda install -c "nvidia/label/cuda-11.8.0" cuda> When installed, follow the Post-installation steps to activate the CUDA Toolkit on your server
Install the latest cuDNN version from the default channel
$ conda install cudnn=="8.9.2.26" -c defaultTo install a specific version from a particular channel, use the command syntax
conda install cudnn=="x.y.z.w" -c channel-name. The above command installs the cuDNN version8.9.2.26from the default channel.
Verify the cuDNN Installation
To test your cuDNN installation, download and run the NVIDIA verification program using the .deb release file as described below.
- In your web browser, visit the cuDNN download page
- Agree to the cuDNN software license agreement
- Find and click the
Local installer for Ubuntu22.04 x86_64 (Deb)file link to download the file on your computer
This article uses the cuDNN version 8.9.4 with the following filename
cudnn-local-repo-ubuntu2204-8.9.4.25_1.0-1_amd64.debIn a new terminal session, switch to your downloads file directory
$ cd DownloadsUsing SCP, upload the file to your remote server
$ scp cudnn-local-repo-ubuntu2204-8.9.4.25_1.0-1_amd64.deb pythonuser@SERVER-IP:/home/pythonuser/In your SSH session, switch to your user's home directory
$ cd /home/pythonuser/Install the required dependency libraries
$ sudo apt install libfreeimage3 libfreeimage-devLong list files in the directory
$ ls -lVerify that the
.debfile is availableCreate a new temporary directory such as
deb$ mkdir debMove the uploaded
.debinstaller package to the directory$ mv cudnn-local-repo-ubuntu2204-8.9.4.25_1.0-1_amd64.deb deb/Switch to the directory
$ cd debUsing the
arutility, extract the contents from the deb file$ ar x cudnn-local-repo-ubuntu2204-8.9.4.25_1.0-1_amd64.debWhen the extraction is successful, long list files in the directory
$ ls -lOutput:
 -rw-r--r-- 1 pythonuser  pythonuser       1252 Sep  9 08:44 control.tar.xz
 -rw-rw-r-- 1 pythonuser  pythonuser  904535554 Sep  9 08:43 cudnn-local-repo-ubuntu2204-8.9.4.25_1.0-1_amd64.deb
 -rw-r--r-- 1 pythonuser  pythonuser  904532772 Sep  9 08:44 data.tar.xz
Verify that a new
data.tar.xzis availableExtract files from the
data.tar.xzarchive$ tar -xf data.tar.xzWhen the extraction is complete, the
etc,usr, andvarsubdirectories are added to the directory.Switch to the
cudnn-local-repo-ubuntu2204-8.9.4.25sub-directory within thevardirectory$ cd var/cudnn-local-repo-ubuntu2204-8.9.4.25/Within the directory, extract files from the
libcudnn8-samples_8.9.4.25-1+cuda12.2_amd64.debfile$ ar x libcudnn8-samples_8.9.4.25-1+cuda12.2_amd64.debExtract files from the new
data.tar.xzarchive file$ tar -xf data.tar.xzWhen the extraction is complete, switch to the new
usrdirectory that contains source code, and sample program files$ cd usr/src/cudnn_samples_v8/Switch to the
mnistCUDNNprogram directory$ cd mnistCUDNNClean any previous build artifacts
$ make cleanCompile the
MNISTprogram$ makeWhen successful, your output should look like the one below:
 CUDA_VERSION is 12000
 Linking agains cublasLt = true
 TARGET ARCH: x86_64
 .
 .
 /usr/local/cuda/bin/nvcc -I/usr/local/cuda/include -I/usr/local/cuda/include
 -IFreeImage/include -ccbin g++ -m64 -gencode
 arch=compute_50,code=sm_50 -gencode
 .
 .
 arch=compute_90,code=compute_90 -o fp16_dev.o -c fp16_dev.cu
 .
 g++ -I/usr/local/cuda/include -I/usr/local/cuda/include -IFreeImage/include   -o mnistCUDNN.o -c mnistCUDNN.cpp
 /usr/local/cuda/bin/nvcc -ccbin g++ -m64 -gencode arch=compute_50,code=sm_50 -gencode
 .
 arch=compute_90,code=compute_90 -o mnistCUDNN fp16_dev.o fp16_emu.o mnistCUDNN.o -I/usr/local/cuda/include -I/usr/local/cuda/include -IFreeImage/include -L/usr/local/cuda/lib64 -L/usr/local/cuda/lib64 -L/usr/local/cuda/lib64 -lcublasLt -LFreeImage/lib/linux/x86_64 -LFreeImage/lib/linux -lcudart -lcublas -lcudnn -lfreeimage -lstdc++ -lm
If the command returns compilation errors, run the
mnistCUDNNinstead$ ./mnistCUDNNWhen successful, your output should look like the one below:
 Executing: mnistCUDNN
 .
 Testing single precision
 .
 Loading binary file data/conv1.bin
 .
 Testing cudnnGetConvolutionForwardAlgorithm_v7 ...
 .
 ^^^^ CUDNN_STATUS_SUCCESS for Algo 5: -1.000000 time requiring 178432 memory
 .
 Testing cudnnFindConvolutionForwardAlgorithm ...
 ^^^^ CUDNN_STATUS_SUCCESS for Algo 1: 0.045248 time requiring 0 memory
 .
 ^^^^ CUDNN_STATUS_SUCCESS for Algo 4: 5.640960 time requiring 184784 memory
 .
 Test passed!
When the test is successful, cuDNN is active and installed on your server
Verify the System Compatibility with cuDNN Versions
To successfully install and use cuDNN on your server, verify that the following necessary drivers and minimum required versions are available on the system:
- Kernel version
- GCC version
- NVIDIA driver version
Verify the installed drivers and versions on your system to use cuDNN as described in the following sections.
Verify the Installed NVIDIA Drivers
NVIDIA GPU Drivers are essential for the system to access and use the GPU. On Vultr Cloud GPU servers, the drivers are pre-installed during system initialization. When installing NVIDIA cuDNN, verify if the NVIDIA GPU drivers are correctly installed using the following command
$ nvidia-smiVerify the Installed CUDA Toolkit Version
Applications that use cuDNN require the CUDA Toolkit to work correctly. Verify if the CUDA compiler is available on your server using the following command
$ nvcc --versionYour output should look like the one below:
nvcc: NVIDIA (R) Cuda compiler driver
Copyright (c) 2005-2023 NVIDIA Corporation
Built on Tue_Jul_11_02:20:44_PDT_2023
Cuda compilation tools, release 12.0, V12.0.140
Build cuda_12.0.r12.0/compiler.32267302_0
As displayed in the above output, the CUDA 12.x. version is available on the system
Verify the Available Kernel Version
cuDNN requires a recent kernel version to work on your system. The kernel version must be more recent than the minimum version required by the cuDNN version you intend to install. Run the following command to view the available kernel version on your system
$ uname -rOutput:
5.15.0-75-generic The above output displays the installed kernel version 5.15.0-75
Verify the GCC Version
The GNU Compiler Collection (GCC) is necessary when compiling application programs. To use cuDNN, your system must have a GCC version higher than the required cuDNN version.
Verify the installed GCC version
$ gcc --versionYour output should look like the one below:
gcc (Ubuntu 11.3.0-1ubuntu1~22.04.1) 11.3.0
Copyright (C) 2021 Free Software Foundation, Inc.
This is free software; see the source for copying conditions.
There is NO warranty; not even for MERCHANTABILITY or FITNESS FOR A PARTICULAR PURPOSE.
As displayed in the above output, the GCC version 11.3.0 is available on the server
Conclusion
In this guide, you installed the NVIDIA cuDNN package on a Ubuntu 22.04 server using two options, native and Conda. You also verified the system configuration to install the matching cuDNN version. For more information about cuDNN, visit the official documentation. To develop applications using cuDNN, visit the cuDNN API Reference that discusses the available cuDNN functions such as routines for training and inference using neural networks.