
How to Install Parrot OS

Introduction
Parrot OS is a free and open-source Debian-based desktop Linux distribution designed for developers, IT security experts, system administrators, and privacy-centric users. It's best known as an alternative to Kali Linux, and offers a wide range of security and digital forensic tools available through the default Mate desktop environment. This article explains how to install Parrot OS on a Vultr server instance and set up remote access.
Prerequisites
- Deploy a new Debian 11 server. We recommend using a server with at least 4 GB of RAM.
- Create a non-root user with sudo privileges on the server.
- Log in as the non-root user through SSH.
This article uses the example IP address 192.0.2.1 and username example-user. Replace these with your values.
1. Set up a Debian Desktop
By default, Parrot OS uses the Mate desktop environment. Install Mate along with a desktop display manager such as lightdm in the following steps.
Install the Mate desktop environment.
$ sudo apt install mate-desktop-environment -yInstall the Lightdm display manager.
$ sudo apt install lightdm lightdm-gtk-greeter -yStart Lightdm.
$ sudo systemctl start lightdmConfirm that Lightdm is up and running.
$ sudo systemctl status lightdmChange the default server environment from terminal to desktop.
$ sudo systemctl set-default graphical.targetRestart the server to save changes.
$ sudo reboot
2. Install NoMachine
Visit the official NoMachine website in your desktop web browser.
Navigate to the NoMachine for Linux page.
Download the
NoMachine for Linux DEB amd64package.Open a new terminal session on your desktop computer. Windows users should open PowerShell.
Navigate to the directory you saved the download file, usually your Downloads folder.
$ cd ~/DownloadsUpload the NoMachine package to the server using Secure Copy.
$ scp nomachine_<version>_amd64.deb example-user@192.0.2.1:~/Enter your server password when prompted.
When the upload is complete, SSH to the Debian server as your non-root user.
$ ssh example-user@192.0.2.1Install the NoMachine package.
$ sudo apt install ./nomachine_<version>_amd64.debConfigure the firewall to allow NoMachine connections.
$ sudo ufw allow 4000/tcpRestart the Firewall.
$ sudo ufw reload
3. Connect with NoMachine
Open your web browser and visit the NoMachine website at https://nomachine.com
Download and install NoMachine on your computer.
Open the NoMachine application from your computer's start menu.
In the Welcome to NoMachine tutorial window, click OK to proceed.
On the Machines page, click Add. Enter a Name (label) for your connection, enter your Debian server IP address in the Host: field, and keep
4000as the Port,NXas the protocol.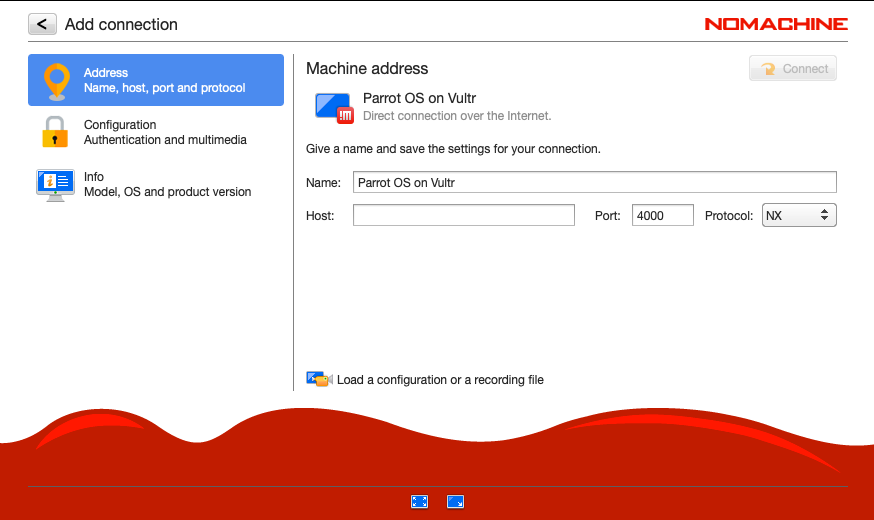
Click Connect to establish a connection, and accept the server certificate fingerprint.
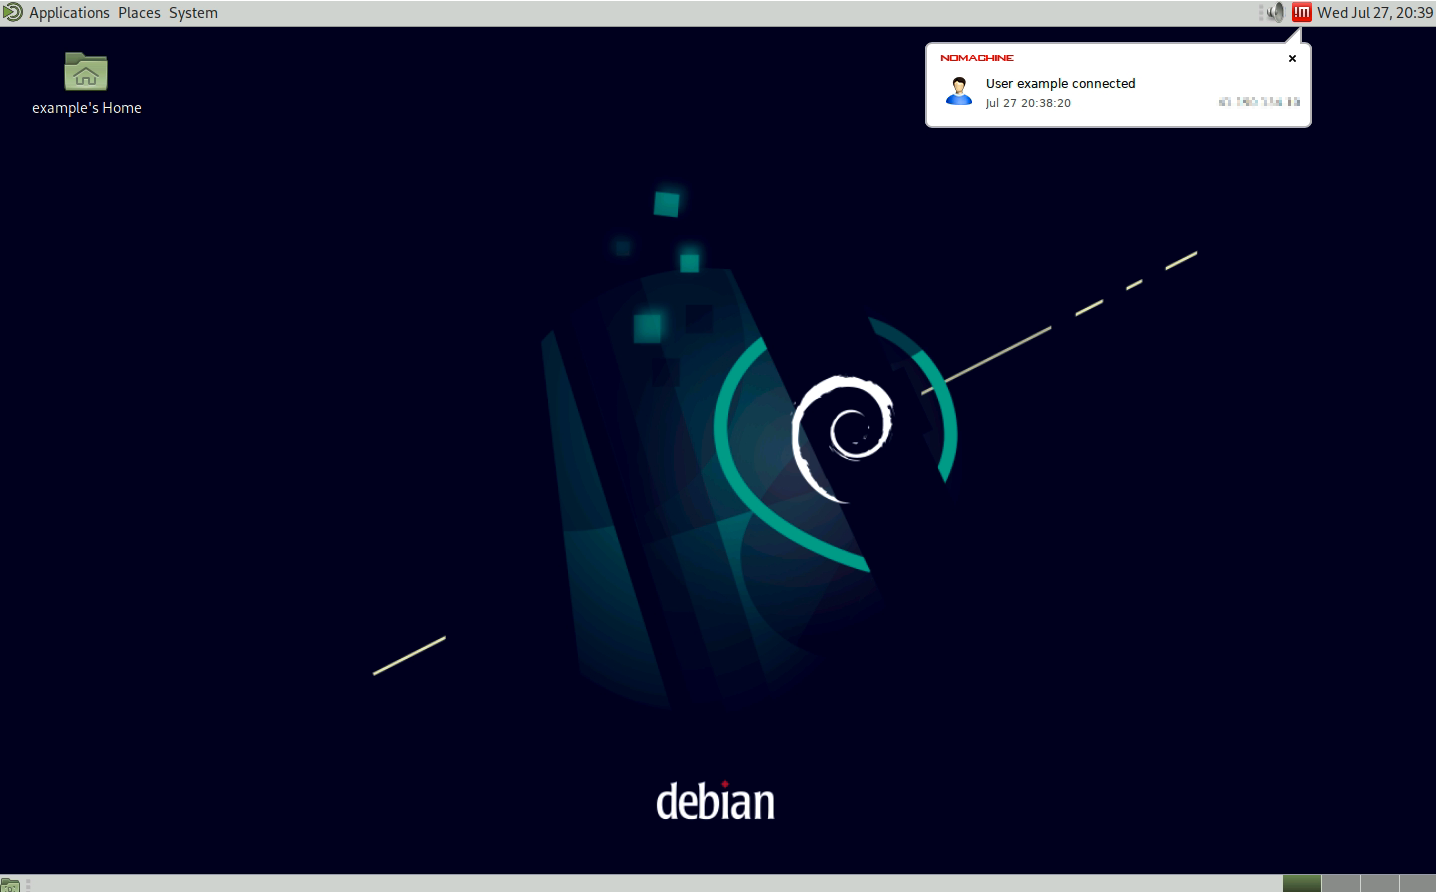
Enter your Username and Password, then click Login to access your Debian server desktop.
4. Install Parrot OS
On your Debian desktop. Click Applications, navigate to System Tools and click Mate Terminal
In the terminal window, update the server.
$ sudo apt updateInstall git.
$ sudo apt install git -yClone the Parrot OS repository.
$ git clone https://nest.parrotsec.org/build/alternate-install.gitSwitch to the
alternate-installdirectory.$ cd alternate-installAdd execution privileges on the
parrot-install.shfile.$ sudo chmod +x parrot-install.shRun the script.
$ sudo ./parrot-install.shSelect your desired Parrot OS edition. This guide uses the Security edition (option 3).
 Choose your edition.

 *********************************************
 Welcome to Parrot On-Debian Installer Script
     rev 0.3 - 2020-03-19
 ** 1) Install Core Only
 ** 2) Install Headless Edition
 ** 3) Install Security Edition
 ** 4) Install Home Edition
 ** 5) Install Embedded Edition
 *********************************************
 Please enter a menu option and enter or enter to exit.
Enter N (case-sensitive) when prompted about the
sources.listfile.Accept the following prompt. Enter N for No (it works) Configuration file '/etc/apt/sources.list.d/parrot.list' ==> File on system created by you or by a script. ==> File also in package provided by package maintainer. What would you like to do about it ? Your options are: Y or I : install the package maintainer's version N or O : keep your currently-installed version D : show the differences between the versions Z : start a shell to examine the situation The default action is to keep your current version. *** parrot.list (Y/I/N/O/D/Z) [default=N] ?The Parrot OS installation starts and takes about 20 minutes to complete. If you receive any errors during the download process, run the script again.
During installation, additional prompts for
MAC address,sslh, andWiresharkpop up, press enter to use the default options for each of the configurations.When the installation is complete, check your Linux distribution information with the following command.
$ cat /etc/*releaseOutput:
 PRETTY_NAME="Parrot OS 5.0 (Electro Ara)"
 NAME="Parrot OS"
 VERSION_ID="5.0"
 VERSION="5.0 (Electro Ara)"
 VERSION_CODENAME=ara
 ID=parrot
 ID_LIKE=debian
 HOME_URL="https://www.parrotsec.org/"
 SUPPORT_URL="https://community.parrotsec.org/"
 BUG_REPORT_URL="https://community.parrotsec.org/"
Restart the Server to boot into the new Parrot OS system.
$ sudo reboot
5. How to Upgrade
Confirm your Parrot OS version.
$ cat /etc/issueUpdate Parrot OS packages.
$ sudo apt updateInstall Parrot Core.
$ sudo apt install parrot-coreUpgrade Parrot OS.
$ sudo parrot-upgradeThe command upgrades all existing server packages and the base Parrot OS system to the latest version. Follow the upgrade process and reply to any prompts until completion.
Reboot the server.
$ sudo rebootYou have successfully upgraded to the latest Parrot OS release. Access your Parrot OS desktop and navigate to System Information, or run
$ cat /etc/issuein the terminal to verify your new Parrot OS version.
More Information
You have successfully installed Parrot OS on a Vultr Instance. For more information and configuration options, please visit the official Parrot OS documentation.
Next Steps
Parrot OS contains powerful tools for security and penetration testing. Please familiarize yourself with Vultr's Terms of Service and Acceptable Use Policy before using your Parrot OS system.