

Introduction
Human face recognition is a computer vision technology that identifies/locates human faces in digital media such as photos or videos and matches each face against a database of faces to recognize individual faces. Facial recognition systems are typically employed for biometric verification purposes of authenticating users.
Human face recognition has several applications including:
- ID verification - facial recognition has been used as biometric authentication for various devices such as the Face ID of recent iPhones, and face recognition login for certain video game consoles.
- Healthcare - machine learning face recognition has been used to identify genetic abnormalities just based on facial dimensions.
- Automobile security - face recognition is used in modern automobiles to secure vehicle access.
- Education - facial recognition is also used in maintaining the security of campuses and also allowing only bonafide students into examination venues.
This guide covers how to build a face recognition application in Python on Vultr Cloud GPU.
Prerequisites
- Working knowledge of Python.
- Properly installed and configured python toolchain including pip (Python version >= 3.3).
How Face Recognition Works
Human face recognition usually occurs in 3 major stages:
- Face detection - this is the first task involved in face recognition and is often mistaken for the entire process of face recognition. The coordinates of the detected faces in the image or video stream are calculated and passed to the next stage. For more information on face detection, check out the Human face detection guide.
- Feature extraction - in this stage, distinctive features from the facial image are extracted using a face embedding model. A face embedding is a vector representing extracted features from the face; face embeddings for the same face are typically very close in the vector space, while the face embeddings of different faces are usually far away. These extracted face embeddings are used for recognition.
- Face recognition - the previously extracted face embeddings for the new image are calculated and compared with face embeddings of individual images already in the database. A close face embedding match with an image in the database represents a face recognition. The recognized face is then appropriately tagged.
Many different facial recognition algorithms are commonly used, each with its unique strengths and limitations. Some of the most popular algorithms include:
- Principal Component Analysis (PCA): This is a dimensionality reduction algorithm that is commonly used in facial recognition. It finds the directions in the data that capture the most variance and projects the data onto these directions. This reduces the dimensionality of the data, making it easier to process and analyze.
- Linear Discriminant Analysis (LDA): This is a classification algorithm that is commonly used in facial recognition. It finds the directions in the data that maximally separate the different classes, and projects the data onto these directions. This makes it easier to distinguish between different classes of faces.
- Support Vector Machines (SVMs): This is a supervised learning algorithm that is commonly used in facial recognition. It finds the hyperplane that maximally separates the different classes in the data, and uses this hyperplane to classify new data points. This allows it to accurately classify faces even in the presence of noise and other variations.
- Convolutional Neural Networks (CNNs): This is a type of deep learning algorithm that is commonly used in facial recognition. It uses multiple layers of interconnected neurons to learn the underlying patterns in the data. This allows it to accurately recognize faces even in complex and challenging environments.
Deploy a Vultr Cloud GPU Instance
To create the Vultr cloud GPU instance, recreate the following steps:
- Log in to your Vultr account, and navigate to the Deploy Server section.
- Select the Cloud GPU server type.
- Select a GPU type from the available options. The options include Compute Nvidia A100 and Workstation Nvidia A40. This guide opts for the A100 option.
- Choose a server location.
- Select an Operating System from the Server Image section. This guide opts for Ubuntu 22.10 x64.
- Choose a server size from the available options. This guide opts for the 1/20 GPU with 4GB GPU RAM option.
- Add your SSH keys to log into the server later, and enter the server hostname and label.
- Click on Deploy Now to create the server. It takes a few minutes for the server to be available, and the Status should be changed to Running.
The Cloud GPU is ready. Now you can proceed to building the face recognition application.
Setting Up The Project Virtual Environment
After the server finishes setting up, ssh into the server:
$ ssh -i /path/to/ssh_key [server_ip]The server's IP address can be copied from its Overview section in its dashboard. When ssh prompts for the server's password - the password can also be found in the server's Overview section.
By default, the server instance comes preinstalled with Python and pip. It also comes preinstalled with the terminal multiplexer - Tmux. When running code on a remote server, all running programs stop after logging out of the server, by using a terminal multiplexer like Tmux - you can leave code running such as an application server, even after you log out of the ssh session.
To start a new Tmux session, run the following command on the server:
$ tmux new -s fr-demoThis starts a new tmux session named fr-demo.
Next, create an isolated virtual environment for your application:
Install the
virtualenvpython package:$ pip install virtualenvCreate the project directory:
$ mkdir face_recognizer_demoNavigate into the new directory:
$ cd face_recognizer_demoCreate the virtual environment:
$ python3 -m venv envThis creates a new folder named
envcontaining scripts to control the virtual environment, including program libraries.Activate the virtual environment:
$ source env/bin/activate
Installing the Face Recognition Library
In this guide, the face-recognition python library is used for facial recognition tasks. The library is built using dblib's state-of-the-art face recognition library with deep learning and has a model accuracy of 99.38% on the Labeled Faces in the Wild benchmark.
To install the face-recognition library:
$ pip install face_recognitionInstalling Other Required Libraries
OpenCV - OpenCV is used to read and write image files in this guide, to install:
$ pip install opencv-pythonNumpy:
$ pip install numpyArgparse - this is used to parse command-line arguments, to install:
$ pip install argparseFlask - this will be used to build the API server:
$ pip install flask
Preparing the Face Database
The face recognition application will recognize faces in new images based on an already built-up database of faces. To detect specific faces in new images, create a new directory within the project directory to act as the facial image database:
$ mkdir face_databaseNow populate the new directory with specific images of individuals. This guide uses the following images:
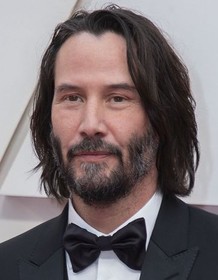
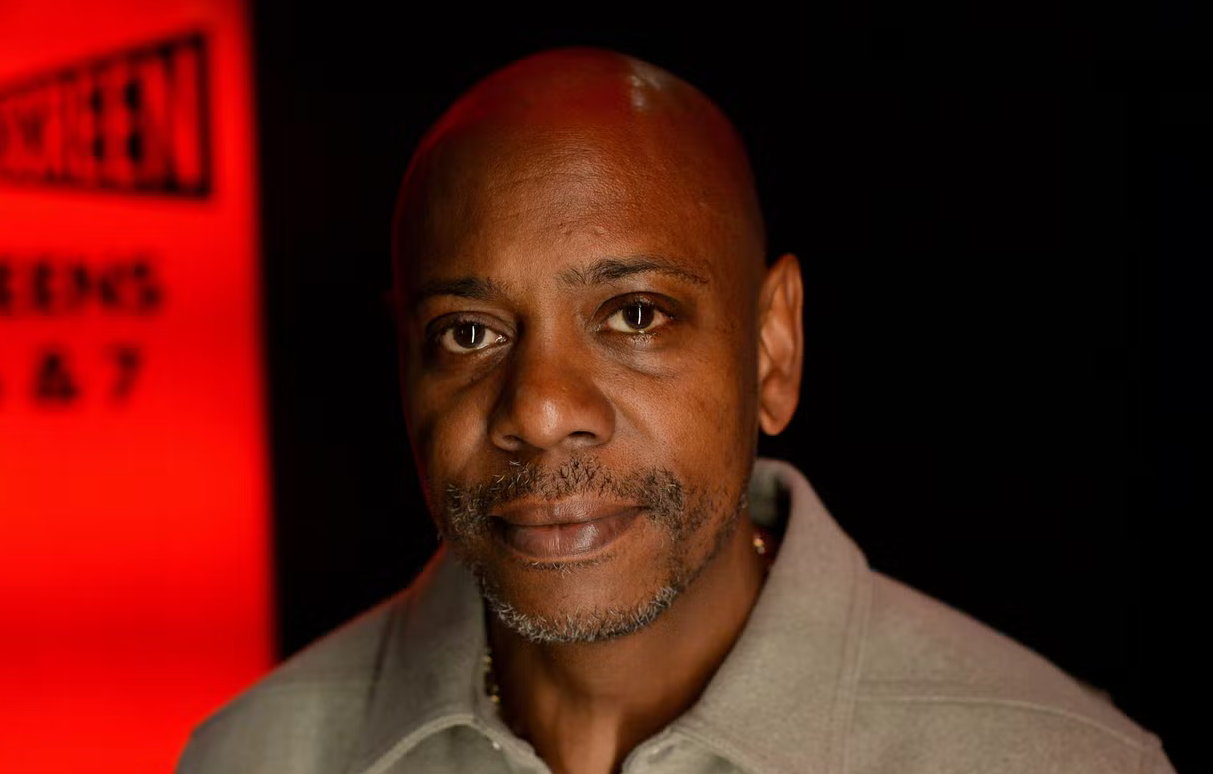
Save both images respectively as the characters in them, e.g Keanu Reeves.jpg and Dave Chapelle.png.
Note: The images in the database should contain pictures of the individuals to be recognized in subsequent images, and saved with a file name corresponding to the characters in the images - as the file names will serve as labels for recognition.
Also, create two more directories within the project directory:
$ mkdir images resultsThe images directory will house the new images containing faces that are to be recognized by the application, which will be sent over an API. The results directory will contain the images where those faces have already been recognized, and prepared to be sent back to the client.
Building Face Recognition
To get started with building the face recognition application, create a face_recognizer.py within the project directory:
$ touch face_recognizer.pyOpen the file in your text editor.
Import Libraries
Import the installed and required libraries for the project by adding the following lines:
import face_recognition as fr
import cv2
import numpy as np
import os
import argparse
import time
Reading Face Encodings
To read face encodings from images in the face database, add the following function:
def get_encoded_faces():
    encoded = {}
    for dirpath, dnames, fnames in os.walk("./face_database"):
        for f in fnames:
            if f.endswith(".jpg") or f.endswith(".png"):
                face = fr.load_image_file("face_database/" + f)
                encoding = fr.face_encodings(face)[0]
                encoded[f.split(".")[0]] = encoding
    return encoded
The get_encoded_faces function walks through the face_database folder in search of jpg or png image files. The load_image_file function is used to read found images, and each image is passed to the face_encodings function.
The face_encodings function takes an image containing faces as an argument and several optional arguments:
- known_face_locations: the bounding boxes of each face if you already know them. Defaults to None.
- num_jitters: number of times to re-sample the face when calculating encoding, with higher values being more accurate but slower (i.e 100 is 100x slower). Defaults to 1.
- model: model to use - "large" or "small" (default) which only returns 5 points but is faster.
This function returns a list of 128-dimensional face encodings for each face in the image. Since each image in the database contains only a single individual to be recognized, the first encoding found is selected and saved to a dictionary with the file name (which represents the individual in the image) as a key for that encoding.
Classifying Faces in New Images
To recognize faces in new images, create the following function:
def classify_faces(images):Next, get the encoded faces in the database:
    faces = get_encoded_faces()
    faces_encoded = list(faces.values())
    known_face_names = list(faces.keys())
To perform recognition, add the following lines to the function:
    recognized_faces = []
    for im in images:
        print(f"Beginning face recognition on image {im}...")
        img = cv2.imread(im, 1)

        start = time.time()
        face_locations = fr.face_locations(img, model="cnn")
        unknown_face_encodings = fr.face_encodings(img, face_locations)

        face_names = []
        for face_encoding in unknown_face_encodings:
            matches = fr.compare_faces(faces_encoded, face_encoding)
            name = "Unknown"

            face_distances = fr.face_distance(faces_encoded, face_encoding)
            best_match_index = np.argmin(face_distances)

            if matches[best_match_index]:
                name = known_face_names[best_match_index]

            face_names.append(name)

            for (top, right, bottom, left), name in zip(face_locations, face_names):
                cv2.rectangle(img, (left-20, top-10), (right+20, bottom+15), (300, 0, 0), 2)
                cv2.rectangle(img, (left-20, bottom -10), (right+20, bottom+15), (500, 0, 0), cv2.FILLED)
                font = cv2.FONT_HERSHEY_DUPLEX
                cv2.putText(img, name, (left -10, bottom + 10), font, 0.5, (300, 300, 300), 1)
Above, the list of images passed to the function is looped through. Each image is read using the imread function of OpenCV, and the time is recorded to calculate recognition time later.
Face locations in the image are returned using the face_locations function. This function takes an image as an argument, including an optional model argument which can take either of two possible values - hog or cnn with hog being less accurate but faster on CPUs, and cnn - a more accurate deep-learning model which is GPU/CUDA accelerated if available.
Note: if running on low power hardware - replace cnn with hog.
face_locations returns a list of tuples of found face locations in (top, right, bottom, left) order. Then, the face encodings of the image are calculated using face_encodings, with the previously returned face locations, passed as the known_face_locations optional argument of the function. This returns the face encodings for each face in the image.
Next, the face encodings for faces in the image are compared to the face encodings from the database using the compare_faces function. This function takes two arguments - a list of known face encodings (e.g face encodings of the database images) and a face encoding to compare against the list. This returns a list of True/False values indicating which face encodings match the face encoding to check. The name variable is also set to Unknown.
To find out how similar the faces are to the ones in the database - the distance between them is calculated using the face_distance function. This function takes two arguments, a list of face encodings and a face to compare. This calculates the euclidean distance for each face comparison and returns a NumPy array with the distance for each face in the same order as the passed list of face encodings.
Using the argmin function, the minimum value is found and its index is returned. This represents the face with the minimum euclidean distance (that is, the most similar face). The name variable is then set to the matching face.
cv2.rectangle is then used to draw bounding boxes over the faces in the image and assign appropriate labels for each face. Unrecognized faces will be labeled as Unknown”.
To save the recognized images, add the following lines to the classify_faces function:
        end = time.time() - start
        filename = os.path.split(im)[-1]
        new_img_path = "./results/" + filename[:-4] + "_detected" + filename[-4:]
        recognized_images.append(new_img_path)

        cv2.imwrite(new_img_path, img)
        print(f"Recognition on image - {im} done...took {end} secs.")

    return recognized_images
The new image with the recognized faces is then saved into the results/ folder, and the image path is saved into the list and returned. The amount of time elapsed is also calculated and displayed on the screen.
Adding WebCam Support
To allow facial recognition through a webcam, add the following function:
def webcam_recognition():
    # 0 for in-built webcam
    video_capture = cv2.VideoCapture(0)

    faces = get_encoded_faces()
    faces_encoded = list(faces.values())
    known_face_names = list(faces.keys())

    face_locations = []
    face_encodings = []
    face_names = []
    process_this_frame = True

    while True:
        # Grab a single video frame
        ret, frame = video_capture.read()

        if process_this_frame:
            # Resize frame of video to 1/4 size for faster face recognition processing
            small_frame = cv2.resize(frame, (0, 0), fx=0.25, fy=0.25)

            # Convert the image from BGR color (which OpenCV uses) to RGB color (which face_recognition uses)
            rgb_small_frame = small_frame[:, :, ::-1]

            # Find all the faces and face encodings in the current frame of video
            face_locations = fr.face_locations(rgb_small_frame, model="cnn")
            face_encodings = fr.face_encodings(rgb_small_frame, face_locations)

            face_names = []
            for face_encoding in face_encodings:
                # See if the face is a match for the known face(s)
                matches = fr.compare_faces(known_face_encodings, face_encoding)
                name = "Unknown"

                # If any matches were found in known_face_encodings, use the known face with the smallest distance

                face_distances = fr.face_distance(known_face_encodings, face_encoding)
                best_match_index = np.argmin(face_distances)
                if matches[best_match_index]:
                    name = known_face_names[best_match_index]

                face_names.append(name)

            process_this_frame = not process_this_frame

        # Display the results
        for (top, right, bottom, left), name in zip(face_locations, face_names):
            # Scale back up face locations since the frame we detected was scaled to 1/4 size
            top *= 4
            right *= 4
            bottom *= 4
            left *= 4

            # Draw a box around the face
            cv2.rectangle(frame, (left, top), (right, bottom), (0, 0, 255), 2)

            # Draw a label with a name below the face
            cv2.rectangle(frame, (left, bottom - 35), (right, bottom), (0, 0, 255), cv2.FILLED)
            font = cv2.FONT_HERSHEY_DUPLEX
            cv2.putText(frame, name, (left + 6, bottom - 6), font, 1.0, (255, 255, 255), 1)

        # Display the resulting image
        cv2.imshow('Video', frame)

        # Hit 'q' on the keyboard to quit!
        if cv2.waitKey(1) & 0xFF == ord('q'):
            break

    # Release handle to the webcam
    video_capture.release()
    cv2.destroyAllWindows()
The code above reads the video stream from the webcam and processes the recognition - frame-by-frame.
Parsing Command-line Arguments
To parse command-line arguments in the application, add the following lines:
parser = argparse.ArgumentParser(description='Recognise faces in an image or through webcam, by\
                                            matching against faces in the database.')
parser.add_argument("images", metavar="I", type=str, nargs='*',
                    help='photo(s) to run facial recognition against the database')
parser.add_argument("--webcam", action='store_true', help='run face recognition through webcam.')
args = parser.parse_args()

if len(args.images) > 0:
    _ = classify_faces(args.images)

if args.webcam:
    webcam_recognition()
This lets you perform face recognition on any number of photos passed as arguments. It also lets you perform face recognition through a webcam by passing the --webcam flag.
Building the API Server
To build the API server which will be hosted on the Vultr Cloud GPU, create a app.py file within the project directory and import the following libraries:
from face_recogniser2 import classify_faces
from flask import Flask, request, send_file
import numpy as np
import cv2
Next, initialize the flask application:
# Initialize the flask application
app = Flask(__name__)

# Image directories
IMAGES = "./images/"
RESULTS = "./results/"
Build the API route by adding the following lines:
# Route ['POST'] requests to this method
@app.route("/api/recognition", methods=["POST"])
def recognition():
    # Get data and filename passed in the header
    file_path = IMAGES + request.headers['File-Name']
    r = request.get_data()

    # Convert image data string to uint8
    np_arr = np.frombuffer(r, np.uint8)

    # Decode image
    img = cv2.imdecode(np_arr, cv2.IMREAD_COLOR)
    cv2.imwrite(file_path, img)

    # Call recognition
    new_img_path = classify_faces([file_path])

    # Send new image back
    return send_file(new_img_path[0])
Above, POST requests to the endpoint /api/recognition are handled by the recognition function. The file path is constructed from the File-Name header field of the request, and the request data (that is, the image sent with request) is read.
The frombuffer function is used to read the binary data string into a numpy array, and the image is decoded into its original representation using the imdecode function. The image is then saved to the constructed file path, and passed to the classify_faces function for face recognition.
After the recognition is done, the image is sent back to the client using the send_file function.
To run the app, add the following line”
app.run(host='0.0.0.0', port=5000)When this is executed, the application will be hosted on port 5000.
Full Code
For reference, the final code:
import face_recognition as fr
import cv2
import numpy as np
import os
import argparse
import time

def get_encoded_faces():
    encoded = {}
    for dirpath, dnames, fnames in os.walk("./face_database"):
        for f in fnames:
            if f.endswith(".jpg") or f.endswith(".png"):
            face = fr.load_image_file("face_database/" + f)
            encoding = fr.face_encodings(face)[0]
            encoded[f.split(".")[0]] = encoding
    return encoded

def classify_faces(images):
    faces = get_encoded_faces()
    faces_encoded = list(faces.values())
    known_face_names = list(faces.keys())

    recognized_images = []
    for im in images:
        print(f"Beginning face recognition on image {im}...")
        img = cv2.imread(im, 1)

        start = time.time()
        face_locations = fr.face_locations(img, model="cnn")
        unknown_face_encodings = fr.face_encodings(img, face_locations)

        face_names = []
        for face_encoding in unknown_face_encodings:
            matches = fr.compare_faces(faces_encoded, face_encoding)
            name = "Unknown"

            face_distances = fr.face_distance(faces_encoded, face_encoding)
            best_match_index = np.argmin(face_distances)

            if matches[best_match_index]:
                name = known_face_names[best_match_index]

            face_names.append(name)

            for (top, right, bottom, left), name in zip(face_locations, face_names):
                cv2.rectangle(img, (left-20, top-10), (right+20, bottom+15), (300, 0, 0), 2)
                cv2.rectangle(img, (left-20, bottom -10), (right+20, bottom+15), (500, 0, 0), cv2.FILLED)
                font = cv2.FONT_HERSHEY_DUPLEX
                cv2.putText(img, name, (left -10, bottom + 10), font, 0.5, (300, 300, 300), 1)

        end = time.time() - start
        filename = os.path.split(im)[-1]
        new_img_path = "./results/" + filename[:-4] + "_detected" + filename[-4:]
        recognized_images.append(new_img_path)

        cv2.imwrite(new_img_path, img)
        print(f"Recognition on image - {im} done...took {end} secs.")

    return recognized_images

def webcam_recognition():
    # 0 for in-built webcam
    video_capture = cv2.VideoCapture(0)

    faces = get_encoded_faces()
    faces_encoded = list(faces.values())
    known_face_names = list(faces.keys())

    face_locations = []
    face_encodings = []
    face_names = []
    process_this_frame = True

    while True:
        # Grab a single video frame
        ret, frame = video_capture.read()

        if process_this_frame:
            # Resize frame of video to 1/4 size for faster face recognition processing
            small_frame = cv2.resize(frame, (0, 0), fx=0.25, fy=0.25)

            # Convert the image from BGR color (which OpenCV uses) to RGB color (which face_recognition uses)
            rgb_small_frame = small_frame[:, :, ::-1]

            # Find all the faces and face encodings in the current frame of video
            face_locations = fr.face_locations(rgb_small_frame, model="cnn")
            face_encodings = fr.face_encodings(rgb_small_frame, face_locations)

            face_names = []
            for face_encoding in face_encodings:
                # See if the face is a match for the known face(s)
                matches = fr.compare_faces(known_face_encodings, face_encoding)
                name = "Unknown"

                # If any matches were found in known_face_encodings, use the known face with the smallest distance

                face_distances = fr.face_distance(known_face_encodings, face_encoding)
                best_match_index = np.argmin(face_distances)
                if matches[best_match_index]:
                    name = known_face_names[best_match_index]

                face_names.append(name)

        process_this_frame = not process_this_frame

        # Display the results
        for (top, right, bottom, left), name in zip(face_locations, face_names):
            # Scale back up face locations since the frame we detected was scaled to 1/4 size
            top *= 4
            right *= 4
            bottom *= 4
            left *= 4

            # Draw a box around the face
            cv2.rectangle(frame, (left, top), (right, bottom), (0, 0, 255), 2)

            # Draw a label with a name below the face
            cv2.rectangle(frame, (left, bottom - 35), (right, bottom), (0, 0, 255), cv2.FILLED)
            font = cv2.FONT_HERSHEY_DUPLEX
            cv2.putText(frame, name, (left + 6, bottom - 6), font, 1.0, (255, 255, 255), 1)

        # Display the resulting image
        cv2.imshow('Video', frame)

        # Hit 'q' on the keyboard to quit!
        if cv2.waitKey(1) & 0xFF == ord('q'):
            break

    # Release handle to the webcam
    video_capture.release()
    cv2.destroyAllWindows()

parser = argparse.ArgumentParser(description='Recognise faces in an image or through webcam, by\
                                            matching against faces in the database.')
parser.add_argument("images", metavar="I", type=str, nargs='*',
                    help='photo(s) to run facial recognition against the database')
parser.add_argument("--webcam", action='store_true', help='run face recognition through webcam.')
args = parser.parse_args()

if len(args.images) > 0:
    _ = classify_faces(args.images)

if args.webcam:
    webcam_recognition()
The app.py code:
from face_recogniser2 import classify_faces
from flask import Flask, request, send_file
import numpy as np
import cv2

# Initialize the flask application
app = Flask(__name__)

# Image directories
IMAGES = "./images/"
RESULTS = "./results/"

# Route ['POST'] requests to this method
@app.route("/api/recognition", methods=["POST"])
def recognition():
    # Get data and filename passed in the header
    file_path = IMAGES + request.headers['File-Name']
    r = request.get_data()

    # Convert image data string to uint8
    np_arr = np.frombuffer(r, np.uint8)

    # Decode image
    img = cv2.imdecode(np_arr, cv2.IMREAD_COLOR)
    cv2.imwrite(file_path, img)

    # Call recognition
    new_img_path = classify_faces([file_path])

    # Send new image back
    return send_file(new_img_path[0])

app.run(host='0.0.0.0', port=5000)
Running the Code
To test the face recognition application, the following images containing individuals in the face database will be used:


Download both images, and save them respectively as test_image_1.png and test_image_2.jpg into the Downloads directory of your computer (not the deployed server).
Run the following command on the server to allow inbound connections on port 5000:
$ ufw allow 5000/tcpTo run the flask application server, enter the following command:
$ python3 app.pyIf the server starts successfully, you should get a similar output:
* Serving Flask app 'app'
* Debug mode: off
WARNING: This is a development server. Do not use it in a production deployment. Use a production WSGI server instead.
* Running on all addresses (0.0.0.0)
* Running on http://127.0.0.1:5000
* Running on http://[server_ip]:5000
Press CTRL+C to quit
This shows the application server started successfully.
To detach the tmux session, press Ctrl + B and then click D. This will detach the application session, now you can exit the ssh session without halting the running server code.
Now to test the endpoint, navigate to the Downloads/ folder of your own computer (where you downloaded the test images earlier in this section:
$ cd ~/DownloadsUsing curl, send a request to the endpoint and attach the first image:
$ curl -v [server_ip]:5000/api/recognition --data-binary @test_image_1.png -H "File-Name: test_image_1.png" --output test_image_1_detected.pngThis sends the specified image to the API endpoint and downloads the received response. Open the newly received image:
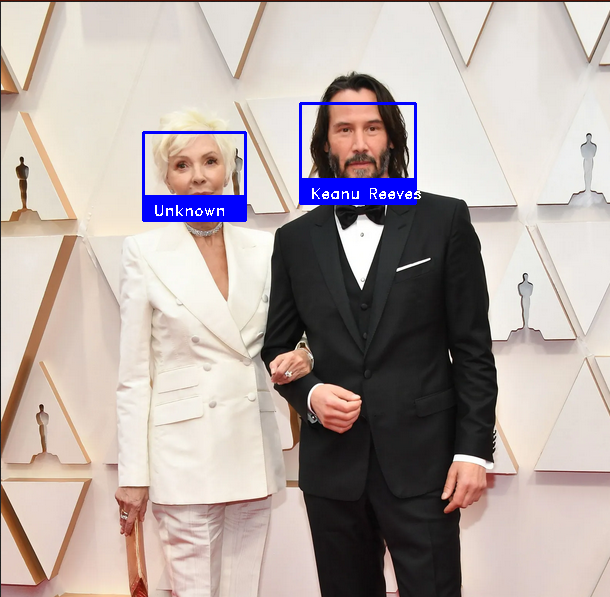
Here, the face recognition application accurately recognized the faces in the image, and tagged faces not present in the database as Unknown.
Send the second image to the endpoint:
$ curl -v [server_ip]:5000/api/recognition --data-binary @test_image_2.jpg -H "File-Name: test_image_2.jpg" --output test_image_2_detected.jpgYou will get back the following image as a response:
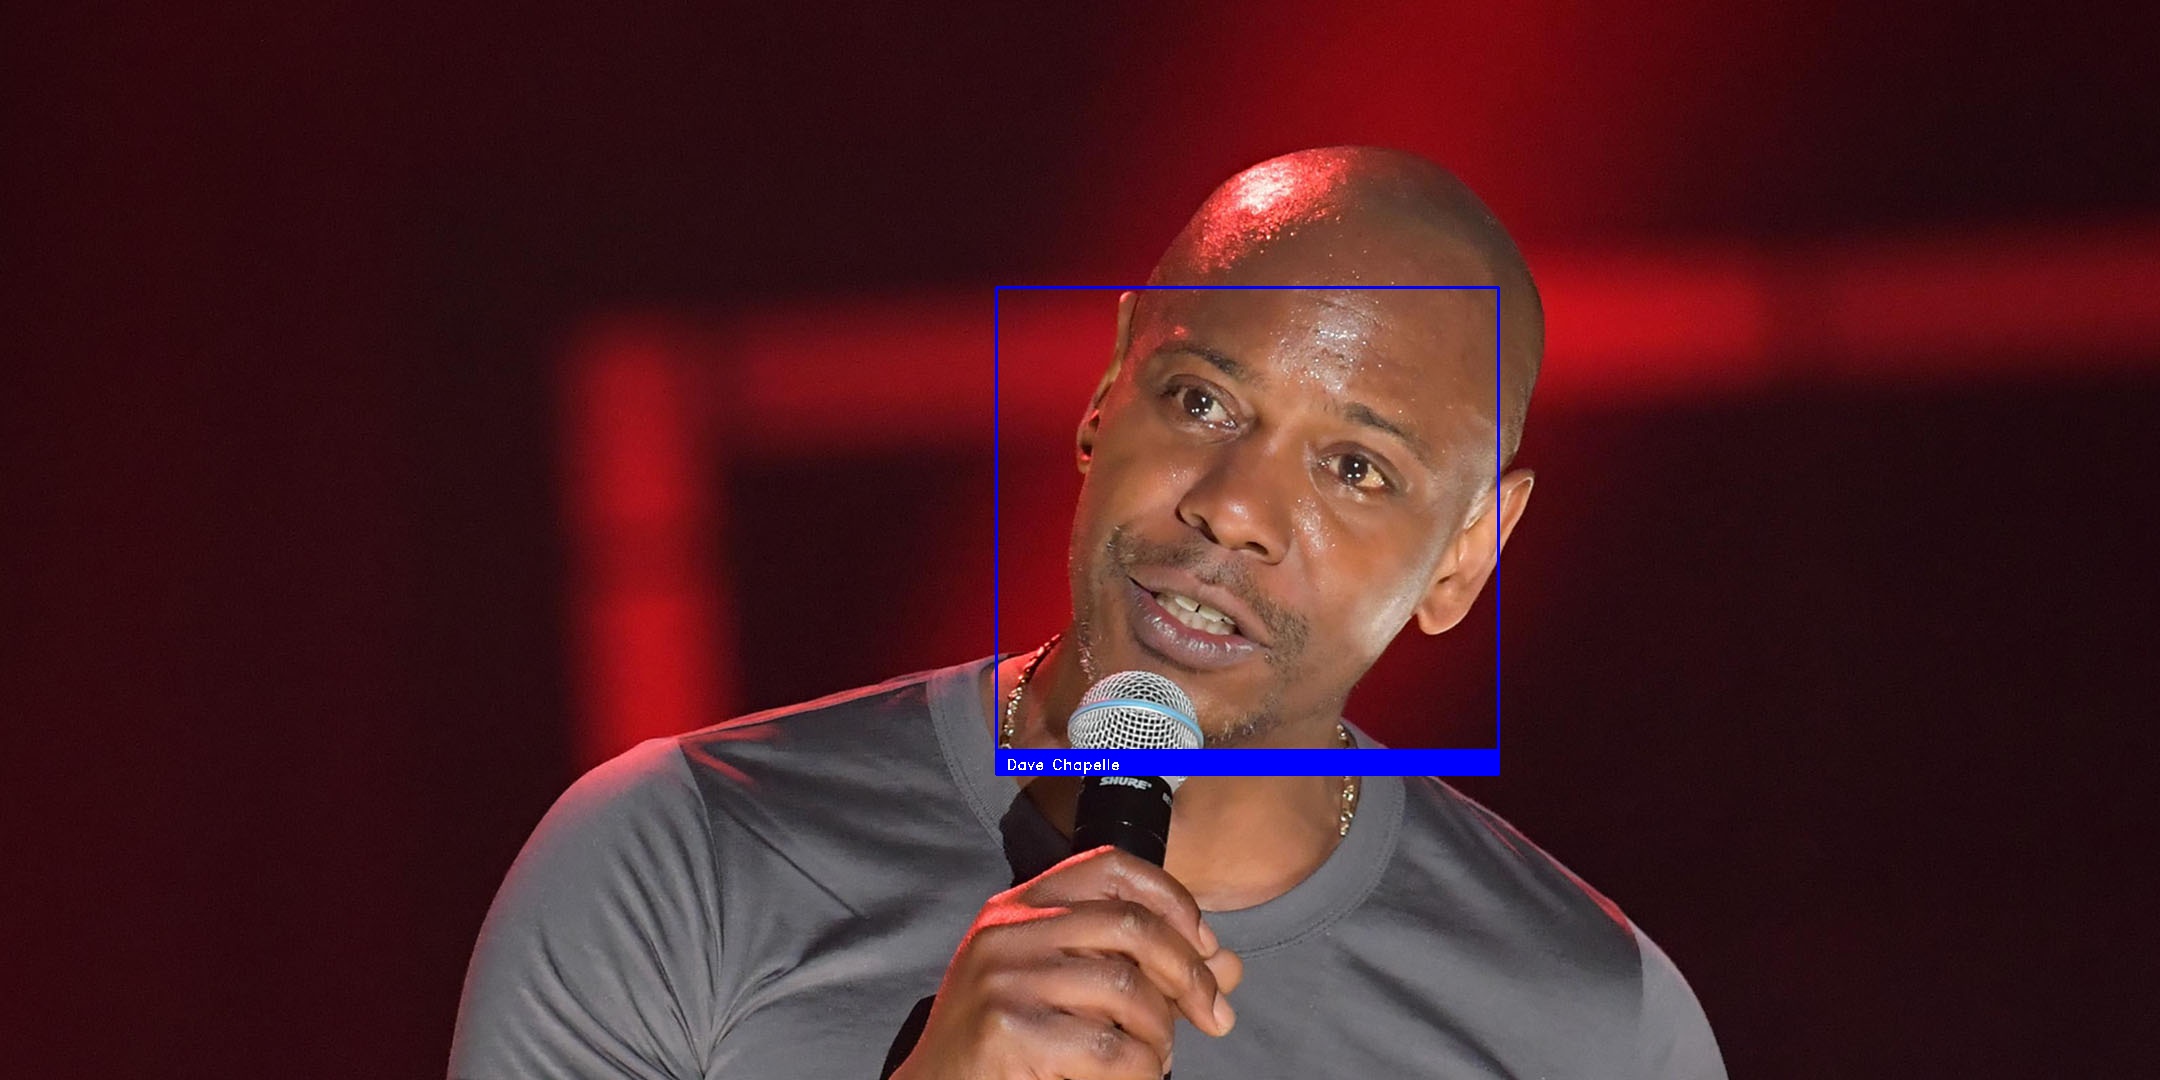
This shows the application ran successfully and accurately recognized all faces. If you go back to the server and check the project directory, you will find the images sent over the API endpoint in their respective directories - images and results.
To test out the recognition through webcam, run the code on your computer, save a picture of yourself in the face_database folder, and enter:
$ python face_recognizer.py --webcamConclusion
This guide covered how to build a face recognition application in python, including hosting it on a Vultr Cloud GPU server.
No comments yet.