How to Store Terraform State in Vultr Object Storage
Introduction
Terraform stores state information about provisioned resources to track metadata, improve performance by making fewer API calls, and synchronize the local configuration with remote resources. The state also allows Terraform to track when it needs to delete remote resources that you've removed from your local configuration.
When you manage infrastructure with Terraform, you must keep track of its state, either in a local state file or a remote backend, because it ties your local configuration files to the existing resources. Losing or corrupting the state could result in a miserable evening of manual terraform import-ing resources back into a new state file.
Storing state remotely instead of in a local file has some advantages. It allows multiple team members to work on the infrastructure without tracking who has the current state file. However, a source control system like git is not ideal because the state file can contain sensitive data and variables that may violate your IT privacy policies and best practices.
Object Storage with appropriate access control is a good solution. This guide explains how to use Vultr Object Storage to store your Terraform state.
Vultr Object Storage does not provide file locking. Therefore, you should take procedural steps to ensure only one person at a time updates the Terraform state in object storage.
Notes
- You'll need a Mac or Linux local machine to follow this guide or a Windows machine with WSL installed.
- This guide uses some "AWS" or "S3" naming conventions for compatibility with Terraform. The information is stored in Vultr Object Storage.
Getting Started
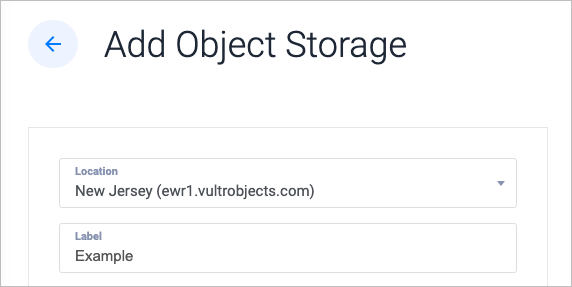
Log in to the Vultr customer portal and create a new Object Storage subscription.
Open the Overview page for your subscription. In the S3 Credentials section, note the Secret Key, Access Key, and Hostname.
This guide uses
ewr1.vultrobjects.comfor the hostname.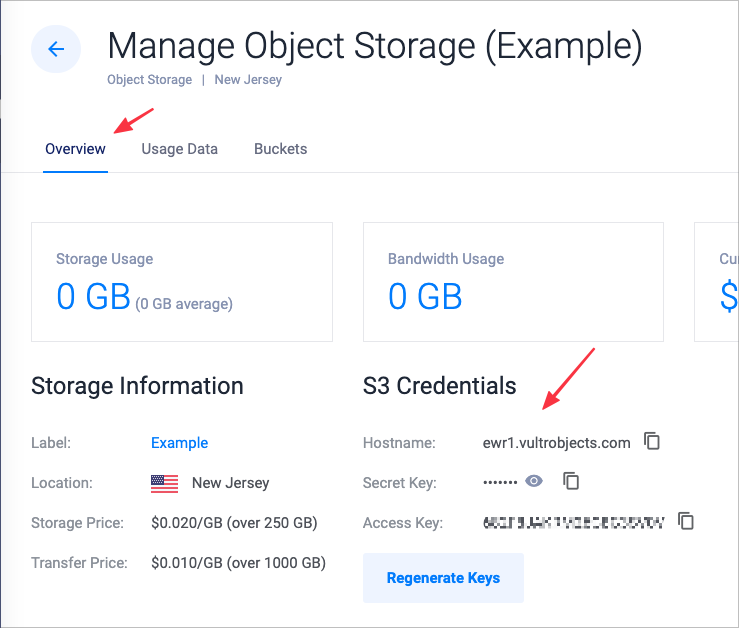
Click the Buckets tab. Create a bucket to store your Terraform state. This guide uses the bucket name
terraform-state-example.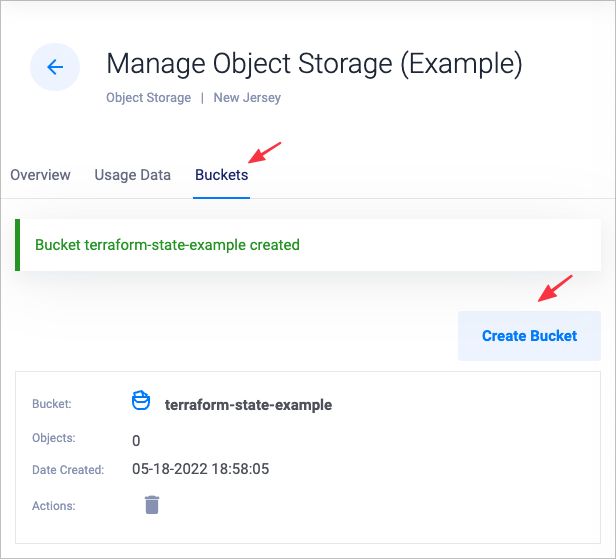
In your local command shell, export your keys as environment variables:
AWS_SECRET_ACCESS_KEYandAWS_ACCESS_KEY.$ export AWS_ACCESS_KEY='your access key' $ export AWS_SECRET_ACCESS_KEY='your secret key'In your
.tffile, create ans3backend configuration block. Use the information below, replacing terraform-state-example with your bucket name.terraform { backend "s3" { bucket = "terraform-state-example" key = "terraform.tfstate" endpoint = "ewr1.vultrobjects.com" region = "us-east-1" skip_credentials_validation = true } }Run
terraform initto initialize the backend.$ terraform init Initializing the backend... Successfully configured the backend "s3"! Terraform will automatically use this backend unless the backend configuration changes.If you have pre-existing state, you'll see an option to copy your existing state to object storage, like this:
     Initializing the backend...
 Do you want to copy existing state to the new backend?
   Pre-existing state was found while migrating the previous "local" backend to the
   newly configured "s3" backend. No existing state was found in the newly
   configured "s3" backend. Do you want to copy this state to the new "s3"
   backend? Enter "yes" to copy and "no" to start with an empty state.

   Enter a value:
If you want to preserve your current state, choose "yes".
Run
terraform applyto update your configuration. Check your object storage bucket to confirm the state file is stored successfully.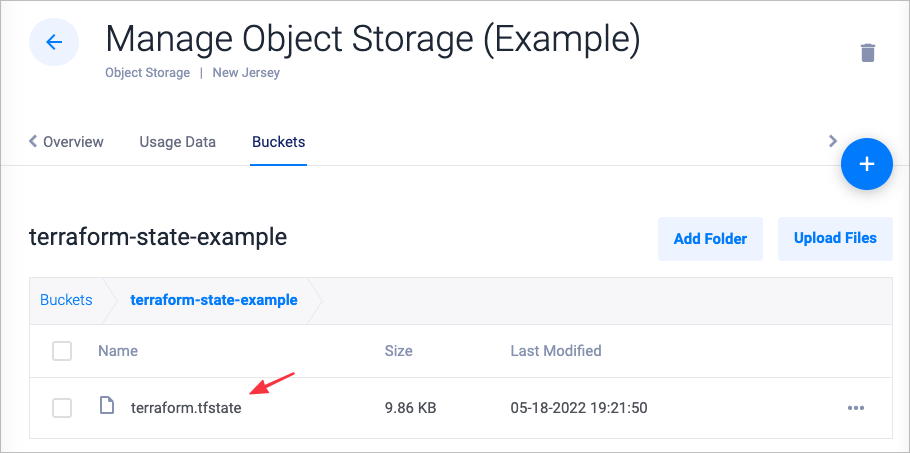
This remote state will be used on subsequent plan and apply runs. If you move or clone your Terraform configuration to a new machine or location, run terraform init to sync with the remote backend again.
Environment Variables
These environment variables are required to use the Terraform s3 backend:
- AWS_ACCESS_KEY: Use the value from your Object Storage overview tab, as shown above.
- AWS_SECRET_ACCESS_KEY: This value is also available on the overview tab.
- VULTR_API_KEY: Use the API key from the customer portal and make sure you've enabled your local machine's IP address in the Access Control section of that page.
S3 Configuration Block Details
Refer to this example configuration block for the details below:
  backend "s3" {
    bucket                      = "terraform-state-example"
    key                         = "terraform.tfstate"
    endpoint                    = "ewr1.vultrobjects.com"
    region                      = "us-east-1"
    skip_credentials_validation = true
}- "s3": is the required backend name. Always use this value.
- bucket: Use the bucket name you chose in the web interface.
- key: This can be an arbitrary name, but
terraform.tfstateis a good choice. If you have multiple environments or projects, you should use different names for each, such asdev.tfstate,qa.tfstate, orprod.tfstate, and so on. - endpoint: The hostname of your object storage location.
- region: Use
us-east-1, although Vultr Object Storage ignores this value. - skip_credentials_validation: Must be
truefor Vultr Object Storage.
Access Control
Files (objects) transferred to Vultr Object Storage are private by default and require your secret key to access them. Use caution if you modify your object or bucket permissions because Terraform state files may contain sensitive information.
Full Example
Here is a complete Terraform example that demonstrates how to deploy a FreeBSD server at Vultr and store the Terraform state in Object Storage. This example assumes the following:
- Environment variables
AWS_SECRET_ACCESS_KEY,AWS_ACCESS_KEY, andVULTR_API_KEY, are exported as described above. - Your local IP address has API access.
- You have already created an Object Storage bucket. Change the
terraform-state-exampleto your unique bucket name in the example below.
Example Steps
Create a project directory on your local machine.
Create an
example.tffile in your text editor.terraform { # Use the latest provider release: https://github.com/vultr/terraform-provider-vultr/releases required_providers { vultr = { source = "vultr/vultr" version = "2.11.1" } } # Configure the S3 backend backend "s3" { bucket = "terraform-state-example" key = "terraform.tfstate" endpoint = "ewr1.vultrobjects.com" region = "us-east-1" skip_credentials_validation = true } } # Set the API rate limit provider "vultr" { rate_limit = 700 retry_limit = 3 } # Store the New Jersey location code to a variable. data "vultr_region" "ny" { filter { name = "city" values = ["New Jersey"] } } # Store the FreeBSD 13 OS code to a variable. data "vultr_os" "freebsd" { filter { name = "name" values = ["FreeBSD 13 x64"] } } # Install a public SSH key on the new server. resource "vultr_ssh_key" "pub_key" { name = "pub_key" ssh_key = "... your public SSH key here ..." } # Deploy a Server using the High Frequency, 2 Core, 4 GB RAM plan. resource "vultr_instance" "freebsd" { plan = "vhf-2c-4gb" region = data.vultr_region.ny.id os_id = data.vultr_os.freebsd.id label = "freebsd" tags = ["runbsd"] hostname = "freebsd.mydomain.tld" ssh_key_ids = [vultr_ssh_key.pub_key.id] } # Display the server IP address when complete. output "freebsd_main_ip" { value = vultr_instance.freebsd.main_ip }Run
terraform initRun
terraform planRun
terraform applyYou can SSH as root to the server at the IP address printed after deployment.
More Information
To learn more about Terraform state and S3, see these resources at HasiCorp: