
Introduction
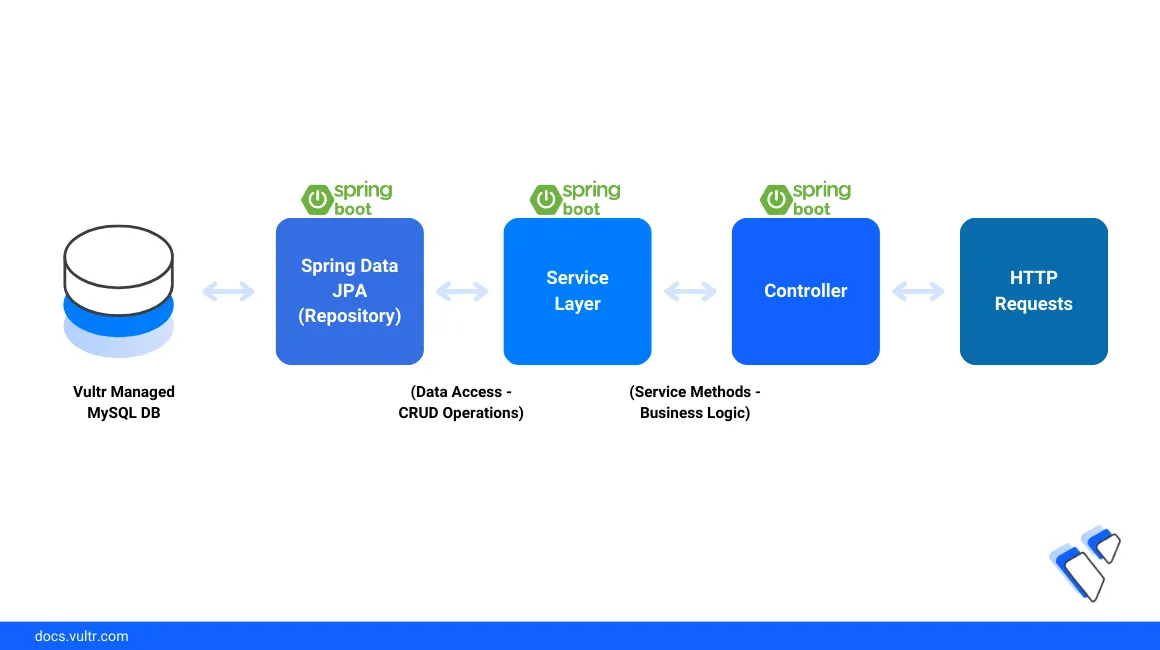
Spring Boot is a Java-based web application framework that supports the development of production standalone applications with minimal configurations. The framework offers rapid development features such as autoconfiguration and embedded web server applications. To improve the scalability and reliability of each application, you can integrate a dedicated database system such as a Vultr Managed Database for MySQL to perform constant read and write operations.
This guide explains how to use Vultr Managed Databases for MySQL with Spring Boot to develop production-ready applications.
Prerequisites
Before you begin:
Deploy a Vultr Managed Database for MySQL.
Deploy a Ubuntu server on Vultr to use as the development server.
Access the server as a non-root user with sudo privileges. For example,
linuxuser.Install the MySQL client tool.
console$ sudo apt install mysql
Install the latest Java Development Kit (JDK) version. For example, JDK 17:
console$ sudo apt install openjdk-17-jdk
Set up the Spring Boot Database
To test the Spring Boot application functionalities, connect to a Vultr Managed Database for MySQL and set up a new application database as described in the following steps.
Connect to your Vultr Managed Database for MySQL. Replace
db-test.vultrdb.com,167531,vultruserwith your actual database, port, and user respectively.sql$ mysql -h db-test.vultrdb.com -P 167531 -u vultruser -p
When prompted, enter your Vultr Managed Database for MySQL password, then press Enter to log in.
Create a new database to use with Spring Boot, for example,
spring-db.sqlmysql > CREATE DATABASE spring-db;
Switch to the database.
sqlmysql > USE spring-db;
Create a new sample table
spring-userswith the following column details.sqlmysql > CREATE TABLE spring-users ( id BIGINT AUTO_INCREMENT PRIMARY KEY, name VARCHAR(255), address VARCHAR(255), email VARCHAR(255) );
Insert sample data to the
spring-userstable with the following values.sqlmysql > INSERT INTO spring-users (name, address, email) VALUES ('John Doe', '151 London St', 'john@example.com'); INSERT INTO spring-users (name, address, email) VALUES ('Jane Doe', '421 Texas St', 'jane@example.com'); INSERT INTO spring-users (name, address, email) VALUES ('Mike Smith', '789 Melbourne St', 'mike@example.com');
View the
spring-userstable data to verify the new values.sqlmysql > SELECT id, name, address, email FROM spring-users;
Output:
+----+-------------+--------------+--------------------+
| id | name        | address      | email              |
+----+-------------+--------------+--------------------+
|  1 | John Doe  | 151 London St | john@example.com  |
|  2 | Jane Doe | 421 Texas St | jane@example.com  |
|  3 | Mike Smith | 789 Melbourne St | mike@example.com |
+----+-------------+--------------+--------------------+
3 rows in set (0.28 sec)
Create a new MySQL database user to grant Spring Boot read access to the database.
sqlmysql> CREATE USER 'example-user'@'localhost' IDENTIFIED BY 'password';
Grant the user full privileges to the Spring Boot Database.
sqlmysql> GRANT ALL PRIVILEGES ON crud_db.* TO 'example'@'localhost';
Flush MySQL privileges.
sqlmysql> FLUSH PRIVILEGES;
Exit the MySQL console.
sqlmysql > EXIT
Set Up the Spring Boot Application Environment
To connect to a MySQL database, Spring Boot uses the application.properties configuration file to authenticate and create new database tables for use within the application. Follow the steps below to set up a new Spring Boot application using a demo template, create the file, and set up a connection to your Vultr Managed Database for MySQL.
Switch to your user home directory.
console$ cd
Download a sample Spring Boot application template using the
curlutility.console$ curl https://start.spring.io/starter.zip -o demo.zip
Extract contents from the archive to a new directory such as
spring-appusing theunziputility.console$ unzip demo.zip -d spring-app
Switch to the new application directory.
console$ cd spring-app
List files in the directory to verify the project structure.
console$ lsOutput:
build buildBackup.gradle build.gradle gradle gradlew gradlew.bat HELP.md output.log settings.gradle srcNavigate to the resources directory to set up the Spring Boot MySQL connection details.
console$ cd src/main/resources
Open the
application.propertiesfile using a text editor such as Nano.console$ nano application.properties
Add the following contents to the file. Replace
db-test.vultrdb.com:167531with your actual Vultr Managed Database for MySQL connection URL and port.spring.datasource.url=jdbc:mysql://db-test.vultrdb.com:167531/spring-db spring.datasource.username=example-user spring.datasource.password=password spring.datasource.driver-class-name=com.mysql.cj.jdbc.Driver spring.jpa.hibernate.ddl-auto=update spring.jpa.show-sql=trueSave and close the file.
The above configuration defines a connection to your Vultr Managed Database for MySQL with the following details:
- Database hostname:
db-test.vultrdb.com - Port:
167531 - Target database:
spring-db - Database user:
example-user - User password:
password
The database
application.propertiesconfiguration file configures the connection of your MySQL database with Spring Boot when you build and run the Java application.Within the file:
spring.datasource.url: Sets the Java Database Connectivity (JDBC) URL to your Vultr Managed Database for MySQL connection string.spring.datasource.username: Sets the MySQL database user to use with the Spring Boot application.spring.datasource.password: Defines the database user password to use when connecting to the database.spring.datasource.driver-class-name: Sets the Java connection driver class to the MySQL Connector (com.mysql.cj.jdbc.Driver).spring.jpa.hibernate.ddl-auto = update: Enables the automatic update of database schema based on the application entity classes.spring.jpa.show-sql=true: Enables SQL statements generated byHibernateto display in a console for debugging purposes.
- Database hostname:
Set Up the Spring Boot Application Dependencies
Back up the default
build.gradlefile to reverse changes in case of dependency errors.console$ cp build.gradle build.gradle.ORIG
Open the
build.gradlefile.console$ nano build.gradle
Add the following configurations to the
dependencies {section.javaimplementation 'org.springframework.boot:spring-boot-starter-data-jpa' implementation 'org.springframework.boot:spring-boot-starter-web' compileOnly 'org.projectlombok:lombok' runtimeOnly 'com.mysql:mysql-connector-j' annotationProcessor 'org.projectlombok:lombok'
Save and close the file.
The above configuration sets up new application dependency libraries that enable additional Spring Boot application functionalities. Within the
build.gradlefile:plugins: Defines the required Java project plugins including Spring Boot, and dependency management packages.group: Sets the application package name.version: Sets application version information when using multiple builds.sourcecompatibility = 17: Enables the Spring Boot application to use the Java version 17.repositories: Includes repository information to resolve dependency issues within the Spring Boot application.tasks.named('test'): Enables the JUnitPlatform for unit testing.
Your modified section should look like the one below:
javadependencies { implementation 'org.springframework.boot:spring-boot-starter' testImplementation 'org.springframework.boot:spring-boot-starter-test' implementation 'org.springframework.boot:spring-boot-starter-data-jpa' implementation 'org.springframework.boot:spring-boot-starter-web' compileOnly 'org.projectlombok:lombok' runtimeOnly 'com.mysql:mysql-connector-j' annotationProcessor 'org.projectlombok:lombok' }
Create the Spring Boot application
To create a Spring Boot application, set up the following file structure:
- Entity Class: Handles the application objects.
- Repository: Create the database operations interface.
- Service: Enables CRUD operations.
- Controller: Handles the application HTTP requests.
To efficiently manage your Spring Boot contents and base application structure, create specific data directories to store the application files.
Navigate to the
com.example.demopackage directoryconsole$ cd /home/linuxuser/demo/src/main/java/com/example/demo
Create the entity, repository, services, and controller data directories.
console$ mkdir entity repository services controller
Switch to the entity data directory to create a new
Userentity Java file to interact with your MySQL database table.console$ cd entity
Create a new
User.javaentity file.console$ nano User.java
Add the following contents to the file:
javapackage com.example.demo.entity; import jakarta.persistence.*; import lombok.Data; @Entity @Data @Table(name = "spring-users") public class User { @Id @GeneratedValue(strategy = GenerationType.IDENTITY) private Long id; private String name; private String address; private String email; }
Save and close the file.
The above file defines the user information in your
spring-usersdatabase. If the database table is unavailable, the file auto-creates the database table the defined user information.Within the file:
@Entity: Defines the Java class as a Java Persistence API (JPA) entity mapped to your database.@Data: Generates boilerplates for the Java classes.@Table(name = "spring-users"): Specifies the target database table.User: Sets a class structure of the User entity with the following values:@id: Specifies the ID column as the unique field or primary key.@GeneratedValue(strategy = GenerationType.IDENTITY): Auto-increments data in the id column when inserting new records to the table.private Long id: Sets the user’s ID and connects with the@idand@GeneratedValuetags.private String name: Defines the database user column.private String address: Defines the user address column.private String email: Defines the user email column.
Switch to the repository directory to create a new
UserRepositoryinterface file to interact with theUserentity.console$ cd ../repository/
Create a new
UserRepository.javafileconsole$ nano UserRepository.java
Add the following contents to the file.
javapackage com.example.demo.repository; import com.example.demo.entity.User; import org.springframework.data.jpa.repository.JpaRepository; import org.springframework.stereotype.Repository; @Repository public interface UserRepository extends JpaRepository<User,Long> { } }
Save and close the file.
The above file serves as an abstraction layer between the Spring Boot application and the MySQL database. It includes a set of methods for connecting to the database without manually writing the SQL queries. Within the file:
@Repository: Sets a new repository for theUserentity.UserRepository: Inherits theJpaRepository<User,Long>database CRUD operations for theUserentity to limit rewriting the implementation.
Switch to the
servicesdirectory to create a newUserServiceJava class file.console$ cd ../services/
Create a
UserService.javafile to enable CRUD operations for theUserentity.console$ nano UserService.java
Add the following contents to the file:
javapackage com.example.demo.services; import com.example.demo.entity.User; import com.example.demo.repository.UserRepository; import org.springframework.beans.factory.annotation.Autowired; import org.springframework.stereotype.Service; import java.util.List; @Service public class UserService { @Autowired private UserRepository userRepository; public User createUser(User user) { return userRepository.save(user); } public User getUserById(Long id) { return userRepository.findById(id).orElse(null); } public User updateUser(User user1) { return userRepository.save(user1); } public List<User> getAllUser() { return userRepository.findAll(); } public void deleteUser(User user) { userRepository.delete(user); } }
Save and close the file.
The above
UserService.javafile defines methods to perform CRUD operations on user entities from HTTP requests and database operations. Within the file:UserRepository: Creates a connection to theUserServiceclass to perform database operations.UserService: Acts as the connection between the controller and the repository with the following methods:createUser: Creates a new user record and saves it to the database using theUserRepository.save(user)function.getUserById: Inputs an ID value and retrieves a user's details based on the value or returns null if not found using theUserRepository.findById(id).orElse(null)function.updateUser: Inputs a user record and updates it in the database using theUserRepository.save(user1)function.getAllUser: Returns all user records in the database using theUserRepository.findAll()function.deleteUser: Inputs a user object and deletes the target ID value from the database using theUserRepository.delete(user)function.
Navigate to the controller directory to create the
UserControllerJava class file.console$ cd ../controller/
Create a new
UserController.javafile to handle the application HTTP requests.console$ nano UserController.java
Add the following contents to the file.
javapackage com.example.demo.controller; import com.example.demo.entity.User; import com.example.demo.services.UserService; import org.springframework.beans.factory.annotation.Autowired; import org.springframework.http.ResponseEntity; import org.springframework.web.bind.annotation.*; import java.util.List; @RestController @RequestMapping("/api") @CrossOrigin("*") public class UserController { @Autowired private UserService userService; @PostMapping("/user") public User createUser(@RequestBody User user) { return userService.createUser(user); } @GetMapping("/user/{id}") public ResponseEntity<User> getUserById(@PathVariable Long id) { User user = userService.getUserById(id); if (user == null) { return ResponseEntity.notFound().build(); } return ResponseEntity.ok(user); } @PutMapping("/user/{id}") public ResponseEntity<User> updateUser(@RequestBody User user, @PathVariable Long id){ User user1 = userService.getUserById(id); if (user == null){ return ResponseEntity.notFound().build(); } user1.setEmail(user.getEmail()); user1.setAddress(user.getAddress()); user1.setName(user.getName()); User updatedUser = userService.updateUser(user1); return ResponseEntity.ok(updatedUser); } @GetMapping("/spring-users") public List<User> getAllUsers(){ return userService.getAllUser(); } @DeleteMapping("/{id}") public ResponseEntity<String> deleteUser(@PathVariable Long id) { User user = userService.getUserById(id); if (user == null) { return ResponseEntity.notFound().build(); } userService.deleteUser(user); String responseMessage = "ID " + id + " deleted successfully."; return ResponseEntity.ok(responseMessage); } }
Save and close the file.
The above
UserController.javafile controls the data flow structure between the client and the application to ensure proper handling of user-related operations. Within the file:@RestController: Provides a Spring Model-View-Controller (MVC) architecture that combines the application controller and the response body object as JSON data.@RequestMapping("/api"): Creates a primary URL connection to the application controller.@CrossOrigin("*"): Enables cross-sharing of resources using the origin path\*.The
UserControllerclass enables HTTP request methods for theUserentity with the following functions:@PostMapping("/user"): Enables HTTP POST requests to create a new user record and return the new database record.@GetMapping("/user/{id}"): Enables HTTP GET requests to return a user record based on the ID value or anotFoundresponse if the input value does not match any records.@PutMapping("/user/{id}"): Handles the HTTP PUT request to update a user record by ID or return anotFounderror when a record doesn't exist.@GetMapping("/spring-users"): Handles HTTP GET requests to return all user records in the database.@DeleteMapping("/{id}"): Handles HTTP DELETE requests to delete a user record by ID and return a string of"ID " + id + " deleted successfully.", ornotFoundwhen no record is associated with the ID value.UserService: Activate the CRUD operations.
Test the Spring Boot Application Functionality
Follow the steps below to verify that your Spring Boot application interacts with your Vultr Managed Database for MySQL by running HTTP request methods to perform database queries.
Navigate to the Spring Boot application directory
spring-app.console$ cd /home/linuxuser/spring-app
Compile and run the Spring Boot application as a background process using the
nohuputility.console$ nohup ./gradlew bootRun > output.log 2>&1 &
The above command starts the application on the host port
8080with the following values:nohup: Enables the Spring Boot application to remain connected even after you exit the terminal session../gradlew bootRun: Builds and runs the Spring Boot application.> output.log 2>&1: Redirects the standard output and logs runtime errors to theoutput.logfile within the project directory.&: Starts a new background process for the Spring Boot application.
Wait for at least
2minutes and view the application log file to verify that it's running correctly:console$ cat output.log
Your output should be similar to the one below:
  .   ____          _            __ _ _
 /\\ / ___'_ __ _ _(_)_ __  __ _ \ \ \ \
( ( )\___ | '_ | '_| | '_ \/ _` | \ \ \ \
 \\/  ___)| |_)| | | | | || (_| |  ) ) ) )
  '  |____| .__|_| |_|_| |_\__, | / / / /
 =========|_|==============|___/=/_/_/_/
 :: Spring Boot ::                (v3.2.3)

2024-03-09T18:18:30.514Z  INFO 7056 --- [           main] com.example.demo.DemoApplication         : Starting DemoApplication using Java 17.0.10 with PID 7056 (/home/hum/springboot-app/build/classes/java/main started by hum in /home/hum/springboot-app)
2024-03-09T18:18:30.525Z  INFO 7056 --- [           main] com.example.demo.DemoApplication         : No active profile set, falling back to 1 default profile: "default"
2024-03-09T18:18:31.568Z  INFO 7056 --- [           main] .s.d.r.c.RepositoryConfigurationDelegate : Bootstrapping Spring Data JPA repositories in DEFAULT mode.
2024-03-09T18:18:31.657Z  INFO 7056 --- [           main] .s.d.r.c.RepositoryConfigurationDelegate : Finished Spring Data repository scanning in 76 ms. Found 1 JPA repository interface.
2024-03-09T18:18:32.468Z  INFO 7056 --- [           main] o.s.b.w.embedded.tomcat.TomcatWebServer  : Tomcat initialized with port 8080 (http)
2024-03-09T18:18:32.489Z  INFO 7056 --- [           main] o.apache.catalina.core.StandardService   : Starting service [Tomcat]
2024-03-09T18:18:32.490Z  INFO 7056 --- [           main] o.apache.catalina.core.StandardEngine    : Starting Servlet engine: [Apache Tomcat/10.1.19]
Retrieve all records from the
spring-usersdatabase to verify that the application has query privileges.console$ curl http://localhost:8080/api/spring-users
Output:
[{"id":1,"name":"John Doe","address":"151 London St","email":"john@example.com"},{"id":2,"name":"Jane Doe","address":"421 Texas St","email":"jane@example.com"},{"id":3,"name":"Mike Smith","address":"789 Melbourne St","email":"mike@example.com"}]Create a new sample user in the database. For example,
Smith Doe.console$ curl -X POST -H "Content-Type: application/json" -d '{"name":"Smith Doe", "address":"4 new york street", "email":"smith@example.com"}' http://localhost:8080/api/user
Output:
{"id":4,"name":"Smith Doe","address":"4 new york street","email":"smith@example.com"}Update a user record in the database. For example, the user
John Doewith the ID1.console$ curl -X PUT -H "Content-Type: application/json" -d '{"name":"Sleek", "email":"Sleek.email@example.com"}' http://localhost:8080/api/user/{1}
Output:
{"id":1,"name":"Sleek","address":null,"email":"Sleek.email@example.com"}Retrieve a user record from the database.
console$ curl http://localhost:8080/api/user/{2}
Output:
{"id":2,"name":"Jane Doe","address":"421 Texas St","email":"jane@example.com"}Delete a user record from the database.
console$ curl -X DELETE http://localhost:8080/api/{1}
Output:
ID 1 deleted successfully.View the list of running jobs to stop the Spring Boot application background process.
console$ jobs
Output:
$ [1]+ Running nohup ./gradlew bootRun > output.log 2>&1 &Keep note of the background job process ID, for example,
1.Stop the running background process by ID to stop the application.
console$ kill %1
Output:
[1]+ Exit 143 nohup ./gradlew bootRun > output.log 2>&1
Conclusion
You have integrated a Vultr Managed Database for MySQL with a Spring Boot Java application and processed database queries with CRUD operations. Depending on your Java application environment, integrating a highly available database system improves the efficiency and management of your production application. To securely expose the application on the internet, create a system service and use a reverse proxy such as Nginx to handle incoming user requests. For more information, visit the Vultr Managed Databases for MySQL Reference Guide
No comments yet.