
How to Use Vultr's AMD AI Workbench VKE Application
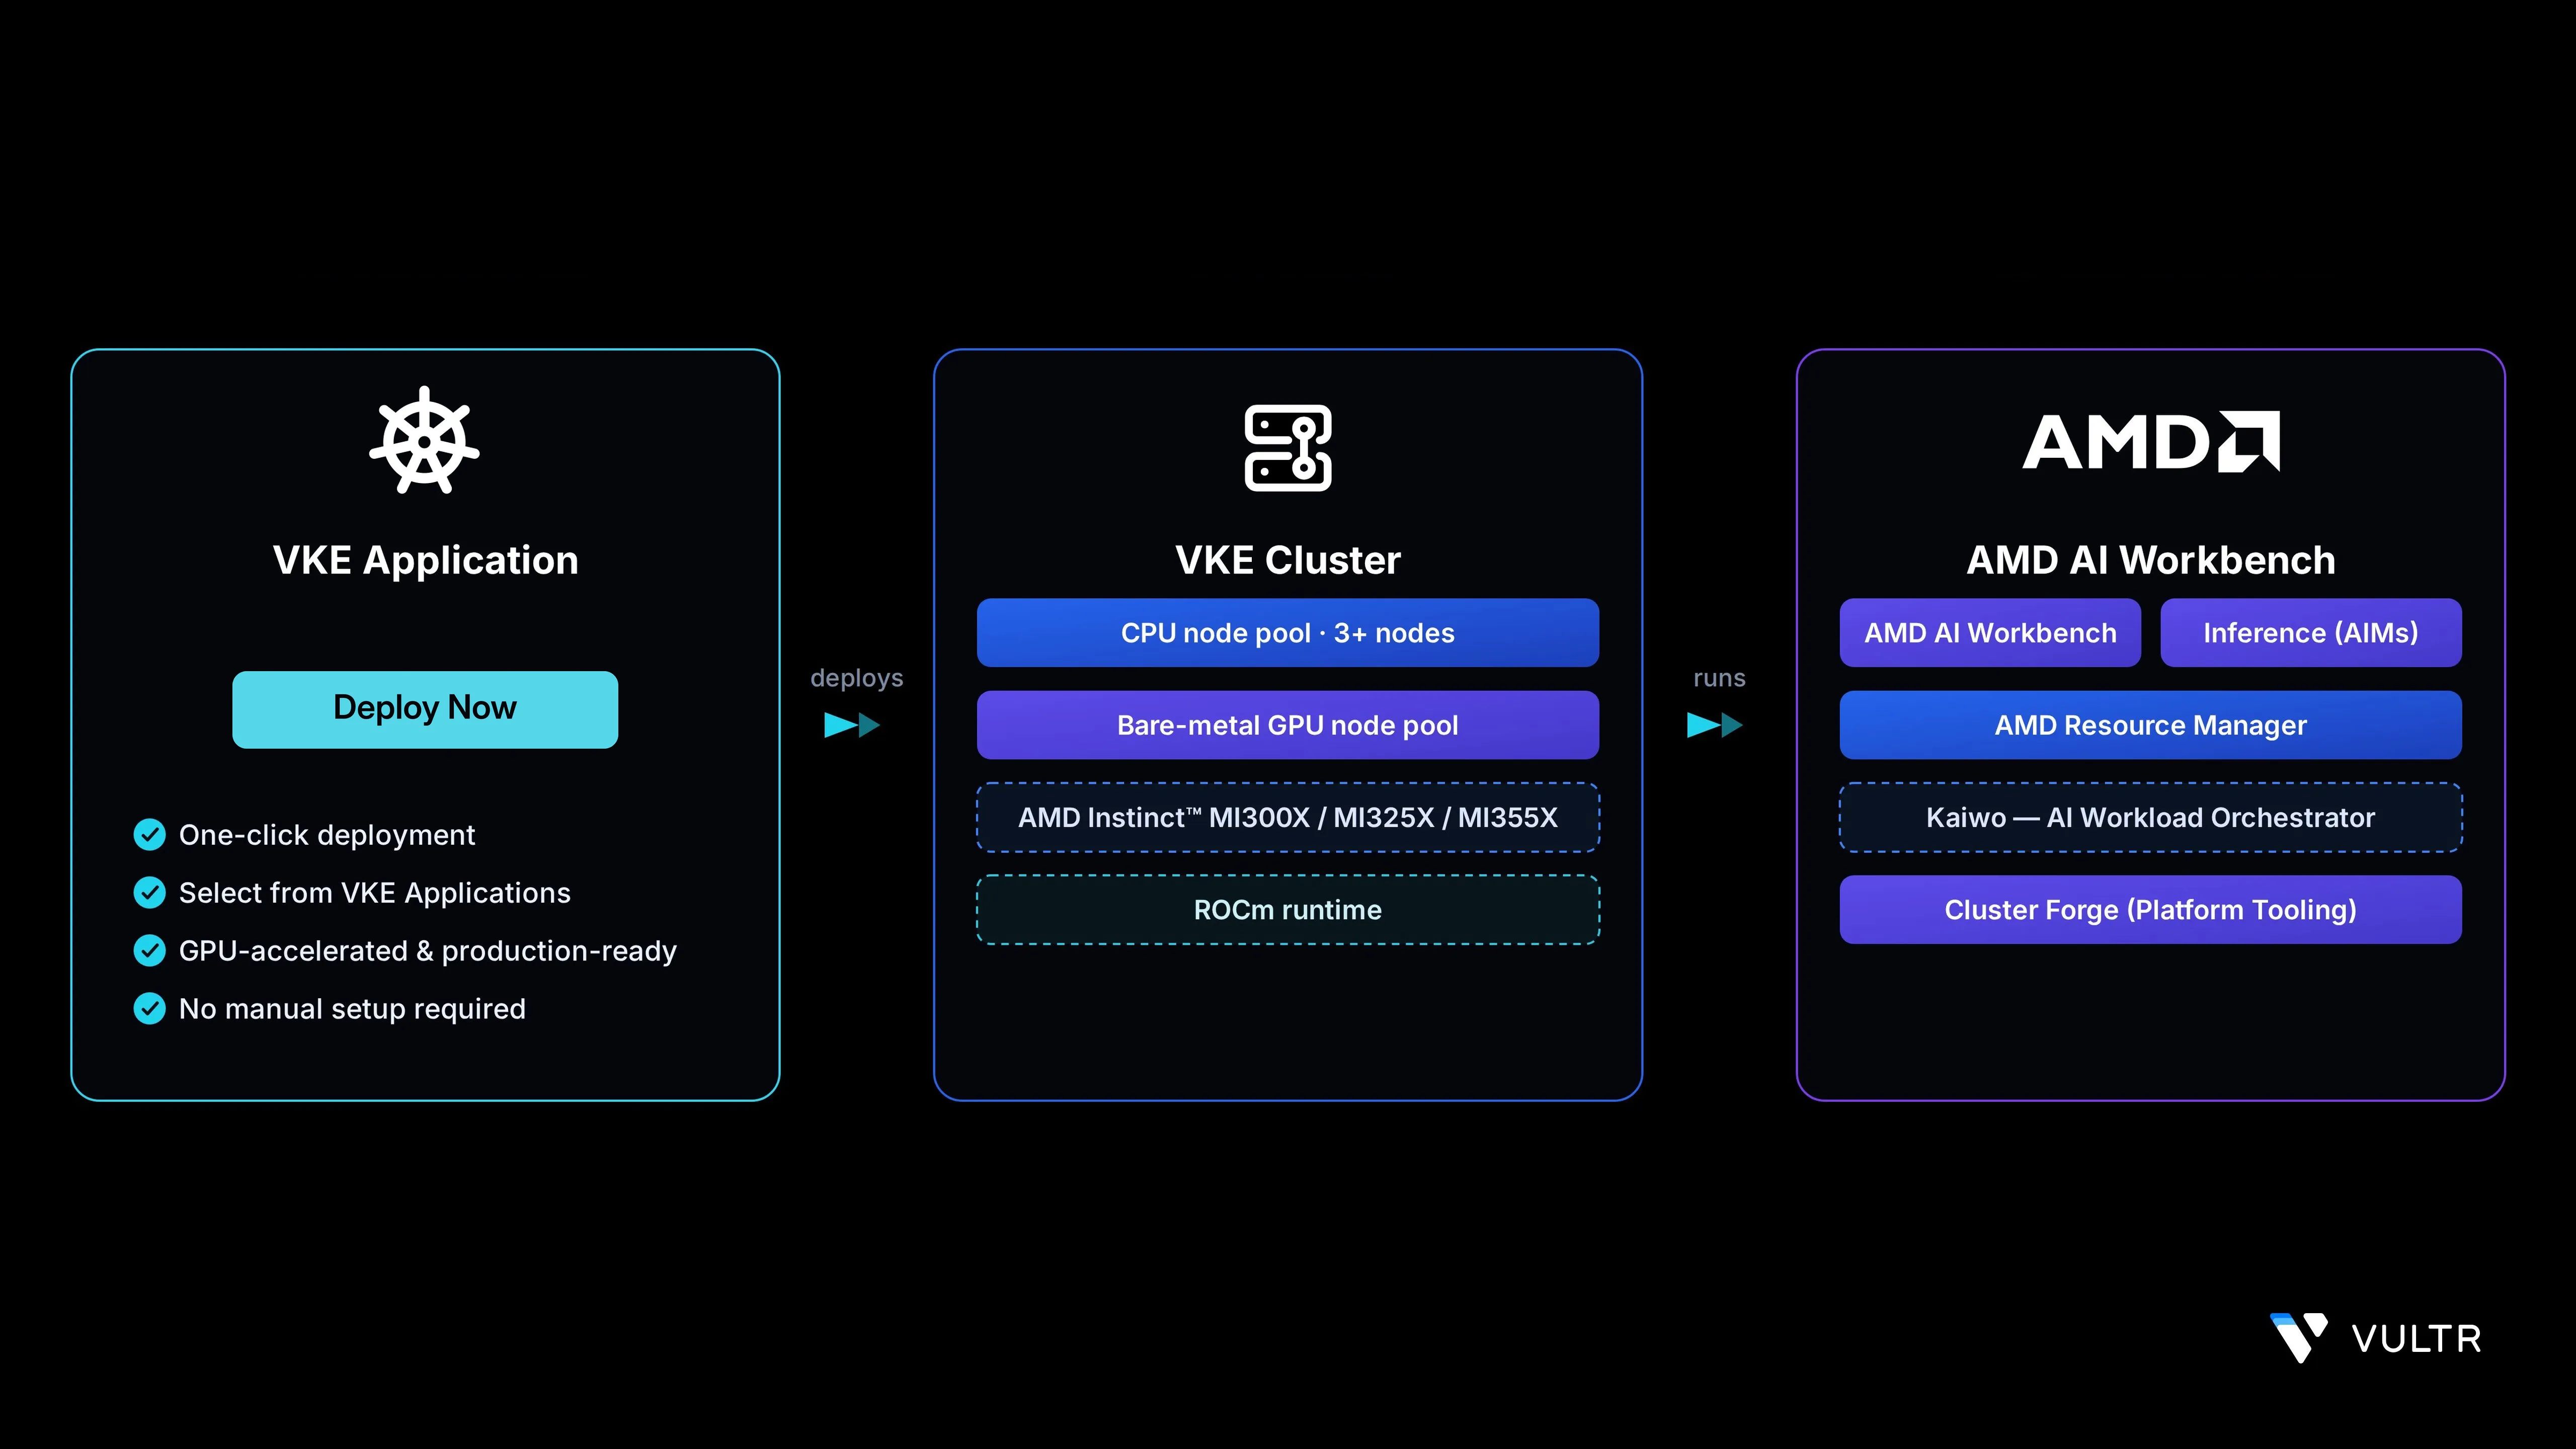
AMD AI Workbench is a low-code AI development platform that simplifies fine-tuning, inference, and other AI jobs on AMD Instinct™ GPUs. It includes a comprehensive model catalog, an AIM Catalog for deploying AMD Inference Microservices, and integrations with MLflow, TensorBoard, and Kubeflow. The Vultr Marketplace provides a pre-configured AMD AI Workbench application that deploys directly into a Vultr Kubernetes Engine (VKE) cluster running on AMD Instinct™ MI3xx GPUs, enabling rapid platform setup for AI teams.
This guide explains deploying and using Vultr's AMD AI Workbench VKE Application on Vultr Kubernetes Engine. It covers adding a bare-metal AMD Instinct™ GPU node pool to an existing VKE cluster, deploying the AMD AI Workbench application through the VKE Applications interface, and accessing the AMD Resource Manager and AMD AI Workbench UIs to manage AI workloads.
Prerequisites
Before you begin, ensure you:
- Have access to a Vultr Kubernetes Engine (VKE) cluster with at least three CPU nodes. Each node must have a minimum of 8 vCPU and 32 GB RAM to schedule the AMD AI Workbench supporting workloads.
- Have
kubectlconfigured on your workstation to access the cluster by following the Vultr Kubernetes Engine connection guide.
Add a Bare-Metal GPU Node Pool
Add a bare-metal GPU node pool with AMD Instinct™ MI3xx GPUs to the cluster. The AMD AI Workbench application schedules its inference and fine-tuning workloads on these GPU nodes.
From the Kubernetes section, click the cluster name to open its details page.
Click the Node Pools tab.
Click Add Node Pool.
Configure the GPU node pool.
Click Create Node Pool to provision the GPU nodes.
Bare-metal GPU provisioning takes longer than virtual nodes. Allow 15 to 30 minutes for the nodes to register with the cluster.NoteList the registered nodes to verify that the GPU nodes joined the cluster.
console$ kubectl get nodes
The output displays both the CPU and GPU node pools with the GPU nodes showing the
Readystatus.
Deploy the AMD AI Workbench Application
After the GPU nodes are Ready, deploy the AMD AI Workbench VKE Application from the VKE Applications interface. The application installs the AMD Enterprise AI Reference Stack components, including AMD AI Workbench, AMD Resource Manager, Kaiwo, Cluster Forge, and AIMs.
Initiate the Deployment
From the cluster details page, click the Applications tab.
Click Deploy Application.
Select AMD AI Workbench from the available VKE Applications.
Set the Timeout to
60 minutesto allow sufficient time for all platform components to install.Click Deploy Now to start the application deployment.
Application deployment runs two background jobs in theNoteamd-ai-systemnamespace. Monitor both jobs as described below.
Monitor the Deployment Logs
The VKE Application launches two Kubernetes jobs that run in sequence: a GPU node configuration job followed by the main bootstrap job. Follow each job's logs to confirm the deployment is progressing and to surface errors early.
Follow the GPU node configuration job logs. This job runs first and typically completes in 1 to 2 minutes.
console$ kubectl logs -n amd-ai-system job/amd-ai-enterprise-gpu-node-config -f
After the GPU node configuration job completes, follow the bootstrap job. This is the main installation and typically takes 30 to 35 minutes.
console$ kubectl logs -n amd-ai-system job/amd-ai-enterprise-bootstrap -f
The bootstrap logs display the auto-generated domain and load balancer IP in a block similar to the one below.
LB IP:  192.0.2.10
Domain: amd-ai-suite.192-0-2-10.nip.io
*.amd-ai-suite.192-0-2-10.nip.io → 192.0.2.10 (via nip.io)
The VKE Application uses
nip.ioto generate a wildcard-resolvable domain from the load balancer IP. No DNS configuration is required.Wait for the completion marker in the bootstrap logs.
✅ AMD AI Enterprise deployment complete!Save the domain name for use in the next section.
Access the AMD AI Workbench Platform
After the bootstrap job completes, the platform exposes several UIs and APIs at predictable subdomains under the auto-generated nip.io domain. The following table lists the available service endpoints. Replace 192-0-2-10 in the URLs with the dashed form of your load balancer IP from the bootstrap logs.
| Service | URL |
|---|---|
| AMD AI Workbench UI | https://aiwbui.amd-ai-suite.192-0-2-10.nip.io |
| AMD AI Workbench API | https://aiwbapi.amd-ai-suite.192-0-2-10.nip.io |
| AMD Resource Manager UI | https://airmui.amd-ai-suite.192-0-2-10.nip.io |
| AMD Resource Manager API | https://airmapi.amd-ai-suite.192-0-2-10.nip.io |
| Keycloak | https://kc.amd-ai-suite.192-0-2-10.nip.io |
| MinIO Console | https://minio.amd-ai-suite.192-0-2-10.nip.io |
| Grafana | https://grafana.amd-ai-suite.192-0-2-10.nip.io |
Retrieve the initial
devuserpassword.console$ kubectl get secret airm-realm-credentials -n keycloak \ -o jsonpath='{.data.KEYCLOAK_INITIAL_DEVUSER_PASSWORD}' | base64 -d
Open the AMD AI Workbench UI or the AMD Resource Manager UI in your browser and sign in with the
devusercredentials.- AMD AI Workbench UI:
https://aiwbui.amd-ai-suite.192-0-2-10.nip.io - AMD Resource Manager UI:
https://airmui.amd-ai-suite.192-0-2-10.nip.io - Email:
devuser@amd-ai-suite.192-0-2-10.nip.io - Password: The value retrieved in the previous step.
- AMD AI Workbench UI:
Retrieve the Keycloak admin password to access the admin console.
console$ kubectl get secret keycloak-credentials -n keycloak \ -o jsonpath='{.data.KEYCLOAK_INITIAL_ADMIN_PASSWORD}' | base64 -d
Open the Keycloak admin console in your browser and sign in.
- URL:
https://kc.amd-ai-suite.192-0-2-10.nip.io - Username:
silogen-admin - Password: The value retrieved in the previous step.
- URL:
Use Cases
AMD AI Workbench supports a range of AI workloads on Vultr's AMD Instinct™ GPU infrastructure.
- Model fine-tuning: Fine-tune open-weight large language models on private datasets using ROCm-accelerated training pipelines and MLflow experiment tracking.
- Inference serving: Deploy AMD Inference Microservices (AIMs) from the AIM Catalog with OpenAI-compatible endpoints for production inference workloads.
- Multi-tenant AI platforms: Provide isolated project workspaces with guaranteed GPU quotas for research teams, departments, or external customers.
- Interactive development: Launch JupyterLab or VS Code workspaces preconfigured with PyTorch, TensorFlow, and ROCm for experimentation and prototyping.
- MLOps pipelines: Integrate with Kubeflow, MLflow, and TensorBoard to orchestrate training jobs, track experiments, and serve models through a unified platform.
- Cost-controlled GPU sharing: Use Kaiwo and AMD Resource Manager to enforce fair scheduling, queue management, and per-project GPU quotas across multiple users.
Conclusion
In this guide, you deployed Vultr's AMD AI Workbench VKE Application on a Vultr Kubernetes Engine cluster. You added a bare-metal AMD Instinct™ GPU node pool, installed the application through the VKE Applications interface, and accessed the AMD AI Workbench, AMD Resource Manager, and Keycloak admin UIs. With AMD AI Workbench's model catalog, AIM Catalog, and integrated MLOps tooling on Vultr's AMD Instinct™ GPU infrastructure, you can run fine-tuning, inference, and multi-tenant AI workloads on a unified platform. For more information, visit the official AMD AI Workbench documentation.