
How to Use Vultr's Broadcaster Marketplace App

Introduction
Open Broadcasting Studio (OBS) is a streaming application that lets you create and live-stream content to web destinations such as YouTube, Twitch, Facebook, Twitter, and many more. Vultr Broadcaster is an implementation of OBS Studio conveniently available through a web browser.
The application is pre-configured with stream-ready OBS settings including scenes and GPU integration. Unlike local OBS installations on your computer, the remotely accessible Vultr broadcaster application offers the following benefits when deployed.
- Unlimited Network Bandwidth.
- High Availability.
- Predictable Pricing.
- Collaboration with other users.
- Distraction-free Monitoring.
- Scaling in cases where OBS requires more GPU resources to render scenes.
- Instant access and Management with little to no need for a physical computer, but access to a web browser.
This article explains how you can access your Vultr Broadcaster instance and use OBS to manage your live streams. In addition, you will set up OBS stream sources, send live feed over RTMP from your smartphone or laptop, and broadcast it in a live stream session to a platform such as YouTube.
Prerequisites
Before you begin:
Deploy a One Click Vultr Broadcaster A16 GPU instance from the Vultr marketplace.
When deployed, scroll down on the instance page, and keep note of the generated OBS Studio Web passwords in the Vultr Broadcaster Details section.
Set up a subdomain A record pointing to your Vultr Broadcaster instance.
It's easier to remember a domain name than an IP Address. For faster access to your instance, point a subdomain to your Vultr Broadcaster instance. For example,
obs.example.com.Prepare your stream destinations. For example, on YouTube, create a new stream, and copy the generated stream keys.
Access OBS Studio
In a web browser such as Google Chrome, or Microsoft Edge. Access your OBS virtual instance.
http://192.168.0.31When prompted to enter a password, paste the password you copied from your broadcaster details page.
If the password is correct, OBS Studio should display in your browser window.

In the Auto-Configuration Wizard, choose your desired OBS optimization type.
Click Next to set your Video Settings. Change the
base resolutionandframes per second (fps)values to match your needs.Click Next to set your target streaming platform. Then, click the Service drop-down to select your platform, and either log in to your account or enter the appropriate stream keys.
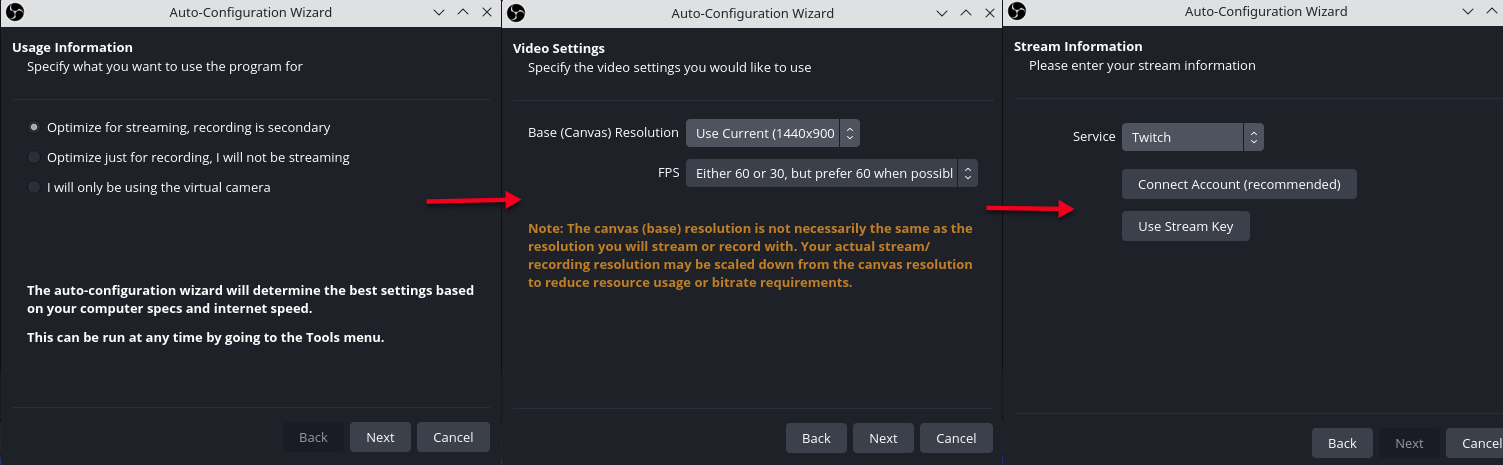
To test your streaming platform information, click Next, and click Yes in the open dialog box to send sample stream data.
When complete, prepare your stream sources and start streaming to the target platform.
Prepare OBS Stream Sources
Depending on the type of content you intend to stream using OBS, prepare the stream sources to broadcast in your stream. If you plan to run a 24/7 live stream, then, upload your source files to the server. To run Interactive streams, use RTMP to stream directly from your smartphone, computer, or action camera as described in this section.
Upload Files
You can upload files to your server in multiple ways and import them for use in OBS Studio. You can either use FTP, SFTP, SCP, or Rsync to transfer files from your computer to the remote desktop. In this article, use SFTP to securely upload files to the server.
SFTP using FileZilla (Graphical)
Download and Install FileZilla on your computer if not already installed.
Open FileZilla.
In the FileZilla window, find the connection fields on the main menu bar, and fill them in as follows:
- Host:
192.168.0.31- replace with your actual Server IP Address. - Username:
example- The non-root user you created earlier. - Password:
strong-password- The user's password. - Port:
22- SSH Port to use for SFTP transfers.
- Host:
Click Quick Connect to establish an SFTP connection to the server, and accept the host fingerprint key.
When connected, the user home directory displays in the Remote section. Click the
Remote Site:field, and enter a directory accessible by all users. For example/tmp.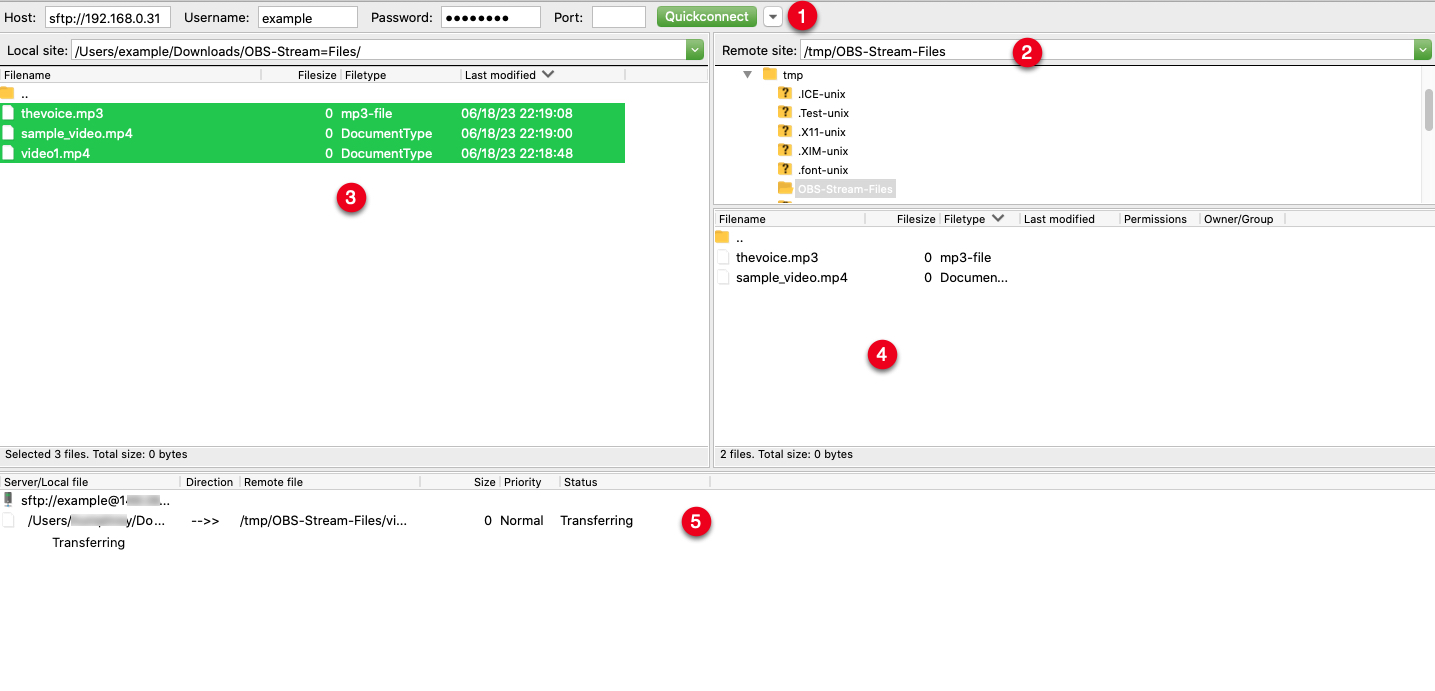
Right-click within the
/tmpdirectory and create a new subdirectory to store the OBS files.Within the Local Site section, navigate to the local directory with your stream files.
Drag files from the Local directory to the Remote directory to start the transfer process.
Monitor your SFTP upload progress in the Transfers section, and verify that all files are successful.
SFTP via CLI (Faster)
Open a new terminal session, and establish an SFTP connection to the server as below.
$ sftp example@192.168.0.31Switch to a directory accessible by all users. For example
/tmp.sftp> cd /tmpCreate a new directory to store your OBS stream files.
sftp> mkdir OBS-filesUpload files to the remote directory using the command below.
sftp> put ~/OBS-Stream-Files/* .The above command uploads all files in the
OBS-Stream-Filesdirectory to the server. Replace the directory with your actual local path.Monitor the progress of your uploads and verify that all necessary files are successfully transferred to the server.
Send Camera/Microphone Feed to OBS over RTMP
The Real-Time Messaging Protocol (RTMP) is a live streaming technology that lets you send visual and audio data over IP networks like the Internet. You can use RTMP to send camera and microphone feed to your OBS instance using your smartphone, computer, or an action camera like DJI Pocket cameras.
By default, Vultr broadcaster is pre-installed with the Nginx web server which can configured to accept RTMP traffic. When enabled, the server accepts live feed over RTMP and forwards it to OBS which processes it as one of your stream sources as described below.
Enable RTMP
In a new terminal session, use SSH to access the server as root.
$ ssh root@192.168.0.31Create a new non-root sudo user and switch to the account.
# adduser example && adduser example sudo && su - exampleInstall the RTMP Nginx module.
$ sudo apt install libnginx-mod-rtmpBack up the original Nginx configuration file.
$ sudo cp /etc/nginx/nginx.conf /etc/nginx/nginx.ORIGUsing a text editor such as
nano, edit the Nginx configuration file.$ sudo nano /etc/nginx/nginx.confAdd the following configurations at the end of the file.
 rtmp {
      server {
              listen 1935;
              chunk_size 4096;

              application obs {
                      live on;
                      record off;
              }
      }
 }
Save and close the file.
Check the Nginx configuration for errors.
$ sudo nginx -tRestart Nginx.
$ sudo systemctl restart nginxBy default, UFW is active on the server, allow port
1935through the firewall.$ sudo ufw allow 1935/tcpRestart the firewall.
$ sudo ufw reload
Send Live Feed from your Smartphone or Computer
Depending on your device, install an application that allows you to send feed over RTMP. On a smartphone, install the Streamlabs or StreamElements app. On a computer, install OBS and set up your streaming platform as follows.
Go to your application's stream settings, and change your stream destination to Custom or RTMP.
Enter your Server IP and endpoint as below.
Server:
rtmp://192.168.0.31/obsStream Key:obs_streamThe endpoint
/obsrefers to the application block you set in the Nginx configuration file earlier. Enter a stream key of your choice. For examplefeed.Save and apply changes.
Click the Start Streaming or Go Live button in your application to start sending feed over RTMP to the server.
Add OBS Stream Sources
OBS supports multiple sources depending on your setup. You can either add a browser (Internet) source, local files, or broadcast your live RTMP feed. This section describes how to add the RTMP and local media file resources you added to the server as stream sources.
Access your Vultr Broadcaster OBS window using a web browser.
http://192.168.0.31Add RTMP as an OBS Stream Source
Go to the Sources section, and click the + Add symbol.
Select VLC Video Source from the list of options.
In the properties dialog, click the + symbol next to Playlist, and select Add Path/URL from the list.
Enter the RTMP link
rtmp://127.0.0.1/obs/feedin the open dialog field and click OK to save.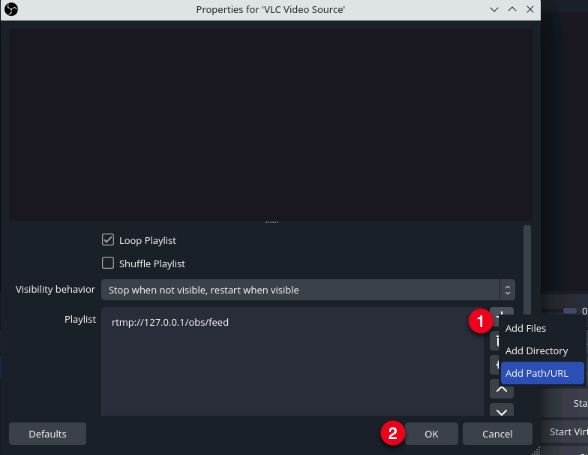
Click OK to save and apply changes.
Verify that the RTMP feed displays well on your OBS screen.
Verify that the Audio Mixer section recognizes audio from your RTMP feed as VLC Media Source when you speak over the microphone or play audio from your device.
To keep your RTMP source live, keep the Internet connection on your device active and send live feed before starting your OBS stream. When you stop sending feed via RTMP, also access OBS and change your stream sources to keep your stream live.
Add a Media File as an OBS stream source
- In the Sources section, click +.
- Select Media Source from the list of options.
- In the Properties dialog window, click Browse to locate and open your media file. For direct access, enter your upload directory
/tmp/to open the file. - Check the Loop option to auto-replay the file, then click OK to save changes.
- Verify that your media file plays well in your OBS Preview screen, and the Audio Mixer section correctly displays the media source audio levels. To set up multiple files to play and loop repeatedly, use the VLC Video Source.
Start Streaming
To manage scenes well, click Studio Mode in the Controls section to separate your configuration section from the Live section.
To start broadcasting the content from your Program screen, click the Start Streaming button in the Controls Section.
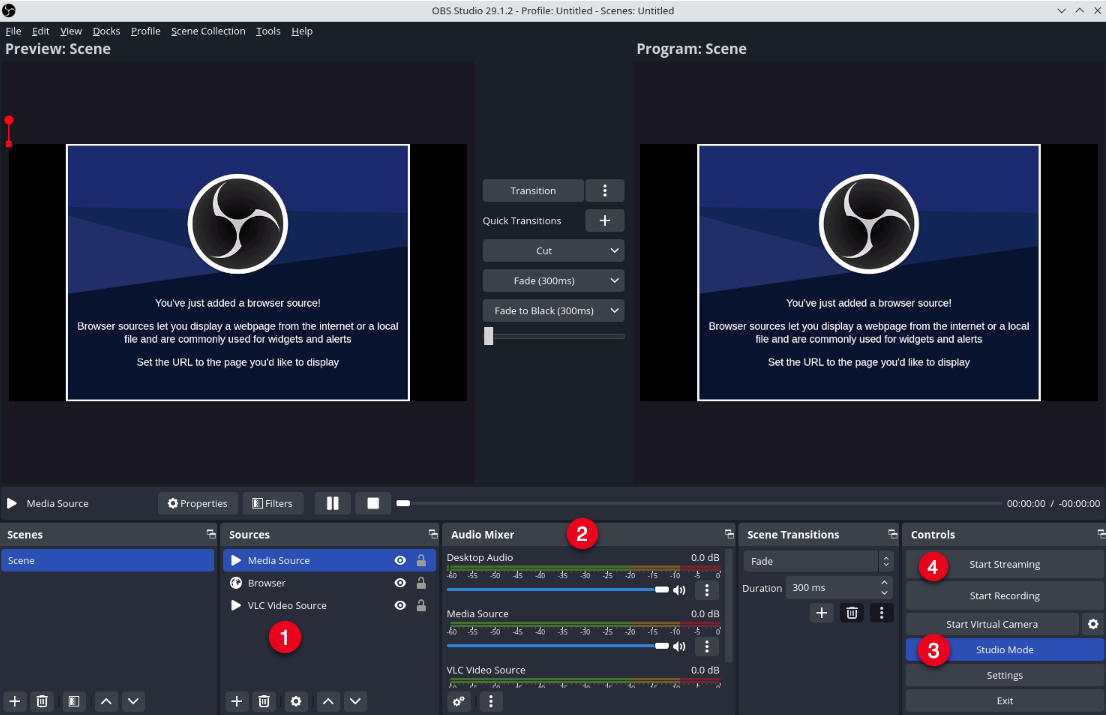
Verify that the OBS Live counter starts well, and the CPU usage percentage is below
50%for a healthy stream.Visit your stream platform and verify that your stream is active with all active sources as set in your OBS window.
Security
To tighten server security, it's important to set up trusted SSL certificates if you are using a domain name on the server. Also, you can further limit access to critical ports such as the RTMP port 1935 to your IP Address through the Vultr Firewall as described in this section.
Generate Let's Encrypt SSL Certificates
By default, the Certbot Let's Encrypt client is available on the Vultr Broadcaster application. To generate SSL certificates for your domain, follow the steps below.
Switch to the
/etc/nginx/sites-available/directory.$ cd /etc/nginx/sites-available/Check the Vultr Broadcaster configuration files available in the directory.
$ lsEdit the
_httpsfile, and add your domain name to theserver_nameas below.server_name obs.example.com;Save and close the file.
Test the Nginx configuration for errors.
$ sudo nginx -tRestart Nginx.
$ sudo systemctl restart nginxRequest for a free Let's Encrypt certificate.
$ sudo certbot -d obs.example.com -m hello@example.com --agree-tosReplace
obs.example.com,hello@example.comwith your domain name and email respectively.When a certificate is successfully issued to your domain name, your output should look like the one below.
 Successfully deployed certificate for obs.example.com to /etc/nginx/sites-enabled/broadcaster_https.conf
 Congratulations! You have successfully enabled HTTPS on https://obs.example.com
Optional: Configure the Vultr Firewall
To tighten your server security from any potential attacks, limit access to the following ports:
22- SSH access port.1935- RTMP port.
Login to your Vultr account.
On the Products page, navigate to Network, and click Firewall on the left navigation menu.
Click the + Add symbol to set up a new firewall group.
Enter a description for your firewall group. For example
OBS-Rules. Then, click Add Firewall Group.In the Inbound IPV4 Rules section, click the Source drop-down and select
My IPfrom the list to limit SSH access to your IP Address. Then, click the +Add Firewall Rulebutton to add the new rule.To set up a new rule, click the Protocol drop-down, scroll up, and select TCP from the list. In the Port field, enter
5900and selectMy IPfrom the Source drop-down. Click + to add the firewall rule.Add the RTMP port
1935and limit access to your IP, orAnywhereif you intend to broadcast RTMP feed from multiple devices.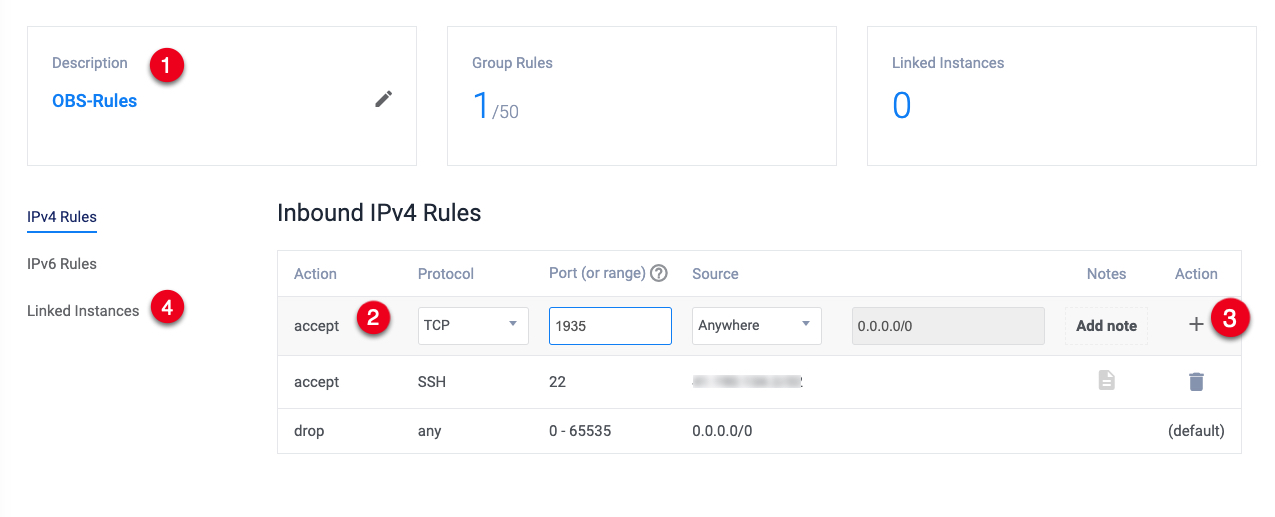
Click Linked Instances on the left navigation pane.
Click the Server drop-down and select your Vultr Broadcaster instance from the list.
Click +
Add Linked Instanceto enable the Vultr Firewall rules on your server.Verify that you can access the server using SSH.
$ ssh example@192.168.0.31If successful, your IP Address can access the server over SSH and any other ports open in the firewall table.
Conclusion
You have deployed the Vultr Broadcaster Marketplace App and set up OBS with the necessary stream sources to start a live stream. If you broadcast game play from your local computer or smartphone, you can conveniently send live feed to your OBS instance and stream to destinations with little or no packet drops.
If you run Interactive and In Real Life (IRL) live streams using your smartphone or action camera, use RTMP to send live feed packets, and access your OBS instance in a web browser without the need for a physical computer. For more information about OBS Studio, visit the official project Wiki.