
How to Use Vultr Broadcaster with Owncast to Livestream
Introduction
Owncast is a self-hosted streaming application that lets you create your own platform and manage it with your own rules. Best known as an alternative to services like Twitch and YouTube, Owncast allows you to stream to thousands of viewers in multiple resolutions.
To live stream content to Owncast, you need to use supported streaming software such as Open Broadcasting Studio (OBS) offered by the Vultr Broadcaster application. Within OBS, you can set up a maximum output resolution, and configure Owncast to scale the resolution to offer multiple quality options to viewers.
In this article, you will use the Vultr Broadcaster application with Owncast to live stream content to a public audience through your domain name.
Prerequisites
Before you begin:
Deploy a Vultr Broadcaster A16 Cloud GPU Instance from the Vultr Marketplace.
When deployed, keep note of your set username and auto-generated password to access the application interface.
Deploy a Debian 12 Vultr A16 Cloud GPU Instance.
It’s recommended to deploy the Owncast server to a location close to your intended viewer audience. For example, if you are targeting viewers in New York, deploy a server in the Vultr New York location.
Set up a new subdomain A record pointing to the Owncast Server.
A domain is quick to access, unlike a Server IP Address. A subdomain record such as
stream.example.commakes it easy for viewers to access your Owncast livestream.Optional: Set up a subdomain A record pointing to the Vultr Broadcaster Server.
The record
obs.example.comis used in this article, replace all occurrences with your domain name or Server IP.Optional: Add both servers to the same Vultr Virtual Private Cloud (VPC).
Depending on your server locations, it’s recommended to use a VPC connection when streaming to Owncast. This is because local networks are faster than public networks like the Internet, a VPC connection is logically an adHoc connection between the two servers. Hence, viewers are able to receive 100% of the packets in real-time as sent from the Vultr Broadcaster server without any packet delays.
Configure Owncast
In this section, configure the Owncast server to broadcast content in 3 viewing qualities, Full HD 1080p, HD 720p, and Standard Quality (SD) 480p. This allows users to switch between viewing modes depending on their network quality. Additionally, configure the server to grant users access to Owncast through your domain name as described in the steps below.
Using SSH, access the Owncast server.
$ ssh root@SERVER-IPTo get your server details, visit your Vultr instance page to copy the auto-generated password for the
rootuser.Create a new bash script named
stream.sh.# touch stream.shUsing a text editor such as
nano, edit the file.# nano stream.shAdd the following configurations to the file.
 #!/bin/sh

 echo "This script will Install Caddy, Owncast on the server"

 curl -1sLf 'https://dl.cloudsmith.io/public/caddy/stable/gpg.key' | sudo gpg --dearmor -o /usr/share/keyrings/caddy-stable-archive-keyring.gpg
 curl -1sLf 'https://dl.cloudsmith.io/public/caddy/stable/debian.deb.txt' | sudo tee /etc/apt/sources.list.d/caddy-stable.list

 echo "Running a quick Update"

 apt update

 echo "Installing Caddy......"

 apt install caddy -y

 echo "Loading Owncast"

 curl -s https://owncast.online/install.sh | bash

 echo "Moving the Owncast directory to /opt!!!!!!"

 mv owncast /opt/

 echo "Setup the Systemd file"

 echo " [Unit]

 Description=Owncast Streaming Server

 [Service]

 Type=simple

 WorkingDirectory=/opt/owncast

 ExecStart=/opt/owncast/owncast

 Restart=on-failure

 RestartSec=5

 [Install]

 WantedBy=multi-user.target " > /etc/systemd/system/owncast.service

 echo "Reload Systemd Daemon"

 sudo systemctl daemon-reload

 echo " Enable Owncast"

 sudo systemctl enable owncast

 echo "Start Owncast"

 sudo systemctl start owncast

 echo "Configuring the Firewall!!!!"

 sudo ufw allow 1935 && sudo ufw allow 80/tcp && sudo ufw allow 443 /tcp

 echo "Restarting the Firewall"

 service caddy restart

 echo "#### Is Owncast running, verify if no error is returned ######"

 sudo systemctl status owncast | head

 echo "######## All Done!!!!!!"
Save and close the file.
The above script installs the latest Owncast version on the server, installs the Caddy web server, and configures Owncast as a system service. Also, it opens the RTMP port
1935, HTTP, and HTTPS ports through the firewall to allow access to Owncast.Run the script.
# bash stream.shVerify that Owncast status to confirm that it’s successfully installed on the server.
# service owncast statusCreate a new user account. For example
example-user.# adduser example-userEnter a strong password for the user, and press enter to accept all listed options.
Add the user to the sudoers group.
# adduser example-user sudoThe above command grants the user sudo privileges to perform tasks such as installation and configuration of application packages on the server.
Switch to the user account.
# su example-userNavigate to the Caddy webserver directory.
$ cd /etc/caddy/Back up the original
Caddyfileconfiguration.$ mv Caddyfile Caddyfile.ORIGCreate a new
Caddyfileconfiguration.$ nano CaddyfileAdd the following configurations to the file. Replace
stream.example.comwith your actual subdomain record.stream.example.com { reverse_proxy localhost:8080 }Save and close the file.
The above configuration file sets up a reverse proxy connection to the backend Owncast port
8080, and accepts connection requests through your domain name on port80for HTTP requests, and443for HTTPS.Test the Caddy configuration for errors.
# caddy validateOutput:
 2023/07/28 01:17:07.378	INFO  using adjacent Caddyfile

 Valid configuration
Restart the Caddy web server to save changes.
# service caddy restartIn a web browser such as Chrome, visit your Owncast administrator dashboard using the
/adminpath.https://stream.example.com/adminLog in using the default administator details below:
USERNAME:
adminPASSWORD:
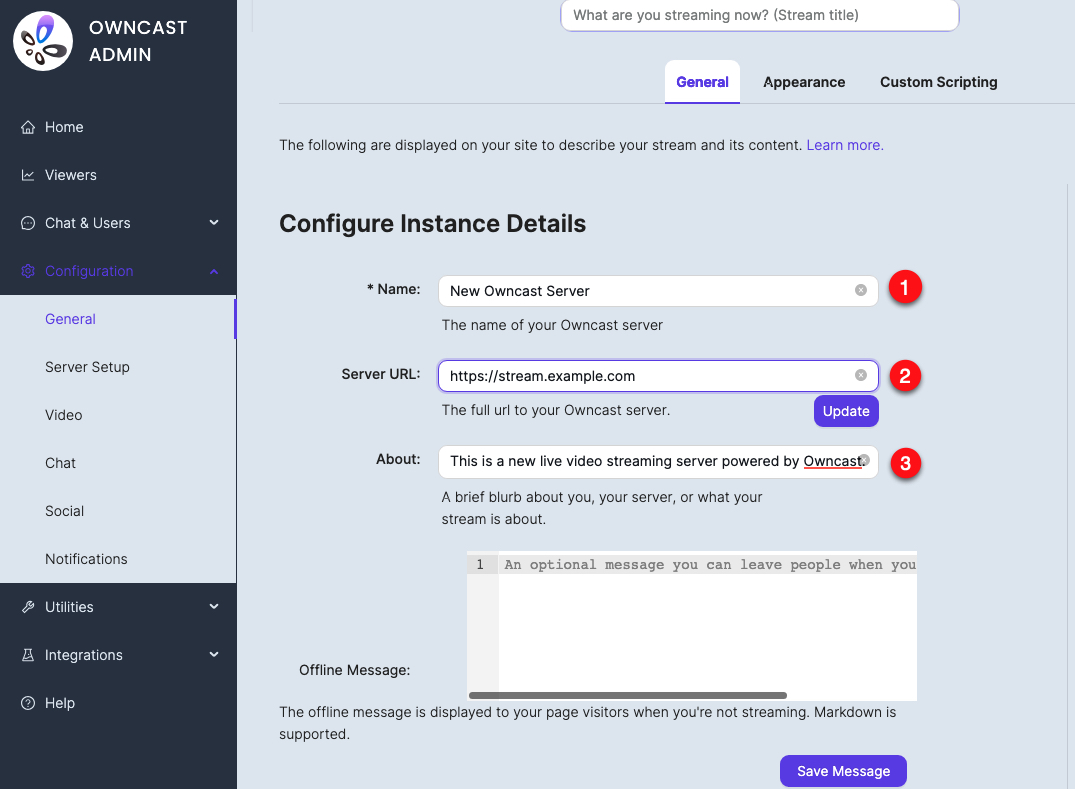
abc123Within the Owncast Admin interface, click the Configuration dropdown on the main navigation menu, and select General from the list.
Enter your desired Owncast server name in the Name: field, and click Update.
Enter your full domain name URL in the Server URL: field, and click Update to save the URL.
In the About field, enter a brief tagline about your livestream server, and click Update to save the description.
Scroll to the Custom Page Content section, and enter a full description of your Livestream in markdown format. Click Save your about stream description.
Navigate to Server Setup on the Configuration dropdown list.
Enter a new strong password in the Admin Password: field, and click Update to save the new password.
Navigate to Stream Keys on the top navigation menu.
Click the Delete button to remove the default
abc123stream key.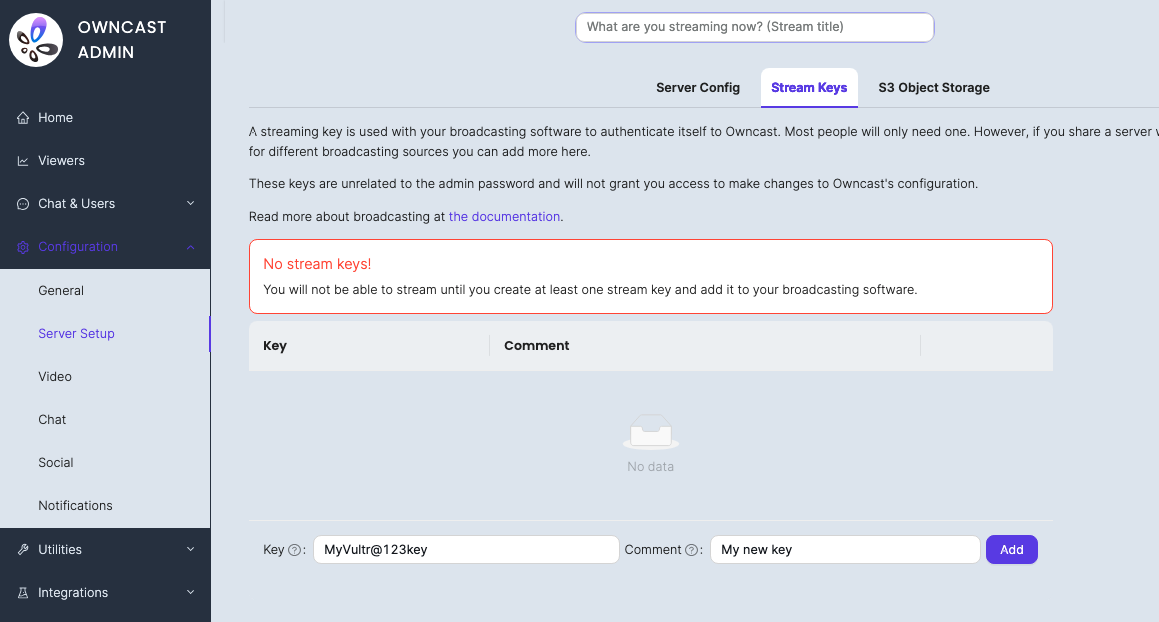
Click the + Add button, and enter a new key such as
MyVultr@123key, enter a comment to describe the key, and click the Add button to save the new stream key.Navigate to Video.
In the Latency Buffer section, slide the select to Highest to enable high error tolerance and reduce buffers for viewers with moderate network connectivity.
In the Stream Output section, click the Add a new variant button.
Enter a new video quality identifier in the Name* field, for example, **Full HD.
Slide the CPU or GPU Utilization selector to
highest.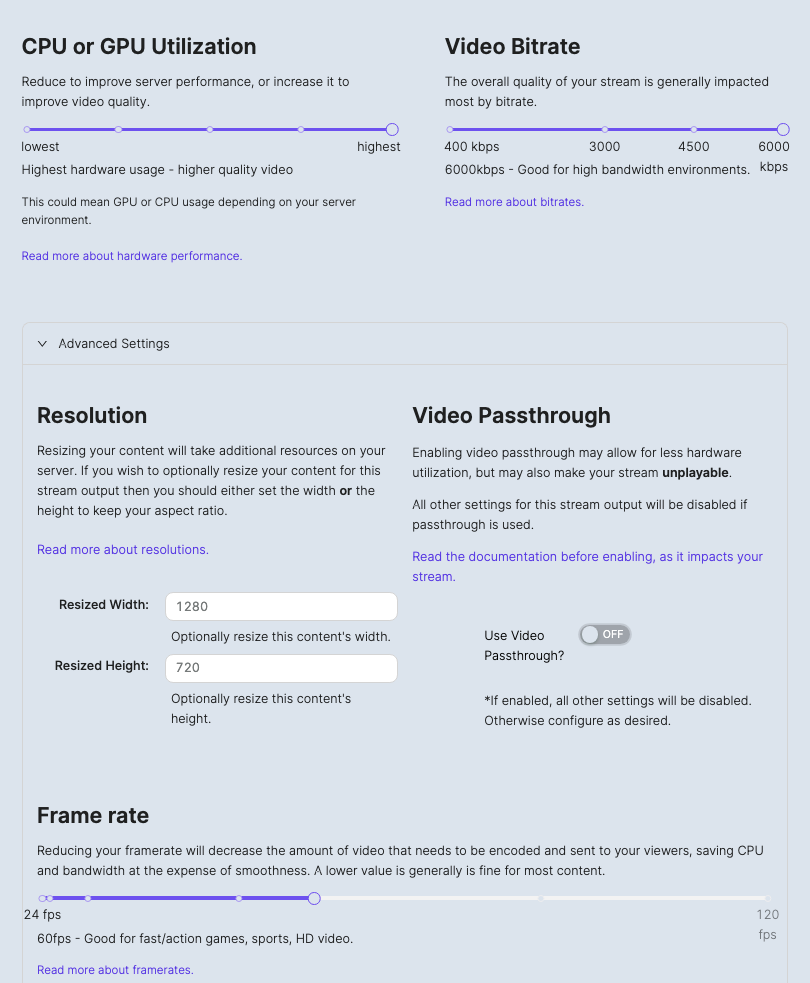
Set the Video Bitrate to the highest quality sent by the Vultr Broadcaster server. For this article, set it to
6000 Kbpswhich translates to the1080p 60fpsstream quality.Toggle the Advanced Settings setting, and keep the resolution fields empty to use the original resolution sent by the Vultr Broadcaster application.
Slide the Frame rate bar to your target frames per second. For this article, set it to
60 fps.Click OK to save the new video quality.
Click the Delete icon to remove the default
1.2Mbps@24fpsoutput quality.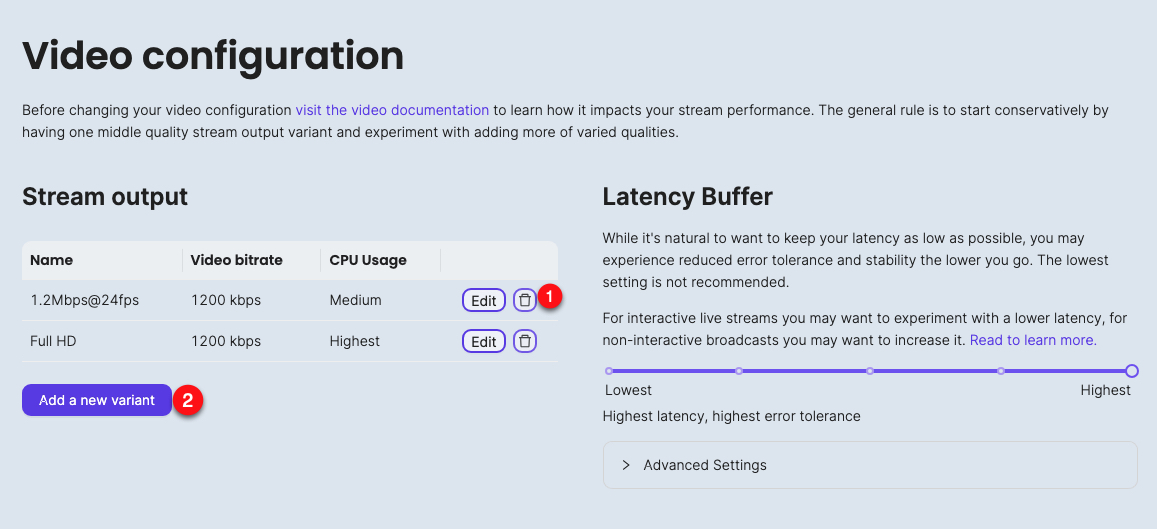
Click Add a new variant, and set up a new video quality for
720pwith a3000bitrate, set the utilization tohighest, the resized width, height to1280,720respectively, and the framerate to30fps.Click OK to save the new video quality.
Add a new variant for the
480pwith a2500bitrate, set the framerate to30fps, and click OK to save the quality.Set any other additional options such as
Chat NamesandNotificationsfrom the Configuration dropdown list.When complete, your Owncast server is ready to start receiving livestream packets from the Vultr Broadcaster server.
To fully configure and secure your server using Nginx instead of Caddy, visit how to install and configure Owncast on a Ubuntu 20.04.
Set up Vultr Broadcaster
In this section, configure Vultr Broadcaster to send livestream packets to the Owncast server. If the two servers are connected in a VPC, 100% of the packets are successfully sent to the Owncast server, and over the internet, 99.9% of the packets are delivered to your viewers' audience. To set up Broadcaster, configure your output resolution, and sources as described in the steps below.
Using a web browser such as Chrome, access your Vultr Broadcaster application.
http://obs.example.comWhen prompted, enter the username you set during deployment, and the auto-generated password for your account.
In the OBS Auto-configuration wizard, click Cancel to manually configure your streaming options.
Within the OBS Window, click the Settings button in the left bottom corner.
Click Stream in the Settings pop-up window.
Click the Service dropdown, and select
Customfrom the list of options.In the Server field, enter the RTMP URL address displayed in your Owncast administrator dashboard. For example
http://192.0.2.100:1935/live.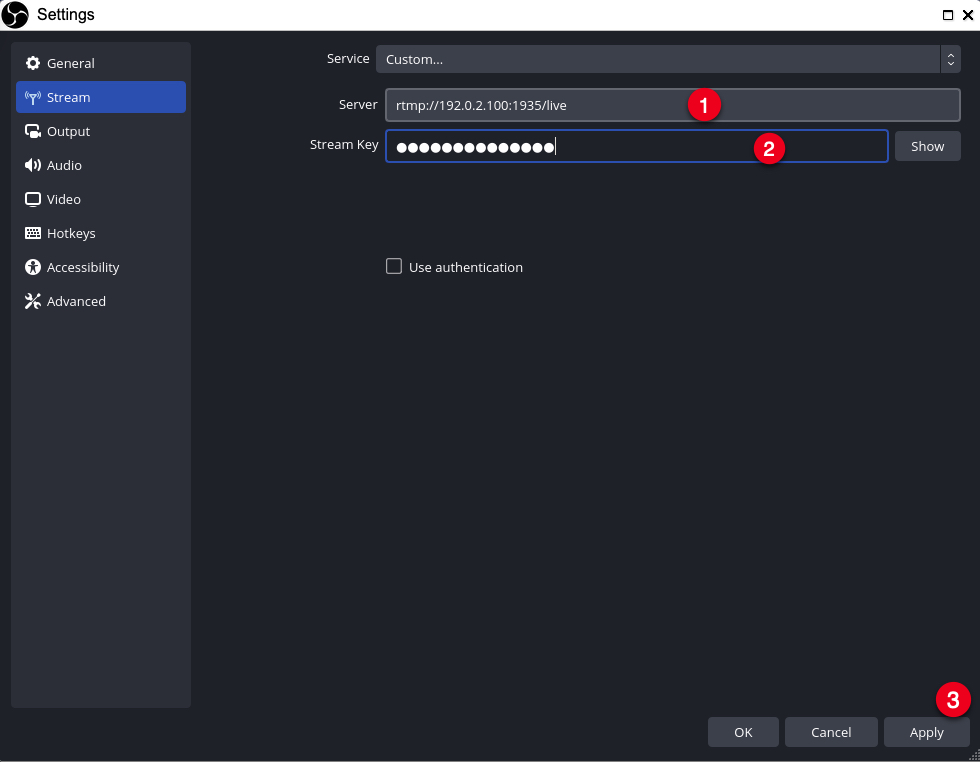
If your Vultr Broadcaster and Owncast are connected in a single Vultr Virtual Private Cloud (VPC), use the Owncast VPC server Address instead. For example,
rtmp://10.24.96.2:1935/live.In the Stream Key field, enter the RTMP stream key displayed in your dashboard. For this article,
MyVultr@123key.Click Apply to save changes.
Navigate to Video, and set the Base (Canvas) Resolution, and Output (Scaled) Resolution to the same dimensions. For example
1920 * 1080for FullHD at 1080p.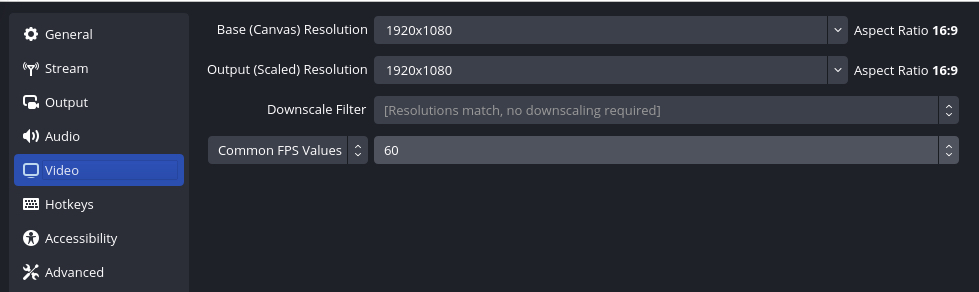
Set the Common FPS Values to your desired setting. For the best quality, select
60.Click Apply to save changes.
Navigate to Output, and set the Video Bitrate value to a figure that matches your output resolution as below:
 | Resolution | FPS | Minimum Bitrate |
 | --- | --- | --- |
 | 1080p | 60  | 6000 |
 | 720p | 60  | 3000 |
 | 480p | 30  | 2500 |
When set, click Apply, then click OK to save and apply changes.
Test: Livestream to Owncast using Vultr Broadcaster
Within your Vultr Broadcaster OBS Window, click Start Streaming to start sending live stream data to the Owncast server.
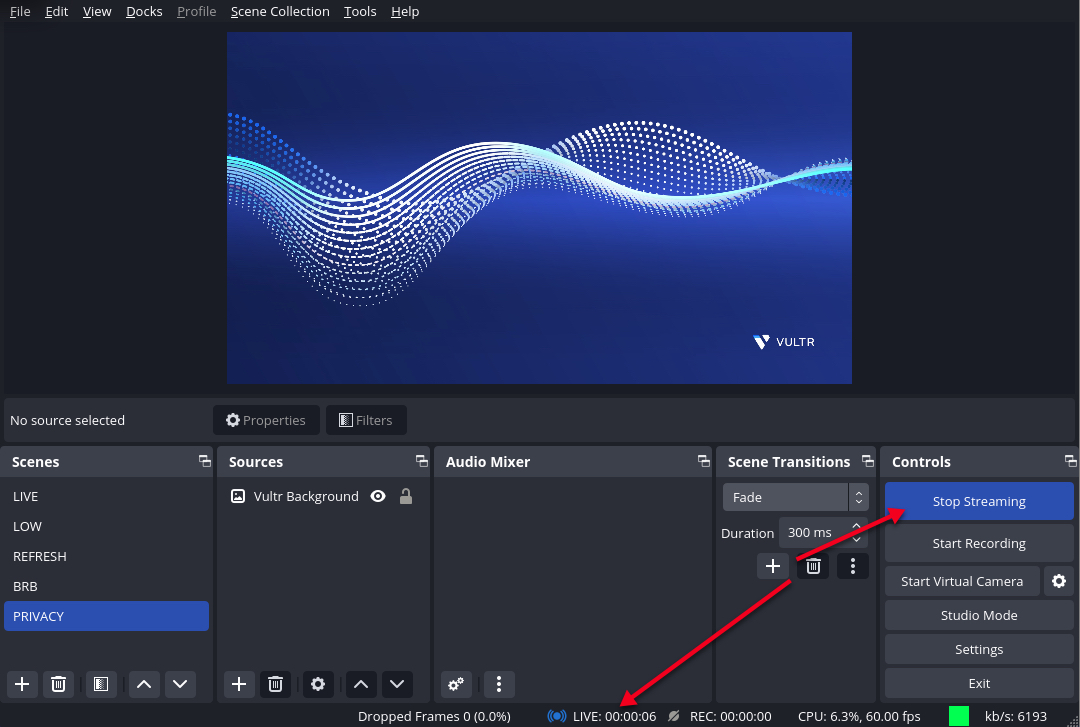Verify that the button changes to Stop Streaming, the live stream counter starts, and the connection is set to Green with a network speed counter.
Visit your Owncast domain as a viewer.
https://stream.example.comVerify that your Livestream displays successfully.

Click the Settings button on the live stream window, and verify that the viewing options
FullHD,HD, andSDare available.Share your Owncast stream with your potential viewers.
Optional: Protect your Owncast Livestreams
To protect your Owncast live streams from uninvited guests, set up usernames and passwords for allowed users as described in the following steps.
Access your Owncast Server SSH session.
Create a new hashed password using the
Caddy hash-passwordutility.# caddy hash-passwordEnter your password, and repeat it to confirm that it matches. When complete, copy the generated hashed password to your clipboard.
Navigate to the Caddy web server directory.
# cd /etc/caddy/Back up a copy of the
Caddyfileconfiguration.# cp Caddyfile Caddyfile.NEWEdit the
Caddyfileconfiguration.# nano CaddyfileAdd the following
basic auth {section, after thereverse_proxydeclaration.basicauth / { viewer1:<paste hashed password here> }Replace,
viewer1with your desired username, and paste the generated hashed password next to the user.Save and close the file.
Test the Caddy configuration for errors.
# caddy validateRestart Caddy to save changes.
# service caddy restartIn your web browser, open a new Owncast livestream tab.
https://stream.example.comVerify that you are prompted for a password. Enter the correct username and password as set in your Caddy configuration file.
Conclusion
In this article, you have used Vultr Broadcaster with Owncast to livestream content to your audience. Using the setup, you can live stream to a private or public group of viewers and implement a subscription plan for premium viewers to access your live streams through your domain name.
To finetune and record your Owncast live streams, you can attach a Vultr Object Storage volume to reduce the server load and record your live streams separately. For more information, visit the Owncast documentation.