
Create a Streaming Server with OBS and Ubuntu
Introduction
Open Broadcasting Studio (OBS) is an open-source streaming application that lets you create streams and broadcast them to a self-hosted stream server or popular platforms such as YouTube, Facebook, Twitch, and DLive. This article explains how to create a streaming server with OBS to broadcast your content.
Prerequisites
Before you start, make sure you:
- Deploy a fresh Ubuntu Server on Vultr with at least:
- 2 Virtual CPUs (VCPUs)
- 4 GB Memory (RAM)
- 80 GB Storage
- 3 TB Bandwidth
- Use SSH to access the server as a non-root user with sudo privileges.
- Install a Desktop environment on the server.
Install OBS on Ubuntu
OBS Studio is available in the default Ubuntu repositories.
SSH to the Ubuntu server as a non-root user.
Update and upgrade the server.
$ sudo apt update && sudo apt upgrade -yInstall OBS Studio and FFmpeg, a transcoding utility.
$ sudo apt install ffmpeg obs-studio -y
Set up YouTube Stream
Follow these steps to configure your YouTube stream.
Log in to your YouTube Studio dashboard.
Click the Create button in the top right corner.
Select Go live from the list of options.
On the left navigation pane, click Manage.
Click Schedule Stream.
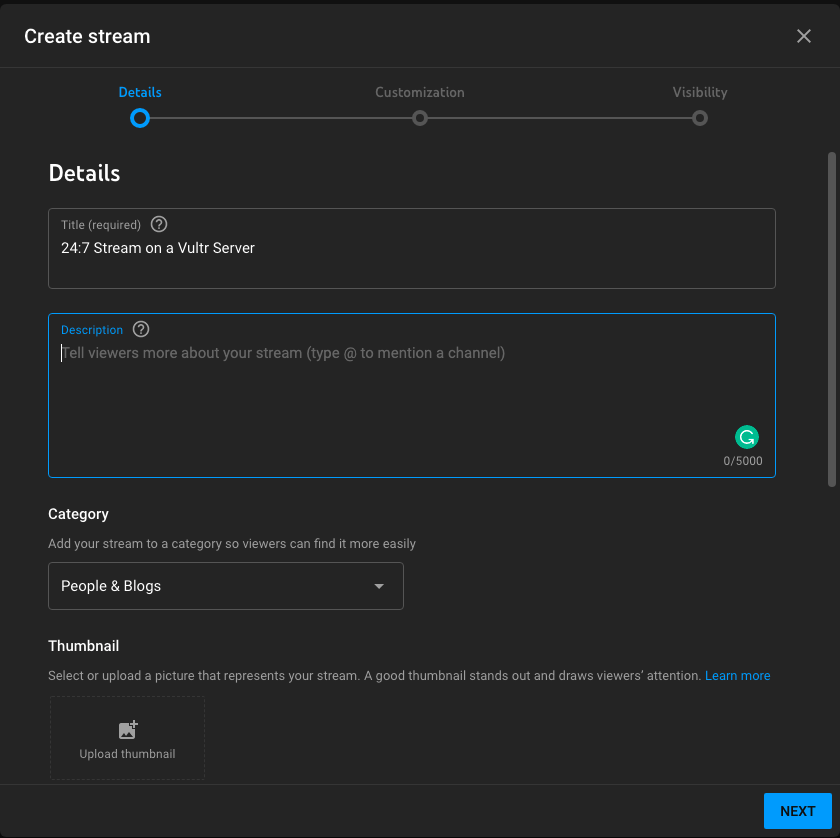
Enter your Live stream details, including the Title, Description, and Category.
Upload a Thumbnail to display on your stream, select your target audience, and click Next.
Choose your desired Customization options, and click next.
Set the stream visibility to Public on the date you intend to start your stream, and click DONE.
In the Stream Settings section, toggle Enable Auto-start to ON.
Copy the Stream Key to your clipboard.
If you use a different platform, such as Twitch, copy your account’s stream key, and RTMP URL from the stream setup page.
Configure OBS
Access your Ubuntu server desktop using remote desktop software such as VNC viewer or NoMachine.
Log in as a non-root user.
Open Applications, find, and launch OBS Studio.
In the Auto-Configuration wizard, click Yes to set up the software.
Keep the Optimize for streaming, and recording is secondary option selected, and click Next.
Keep Video Settings unchanged and click Next.
Click the Service drop-down field, and select YouTube/YouTube Gaming from the list of options.
Paste your YouTube Stream Key, and click Next to test the best settings for your stream.
When complete, click Apply Settings to close the wizard.
Within the OBS Studio interface, click Settings, or navigate to File > Settings.
Click Video, change the base canvas, and output resolution to your desired setting.
If your server has 2 VCPus or more, use the 720p (1280 * 720) resolution. The higher the resolution and FPS value, the more processing power OBS requires.
Change the Common FPS Value to
30or more depending on your desired stream quality.Navigate to Output and change the video bitrate to match a value recommended for your stream resolution as listed below:
  | Resolution  | FPS value   |  Recommended Bitrate Range (Kbps) |
  | ----------- | ----------- |  --------------------------       |
  | 852 * 480   | 30          |    500 to 2000                    |
  | 1280 * 720  | 30          |    1500 to 4500                   |
  | 1280 * 720  | 60          |    2500 to 6500                   |
  | 1920 * 1080 | 30          |    3000 to 6500                   |
  | 1920 * 1080 | 60          |    4500 to 9500                   |
  | 3840 * 2160 | 30          |    13000 to 34000                 |
  | 3840 * 2160 | 60          |    20000 to 51000                 |
Click Apply to save changes.
Navigate to Advanced, and find the Automatically Reconnect section.
Set Retry Delay to 3 seconds or less
Set Maximum Retries to 1000 or more.
Click OK to save and exit settings.
Click Studio Mode to turn on both Preview and Program screens.

Click + in the Sources section to set your stream video and audio source.
Verify that your sources feed, and click Transition to move the content to the live program screen.
Click Start Streaming to start your stream.
In a web browser, visit your YouTube channel, and confirm that the stream is active.
While the stream is active, you need to keep note of the OBS CPU usage rate and ensure it does not exceed 90% or your stream may drop frames leading to multiple buffers. If the CPU usage rate is high, reduce your output resolution, or upgrade the server to the next plan with more vCPUS on your Vultr account.
End your Ubuntu desktop connection, and ensure your stream stays active. You can always log in and confirm that OBS is running without errors.
Stream to a self-hosted Ubuntu Owncast Server in a Vultr Virtual Private Cloud (VPC)
If you are running a self-hosted stream-server such as Owncast, follow the steps below in a single Vultr location.
- Deploy and configure an Owncast server from the Vultr Marketplace.
- Deploy a fresh Windows Server 2022 instance on Vultr.
OBS Studio is more stable on Windows. Use the latest Windows Server edition to install the software and start streaming to your Ubuntu Owncast server.
- Use RDP to access the Windows Server.
- Add both servers to the same Vultr Virtual Private Cloud (VPC).
- Test successful communication between the servers using the
pingnetwork utility tool.
Install and Configure OBS on the Windows Server
Open a web browser such as Microsoft Edge.
Visit the official OBS Project website.
Download the OBS Studio installer package for windows.
Open the package and follow all wizard prompts to install OBS Studio on the server.
Launch OBS Studio from the Windows start menu.
In the OBS auto-configuration wizard, keep Optimize for streaming and recording is secondary, and click next.
When prompted to choose a streaming service, select Custom from the list of services.
Enter your Owncast server VPC
rtmpaddress in theServerfield. For examplertmp://192.0.2.1/live.Enter the server Stream key, click Next to test the connection, and Apply Settings.
Navigate to Settings.
Adjust your Video resolution and Bitrate to your desired setting.
Click Advanced, and set the retry delay to
3 secondsor less.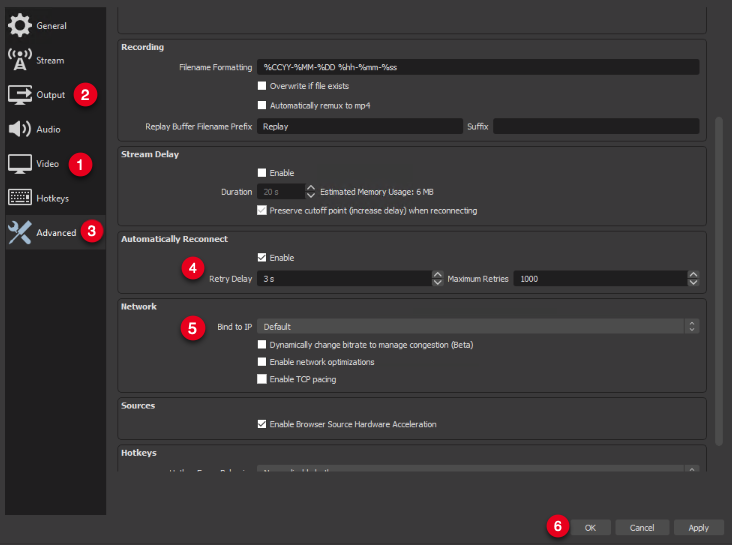
Find the Network section, and bind OBS to your VPC IP Address.
Binding OBS to your Vultr VPC Address increases stream availability due to a faster private network connection.
Click OK to apply changes and start streaming to your Owncast server.
In a web browser, visit your stream server URL, and confirm that the stream is active.
https://mystream.example.com
Configure Windows Server to Stay Active
Each Windows Server remote desktop connection counts as a single user session. When the connection ends, the server automatically locks the user account activity until you log in again. When running OBS, the server needs to be active to keep your stream running.
Tscon is a command line utility that allows you to control remote desktop connections. You can use the tool to keep your Windows Server active even if the remote desktop connection ends, as described below.
Open the Windows command prompt or PowerShell.
Enter the following command to display your remote desktop connection ID.
> qwinstaYour output should look like the one below.
  SESSIONNAME       USERNAME                 ID  STATE   TYPE        DEVICE
  services                                    0  Disc
  console                                     1  Conn
  >rdp-tcp#2        example-user             2  Active
  31c5ce94259d4...                        65536  Listen
  rdp-tcp                                 65537  Listen
Use the
tsconutility to send your remote desktop connection IDrdp-tcp#to the console.> tscon rdp-tcp#2 /Dest:ConsoleYour remote desktop connection should automatically close, and OBS stays active until you log in again or change any server settings.
To monitor your Windows Server and change the console resolution. Install TightVNC on the server, and connect to the VNC session when you send the remote desktop connection to the console.
Visit your stream server URL and verify that your live stream is running.
https://mystream.example.comIf you experience buffers on your live stream, connect to your Windows Server over VNC and verify that the OBS CPU rate is below 90%, or downgrade your resolution to let OBS use fewer server resources.
Conclusion
You have successfully set up a stream server. Depending on your stream settings, you should monitor the server bandwidth usage in your Vultr account to keep the stream up and running.