Bludit is an open-source flat-file Content Management System (CMS) written in PHP and released under the MIT License. With its rich features such as powerful, customizable themes and plug-ins, Bludit allows you to build SEO-friendly blogs and websites in seconds. Bludit is General Data Protection Regulation (GDPR) Compliant, and hence it meets the principles of data protection by design. It has a built-in Markdown and HTML editor that are great for creating content very quickly. Unlike other CMSs, Bludit uses plain JSON format files to store data; hence it doesn't require a database server to work. This makes it highly portable when migrating to a newly deployed server. In addition, it ships with an Application Programming Interface (API) that allows easy data integration to external database systems.
In this tutorial, you'll install Bludit CMS with PHP and Apache on Ubuntu 20.04 server.
Prerequisites
To complete this guide, you require the following:
- An Ubuntu 20.04 server.
- A non-root sudo user.
- A LAMP Stack. Bludit only requires Apache web server and PHP to work. Therefore, you may skip the steps for installing a database server.
A domain name such as example.com is optional. For testing purposes, you may use the public IP address of your server, like 192.0.2.1.
1. Install Bludit Dependencies
SSH to your server, update the package repository index, and upgrade the installed packages.
$ sudo apt update && sudo apt -y upgradeNext, install the PHP extensions required by the Bludit CMS.
$ sudo apt install -y php-cli php-fpm php-common php-mbstring php-gd php-xml php-jsonEnable the Apache mod_rewrite feature. The Bludit application requires this module to craft user-friendly URLs.
$ sudo a2enmod rewriteRestart the Apache web server to load the new modules and extensions.
$ sudo systemctl restart apache2With the PHP extensions and mod_rewrite enabled, you'll now download the Bludit CMS from the official repository.
2. Download Bludit CMS From the Official Repository
Create a bludit directory in the root of your web server.
$ sudo mkdir -p /var/www/bluditNext, use the Linux cd command to navigate to the tmp directory.
$ cd /tmpThen, download the current Bludit archive from the Official Bludit Repository using the Linux wget command.
$ wget https://www.bludit.com/releases/bludit-3-13-1.zipInstall the Linux unzip tool. You'll use it to decompress the bludit-3-13-1.zip file you've just downloaded.
$ sudo apt install -y unzipUse the unzip command to unpack the bludit-3-13-1.zip archive file.
$ sudo unzip bludit-3-13-1.zipThen, move the content of the unzipped bludit-3-13-1 directory to the /var/www/bludit/ directory that you've created earlier using the Linux rsync command.
$ sudo rsync -rtv bludit-3-13-1/ /var/www/bludit/Ensure Bludit has the right ownership to the /var/www/bludit directory.
$ sudo chown -R www-data:www-data /var/www/bluditYou've now set the correct server environment for Bludit to work. Next, you'll create a virtual host file for your Bludit site.
3. Create a Virtual Host File for the Bludit Website
Apache ships with a default configuration file named /etc/apache2/sites-available/000-default.conf. To make your installation cleaner, create a separate configuration file for the Bludit site.
Open a new /etc/apache2/sites-available/bludit.conf configuration file using Nano text editor.
$ sudo nano /etc/apache2/sites-available/bludit.confThen, enter the information below into the file. Replace 192.0.2.1 with your domain name or public IP address of your server.
<VirtualHost *:80>
    ServerName 192.0.2.1
    DocumentRoot /var/www/bludit
    <Directory /var/www/bludit>
        Options Indexes FollowSymLinks MultiViews
        AllowOverride All
        Order allow,deny
        allow from all
    </Directory>
</VirtualHost>
Save and close the file by pressing Ctrl + X, then Y and Enter. After you've created a new virtual hosts file, disable Apache's default configuration file using the a2dissite command.
$ sudo a2dissite 000-default.confThen, enable your new /etc/apache2/sites-available/bludit.conf configuration file.
$ sudo a2ensite bludit.confRestart the Apache web server to load the new virtual host file.
$ sudo systemctl restart apache2Your new virtual host is now ready. You can now complete installing the Bludit website in the next step.
4. Finish Bludit Site Installation
Visit the URL below on a web browser to complete the Bludit installation. Substitute your IP address or domain name.
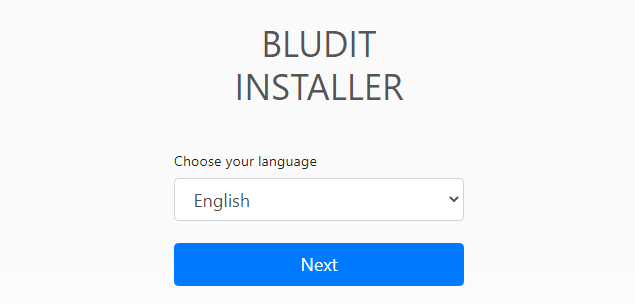
Choose your desired language and click Next to proceed after the installation wizard loads.

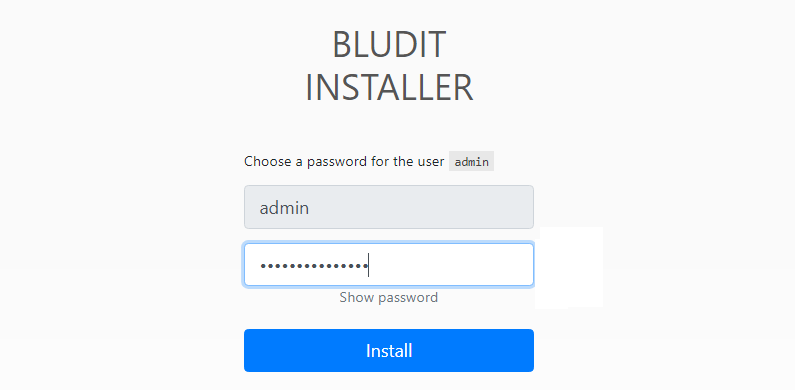
Next, enter a strong password to create a new admin account.

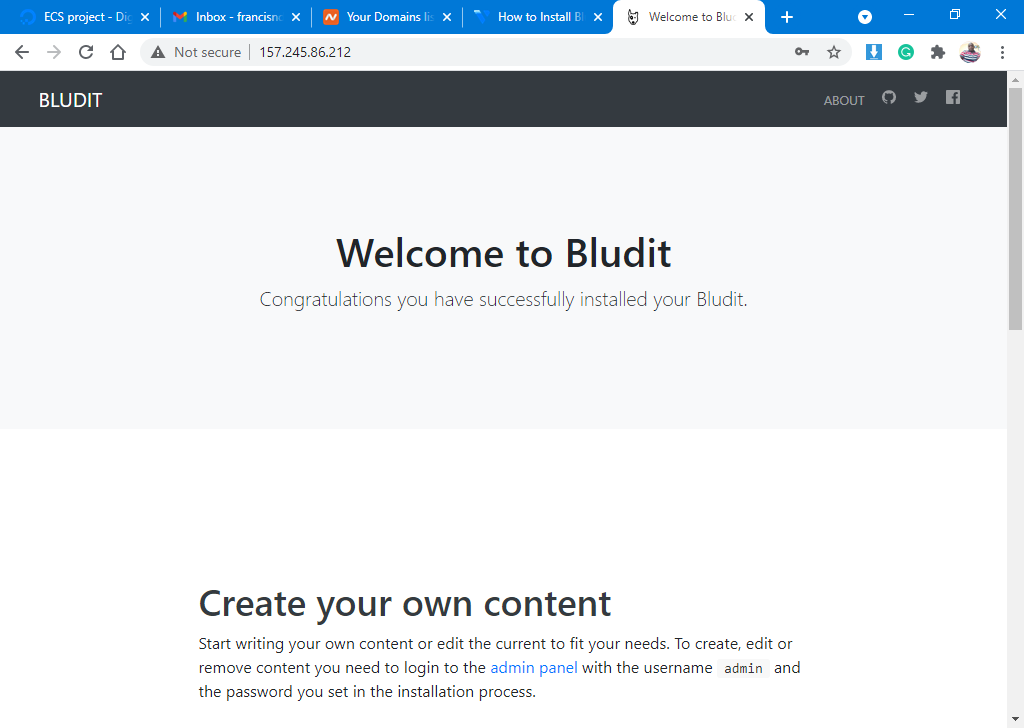
Finally, you should see a "Congratulations you have successfully installed your Bludit." message on your browser window that shows your installation was completed.

From this point forward, your Bludit site is ready, and you can log in using the admin account and start creating new content for your audience.
Conclusion
In this guide, you've installed Bludit CMS with Apache and PHP on Ubuntu 20.04 server. Use it to build powerful portable blogs and websites.
No comments yet.