
Set up a Transcoding Server with Handbrake and Vultr Cloud GPU
Introduction
Transcoding is a process of converting media files from one format to another. Depending on the source file size, transcoding requires a lot of CPU and GPU resources that can be beyond a local computer’s specifications. To solve this, dedicated transcoding servers effectively handle media transcoding processes with hardware acceleration, fast, and powerful processing capabilities.
HandBrake is an open-source video transcoder that can be set up as a dedicated transcoding server to convert media files from one format to another. When used with FileBrowser, HandBrake allows you to leverage cloud GPU resources to perform fast and efficient transcoding operations.
This guide explains how to set up a transcoding server with Handbrake using a Vultr A16 Cloud GPU instance. You will use the dedicated NVIDIA NGC marketplace application to run HandBrake and FileBrowser as Docker containers.
Prerequisites
Before you start:
Deploy an A16 Vultr Cloud GPU Instance with the NVIDIA NGC App from the Vultr Marketplace.
Create two subdomain records to securely access HandBrake and FileBrowser.
In this article, the subdomains
filebrowser.example.com,handbrake.example.comare used. Replace all occurrences with your actual domains.Access the server using SSH.
Create a non-root user with sudo privileges, and switch to the user.
Add the user to the Docker group:
$ sudo usermod -aG docker example-userRestart your SSH session to load changes.
Install Nginx.
You will set up Nginx as a reverse proxy to securely access HandBrake and FileBrowser as described in this article.
Install HandBrake
Verify that Docker Engine is up and running.
$ sudo service docker statusRun Handbrake as a new docker container using the following command.
 $ docker run -d \
     --name=handbrake \
     -p 8000:5800 \
     -v /docker/appdata/handbrake:/config:rw \
     -v /home/handbrake-user/:/storage:ro \
     -v /home/handbrake-user/HandBrake/watch:/watch:rw \
     -v /home/handbrake-user/HandBrake/output:/output:rw \
     jlesage/handbrake
The above command creates a new system home directory
handbrake-useras required by the application, and creates the HandBrake container that listens on the host port8000.Verify that the HandBrake container is created and the status is Up.
$ docker psYour output should look like the one below.
 CONTAINER ID   IMAGE                        COMMAND   CREATED         STATUS                    PORTS                                                 NAMES
 a3b169d5ec70   jlesage/handbrake            "/init"   6 seconds ago   Up 5 seconds              5900/tcp, 0.0.0.0:8000->5800/tcp, :::8000->5800/tcp   handbrake
Test that HandBrake is listening on port
8000.$ curl 127.0.0.1:8000
Install FileBrowser
Create a new directory to store FileBrowser files.
$ sudo mkdir /home/handbrake-user/FilesFor compatibility and file discovery. The FileBrowser directory must be stored in the same path as the HandBrake directory.
Create the host FileBrowser database file.
$ touch /home/handbrake-user/Files/filebrowser.dbRun FileBrowser as a new container using the following command.
 $ docker run -d \
 --name=filebrowser \
 -v /home/handbrake-user/Files:/srv \
 -v /home/handbrake-user/Files/filebrowser.db:/database.db \
 -e PGID=$(id -g) \
 -e PUID=$(id -u) \
 -p 8001:80 \
 filebrowser/filebrowser
The above command creates the FileBrowser container that listens on the host port
8001.Verify that the FileBrowser container is created, up, and healthy.
$ docker psYour output should look like the one below.
 CONTAINER ID   IMAGE                        COMMAND          CREATED          STATUS                    PORTS                                                 NAMES
 309d095f3012   filebrowser/filebrowser      "/filebrowser"   6 seconds ago    Up 5 seconds (healthy)    0.0.0.0:8001->80/tcp, :::8001->80/tcp                 filebrowser
 a3b169d5ec70   jlesage/handbrake            "/init"          48 seconds ago   Up 47 seconds             5900/tcp, 0.0.0.0:8000->5800/tcp, :::8000->5800/tcp   handbrake
Test that FileBrowser is listening on port
8001.$ curl 127.0.0.1:8001
Set up Nginx as a Reverse proxy
In this section, set up Nginx as a reverse proxy to forward traffic to the Internal host port 8000 for Handbrake, and port 8001 for FileBrowser to securely access the applications as described below.
To avoid port conflicts, delete the
defaultNginx host configuration file.$ sudo rm /etc/nginx/sites-enabled/defaultUsing a text editor such as
nano, create a new Nginx host configuration file for HandBrake.$ sudo nano /etc/nginx/conf.d/handbrake.confAdd the following configurations to the file.
 map $http_upgrade $connection_upgrade {
     default upgrade;
     '' close;
 }

 server {
     listen 80;
     server_name handbrake.example.com;

     location / {
         proxy_pass http://127.0.0.1:8000;
         proxy_set_header Host $host;
         proxy_set_header X-Real-IP $remote_addr;
     }

     location /websockify {
         proxy_pass http://127.0.0.1:8000;
         proxy_http_version 1.1;
         proxy_set_header Upgrade $http_upgrade;
         proxy_set_header Connection $connection_upgrade;
         proxy_read_timeout 86400;
     }
     }
Save and close the file.
The above configuration forwards HTTP requests to the HandBrake host port
8000using theproxy_passdirective, and also supports the HandBrake websocket declared by thewebsockifypath.Test the Nginx configuration for errors.
$ sudo nginx -tCreate a new Nginx host configuration file for FileBrowser.
$ sudo nano /etc/nginx/conf.d/filebrowser.confAdd the following configurations to the file.
 server {
 listen 80;
 server_name filebrowser.example.com;

 location / {
     proxy_pass http://127.0.0.1:8001;
     proxy_set_header Host $host;
     proxy_set_header X-Real-IP $remote_addr;
 }

 }
Save and close the file.
The above configuration forward all HTTP requests to the FileBrowser port
8001through thefilebrowser.example.comdomain.Test the Nginx configuration for errors.
$ sudo nginx -tRestart Nginx to save changes.
$ sudo systemctl restart nginx
Security
To secure your server, you need to configure the necessary firewall rules and allow access to handle incoming requests on the Nginx HTTP port 80. To fasten your setup, allow access to the HTTPS port 443 and redirect all HTTP requests by setting up trusted SSL certificates as described in this section.
Configure the Firewall
By default, Uncomplicated Firewall (UFW) is active and running on Vultr servers. Verify the firewall status.
$ sudo ufw statusAllow incoming traffic to the HTTP port
80.$ sudo ufw allow 80/tcpAllow the HTTPS port
443.$ sudo ufw allow 443/tcpRestart UFW to load changes.
$ sudo ufw reload
To add an extra layer of security, you can configure the Vultr Firewall to filter traffic before forwarding it to UFW.
Password Protect HandBrake (Basic Auth)
HandBrake offers a direct unprotected web-based user interface. To protect your application from being used by unauthorized users, enable basic authentication in your Nginx configuration file to grant specific users access to the application as described below.
Using the
htpasswdutility, create a new passwords file, and generate a new password for the useradminas below.$ sudo htpasswd -c /etc/nginx/passwords adminWhen prompted, enter a strong password for the user to secure the account.
Edit the HandBrake Nginx configuration file.
$ sudo nano /etc/nginx/conf.d/handbrake.confAdd the following content to the
location / {section.auth_basic "Private area, only allowed users"; auth_basic_user_file /etc/nginx/passwords;The above configuration enables basic authentication with the alert message
"Private area, only allowed users", and uses usernames from the/etc/nginx/passwordsfile.The edited
location / {block should look like the one below.location / { auth_basic "Private area, only allowed users"; auth_basic_user_file /etc/nginx/passwords; proxy_pass http://127.0.0.1:8000; }Save and close the file.
Test the Nginx configuration for errors.
$ sudo nginx -tRestart Nginx to save changes.
$ sudo systemctl restart nginx
Generate Trusted SSL Certificates
Generate trusted SSL certificates from a certificate authority (CA) such as Let’s Encrypt to use in your Nginx configuration. If you have certificates from another CA, add them to your Nginx configuration, or, follow the steps below to generate free Let’s Encrypt SSL certificates.
Using
snap, install the Certbot Let’s Encrypt client.$ sudo snap install --classic certbotActivate the Certbot command.
$ sudo ln -s /snap/bin/certbot /usr/bin/certbotGenerate the SSL certificates.
$ sudo certbot --nginx --no-redirect -d handbrake.example.com, filebrowser.example.com -m user@example.com --agree-tosReplace
handbrake.example.com,filebrowser.example.com, anduser@example.comwith your actual domains and email address respectively.When successful, your output should look like the one below.
 Deploying certificate
 Successfully deployed certificate for handbrake.example.com to /etc/nginx/conf.d/handbrake.conf
 Successfully deployed certificate for filebrowser.example.com to /etc/nginx/conf.d/filebrowser.conf
 Congratulations! You have successfully enabled HTTPS on https://handbrake.example.com and https://filebrowser.example.com
Test that your certificates auto-renew after 90 days.
$ sudo certbot renew --dry-run
Test
You have installed HandBrake and FileBrowser as active docker containers, then configured Nginx as a reverse proxy to serve requests to the Internal host ports. Verify that you have access to both applications and start transcoding media files using HandBrake.
Upload files using FileBrowser
Using a web browser such as Google Chrome. Visit the FileBrowser domain.
https://filebrowser.example.comEnter the default administrator username
adminand passwordadminto log in to FileBrowser.Within the FileBrowser dashboard, click New Folder on the left navigation menu.
Enter a name for your new directory. For example
HandBrake-uploads, and click Create to save.Within the directory, click the Upload ↑ button on the top right bar.
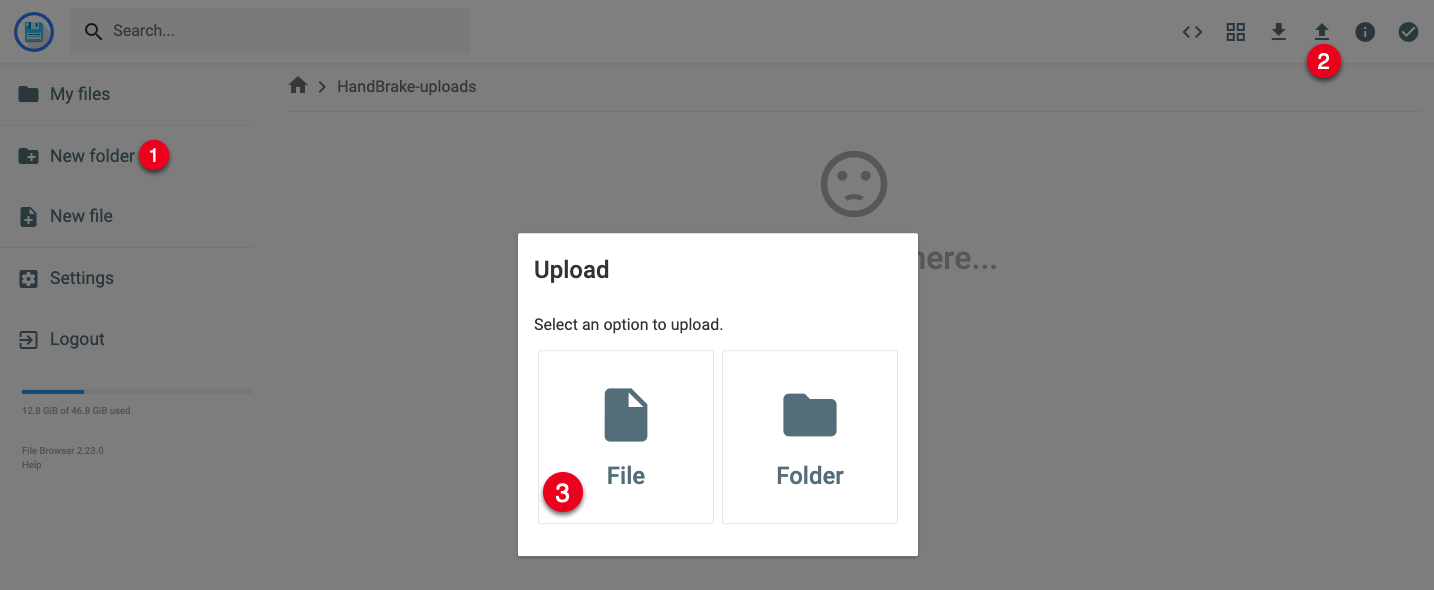
In the popup dialog, click File to browse and upload a media file on your computer.
When the upload is complete, verify that your file is available within the directory to start the transcoding process with HandBrake.
Transcode Files using Handbrake
In your web browser, visit the Handbrake domain.
https://handbrake.example.comEnter the username and password as set in your Nginx configuration password file.
Within the HandBrake web interface, click Open Source to locate your media file.
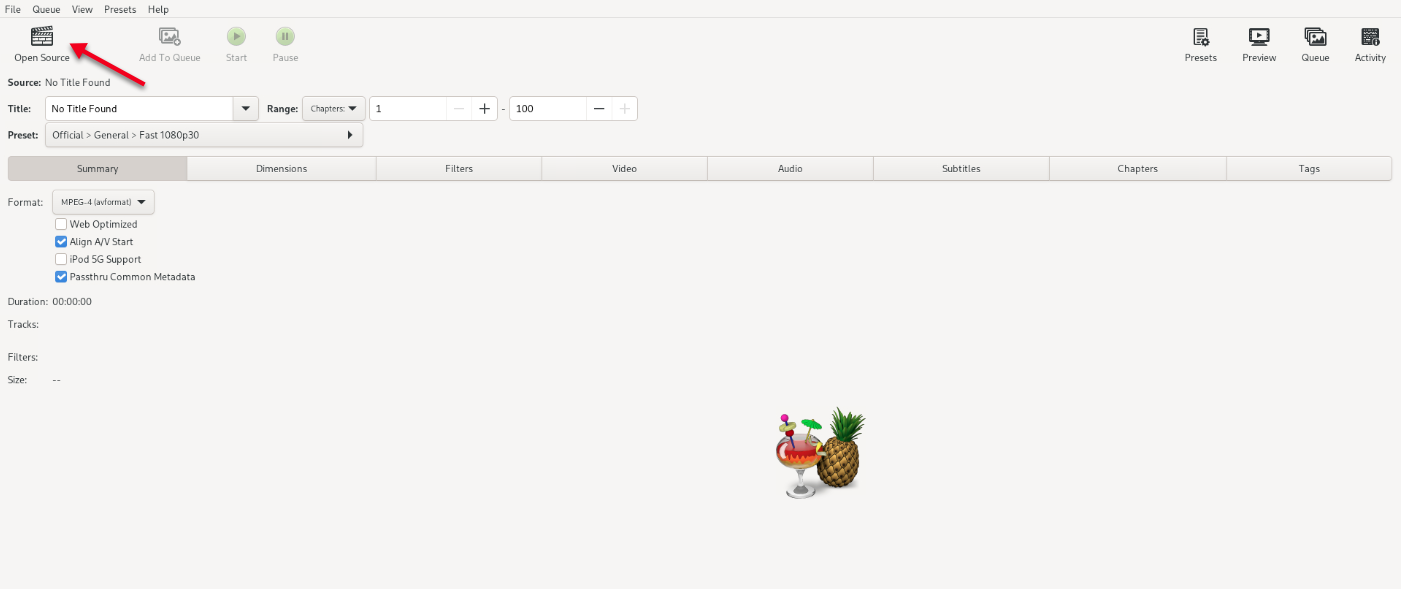
Navigate to the
Filesdirectory where you uploaded the media file, and click Open to load it.Click the Presets button on the top right bar, and select your desired transcode preset, for example,
Creator 2160p60 4Kfrom the dropdown list. Click X to close the popup dialog.In the Summary section, click the Format dropdown and set your destination format.
In the Video section, click Video Encoder to set your desired encoder and framerate.
Adjust the Audio, Subtitles, and Tags for your media file.
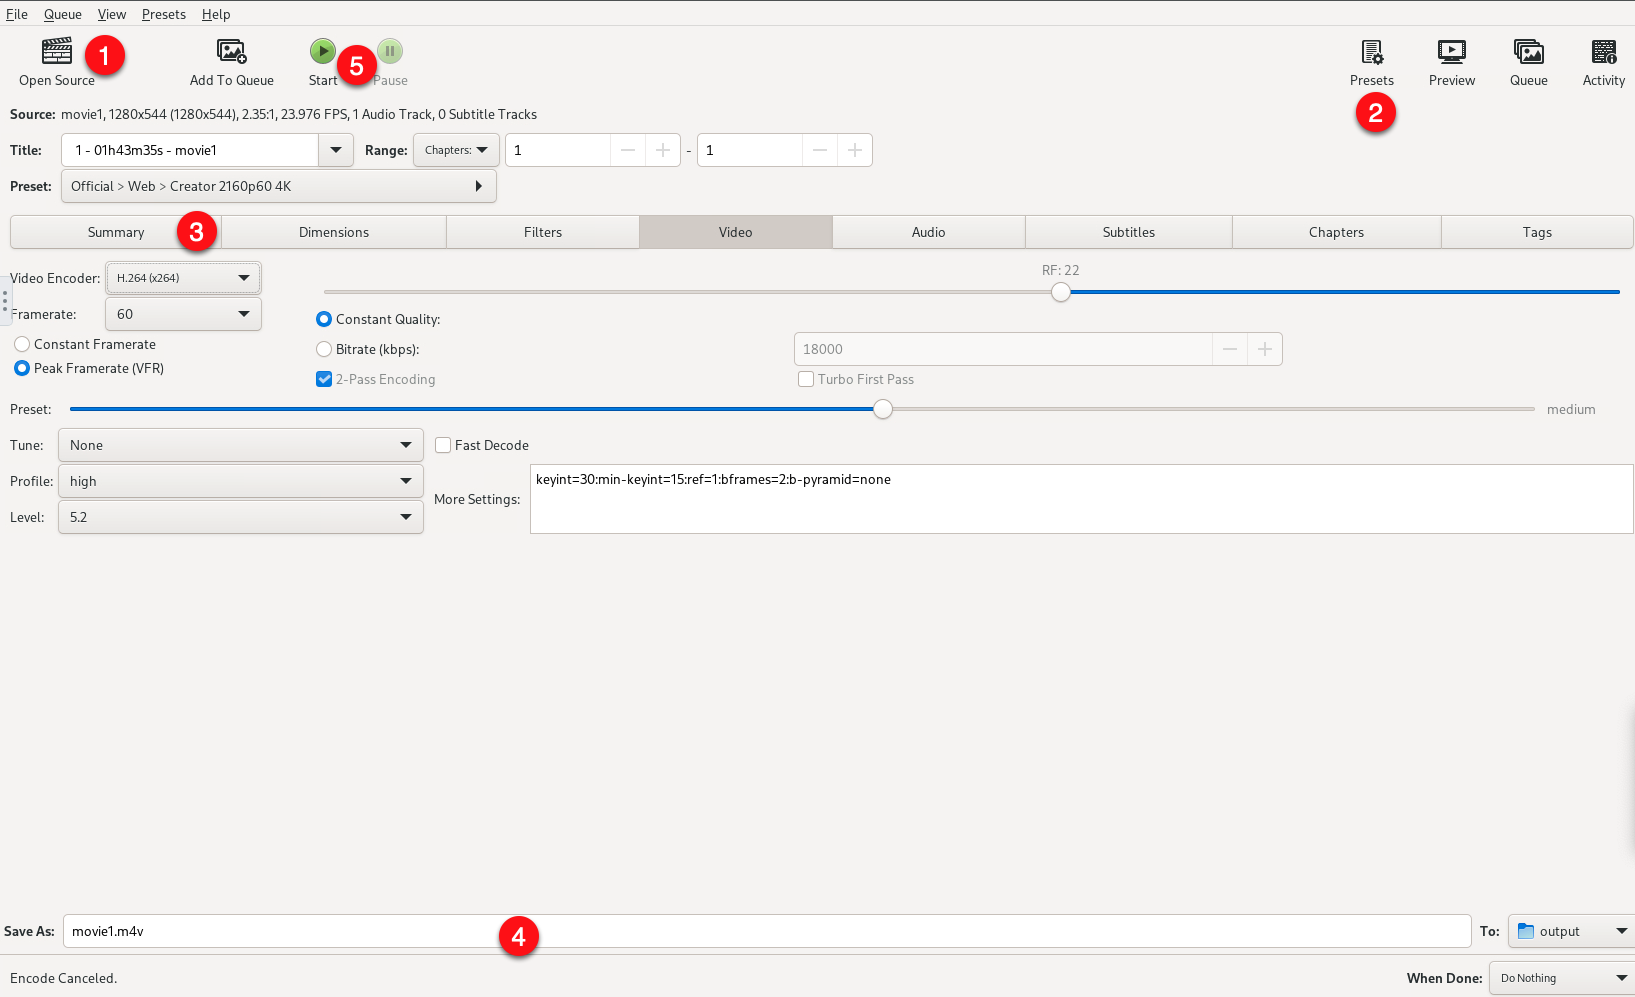
In the bottom Save As: field, enter a new name for your transcoded file and select the destination directory in the TO: dropdown. For this article, click the dropdown, scroll to select other, in the file manager, click storage, and set the
Filesdirectory as your output destination.Click Start to begin the transcoding process.
When the process is complete, open FileBrowser to download the files.
Download Transcoded Files
Log in to FileBrowser.
Verify that the new transcoded file is available in your main directory
Files.Click the file, then click the Download ↓ button on the top right bar.

The download should start automatically, verify that the file downloads directly to your computer.
Save the file on your computer.
Conclusion
You have set up a transcoding server with Handbrake and a Vultr Cloud GPU. By leveraging the GPU processing power, you can transcode multiple files at the same time, and generate the best quality files downloadable through FileBrowser. Depending on your transcoding requirements, you can scale your GPU instance to get more processing power and convert files fast and efficiently. For more information about HandBrake, visit the official documentation, to scale your server's storage space, attach a block storage volume.