DHCP is a protocol used to dynamically allocate IP addresses to machines in your network. Not only can Windows Server 2012 be a DNS server or domain controller, it can even be a DHCP server!
Step 1: Installing the DHCP Server
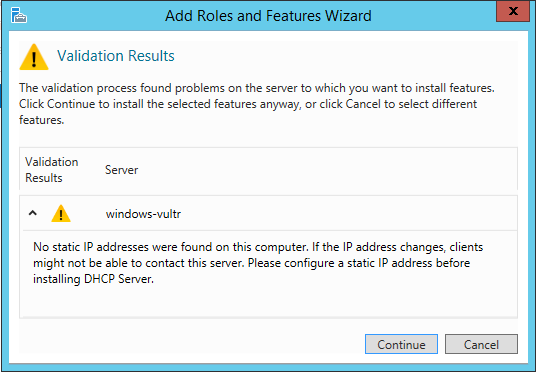
In order to install the DHCP server itself to your Windows Server, go to the "Server Manager". Click "Manage -> Add Roles and Features". You will be asked for the role you want to install; this will be "DHCP Server". You may see the following warning.

This can occur with some servers, it's safe to ignore though. Just click "Continue". Click "Next". You will not need to select any features, so just click "Next".
You will now find a description of DHCP. You can read this if you want, it's not really needed though. It reports that you will need to plan, among other items, the scopes for your DHCP server; don't worry about this for right now. We will address scopes later in this article. Click "Next".
You will now see all of the software you're going to install. Confirm that this is correct, and click "Install". Note that installing the DHCP server on Windows Server can take longer than most other roles (such as IIS). You do not need to restart the server at this time, we will do that later in this guide.
Step 2: Completing the DHCP configuration
We will now get a wizard in order to complete our DHCP setup. Click "Complete DHCP configuration". If you've already clicked "Close", go to your notifications and click "Complete DHCP configuration" from there.
Your DHCP server should not be joined to a domain. In the wizard, click "Commit". If you don't see any errors, reboot your server.
Step 3: Creating a scope
DHCP on Windows Server is based on "scopes". Scopes determine the settings that leases will get. You determine which clients will get which scope. For example, if you are setting up a DHCP server for a school, the students might get Google's DNS servers, whereas teachers will get the DNS servers that are hosted by the school itself. In that case, you would create two scopes: "Students" and "Teachers". You would set two separate DNS server settings for those two scopes.
In order to create our first scope, navigate to "Server Manager -> Tools -> DHCP". First off, you must understand that you can give IPv4 and IPv6 leases to clients. These have separate settings and therefore different scopes. Probably, you want to setup IPv4. So right-click on IPv4 in the sidebar and click "New Scope...". This will open a wizard which will guide you through adding a scope. Click "Next".
You will now be asked to enter a name and description for the scope. If you do not require different settings for certain devices, you can just call it "DHCP", for example. Make sure it's clear, though. Click "Next".
You will now be able to enter the IP address range. This is the range of IP addresses that this scope will assign to machines with DHCP. This could be 10.0.0.1 to 10.0.0.10, for example. It will automatically add the subnet mask. Click "Next".
This is the part where you can exclude certain IP addresses from being assigned, which is extremely handy. For example, say you are planning to use the IP address range of 10.0.0.1 - 10.0.0.10, but you know that 10.0.0.3 - 10.0.0.6 are in use and should not be assigned to machines. Then in this case, you can exclude 3-6 from being assigned, even though they're in the IP address range of the scope. To exclude any IP addresses in the range, click "Add". When you're ready to move on, click "Next".
You will now be able to specify the lease duration. This will determine how long leases will last. The default is 8 hours. It can be anything you want, and it even gives you the option to specify the hours and minutes until the lease expires. Click "Next".
You will now be able to configure the DHCP options. The wizard will ask if we want to do this now; we do, so check "Yes, I want to configure these options now". Click "Next".
Step 4: Configuring the settings of the scope
Router: Specify the IP address of the router (the default gateway) here. Click "Add", and then click "Next".
DNS servers: You can specify the DNS servers that will be used here, as well as the search domain. Windows calls search domains "parent domains". When you add a DNS server that does not work according to Windows, it will warn you; make sure to specify a valid DNS server.
WINS servers: You probably do not want to use this, so just skip it by clicking "Next".
Activate scope: When a scope is not activated, it will not be able to assign IP addresses, so make sure to check "Yes, I want to activate this scope now". Click "Next".
Click "Finish". Congratulations! You have just added a scope! In order to add multiple scopes, just repeat the steps above.
You now have a fully functional DHCP server.
No comments yet.