
AI Generated Images with Stable Cascade and Vultr Cloud GPU
Introduction
Stable Cascade is a text-to-image generation model developed by Stability AI based on the Würstchen architecture. The model uses a three-stage architecture in the A, B, C format for greater efficiency and image generation quality. As a result, all known model extensions such as finetuning, LoRA, ControlNet, IP-Adapter, and LCM are possible with Stable Cascade making it an efficient model you can adopt in multiple projects.
This guide explains how to achieve AI-generated images with the Stable Cascade model on a Vultr Cloud GPU server. You will install the required packages to create a development environment to run the Stable Cascade model. Then, generate images with Text-to-Image, Image-to-Image, and Image Variation methods in addition to exploring the model's performance benefits and limitations.
Prerequisites
Before you begin:
- Deploy a Ubuntu 22.04 A100 Vultr Cloud GPU server with at least
80GB VRAM. - Access the server using SSH as a non-root user with sudo privileges.
- Update the server.
- Install JupyterLab and PyTorch.
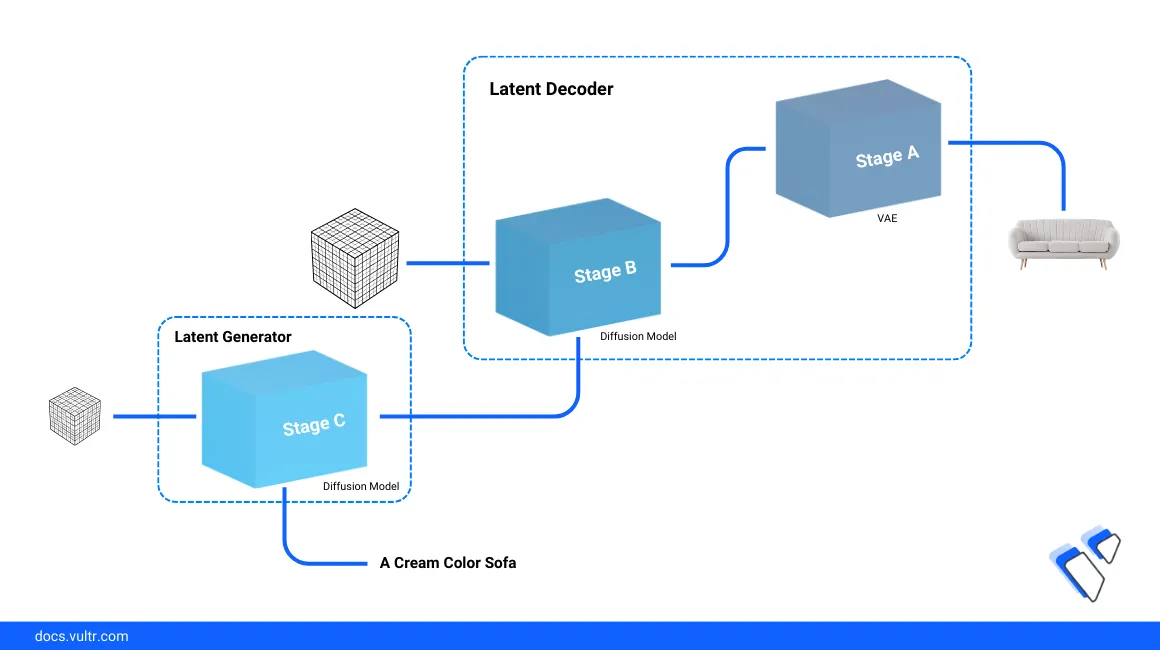
Stable Cascade Architecture
Stable Cascade consists of three models divided into stages that include Stage A, Stage B, and Stage C. Stage A and B support image compression similar to the role of the VAE (Variational Autoencoder) in Stable Diffusion while Stage C focuses on the generated resolution as described in the following sequence operations:
- Stage A: The Encoder Network imports an image (often low-resolution) and extracts key features. Then, it compresses the features into a latent code with a 42x data size reduction. Condensed data is stored to a low-dimensional space called latent space and runs as the Stage B input.
- Stage B: The Decoder Network expands the data size, adds details, and progressively fills-in the missing information before forwarding it to the Latent Generator.
- Stage C: The Latent Generator receives both the compressed latent code (from Stage B) and an input text prompt that describes the generated image. The stage iteratively refines the latent code, gradually transforming it into a high-resolution image that aligns with your prompt.
Install the Stable Cascade Model
To implement the Stable Cascade model, access the Jupyter Lab interface, open a new terminal session, and clone the Stable Cascade model repository to your server. Then, download the model checkpoints in a Safetensors format, and install the required Python packages as described in the following steps.
Open a new JupyterLab terminal session.

Switch to the Jupyter user home directory.
console$ cd
Create a new directory to store the model generated images.
console$ mkdir /home/jupyter/notebooks/generated_images
Clone the Stable Cascade repository using Git.
console$ git clone https://github.com/Stability-AI/StableCascade.git
Switch to the new Stable Cascade directory.
console$ cd StableCascade
Install all necessary dependencies using the
requirements.txtfile.console$ pip install -r requirements.txt
When successful, switch to the
modelsdirectory.console$ cd models
Execute the
download_models.shfile with the target dependency models to install on your server.console$ bash download_models.sh essential big-big bfloat16
Switch back to the main Stable Cascade directory.
console$ cd ..
Print the working directory path to use in your model configurations.
console$ pwd
Output:
/home/jupyter/StableCascade/
Set Up the Stable Cascade Model Environment to Perform Image Generation Tasks
To generate images with the Stable Cascade model, create a new Jupyter Notebook file to use as the implementation environment. Then, import the required modules and load the model configuration files to activate as described in the steps below.
Create a new Jupyter Notebook
Python3Kernel file and set its name toStable Cascade Text-to-Image.
Import the required packages in a new code cell. Replace
/home/jupyter/StableCascade/with your actual model directory.Pythonimport os import yaml import torch import torchvision from tqdm import tqdm from PIL import Image os.chdir('/home/jupyter/StableCascade/') from inference.utils import * from core.utils import load_or_fail from train import WurstCoreC, WurstCoreB
Below are the tasks performed by each of the imported packages:
- os: Enables operating system-dependent functionalities such as reading and writing files to the file system.
- yaml: Enables YAML file parsing.
- torch: Runs general PyTorch functionalities.
- torchvision: Includes datasets, model architectures, and image transformations for computer vision tasks.
- tqdm: Provides a fast extensible progress bar for loops and other iterable computations.
- PIL: The Python Imaging Library (PIL) opens, manipulates, and enables the export of multiple image file formats.
- os.chdir(): Changes the working directory to the specified path to import functions and classes from custom modules.
- inference.utils: Imports all functions and classes from the
utilsmodule in theinferencepackage. - load_or_fail: Imports the
load_or_failfunction from theutilsmodule in thecorepackage. - WurstCoreC, WurstCoreB: Imports the
WurstCoreCandWurstCoreBclasses from thetrainmodule.
Press Shift + Enter to run the code cell and import all packages.
Verify the system GPU availability status.
Pythondevice = torch.device("cuda:0" if torch.cuda.is_available() else "cpu") print(device)
Output:
cuda:0The above code queries the NVidia GPU availability status with the
torch.cuda.is_available()function and displays the result with aprintfunction. The output value0means a GPU device is available and ready to use while any other value switches the default device to CPU.Load the Stage C model configuration file.
Pythonconfig_file = 'configs/inference/stage_c_3b.yaml' with open(config_file, "r", encoding="utf-8") as file: loaded_config = yaml.safe_load(file) core = WurstCoreC(config_dict=loaded_config, device=device, training=False)
Within the above code,
config_filestores thestage_c_3b.yamlstage path that contains settings and parameters for the Stage C model.Load the Stage B model configuration file.
Pythonconfig_file_b = 'configs/inference/stage_b_3b.yaml' with open(config_file_b, "r", encoding="utf-8") as file: config_file_b = yaml.safe_load(file) core_b = WurstCoreB(config_dict=config_file_b, device=device, training=False)
Within the above code, the
config_file_bvariable stores thestage_b_3b.yamlconfiguration path that contains settings and parameters for the Stage B model.Load the model extras to set up Stage C.
Pythonextras = core.setup_extras_pre() models = core.setup_models(extras) models.generator.eval().requires_grad_(False) print("STAGE C READY")
The above code prepares the Stage C model with the following values:
setup_extras_pre(): Calls thecorefunction in theWurstCoreCpackage.extras: Contains setup details.models: Contains the initialized generator, discriminator, and tokenizer.models.generator.eval(): Sets the generator to evaluation mode while.requires_grad_(False)disables gradient computation for its parameters, saving computational resources.
Load the model extras to set up Stage B.
Pythonextras_b = core_b.setup_extras_pre() models_b = core_b.setup_models(extras_b, skip_clip=True) models_b = WurstCoreB.Models( **{**models_b.to_dict(), 'tokenizer': models.tokenizer, 'text_model': models.text_model} ) models_b.generator.bfloat16().eval().requires_grad_(False) print("STAGE B READY")
The above code prepares the Stage B model similar to Stage C with the following functions:
WurstCoreB.Models: Creates a new instance with the model details includingmodelsandmodels_b.models_b.generator.bfloat16(): Converts the generator parameters to16-bitfloating-point precision..eval().requires_grad_(False): Sets the model to evaluation mode, preventing gradient computation during inference.
Generate Images from Text Prompts with Stable Cascade
Create a batch size and a text prompt to describe the image generation process. Replace
Anthropomorphic cat dressed as a pilotwith your desired text prompt.Pythonbatch_size = 4 caption = "Anthropomorphic cat dressed as a pilot"
In the above code, the
batch_sizevariable has a value of4. This means that the code will generate images in4batches using thecaptionvariable that includes a text promptAnthropomorphic cat dressed as a pilotfor generating the image.Define the target image height and width.
Pythonheight, width = 1024, 1024 stage_c_latent_shape, stage_b_latent_shape = calculate_latent_sizes(height, width, batch_size=batch_size)
The above code sets the
heightandwidthvariables to1024pixels to set the generated image dimensions. Thecalculate_latent_sizesfunction computes latent sizes for Stage C and Stage B based on the specified height, width, and batch size.Define the Stage C and Stage B parameters.
Python# Stage C Parameters extras.sampling_configs['cfg'] = 4 extras.sampling_configs['shift'] = 2 extras.sampling_configs['timesteps'] = 20 extras.sampling_configs['t_start'] = 1.0 # Stage B Parameters extras_b.sampling_configs['cfg'] = 1.1 extras_b.sampling_configs['shift'] = 1 extras_b.sampling_configs['timesteps'] = 10 extras_b.sampling_configs['t_start'] = 1.0
The above model parameters control the sampling process when generating an image.
Add the model conditions.
Pythonbatch = {'captions': [caption] * batch_size} conditions = core.get_conditions(batch, models, extras, is_eval=True, is_unconditional=False, eval_image_embeds=False) unconditions = core.get_conditions(batch, models, extras, is_eval=True, is_unconditional=True, eval_image_embeds=False) conditions_b = core_b.get_conditions(batch, models_b, extras_b, is_eval=True, is_unconditional=False) unconditions_b = core_b.get_conditions(batch, models_b, extras_b, is_eval=True, is_unconditional=True)
The above code prepares
conditionsandunconditionalinputs for both Stage C and Stage B that are required when generating images conditioned to a specific caption.Set
TOKENIZERS_PARALLELISMenvironment variable tofalseto disable parallelism while generating the image.Pythonos.environ["TOKENIZERS_PARALLELISM"] = "false"
Start the image generation process.
Pythonwith torch.no_grad(), torch.cuda.amp.autocast(dtype=torch.bfloat16): sampling_c = extras.gdf.sample( models.generator, conditions, stage_c_latent_shape, unconditions, device=device, **extras.sampling_configs, ) for (sampled_c, _, _) in tqdm(sampling_c, total=extras.sampling_configs['timesteps']): sampled_c = sampled_c conditions_b['effnet'] = sampled_c unconditions_b['effnet'] = torch.zeros_like(sampled_c) sampling_b = extras_b.gdf.sample( models_b.generator, conditions_b, stage_b_latent_shape, unconditions_b, device=device, **extras_b.sampling_configs ) for (sampled_b, _, _) in tqdm(sampling_b, total=extras_b.sampling_configs['timesteps']): sampled_b = sampled_b sampled = models_b.stage_a.decode(sampled_b).float()
The above code generates images with two stages Stage C and Stage B using the specified models, conditions, and sampling configurations. The
torch.cuda.amp.autocastperforms automatic mixed-precision tasks to speed up the model computations.View the generated images.
Pythonshow_images(sampled)
Based on the input text prompt
Anthropomorphic cat dressed as a pilot, the model generates a photo-realistic image with the set resolution. For each text prompt, the model generates a different image.
Perform Image-to-Image Generation with Stable Cascade
Stable Cascade image-to-image generation works similar to the text-to-image model process with a three-stage architecture. Instead of a text prompt, image-to-image uses an input image and the involves adding noise to a specific point. Follow the steps below to generate images using the image-to-image procedure, add noise and start the model image generation process.
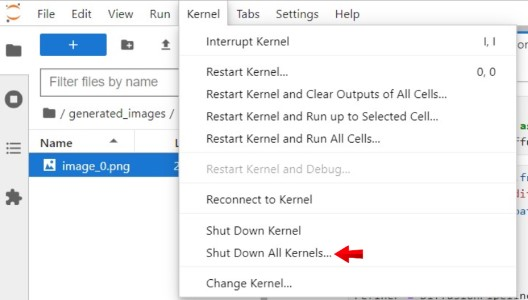
Click Kernel on the top navigation bar and select Shutdown Down All Kernels from the list of options to clear the GPU memory.
In a new code cell, define the batch size and the input image URL to use with the model. Replace
https://imagizer.imageshack.com/img922/1920/iquupP.pngwith your desired input image URL.Pythonbatch_size = 4 url = "https://imagizer.imageshack.com/img922/1920/iquupP.png" images = resize_image(download_image(url)).unsqueeze(0).expand(batch_size, -1, -1, -1).to(device) batch = {'images': images}
Enter a text prompt to define the generated image with the target width and height to set the image dimensions. Replace
a person riding a rodentand1023with your desired prompt, and target image dimensions respectively.Pythoncaption = "a person riding a rodent" noise_level = 0.8 height, width = 1024, 1024 stage_c_latent_shape, stage_b_latent_shape = calculate_latent_sizes(height, width, batch_size=batch_size) effnet_latents = core.encode_latents(batch, models, extras) t = torch.ones(effnet_latents.size(0), device=device) * noise_level noised = extras.gdf.diffuse(effnet_latents, t=t)[0]
Define the Stage C and Stage B parameters.
Python# Stage C Parameters extras.sampling_configs['cfg'] = 4 extras.sampling_configs['shift'] = 2 extras.sampling_configs['timesteps'] = int(20 * noise_level) extras.sampling_configs['t_start'] = noise_level extras.sampling_configs['x_init'] = noised # Stage B Parameters extras_b.sampling_configs['cfg'] = 1.1 extras_b.sampling_configs['shift'] = 1 extras_b.sampling_configs['timesteps'] = 10 extras_b.sampling_configs['t_start'] = 1.0
Prepare the image generation conditions.
Pythonbatch['captions'] = [caption] * batch_size
Set the
TOKENIZERS_PARALLELISMenvironment variable tofalseto disable parallelism.Pythonos.environ["TOKENIZERS_PARALLELISM"] = "false"
Generate the images based on your input image and prompt.
Pythonwith torch.no_grad(), torch.cuda.amp.autocast(dtype=torch.bfloat16): conditions = core.get_conditions(batch, models, extras, is_eval=True, is_unconditional=False, eval_image_embeds=False) unconditions = core.get_conditions(batch, models, extras, is_eval=True, is_unconditional=True, eval_image_embeds=False) conditions_b = core_b.get_conditions(batch, models_b, extras_b, is_eval=True, is_unconditional=False) unconditions_b = core_b.get_conditions(batch, models_b, extras_b, is_eval=True, is_unconditional=True) sampling_c = extras.gdf.sample( models.generator, conditions, stage_c_latent_shape, unconditions, device=device, **extras.sampling_configs, ) for (sampled_c, _, _) in tqdm(sampling_c, total=extras.sampling_configs['timesteps']): sampled_c = sampled_c conditions_b['effnet'] = sampled_c unconditions_b['effnet'] = torch.zeros_like(sampled_c) sampling_b = extras_b.gdf.sample( models_b.generator, conditions_b, stage_b_latent_shape, unconditions_b, device=device, **extras_b.sampling_configs ) for (sampled_b, _, _) in tqdm(sampling_b, total=extras_b.sampling_configs['timesteps']): sampled_b = sampled_b sampled = models_b.stage_a.decode(sampled_b).float()
View the generated images.
Pythonshow_images(sampled)
Based on the input image, dimensions, and the text prompt
a person riding a rodent. The model outputs a final image that closely matches your input values.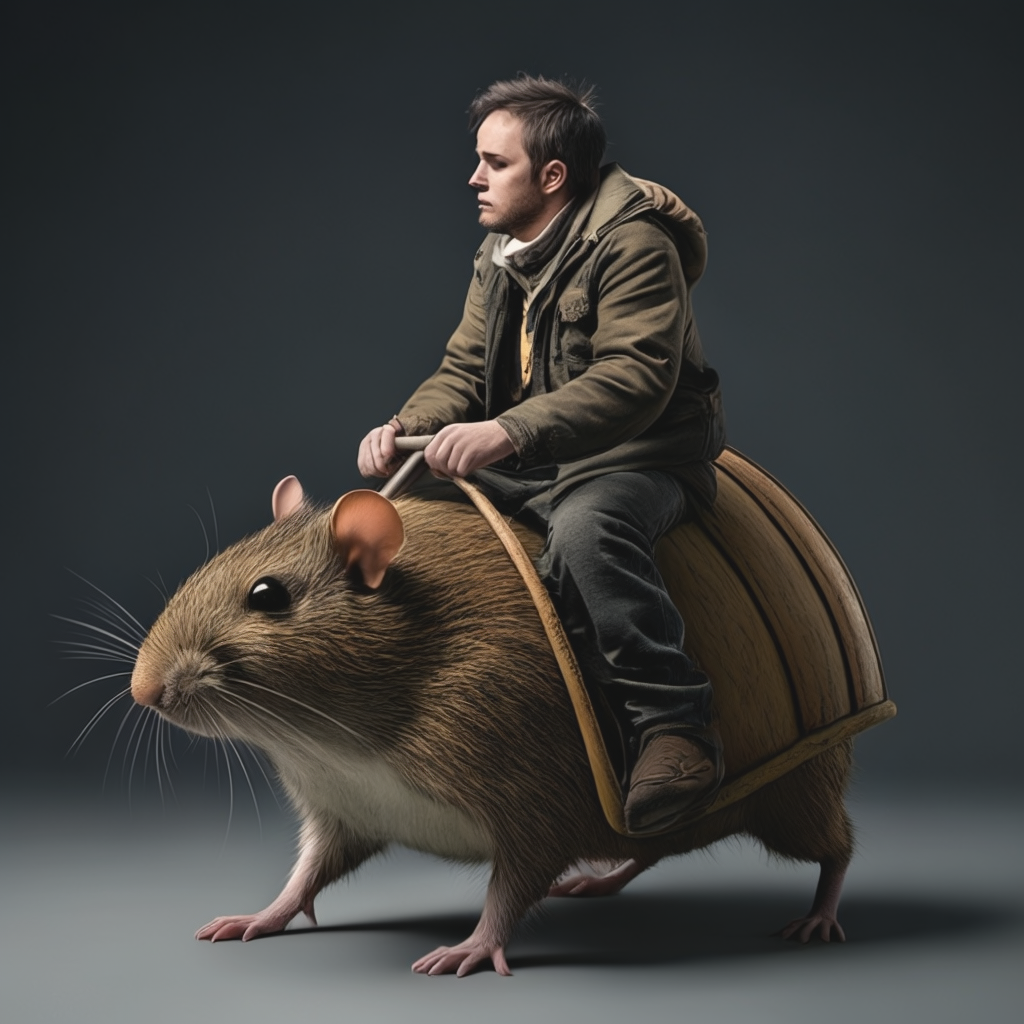
Image Variation
Image variation enables the Stable Cascade model to comprehend image embeddings and generate variations without a base prompt. Similar to the image-to-image generation process, image variation uses an input image but does not require a prompt to generate a final image as described in the steps below.
Click the Kernel menu option and select Shutdown Down All Kernels to clear the system GPU memory to run a new model process.
In a new code cell, define your target batch size and input image URL. Replace
https://imagizer.imageshack.com/img923/8748/1Lo6Ii.pngwith your desired image URL to use with the model.Pythonbatch_size = 4 url = "https://imagizer.imageshack.com/img923/8748/1Lo6Ii.png" images = resize_image(download_image(url)).unsqueeze(0).expand(batch_size, -1, -1, -1).to(device) batch = {'images': images}
Define the target width and height to set the generated image dimensions.
Pythoncaption = "" height, width = 1024, 1024 stage_c_latent_shape, stage_b_latent_shape = calculate_latent_sizes(height, width, batch_size=batch_size)
Add the model Stage C parameters.
Python# Stage C Parameters extras.sampling_configs['cfg'] = 4 extras.sampling_configs['shift'] = 2 extras.sampling_configs['timesteps'] = 20 extras.sampling_configs['t_start'] = 1.0 # Stage B Parameters extras_b.sampling_configs['cfg'] = 1.1 extras_b.sampling_configs['shift'] = 1 extras_b.sampling_configs['timesteps'] = 10 extras_b.sampling_configs['t_start'] = 1.0
Prepare the model image generation conditions.
Pythonbatch['captions'] = [caption] * batch_size
Disable parallelism.
Pythonos.environ["TOKENIZERS_PARALLELISM"] = "false"
Generate the images.
Pythonwith torch.no_grad(), torch.cuda.amp.autocast(dtype=torch.bfloat16): conditions = core.get_conditions(batch, models, extras, is_eval=True, is_unconditional=False, eval_image_embeds=True) unconditions = core.get_conditions(batch, models, extras, is_eval=True, is_unconditional=True, eval_image_embeds=False) conditions_b = core_b.get_conditions(batch, models_b, extras_b, is_eval=True, is_unconditional=False) unconditions_b = core_b.get_conditions(batch, models_b, extras_b, is_eval=True, is_unconditional=True) sampling_c = extras.gdf.sample( models.generator, conditions, stage_c_latent_shape, unconditions, device=device, **extras.sampling_configs, ) for (sampled_c, _, _) in tqdm(sampling_c, total=extras.sampling_configs['timesteps']): sampled_c = sampled_c conditions_b['effnet'] = sampled_c unconditions_b['effnet'] = torch.zeros_like(sampled_c) sampling_b = extras_b.gdf.sample( models_b.generator, conditions_b, stage_b_latent_shape, unconditions_b, device=device, **extras_b.sampling_configs ) for (sampled_b, _, _) in tqdm(sampling_b, total=extras_b.sampling_configs['timesteps']): sampled_b = sampled_b sampled = models_b.stage_a.decode(sampled_b).float()
View the generated images.
Pythonshow_images(sampled)
Based on your input image, the Stable Cascade image variation model process outputs a generated image that matches your condition specifications.

Save Generated Images
All Stable Cascade image generation processes generate final images but do not save the result. Follow the steps below to export and save generated images to your data directory.
Import the required model packages to save generated images.
Pythonimport matplotlib.pyplot as plt import torchvision.utils as vutils
Set your target server directory to save the generated images. Replace
/home/jupyter/notebooks/generated_imageswith your desired directory path.Pythonsave_dir = "/home/jupyter/notebooks/generated_images"
Declare a new condition to create the directory if it does not exist on the server.
Pythonos.makedirs(save_dir, exist_ok=True)
Create a new loop to scan each generated image in the batch and save it as a standalone file.
Pythonfor i in range(sampled.size(0)): # Extract the i-th image from the batch current_image = sampled[i] # Convert the tensor to a grid of images grid_image = vutils.make_grid(current_image, normalize=True, scale_each=True) # Convert PyTorch tensor to NumPy array and transpose the dimensions grid_image_np = grid_image.cpu().numpy().transpose((1, 2, 0)) # Save the generated image to a file in the specified directory save_path = os.path.join(save_dir, f'generated_image_{i + 1}.png') plt.imsave(save_path, grid_image_np)
Within the above code,
for i in rangestarts a new loop that iterates through each of the generated images. For each image:- Extract Image: Retrieves each image from the batch using
current_image = sampled[i]. - Convert to Grid: Uses the
vutils.make_gridfunction to convert the image tensor to a grid format suitable for visualization. - Convert to NumPy Array: Converts the grid tensor to a NumPy array and transposes the dimensions to match the Matplotlib format.
- Save Image: Saves the generated image as a PNG file in the specified directory with an increment value
index + 1to avoid starting new image files from zero and ensure uniqueness for each filename.
To download the exported Stable Cascade images to your local machine, use a file transfer protocol such as SFTP, SCP or Rsync.
- Extract Image: Retrieves each image from the batch using
Performance Benefits
In comparison with other image generation models, Stable Cascade consistently outperforms other variants in prompt alignment and aesthetic quality. Particularly, Stable Cascade (30 inference steps) exhibits superior performance compared to Playground v2 (50 inference steps), SDXL (50 inference steps), SDXL Turbo (1 inference step), and Würstchen v2 (30 inference steps) based on the initial model tests.
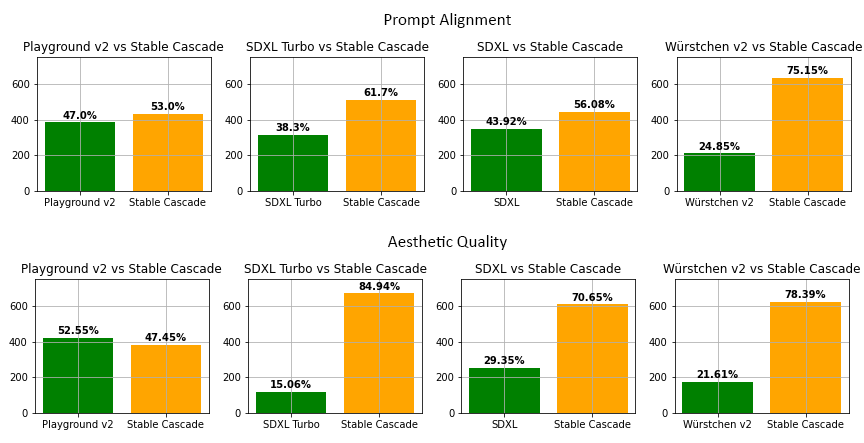
It's important to note that the model results are specifically related to text-to-image generation.
Conclusion
You have generated AI images using the Stable Cascade model on a Vultr Cloud GPU server with text-to-image, image-to-image, and image variation methods. Based on your model deployment needs, you can use Stable Cascade with multiple input prompts and images to finetune it to your environment. For more information and usage samples, visit the Stable Cascade model page on Hugging Face.