
AI Generated Images using Stable Diffusion Turbo Models
Stable Diffusion Turbo models, Stable Diffusion (SD) Turbo and Stable Diffusion XL (SDXL) Turbo are real-time revolutionary text-to-image generation models developed by Stability AI. They're are based on the previous Stable Diffusion 2.1 and Stable Diffusion XL (SDXL) models with a new execution Adversarial Diffusion Distillation (ADD) technique.
ADD allows these models to synthesize image outputs in a series of one to four steps as compared to the conventional 50 steps. This remarkable capability makes both models much faster than previous text-to-image models and image-to-image models, which typically require hundreds of steps to generate an image.
This guide explains how you can achieve AI generated images using Stable Diffusion Turbo Models on a Vultr Cloud GPU server. You are to install the required packages to create the development environment and further compare the model time differences, performance benefits, and limitations while generating images.
Prerequisites
Before you begin, you should:
- Deploy a fresh Ubuntu 22.04 A100 Vultr Cloud GPU server with at least
80 GBGPU RAM. - Securely access the server using SSH as a non-root sudo user.
- Update the server.
- Install JupyterLab and PyTorch.
Adversarial Diffusion Distillation (ADD)
Adversarial Diffusion Distillation (ADD) is an advanced training method for large-scale image diffusion models such as Stable Diffusion Turbo. It utilizes score distillation with a pre-trained Stable Diffusion model as a guide to distill valuable knowledge for a high-quality output. The inclusion of an adversarial loss mechanism ensures realism which makes ADD a potent tool for real-time image generation.
ADD speeds up SD Turbo models by reducing the refinement steps through knowledge distillation from a pre-trained "teacher" model. This dual approach leverages the teacher's knowledge, results in real-time image generation, lower computational costs, and quicker experimentation even in the absence of official code.
Install the Model Dependency Packages
Open a terminal within the Jupyter lab interface.
Install the required dependency packages.
console$ pip install diffusers transformers accelerate matplotlib ipywidgets --upgrade
The above command installs the following packages:
- diffusers: Provides tools for building and training diffusion models. Diffusers include many different core neural network models and are used as building blocks to create new pipelines.
- transformers: Consists of multiple pre-trained models used for Natural Language Processing (NLP), Named Entity Recognition (NER), machine translation, and sentiment analysis.
- accelerate: Enables PyTorch to run across any distributed configuration. It uses accelerators such as GPUs and TPUs to improve efficiency and scalability, speed up natural language processing (NLP) workflows, and enhance performance.
- matplotlib: Display the images in your Jupyter Notebook.
Generate Images using Stable Diffusion Turbo
Stable Diffusion Turbo is available as a pre-trained model with the Hugging Face Diffusers library. The model can generate images from text prompts and images from images. In this section, generate images using the model using both prompt types as described in the steps below.
Text to Image Generation
To generate images from text prompts, import the required modules such as AutoPipelineForText2Image from diffusers, torch, and matplotlib.pyplot. Then, initialize the model using the provided model_id to set it up for GPU acceleration by assigning it to the CUDA device.
Open a new Notebook session, and set its name to
Stable Diffusion Turbo Text2Image.
To use the model, import the following packages.
pythonimport torch import matplotlib.pyplot as plt from diffusers import AutoPipelineForText2Image
Below is what each module does:
AutoPipelineForText2Image: Provides an interface to the model for generating images.torch: Enables support for tensor computations. In this context, it's used for GPU acceleration.matplotlib: Allows you to display the generated images.
Declare the model.
pythonmodel_id = "stabilityai/sd-turbo" pipe = AutoPipelineForText2Image.from_pretrained( model_id, torch_dtype=torch.float16, variant="fp16" ) pipe.to("cuda")
The pipeline applies the necessary setup to generate images from text using the
from_pretrainedmethod. The parameters passed to the method include:model_id: Loads thestabilityai/sd-turbomodel. The model ID can also be the path to a local directory containing model weights or URL to a checkpoint file.torch_dtype: Defines the Torch datatype of the tensors to use for pipeline computations.float16is specified explicitly to run model computations with 16-bit floating point numbers. To let the system choose the optimal data type use theautovaluetorch_dtype = "auto".
Generate an image using a text prompt. For example,
Sunset on a beach.pythonprompt = "Sunset on a beach" image = pipe(prompt=prompt, num_inference_steps=1, guidance_scale=0.0).images
The above code declares and feeds the prompt to the previously declared pipeline to store the image attribute. A different image is generated each time you run the module. To enhance the image output, enter a more detailed prompt to match your desired results.
View the generated image.
pythonplt.imshow(image[0])
Verify that the generated image matches your
Sunset on a Beachprompt or fine-tune the prompt to generate a more desired result.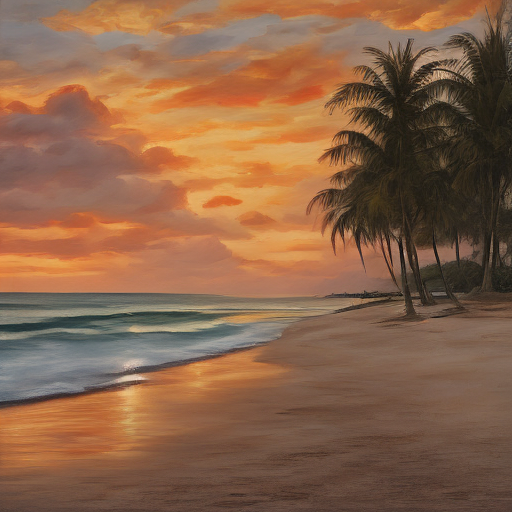
Image to Image Generation
Open a new Notebook and set its name to
Stable Diffusion Turbo Image2Image.Navigate to the Kernel menu option in your Jupyter Notebook, and click Shutdown Down All Kernels to clear GPU memory.
In a new code cell, import the following packages.
pythonimport torch import matplotlib.pyplot as plt from diffusers import AutoPipelineForImage2Image from diffusers.utils import load_image
Below is what each module does:
AutoPipelineForImage2Image: Provides an interface to the model for refining images.load_image: Loads image data from a declared source.
Declare the model.
pythonmodel_id = "stabilityai/sd-turbo" pipe = AutoPipelineForImage2Image.from_pretrained( model_id, torch_dtype=torch.float16, variant="fp16" ) pipe.to("cuda")
Load the image to the pipeline. Replace
https://i.imgur.com/wFC9Yw6.pngwith your desired source image URL.pythoninit_image = load_image("https://i.imgur.com/wFC9Yw6.png").resize((512, 512))
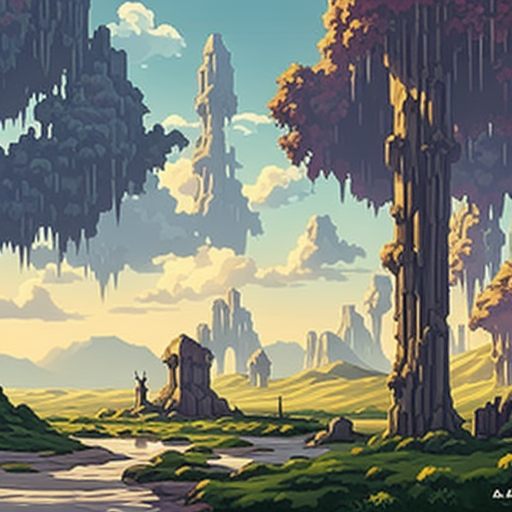
Add a supporting text prompt to guide the image generation process. For example,
A fantasy landscape, trending on artstation.pythonprompt = "A fantasy landscape, trending on artstation" image = pipe(prompt, image=init_image, num_inference_steps=4, strength=1, guidance_scale=0.0).images
View the generated image.
pythonplt.imshow(image[0])
Verify that your input image matched with the supporting prompt generates a new image.
Time Difference Compared to Stable Diffusion 2.1
Text to Image Generation Time Difference
In this section, compare the text-to-image generation times between SD Turbo and Stable Diffusion 2.1. The image generation steps are similar, but you need to import the time variable to calculate the image generation duration for each model as described in the steps below.
Open a new Notebook and set its name to
Stable Diffusion text-to-image Time comparison.Clear the GPU memory to start running the model
Import the following packages.
pythonimport torch import matplotlib.pyplot as plt from diffusers import AutoPipelineForText2Image
Declare the model.
pythonmodel_id = "stabilityai/sd-turbo" pipe = AutoPipelineForText2Image.from_pretrained( model_id, torch_dtype=torch.float16, variant="fp16" ) pipe.to("cuda")
Generate an image using the Stable Diffusion Turbo model with a prompt such as
Sunset on a beach.pythonimport time prompt = "Sunset on a beach" start_time = time.time() image = pipe(prompt=prompt, num_inference_steps=1, guidance_scale=0.0).images end_time = time.time() plt.imshow(image[0])
View the model generation time.
pythonelapsed_time = end_time - start_time print(f"Image generation time: {elapsed_time} seconds")
Output:
Image generation time: 0.7282497882843018 secondsKeep note of the time value.
Generate an image with the Stable Diffusion 2.1 Model.
The Stable Diffusion 2.1 model steps are similar to SD Turbo text-to-image generation. In the previous code examples, replace the
model_idname and removenum_inference_steps, andguidance_scalevariables to pass the prompt with its default setting as described below.Replace the
model_ID.pythonmodel_id = "stabilityai/stable-diffusion-2-1"
Generate an image by providing using a prompt such as
Sunset on a beach.pythonimport time prompt = "Sunset on a beach" start_time = time.time() image = pipe(prompt=prompt).images end_time = time.time() plt.imshow(image[0])
Print the time.
pythonelapsed_time = end_time - start_time print(f"Image generation time: {elapsed_time} seconds")
Output:
Image generation time: 6.339369297027588 seconds
In comparison with the earlier Stable Diffusion Turbo 0.7282497882843018 seconds time, Stable Diffusion 2.1 is slower with 6.339369297027588 seconds. This is because SD Turbo can generate images in just one step, while Stable Diffusion 2.1 requires 50 steps to generate an image.
Image to Image Generation Time Difference
Open a new Notebook and set its name to
Stable Diffusion image-to-image Time comparison.Clear the GPU memory to start running the model.
Import the following packages.
pythonimport torch import matplotlib.pyplot as plt from diffusers import AutoPipelineForImage2Image from diffusers.utils import load_image
Declare the model.
pythonmodel_id = "stabilityai/sd-turbo" pipe = AutoPipelineForImage2Image.from_pretrained( model_id, torch_dtype=torch.float16, variant="fp16" ) pipe.to("cuda")
Generate an image with the SD Turbo Model.
pythonimport time prompt = "A fantasy landscape, trending on artstation" start_time = time.time() image = pipe(prompt, image=init_image, num_inference_steps=4, strength=1, guidance_scale=0.0).images end_time = time.time() plt.imshow(image[0])
Print the time.
pythonelapsed_time = end_time - start_time print(f"Image generation time: {elapsed_time} seconds")
Output:
Image generation time: 0.8927862644195557 secondsKeep note of the generation time.
Generate an image with the Stable Diffusion 2.1 Model.
Replace the
model_ID.pythonmodel_id = "stabilityai/stable-diffusion-2-1"
Generate an image with a prompt such as
A fantasy landscape, trending on artstation.pythonimport time prompt = "A fantasy landscape, trending on artstation" start_time = time.time() image = pipe(prompt, image=init_image).images end_time = time.time() plt.imshow(image[0])
Print the time.
pythonelapsed_time = end_time - start_time print(f"Image generation time: {elapsed_time} seconds")
Output:
Image generation time: 2.755378007888794 seconds
Based on the image generation time, SD Turbo is much faster than Stable Diffusion 2.1. SD Turbo creates an in four steps, while Stable Diffusion 2.1 uses 40 steps for an image.
Generate Images using Stable Diffusion XL Turbo
SDXL Turbo is similar to the SD Turbo model and is a larger version capable of generating higher quality and clearer images. Similarly, it can also be used to generate images from images.
Text to Image Generation
The SDXL Turbo model steps are similar to the SD Turbo text-to-image generation process. In the previous code examples, replace the model_id name as below.
Open a new Notebook and set its name to
Stable Diffusion XL Turbo Text2Image.To clear GPU memory and start running the model, navigate to the Kernel menu option in your Jupyter Notebook, and click Shutdown Down All Kernels.
Import the following packages.
pythonimport torch import matplotlib.pyplot as plt from diffusers import AutoPipelineForText2Image
Declare the model.
pythonmodel_id = "stabilityai/sdxl-turbo" pipe = AutoPipelineForText2Image.from_pretrained( model_id, torch_dtype=torch.float16, variant="fp16" ) pipe.to("cuda")
Generate an image by providing a
promptas below.pythonprompt = "A baby racoon wearing a robe" image = pipe(prompt=prompt, num_inference_steps=1, guidance_scale=0.0).images
Replace
A baby raccoon wearing a robewith your desired prompt.Render the generated image.
pythonplt.imshow(image[0])
The
A baby raccoon wearing a robegenerates an image like the one below: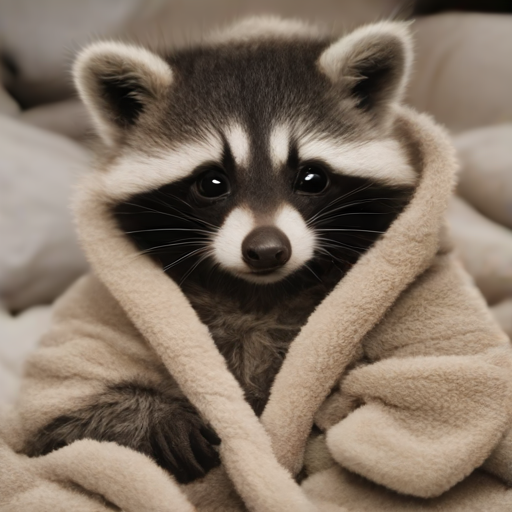
You can also access the above code in the following Jupyter Notebook.
Image to Image Generation
Stable Diffusion XL Turbo model steps are similar to the SD Turbo image-to-image generation process. In the previous code examples, replace the model_id variable with the SDXL Turbo model to generate images as described in the steps below.
Open a new Notebook and set its name to
Stable Diffusion XL Turbo Image2Image.Navigate to the Kernel menu option in your Jupyter Notebook, and click Shutdown Down All Kernels to clear GPU memory.
Import the following packages.
pythonimport torch import matplotlib.pyplot as plt from diffusers import AutoPipelineForImage2Image from diffusers.utils import load_image
Declare the model.
pythonmodel_id = "stabilityai/sdxl-turbo" pipe = AutoPipelineForImage2Image.from_pretrained( model_id, torch_dtype=torch.float16, variant="fp16" ) pipe.to("cuda")
Load the image.
pythoninit_image = load_image("https://i.imgur.com/5OiqkNA.png").resize((512, 512))
Generate an image using a text prompt such as
Astronauts in a jungle.pythonprompt = "Astronauts in a jungle" image = pipe(prompt, image=init_image, num_inference_steps=4, strength=1, guidance_scale=0.0).images
View the generated image.
pythonplt.imshow(image[0])
Verify that your generated image matches your input prompt
Astronauts in a Jungle.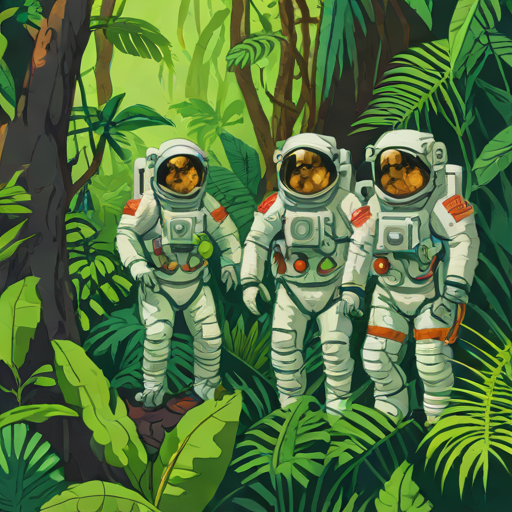
SDXL Turbo and XDXL Text to Image Generation Time Differences
Open a new Notebook and set its name to
Stable Diffusion XL text-to-image Time comparison.Clear the GPU memory to start running the model
Import the following packages.
pythonimport torch import matplotlib.pyplot as plt from diffusers import AutoPipelineForText2Image
Declare the model.
pythonmodel_id = "stabilityai/sdxl-turbo" pipe = AutoPipelineForText2Image.from_pretrained( model_id, torch_dtype=torch.float16, variant="fp16" ) pipe.to("cuda")
Generate an image with the SDXL Turbo Model.
pythonimport time prompt = "A baby racoon wearing a robe." start_time = time.time() image = pipe(prompt=prompt, num_inference_steps=1, guidance_scale=0.0).images end_time = time.time() plt.imshow(image[0])
Print the time.
pythonelapsed_time = end_time - start_time print(f"Image generation time: {elapsed_time} seconds")
Output:
Image generation time: 0.8553969860076904 secondsGenerate an image with the SDXL Model.
Replace the
model_id.pythonmodel_id = "stabilityai/stable-diffusion-xl-base-1.0"
Generate an image using a prompt such as
A baby racoon wearing a robe.pythonimport time prompt = "A baby racoon wearing a robe" start_time = time.time() image = pipe(prompt=prompt).images end_time = time.time() plt.imshow(image[0])
Print the time.
pythonelapsed_time = end_time - start_time print(f"Image generation time: {elapsed_time} seconds")
Output:
Image generation time: 13.608830213546753 seconds
Image to Image Generation Time Differences
Open a new Notebook and set the filename to
Stable Diffusion XL image-to-image Time comparison.Clear the GPU memory to start running the model
Import the following packages.
pythonimport torch import matplotlib.pyplot as plt from diffusers import AutoPipelineForImage2Image from diffusers.utils import load_image
Declare the model.
pythonmodel_id = "stabilityai/sdxl-turbo" pipe = AutoPipelineForImage2Image.from_pretrained( model_id, torch_dtype=torch.float16, variant="fp16" ) pipe.to("cuda")
Generate an image with the SDXL Turbo Model.
pythonimport time prompt = "Astronauts in a jungle" start_time = time.time() image = pipe(prompt, image=init_image, num_inference_steps=4, strength=1, guidance_scale=0.0).images end_time = time.time() plt.imshow(image[0])
Print the time.
pythonelapsed_time = end_time - start_time print(f"Image generation time: {elapsed_time} seconds")
Output:
Image generation time: 1.2138450145721436 secondsGenerate an image with the SDXL Model.
Replace the
model_id.pythonmodel_id = "stabilityai/stable-diffusion-xl-base-1.0"
Generate an image using a prompt such as
Astronauts in a junglepythonimport time prompt = "Astronauts in a jungle" start_time = time.time() image = pipe(prompt, image=init_image, strength=0.8, guidance_scale=10.5).images end_time = time.time() plt.imshow(image[0])
Print the time.
pythonelapsed_time = end_time - start_time print(f"Image generation time: {elapsed_time} seconds")
Output:
Image generation time: 4.103722095489502 seconds
Performance Benefits Compared to Other Diffusion Models
To make a selection for both SD and SDXL Turbo, Stability AI conducted comparisons among various model variants, including StyleGAN-T++, OpenMUSE, IF-XL, SDXL, LCM-Lora1.5, and LCM-XL by generating outputs with the same prompt. The goal was to determine which model generated outputs that closely aligned with a given prompt. Human evaluators were presented with two randomly selected outputs and asked to choose the one that best followed the prompt’s direction. A similar test was conducted to assess image quality.
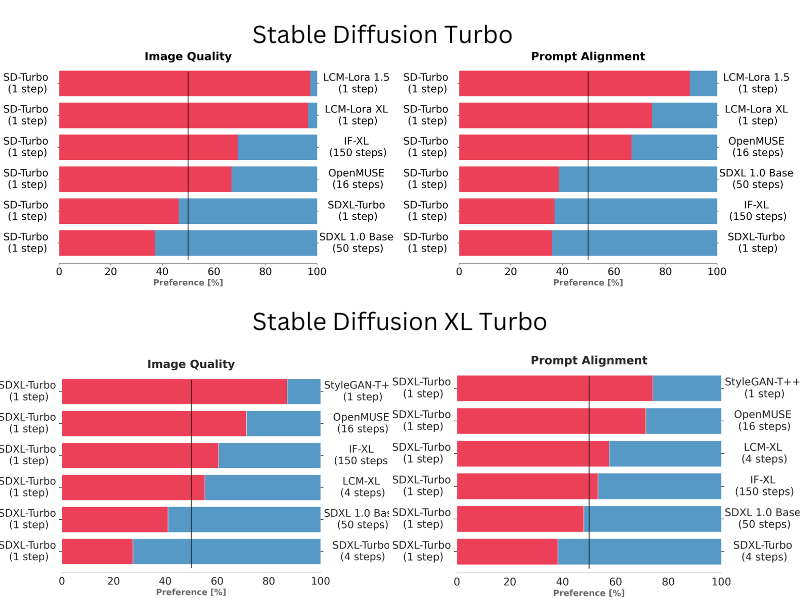
In these blind tests, both SD and SDXL Turbo models performed exceptionally well. SDXL Turbo outperformed a 4-step configuration of LCM-XL with just a single step, and in addition, it surpassed a 50-step configuration of SDXL with only 4 steps. In a recent benchmark, it achieved the generation of images with an impressive average CLIP score of 0.42, significantly higher than the average CLIP score of 0.28 for other text-to-image models. These results show that both models deliver superior performance compared to multi-step models, all while substantially reducing computational requirements. Importantly, this advancement does not compromise the quality of the generated images.
Limitations of Stable Diffusion Turbo Models
While SD Turbo models are powerful, they do have some limitations. The models are still under development, and may not be accurate as some other text-to-image models. Neither of the models makes use of the guidance_scale or negative_prompt while generating images at a resolution of 512x512. Although higher image sizes are possible, they may not perform as the default 1024x1024 resolution within the SDXL model.
Conclusion
In this guide, you have generated images using Stable Diffusion Turbo models on a Vultr Cloud A100 GPU server. You further installed the necessary packages to create an environment and generated images using both Turbo models. To choose the best model to implement, you compared the time difference with previous models to understand their performance benefits and limitations.
More Information
For more information, please visit the following resources: