
Zero-shot Image Classification using OpenAI CLIP
Introduction
Image classification is a vision recognition approach that involves understanding and categorizing an image according to its visual content. Traditionally, classification involves a supervised learning process that requires careful data preparation and customized model training efforts to achieve results similar to a pre-trained model, such as Zero-shot Image Classification using OpenAI CLIP.
With the emergence of large pre-trained multi-modal models, it's faster and more practical to achieve near-perfect image classification performance without any prior training or pre-labeled data of classes. This model approach is called Zero-shot because no data samples are required to apply the model to a new domain.
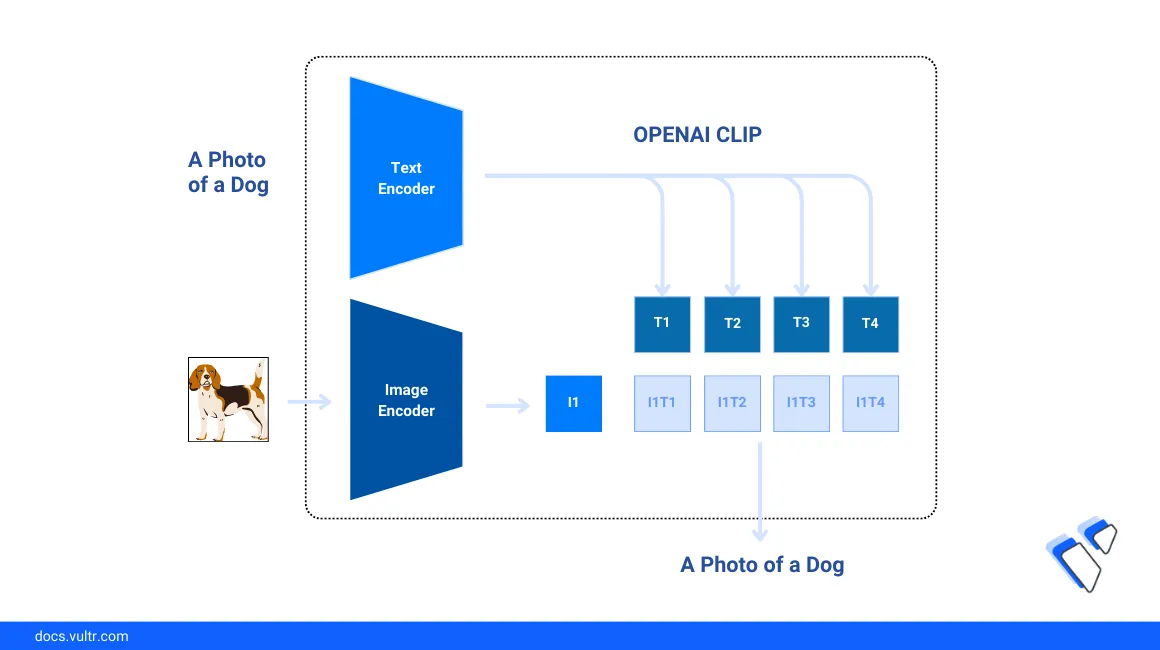
This article explains how to fulfill a Zero-shot image classification task using OpenAI’s CLIP (Contrastive Language-Image Pretraining) model on a Vultr Cloud GPU server. You will use sample datasets to test the model performance and classify generated images based on the visual content.
Prerequisites
- Deploy a Ubuntu A100 Cloud GPU server.
- Access the server using SSH as a non-root user with sudo privileges.
- Update the server.
- Install JupyterLab and PyTorch.
Install the OpenAI CLIP Model Dependencies
To run image classification tasks on the server, install the OpenAI Clip model and all necessary dependencies on the server as described in the steps below.
Access your JupyterLab interface in a new web browser session.
Click Notebook and select
Python3to create a new file.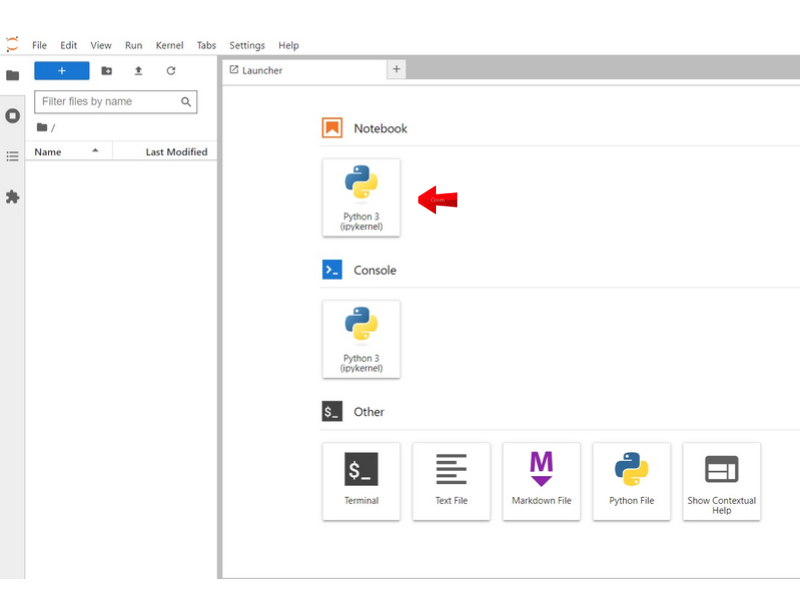
In a new code cell, install the required model dependencies.
console$ pip install git+https://github.com/openai/CLIP.git scikit-image matplotlib
The above command installs all necessary packages including:
CLIP: A neural network trained on image and text pairs with the ability to perform zero-shot prediction on the most relevant text snippet based on an image input. When installing the package, use the latest GitHub release package withpipbecause a command such aspip install clipinstalls a different unrelated library.scikit-image: Offers a collection of sample images commonly used to verify computer vision-related tasks.matplotlib: A visualization library that creates informative data plots.
Press Shift + Enter to run the code cell and install all packages.
When successful, click Kernel on the top navigation bar and select Restart Kernel to activate the new packages in your Jupyter Notebook session.
In a new code cell, import all required model libraries.
pythonimport torch import clip import numpy as np import skimage import matplotlib.pyplot as plt import os from PIL import Image
Load the CLIP model.
pythondevice = "cuda" model, preprocess = clip.load("ViT-B/32", device=device)
The above code loads the system GPU device using the NVIDIA
cudadriver and the vision transformer base model with an image patch size of 32ViT-B/32. For more information on other architectural variants, visit the CLIP release paper to verify the performance differences.
Perform Zero-shot Image Classification with OPENAI CLIP
Follow the steps in this section to perform a zero-shot image classification task using the OpenAI CLIP model with sample images from the scikit-image library. Based on the input data, the model performa classification tasks by calculating the similarity between the image embedding and the text embedding of target classes without initial training as described in the steps below.
Load the base input images from the
scikit-imagelibrary using text prompts. Replace"page", "astronaut", "motorcycle_right", "camera", "horse", "coffee"with your desired image class prompts to classify.pythontarget_classes = ["page", "astronaut", "motorcycle_right", "camera", "horse", "coffee"] original_images = [] image_embeddings = [] plt.figure(figsize=(16, 5)) for filename in [filename for filename in os.listdir(skimage.data_dir) if filename.endswith(".png")]: name = os.path.splitext(filename)[0] if name not in target_classes: continue image = Image.open(os.path.join(skimage.data_dir, filename)).convert("RGB") plt.subplot(2, 3, len(image_embeddings) + 1) plt.imshow(image) plt.xticks([]) plt.yticks([]) original_images.append(image) image_embeddings.append(preprocess(image)) plt.tight_layout()
The above code loads 6 different PNG images from the
scikit-imagelibrary, obtains the preprocessed image embeddings, and displays the generated result within the notebook session. Optionally, you can choose multiple input images and target classes from a specific dataset by loading them at this point.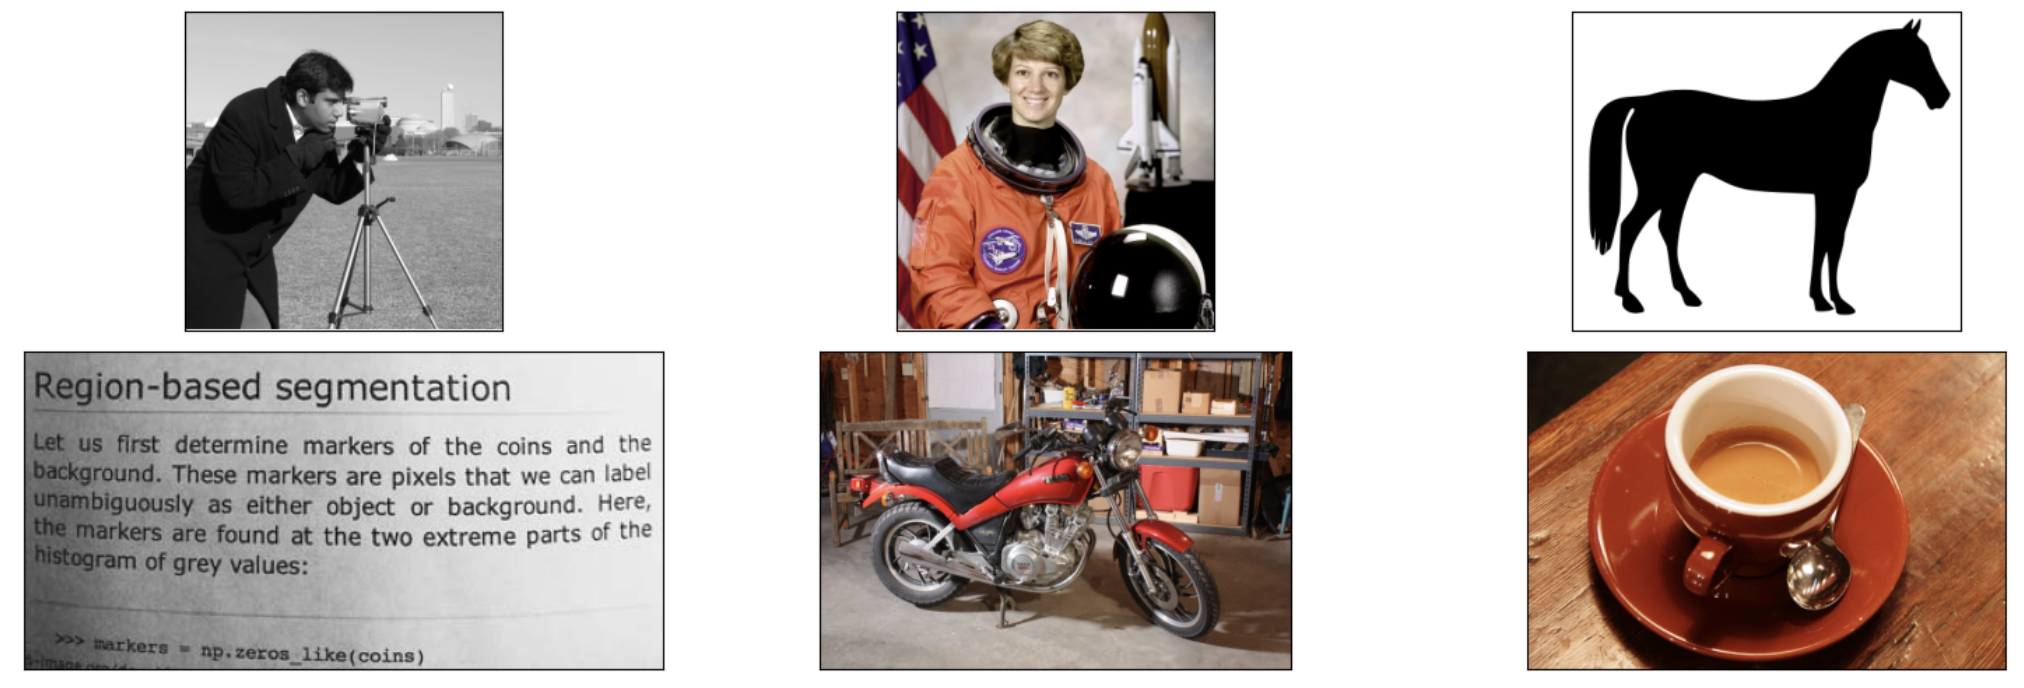 .
.Generate the image features by encoding and normalizing the pre-processed image embeddings.
pythonwith torch.no_grad(): image_input = torch.tensor(np.stack(image_embeddings)).to(device) image_features = model.encode_image(image_input).float() image_features /= image_features.norm(dim=-1, keepdim=True)
Generate text features from the target classes. Replace
This is a photo of awith your desired description.pythonwith torch.no_grad(): text_descriptions = [f"This is a photo of a {label}" for label in target_classes] text_tokens = clip.tokenize(text_descriptions).to(device) text_features = model.encode_text(text_tokens).float() text_features /= text_features.norm(dim=-1, keepdim=True)
The above code assembles the text descriptions from the target classes with a short prompt template
"This is a photo of a class". Then, the model tokenizes, encodes, and normalizes the description to generate the text features.Calculate the image-to-text similarity for classification.
pythontext_probs = (100.0 * image_features @ text_features.T).softmax(dim=-1) top_probs, top_labels = text_probs.cpu().topk(5, dim=-1)
The above code calculates the image-to-text similarity for every pair between all the loaded images and the target class text. Then, it chooses the top 5 similar text labels for each image, and sets the predicted class based on the image with the highest similarity.
Visualize the classification results.
pythonplt.figure(figsize=(16, 16)) for i, image in enumerate(original_images): plt.subplot(3, 4, 2 * i + 1) plt.imshow(image) plt.axis("off") plt.subplot(3, 4, 2 * i + 2) y = np.arange(top_probs.shape[-1]) plt.grid() plt.barh(y, top_probs[i]) plt.gca().invert_yaxis() plt.gca().set_axisbelow(True) plt.yticks(y, [target_classes[index] for index in top_labels[i].numpy()]) plt.xlabel("probability") plt.subplots_adjust(wspace=0.5) plt.show()
The above code outputs the expected visualization and displays the image together with the top 5 similar text labels. In addition, the code classifies all the 6 input images accurately into their corresponding class in a zero-shot manner.

Based on the visualized image results, each of the 6 images has a unique ranking per classification with the highest similarity viewed and ranked first as the predicted class per image.
Conclusion
You have set up a zero-shot image classification pipeline from model loading to visualized results using the OpenAI CLIP model on a Vultr Cloud GPU server. The zero-shot learning approach significantly shortens the development cycle by getting rid of the model training requirements while maintaining the same or even better performance on image classification. For more information and image classification samples, visit the OpenAI CLIP model repository.