
Video Classification and Understanding using VideoMAE
Introduction
Video classification is a machine learning process that involves categorizing video scenes into classes by assigning labels depending on the video content. The video classification pipeline inputs a video file and generates a prediction based on a list of predefined classes. The process is commonly used in surveillance systems to help identify and classify specific actions or behaviors captured in the input video footage.
This article explains how to implement a video classification pipeline on a Vultr Cloud GPU server to identify human actions using the Video Masked Autoencoders VideoMAE pre-trained model from the Kinetics 400 Dataset. You will load input videos, sample the frames, feed the video frames into VideoMAE processors, and get the action class for each classified element in the input video clip.
Prerequisites
Before you begin:
- Deploy a Ubuntu 22.04 A100 Vultr Cloud GPU server.
- Use SSH to access the server as a non-root user with sudo privileges.
- Update the server.
- Install JupyterLab and PyTorch.
Set Up the Server
Follow the steps below to set up the server by installing all necessary dependency packages, download sample videos, and move them to the Notebook directory to use as the input files for the video classification tasks.
Install all dependency library packages using Pip.
console$ pip install transformers pytorchvideo opencv-python matplotlib ipywidgets gdown
The above command installs the following packages on the server.
transformers: Offers APIs and pipelines for downloading download and using pretrained transformer-based models. The VideoMAE image processor and classification models are part of the transformers library.pytorchvideo: Provides reusable, modular and efficient components for running video understanding tasks. VideoMAE internally usestorchvisionfunctions to optimize the video classification process.opencv-python: Provides a wide range of image processing functionalities. You will use Opencv to load videos and extract frames.matplotlib: Creates static or interactive visualizations.ipywidgets: Provides interactive HTML widgets for Jupyter Notebook sessions using IPython kernel.gdown: Downloads files from public links such as Google Drive.
Download a sample input file. For example, use the
gdownmodule to download a sample video from a Google Drive linkconsole$ gdown 1lKgQaafhQFIv6db36Mav72pGBK8CVbYo
You can use any other video file for classification in your session. For purposes of this article, use the sample video provided in the Google Drive URL.
Extract sample videos from the
videos.ziparchive to the notebooks directory using the Jupyter user home path.console$ sudo unzip videos.zip -d /home/jupyter/notebooks/
Extract Sample Frames from a Video File
Select Notebook within the Jupyter interface to create a new
Python3Kernel file.In a new notebook code cell, import all required libraries.
pythonimport os import cv2 import math import torch import numpy as np import matplotlib.pyplot as plt from PIL import Image from transformers import AutoImageProcessor, VideoMAEForVideoClassification
Press Shift + Enter to run the code cell and import libraries.
Load the
4.mp4sample video from the downloaded files using the openCV VideoCapture function.pythonvideo = cv2.VideoCapture("videos/4.mp4")
Define the number of sample frames to use with the VideoMAE model. For its pre-trained Kinetics 400 model, VideoMAE uses 16 frames along the timeline as inputs.
pythonsample_num = 16
Extract the number of total frames from the loaded video clip.
pythonframe_count = video.get(cv2.CAP_PROP_FRAME_COUNT)
Get the indices of all sampled frames that are evenly spaced over a specified interval across the entire video.
pythonindices = np.linspace(0, frame_count - 1, sample_num).astype(int)
Get the sampled frames into a list to use as the inputs of the VideoMAE classification model.
pythonframes = [] for i in indices: video.set(cv2.CAP_PROP_POS_FRAMES, i) frame = video.read()[1] frames.append(Image.fromarray(cv2.cvtColor(frame, cv2.COLOR_BGR2RGB)))
In the above function:
video.set: Locates the specific video frame based on the frame index.video.read()[1]: Returns the image raw data in the BGR order used by the openCV package.Image.fromarray(cv2.cvtColor(frame, cv2.COLOR_BGR2RGB): Converts the image data from the BGR order to the normal RGB order for processing by VideoMAE.
Create a new figure to visualize the sampled frames using Matplotlib.
pythonplt.figure(figsize=(60, 60))
Define the number of frames to display per row, for example,
4and the total number of rows.pythonframe_display_per_row = 4 frame_display_rows = math.ceil(len(frames) / frame_display_per_row)
Visualize and view the sample frames.
pythonfor i, frame in enumerate(frames): plt.subplot(frame_display_rows, frame_display_per_row, i+1) plt.imshow(frame) plt.xticks([]) plt.yticks([]) plt.tight_layout()
Verify that all sampled images in a series display in your notebook. You will feed the sample images to the VideoMAE model for further classification.

Define a new function to return all sampled frames to ease the downstreaming steps.
pythondef get_sample_frames(video): frame_count = video.get(cv2.CAP_PROP_FRAME_COUNT) indices = np.linspace(0, frame_count - 1, sample_num).astype(int) frames = [] for i in indices: video.set(cv2.CAP_PROP_POS_FRAMES, i) frame = video.read()[1] frames.append(Image.fromarray(cv2.cvtColor(frame, cv2.COLOR_BGR2RGB))) return frames
Perform Video Classification using VideoMAE
Load the VideoMAE image processor pretrained from the Kinetics 400 dataset.
pythonimage_processor = AutoImageProcessor.from_pretrained("MCG-NJU/videomae-base-finetuned-kinetics")
Load the VideoMAE pretrained video classification model from the same dataset.
pythonmodel = VideoMAEForVideoClassification.from_pretrained("MCG-NJU/videomae-base-finetuned-kinetics")
Preprocess the frames by resizing, scaling, and normalizing the frame raw data using the Video image processor.
pythoninputs = image_processor(frames, return_tensors="pt")
Get the classification model output using the preprocessed inputs
pythonoutputs = model(**inputs)
Extract the logits from the model outputs.
pythonlogits = outputs.logits
Get the indices of the top
3predicted classes among all 400 predefined classes in the Kinetics 400 dataset.pythontopk = 3 predicted_indices = logits.topk(topk).indices[0]
Get the normalized prediction probability for each class using softmax.
pythonpredicted_prob = torch.nn.functional.softmax(logits, dim=1)[0]
Check the top
1predicted label with its probability.pythonpred_idx = predicted_indices[0].item() print(f"{model.config.id2label[pred_idx]}: {float(predicted_prob[pred_idx])}")
Output:
reading book: 0.4024769365787506Based on the above prediction output, the classification aligns well with the content of the input video.
Define a new function to perform video classification using the sample video frames as the input and output
top-kpredicted classes with the highest probabilities.pythondef predict_video(frames, topk=3): inputs = image_processor(frames, return_tensors="pt") outputs = model(**inputs) logits = outputs.logits predicted_indices = logits.topk(topk).indices[0] predicted_prob = torch.nn.functional.softmax(logits, dim=1)[0] labels, probs = [], [] for idx in predicted_indices: idx = idx.item() labels.append(model.config.id2label[idx]) probs.append(predicted_prob[idx]) return labels, probs
You can also use the above function to scale up the video classification operation to a list of videos in batches.
Scale Up and Visualize Video Classification On Multiple Videos
Define a new function to display the video frame against its top-k predicted class with the probability for each.
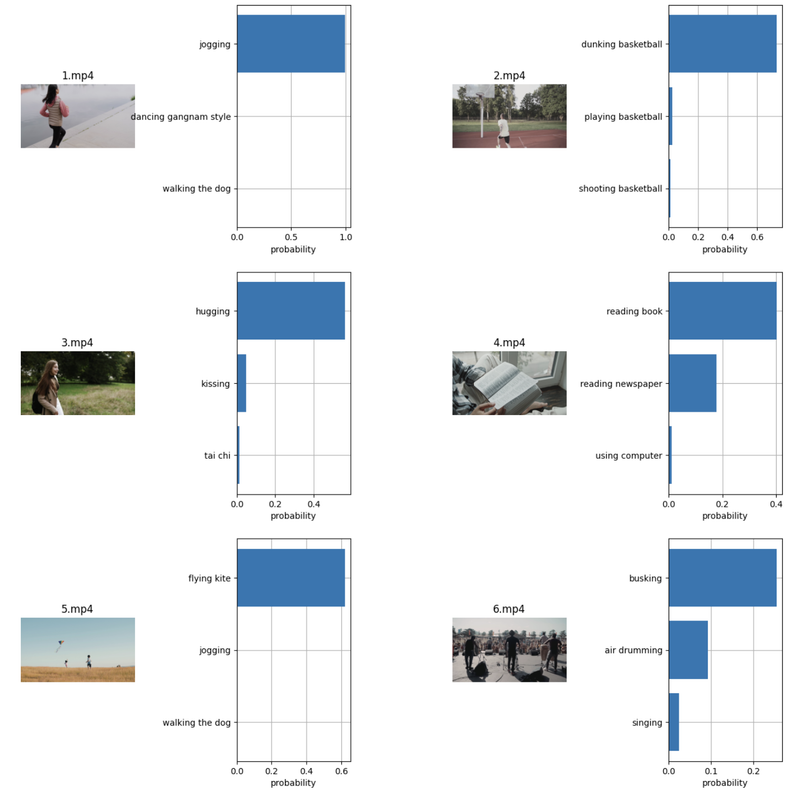
pythondef plot_result(cnt, frame, filename, labels, probs): plt.subplot(3, 4, 2 * cnt + 1) plt.imshow(frame) plt.title(filename) plt.axis("off") plt.subplot(3, 4, 2 * cnt + 2) plt.grid() y = np.arange(topk) plt.barh(y, torch.as_tensor(probs)) plt.gca().invert_yaxis() plt.gca().set_axisbelow(True) plt.yticks(y, labels) plt.xlabel("probability")
The above function displays the video frame against its top-k predicted class that contains all the necessary key information. It includes the frame index
cnt, the raw sampled image dataframe, the video filename, the predicted top-klabelsandprobsfor each label.Set up the directory path to store your sample video files. For example, use
videos/in the Jupyter user home directory.pythonroot = "videos/"
Create a new Matplotlib figure to visualize the video classification results for all available videos in the directory.
pythonplt.figure(figsize=(60, 60))
Output:
<Figure size 6000x6000 with 0 Axes>
<Figure size 6000x6000 with 0 Axes>
Visualize the results.
pythonfor i, filename in enumerate(sorted(os.listdir(root))): file_path = os.path.join(root, filename) video = cv2.VideoCapture(file_path) frames = get_sample_frames(video) labels, probs = predict_video(frames, topk) plot_result(i, frames[0], filename, labels, probs) plt.subplots_adjust(wspace=0.9) plt.show()
Verify that the visualization results display in your session with all videos classified to the most suitable classes.
Conclusion
You have set up a video classification pipeline using VideoMAE on a Vultr Cloud GPU server. You prepared the sample input video frames by extracting the right frames in each time sequence. Then, you applied the input frames to the VideoMAE image processor and video classification models for scaling to a list of video files in batches. For more information, visit the VideoMAE model page.
Download the model pipeline Jupyter Notebook file to view the implementations applied in this article.