
Text to Video Generation Using Hugging Face Diffusers
Introduction
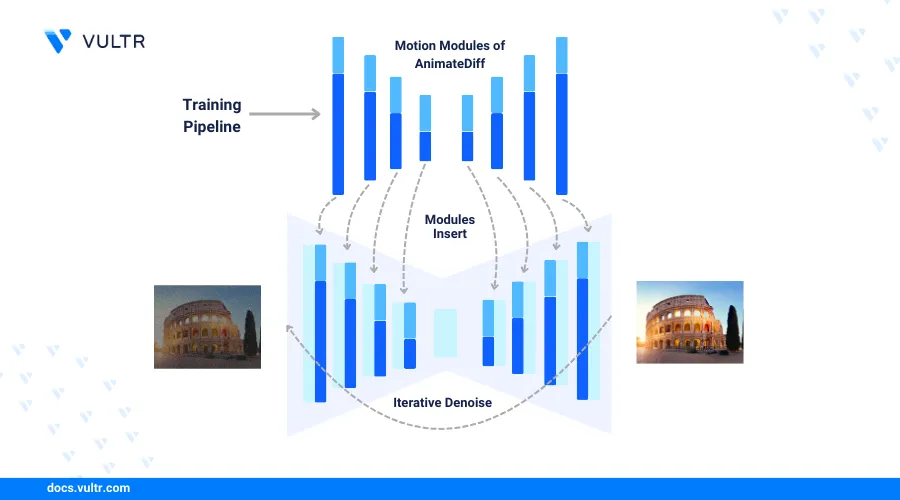
Text-to-video generation involves using a natural language description as the input and generating a video clip that matches the description's semantic meaning. This article explains how to perform text-to-video generation using the AnimateDiff Hugging Face Diffusers library. You will generate a video using the basic model and use different Lora models to further improve the generated video quality.
Prerequisites
Before you begin:
- Deploy a Ubuntu A100 Cloud GPU server with at least 1 A100 GPU.
- Access the server using SSH as a non-root user with sudo privileges
- Update the server
- Install JupyterLab and PyTorch.
Set Up the Server
Install all required model dependency libraries such as
diffusersandtransformersusing Pip.console$ pip install diffusers transformers accelerate peft
The above command installs the following packages on the server:
diffusers: Includes pretrained diffusion models for generating images, audio, and videos. You will import the AnimateDiff, motion adapter, pipeline schedulers, and extra utility functions for text-to-video generation tasks.transformers: Includes APIs and pipelines to download and use pre-trained transformer-based models.accelerate: Enables PyTorch code to run across different platforms efficiently and effectively. In addition, it speeds up the inference time when running the video generation processes.peft: Integrates pre-trained models to various downstream applications without fine-tuning all model parameters. It combines different motion LoRAs for better and more control of the video creation process.
Generate the First Video Using Text Prompts
In this section, load a Motion Adapter and a new AnimateDiff pipeline from the pre-trained models. Then, use the pipeline to generate your first video clip using text prompts, export the generated video clips into a local file, and view the generated video in your Jupyter Notebook session.
Within the Jupyter interface, select Notebook to create a new
Python3Kernel file.In a new notebook code cell, import all required model libraries.
pythonimport torch from diffusers import AnimateDiffPipeline, DDIMScheduler, LCMScheduler, MotionAdapter from diffusers.utils import export_to_gif from IPython.display import Image
Press Shift + Enter to run the code cell.
Load Motion Adapter from a pre-trained checkpoint for Stable Diffusion v1.5 models.
pythonadapter = MotionAdapter.from_pretrained("guoyww/animatediff-motion-adapter-v1-5-2")
A video consists of multiple images with coherent motion between them. The Motion Adapter is responsible for adding such coherent motion to the generated image frames. It consists of a collection of motion modules that apply after the Resnet and attention blocks.
Load the AnimateDiff pipeline that contains a stable diffusion model to generate the image frames and a motion adapter to manage the image motion.
pythonpipe = AnimateDiffPipeline.from_pretrained("emilianJR/epiCRealism", motion_adapter=adapter)
The above command uses the
epiCRealismpre-trained model. You can load any Stable Diffusion model to use with thepipefunction.Load the DDIM (Denoising Diffusion Implicit Models) diffusion pipeline scheduler.
pythonpipe.scheduler = DDIMScheduler.from_pretrained("emilianJR/epiCRealism", subfolder="scheduler")
Enable VAE (Variational Autoencoders) slicing and CPU offloading to reduce the GPU memory usage.
pythonpipe.enable_vae_slicing() pipe.enable_model_cpu_offload()
Generate a video based on your text prompt and include negative prompts to define the generation process.
pythonoutput = pipe( prompt="A space rocket with trails of smoke behind it launching into space from the desert, 4k, high resolution", negative_prompt="bad quality, worst quality, low resolution", num_frames=16, guidance_scale=1.5, num_inference_steps=12, generator=torch.Generator("cpu").manual_seed(0), )
The above command creates the image generation process with the following functions:
promptandnegative_prompt: Guide the generated video content.num_frames: Determines the number of frames to include in the video. The value16creates a 2-second video while a value such as8creates a 1-second video.guidance_scale: Controls the strict level to align the generated frames with your text prompts. A higher guidance scale value forces the model to generate images based on the prompt at the expense of low image quality.num_inference_steps: Sets the number of denoising steps in the diffusion process. More steps lead to higher-quality videos at the expense of a slow generation speed.generator: Ensures a consistent generated video if using the same seed value.
Export the generated video to a local file such as
base.gif.pythonlocal_path = "base.gif" export_to_gif(output.frames[0], local_path)
View the generated video in your notebook environment.
pythonImage(open(local_path,"rb").read())

Based on your input text prompt
A space rocket with trails of smoke behind it launching into space from the desert, 4k, high resolution. Verify that a rocket in a blurry dusty space video displays in your session output.
Improve the Video Generation Pipeline Using AnimateLCM
In this section, integrate AnimateLCM (Latent Consistency Models) into the video generation pipeline to enable consistent and high-quality frame generation with fewer inference steps. As a result, the video quality should improve as described in the following steps.
Create a new function to generate videos with a different pipeline as the input with the same model generation settings including the text prompts.
pythondef generate_video(pipeline, output_path): output = pipeline( prompt="A space rocket with trails of smoke behind it launching into space from the desert, 4k, high resolution", negative_prompt="bad quality, worst quality, low resolution", num_frames=16, guidance_scale=1.5, num_inference_steps=12, generator=torch.Generator("cpu").manual_seed(0), ) export_to_gif(output.frames[0], output_path) return Image(open(output_path,"rb").read())
Load the AnimateDiff model LCM adapter.
pythonadapter = MotionAdapter.from_pretrained("wangfuyun/AnimateLCM")
For more information about LCM-LoRA, visit the model page.
Load the AnimateDiff pipeline with the same
epiCRealismpre-trained model you used earlier.pythonpipe = AnimateDiffPipeline.from_pretrained("emilianJR/epiCRealism", motion_adapter=adapter)
Add the LCM scheduler to the pipeline.
pythonpipe.scheduler = LCMScheduler.from_config(pipe.scheduler.config)
Load the LCM Lora weights into the AnimateDiff pipeline as
lcm-lora.pythonpipe.load_lora_weights("wangfuyun/AnimateLCM", weight_name="AnimateLCM_sd15_t2v_lora.safetensors", adapter_name="lcm-lora")
Reduce the GPU memory usage ratio.
pythonpipe.enable_vae_slicing() pipe.enable_model_cpu_offload()
Generate the video with LCM-LoRA enabled, save it to a local path as
with_lcm.gifand view the generated video.pythongenerate_video(pipe, "with_lcm.gif")
Verify that the generated video quality improves with high-quality video frames as compared to the previous output.
Integrate Motion LoRAs to Improve the Video Generation Controls
In this section, improve the video generation process with more controls using motion LoRAs. For example, in the generated videos, the rocket stays in a static position while you can emphasize its action to launch into space by integrated motion LoRAs as described in the following steps.
Load the
zoom-outmotion LoRA weights into the existing AnimateDiff pipeline aszoom-out.pythonpipe.load_lora_weights("guoyww/animatediff-motion-lora-zoom-out", adapter_name="zoom-out")
You can use multiple movements with motion LoRAs such as pan-left, pan-right, zoom-in, and tilt-up. Visit the Hugging Face model page to view the full list of AnimateDiff motion LoRA models.
Set the adapter to use in the pipeline when multiple LoRAs are loaded.
pythonpipe.set_adapters(["lcm-lora", "zoom-out"], [1.0, 0.8])
You can also specify the weights for each LoRA to determine the actual impact of LoRAs on the generated video.
Generate, view, and save the video with LCM-LoRA as
with_lcm_zoom_out.gif.pythongenerate_video(pipe, "with_lcm_zoom_out.gif")
Verify that the generated video includes motion in which the rocket is flying into space with a zoom-out effect.
Try a different motion LoRA checkpoint such as tile-up to further test the video generation process.
pythonpipe.load_lora_weights("guoyww/animatediff-motion-lora-tilt-up", adapter_name="tilt-up") pipe.set_adapters(["lcm-lora", "tilt-up"], [1.0, 0.8])
Generate, save, and view the generated video as
with_lcm_tilt_up.gif.pythongenerate_video(pipe, "with_lcm_tilt_up.gif")
Conclusion
You have set up a text-to-video generation pipeline using AnimateDiff from the Hugging Face Diffusers library on a Vultr Cloud GPU server. You initiated the baseline version which loads the initial motion adapter and a diffusion model. Then, you loaded the AnimateDiff LCM-LoRA and two different motion LoRAs to improve the generated video quality. Download the pipeline Jupyter Notebook file to verify the model processes applied in this article.