Introduction
Redis® (Remote Dictionary Server) is a fast open-source in-memory key-value database that supports rich data-types including strings, hashes, lists, and sets, making it an ideal choice for creating a performance-oriented system.
Because Redis® stores data in Random Access Memory (RAM), it minimizes the seek-time in accessing data from disks. This feature makes Redis® a versatile data structure for making highly-available and scalable applications.
This guide uses Redis® server to implement an efficient and reliable caching mechanism for MySQL with PHP on Ubuntu 20.04.
Prerequisites
Before you begin, make sure you have the following:
- An Ubuntu 20.04 server.
- A sudo user.
- A Lamp Stack.
- A Redis® Server
Install Redis® Extension
SSH to your Ubuntu server and install the php-redis extension.
$ sudo apt install -y php-redisRestart the Apache server.
$ sudo systemctl restart apache2Create a Test Database
Log in to the MySQL server.
$ sudo mysql -u root -pEnter the root password for your MySQL server and press Enter to continue.
Create a sample_company database after you get the mysql> prompt.
mysql> CREATE DATABASE sample_company;Create a sample_user and assign full privileges to the sample_company database you've created above. Remember to replace EXAMPLE_PASSWORD with a strong password.
mysql> CREATE USER 'sample_user'@'localhost' IDENTIFIED WITH mysql_native_password BY 'EXAMPLE_PASSWORD';
mysql> GRANT ALL PRIVILEGES ON sample_company.* TO 'sample_user'@'localhost';
mysql> FLUSH PRIVILEGES;
Select the sample_company database.
mysql> USE sample_company;Create an employees table. This is the base table used to store employees' data (employee_id, first_name, and last_name) permanently to the disk on the MySQL database.
mysql> CREATE TABLE employees (
       employee_id INT AUTO_INCREMENT PRIMARY KEY,
       first_name VARCHAR(50),
       last_name  VARCHAR(50)
       );
Insert some sample data into the employees table. Don't enter an employee_id because it's defined as an AUTO_INCREMENT column.
mysql> INSERT INTO employees (first_name, last_name) VALUES ('JOHN', 'ROE');
mysql> INSERT INTO employees (first_name, last_name) VALUES ('SMITH', 'DOE');
mysql> INSERT INTO employees (first_name, last_name) VALUES ('RICHARD', 'MAJOR');
mysql> INSERT INTO employees (first_name, last_name) VALUES ('JANE', 'ISAAC');
Query the employees table to make sure that you've inserted records into it.
mysql> SELECT
       employee_id,
       first_name,
       last_name
       from employees;
You should get an output like the one shown below displaying four employees.
+-------------+------------+-----------+
| employee_id | first_name | last_name |
+-------------+------------+-----------+
|           1 | JOHN       | ROE       |
|           2 | SMITH      | DOE       |
|           3 | RICHARD    | MAJOR     |
|           4 | JANE       | ISAAC     |
+-------------+------------+-----------+
4 rows in set (0.00 sec)
Exit from the MySQL database.
quit;Create the PHP Script
Create a PHP script in the root directory of your website. This file connects to the MySQL database that you've created above and queries the employees table.
Open the /var/www/html/employees.php for editing.
$ sudo nano /var/www/html/employees.phpThen, insert the below information into the file. Remember to match the database variables to your database, table, and user you've created above.
<html>
  <head>
    <title>Using Redis® Server with PHP and MySQL</title>
  </head>
  <body>

    <h1 align = 'center'>Employees' Register</h1>

    <table align = 'center' border = '2'>

    <?php
        try {

            $data_source = '';

            $redis = new Redis();
            $redis->connect('127.0.0.1', 6379);

            $sql = 'select
                    employee_id,
                    first_name,
                    last_name
                    from employees
                    ';

            $cache_key = md5($sql);

            if ($redis->exists($cache_key)) {

                $data_source = "Data from Redis® Server";
                $data = unserialize($redis->get($cache_key));

            } else {

                $data_source = 'Data from MySQL Database';

                $db_name     = 'sample_company';
                $db_user     = 'sample_user';
                $db_password = 'EXAMPLE_PASSWORD';
                $db_host     = 'localhost';

                $pdo = new PDO('mysql:host=' . $db_host . '; dbname=' . $db_name, $db_user, $db_password);
                $pdo->setAttribute(PDO::ATTR_ERRMODE, PDO::ERRMODE_EXCEPTION);

                $stmt = $pdo->prepare($sql);
                $stmt->execute();
                $data = [];

                while ($row = $stmt->fetch(PDO::FETCH_ASSOC)) {
                   $data[] = $row;
                }

                $redis->set($cache_key, serialize($data));
                $redis->expire($cache_key, 10);
           }

           echo "<tr><td colspan = '3' align = 'center'><h2>$data_source</h2></td></tr>";
           echo "<tr><th>Employee Id</th><th>First Name</th><th>Last Name</th></tr>";

           foreach ($data as $record) {
              echo '<tr>';
              echo '<td>' . $record['employee_id'] . '</td>';
              echo '<td>' . $record['first_name'] . '</td>';
              echo '<td>' . $record['last_name']  . '</td>';
              echo '</tr>';
           }


        } catch (PDOException $e) {
            echo 'Database error. ' . $e->getMessage();
        }
   ?>

    </table>
  </body>
</html
Save and close the file by pressing Ctrl + X, Y then Enter.
The /var/www/html/employees.php file explained:
$redis = new Redis();
$redis->connect('127.0.0.1', 6379);
The two lines above connect to the Redis® server and initialize the $redis variable you've used later in the script to query the Redis® server.
$sql = 'select
        employee_id,
        first_name,
        last_name
        from employees
        ';
$cache_key = md5($sql);
The $sql variable above holds the actual SQL command that retrieves records from the database.
The Redis® server uses the $cache_key variable to store key-value data. This script uses an md5 hash of the SQL command to shorten the key and make debugging easier.
if ($redis->exists($cache_key)) {
    $data_source = "Data from Redis® Server";
    $data = unserialize($redis->get($cache_key));
...

} else {

   $data_source = 'Data from MySQL Database';

   ...

   $redis->set($cache_key, serialize($data));
   $redis->expire($cache_key, 10);
}
The code above checks for the existence of the $cache_key key in the Redis® server. If the key exists, the script retrieves and unserializes the data into the $data variable. In case the $cache_key key is not available from the Redis® Server, the code fetches data from the MySQL database and caches it with the $redis->set command.
The $redis->expire command sets the expiration time in seconds that the key persists in memory before it deletion. The script uses 10 seconds as the expiration period. Change this value to suit your needs.
Test the Redis® Cache
Visit the URL below and replace the public_ip_address with the public IP address of your website.
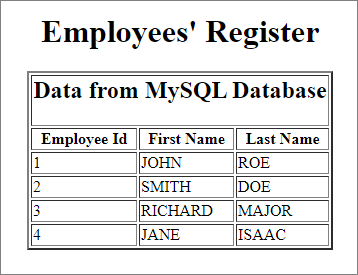
http://public_ip_address/employees.phpWhen you first visit the web page, the script should retrieve data from the MySQL server, as shown below.

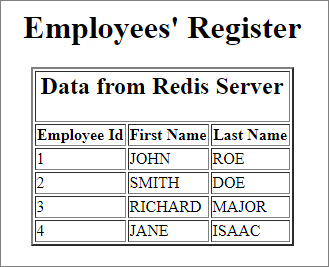
Refresh the page, and this time, PHP serves cached data from the Redis® Server as shown below.

The output above confirms that the PHP script is working as expected, and data is served from the fast in-memory cache from the Redis® server. This minimizes the seek-time of retrieving data from the disk. You may also try refreshing the page after 10 seconds to invalidate the cache.
Conclusion
In this guide, you've used a Redis® server to create an efficient and reliable caching mechanism for MySQL with PHP on Ubuntu 20.04. Extend the PHP script in this tutorial to cache different parts of your website or web applications with frequent read cycles to improve their performance.
No comments yet.