MikroTik Cloud Hosted Router (CHR) is a RouterOS version designed for cloud servers. CHR has full RouterOS features enabled by default but has a different licensing model. The free license has a speed limit of 1 Mbit. For higher speeds, you can activate a 30-day trial or pay for a full license.
Mikrotik CHR is useful as a VPN server or client. It can also perform bandwidth shaping, bridging, and act as a firewall. Mikrotik CHR is ideal for use as an IPsec gateway device in a multi-cloud network. This article explains how to install Mikrotik CHR and configure it with a Vultr Virtual Private Cloud (VPC).
Initial Installation
Mikrotik distributes CHR as a RAW disk image, which you'll download and write to a Vultr instance with the dd command.
Deploy a New Server
- Deploy a new Cloud Compute instance.
- Choose a server location best for your purposes.
- Select the ISO Library tab in the Server Image section.
- Choose the SystemRescue x64 version.
- Choose a server size. MikroTik CHR has low disk and RAM requirements that any Vultr instance meets, so you should choose a size based on your expected bandwidth requirements.
- We recommend enabling the Automatic Backup, IPv6, and Virtual Private Cloud features.
- There is no need to install an SSH key because you'll completely wipe the disk after deployment.
- Give the server a hostname and label, then click Deploy Now.
Optional: The new server will have a blank password after writing the RAW image in the next step. If you are cautious, consider protecting the server with a Vultr Firewall during the installation until you set a strong password.
Download and Install MikroTik CHR
Wait for the server to deploy, then:
In another browser window, navigate to the MikroTik download page.
Locate the RAW version of the latest 7.x Stable version in the Cloud Hosted Router section.
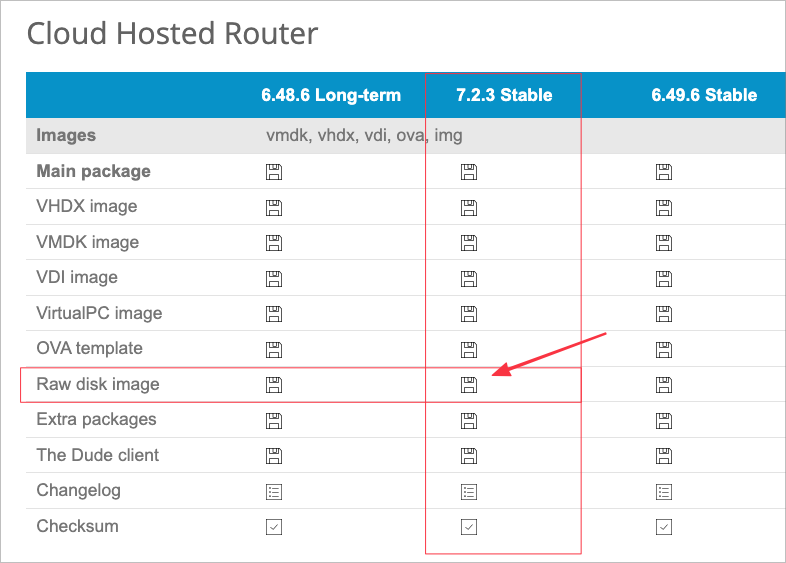
Right-click the floppy disk image and copy the URL to your clipboard.
On the server's overview page, click View Console to connect to the web console.
If SystemRescue hasn't finished booting, select the first option to boot with default options.
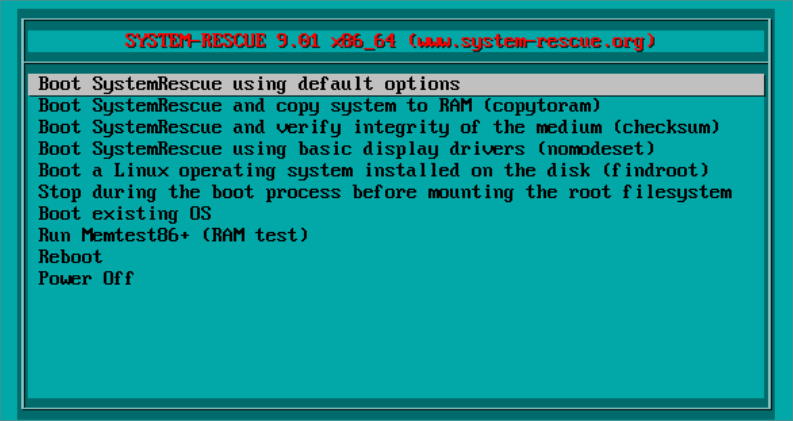
At the root prompt, type
wget, then use the web console Send Clipboard feature to paste the Mikrotik download URL. Type Enter to start the download.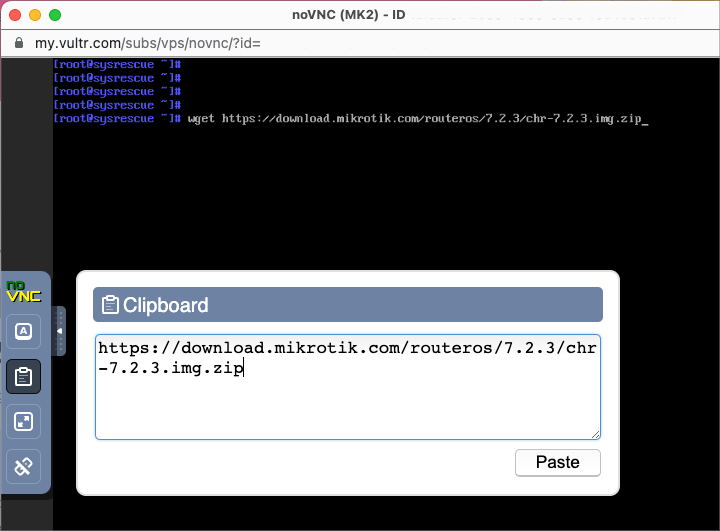
Unzip the downloaded file. Yours may be a different 7.x Stable version than the one shown here.
# unzip chr-7.2.3.img.zipWrite the disk image to the Vultr instance with
dd. This image is small and only takes a few seconds to write to the disk.# dd if=chr-7.2.3.img of=/dev/vdaVerify that the disk image was written successfully with
lsblk. You should see two partitions: vda1 and vda2.The full session looks like this:
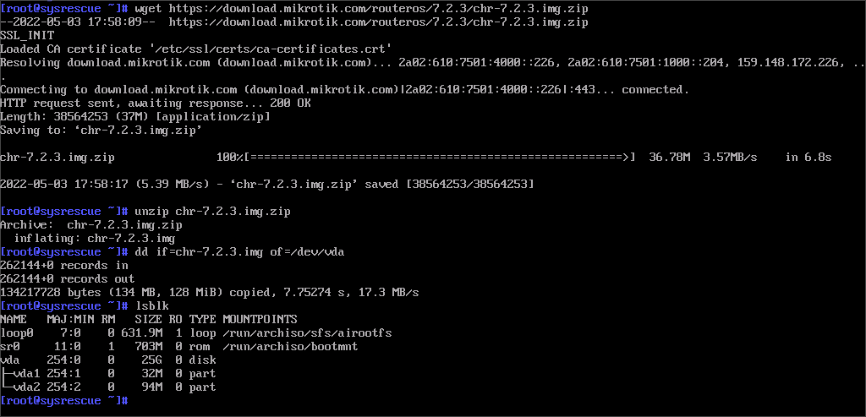
Close the web console window.
Navigate to the Settings section of the customer portal for your cloud server.
Choose the Custom ISO menu, then click Remove ISO. The server will reboot.
Open the web console again.
At the MikroTik Login, type
adminand Enter.The password is blank. Type Enter to continue.
View the software license if desired when prompted.
Choose a new strong password when prompted.
Close the web console.
The basic installation is complete. Next, you'll connect to the server over SSH to finish the configuration.
Configure MikroTik CHR
Create a new administrator account on the server.
Open a terminal on your local computer.
SSH to the server's public IP address as
admin.$ ssh admin@192.0.2.123Enter the strong password you set earlier when deploying the server.
Create a new administrative user different than the well-known "admin". Suppose you wanted to name it steve. At the prompt, type:
/user add name=steve password=your-strong-password group=fullRemove the default user "admin".
/user remove admin
Disable down all services except SSH, and change the SSH port.
Check the service list with
/ip service print.[admin@MikroTik] > /ip service print Flags: X, I - INVALID Columns: NAME, PORT, CERTIFICATE, VRF # NAME PORT CERTIFICATE VRF 0 telnet 23 main 1 ftp 21 2 www 80 main 3 ssh 22 main 4 X www-ssl 443 none main 5 api 8728 main 6 winbox 8291 main 7 api-ssl 8729 none mainDisable all services except SSH. (service number 3 from the list above).
/ip service set 0,1,2,4,5,6,7 disabled=yesChange SSH to a port of your choice. For example, you could change it to 2299.
/ip service set 3 port=2299Verify all services are disabled except SSH and that the port number is changed.
 [admin@MikroTik] > /ip service print
 Flags: X, I - INVALID
 Columns: NAME, PORT, CERTIFICATE, VRF
 #   NAME     PORT  CERTIFICATE  VRF
 0 X telnet     23               main
 1 X ftp        21
 2 X www        80               main
 3   ssh      2299               main
 4 X www-ssl   443  none         main
 5 X api      8728               main
 6 X winbox   8291               main
 7 X api-ssl  8729  none         main
Use
quitto log out of the SSH session.[admin@MikroTik] > quitReconnect to the server on the new port, as
steve, with the new password.$ ssh -p2299 steve@192.0.2.123 -p2299 steve@192.0.2.123's password: MikroTik RouterOS 7.2.3 (c) 1999-2022 https://www.mikrotik.com/ Press F1 for help [steve@MikroTik] >
Secure MikroTik CHR
The steps above are the bare minimum required to secure your MikroTik server. Please consult Securing Your Router in the MikroTik documentation to prepare your server for production use.
Configure the VPC Interface
One common use for MikroTik is to deploy it with a Virtual Private Cloud (VPC) as an IPsec VPN endpoint for multi-cloud connectivity. If you're using a VPC, you'll need to configure the server to use the VPC's IP address. If you didn't add a VPC when you first deployed the server, add one now before proceeding with these instructions.
In the Vultr customer portal, navigate to the server's information page and select the Settings tab.
Choose the IPv4 menu.
Make a note of the server's VPC Network address, Netmask, and MAC address.
In this example, the VPC network settings are:
- MAC address: 00:00:5E:00:53:FF
- Address: 10.10.0.4
- Netmask: 255.255.240.0
Connect to your MikroTik server via SSH.
View the interfaces with
/interface print.[steve@MikroTik] > /interface print Flags: R - RUNNING Columns: NAME, TYPE, ACTUAL-MTU, MAC-ADDRESS # NAME TYPE ACTUAL-MTU MAC-ADDRESS 0 R ether1 ether 1500 00:00:5E:00:53:00 1 R ether2 ether 1500 00:00:5E:00:53:FFThe ether2 interface matches the MAC address of the VPC interface.
Configure the IP address for the ether2 interface.
[steve@MikroTik] > /ip address add address=10.10.0.4/20 interface=ether2Verify the IP address is configured.
 [steve@MikroTik] > /ip address print
 Flags: D - DYNAMIC
 Columns: ADDRESS, NETWORK, INTERFACE
 #   ADDRESS            NETWORK        INTERFACE
 0 D 207.246.121.35/23  207.246.120.0  ether1
 1   10.10.0.4/20      10.10.0.0      ether2
Assume that you have an Ubuntu server on the same VPC with address 10.10.0.3. You should now be able to ping each server from the other.
From the MikroTik server to Ubuntu:
  [steve@MikroTik] > ping 10.10.0.3 count 4
    SEQ HOST                                     SIZE TTL TIME       STATUS
      0 10.10.0.3                                  56  64 935us
      1 10.10.0.3                                  56  64 950us
      2 10.10.0.3                                  56  64 801us
      3 10.10.0.3                                  56  64 822us
      sent=4 received=4 packet-loss=0% min-rtt=801us avg-rtt=877us max-rtt=950us
From the Ubuntu server to MikroTik:
  root@Ubuntu:~# ping 10.10.0.4 -c 4
  PING 10.10.0.4 (10.10.0.4) 56(84) bytes of data.
  64 bytes from 10.10.0.4: icmp_seq=1 ttl=64 time=1.62 ms
  64 bytes from 10.10.0.4: icmp_seq=2 ttl=64 time=1.11 ms
  64 bytes from 10.10.0.4: icmp_seq=3 ttl=64 time=1.39 ms
  64 bytes from 10.10.0.4: icmp_seq=4 ttl=64 time=1.88 ms

  --- 10.10.0.4 ping statistics ---
  4 packets transmitted, 4 received, 0% packet loss, time 3004ms
  rtt min/avg/max/mdev = 1.114/1.498/1.877/0.281 ms
More Information
To learn more about MikroTik and Vultr VPCs, see the following resources:
No comments yet.