
How to Create a NAT Router for Vultr VPC 2.0
Introduction
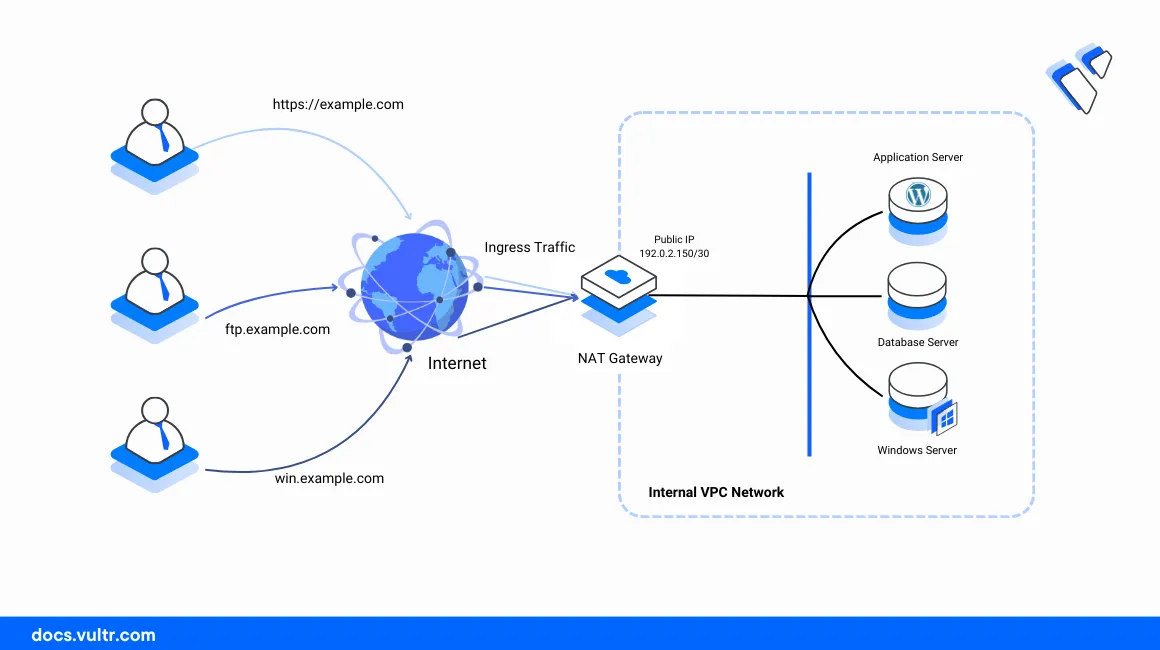
Network Address Translation (NAT) is the process of mapping multiple private IP addresses to a single public IP address for access over the internet. A NAT router in a Vultr Virtual Private Cloud (VPC) 2.0 enables routing functionalities and translates internal host private addresses to a single public IP address.
A Vultr VPC 2.0 runs with non-routable private network addresses that are not accessible on the internet. Servers attached to the VPC 2.0 network communicate with all internal hosts without transmitting data packets over the internet. A NAT router exposes and translates VPC network requests to a single routable public IP address you can bind to one or more domains for access over the internet.
This article explains how to create a NAT router in a Vultr VPC 2.0 network. You will leverage Linux server functionalities to transform a single Vultr Ubuntu server into a NAT router that forwards all incoming and outgoing network requests in the VPC 2.0 network.
Example VPC 2.0 Network Topology
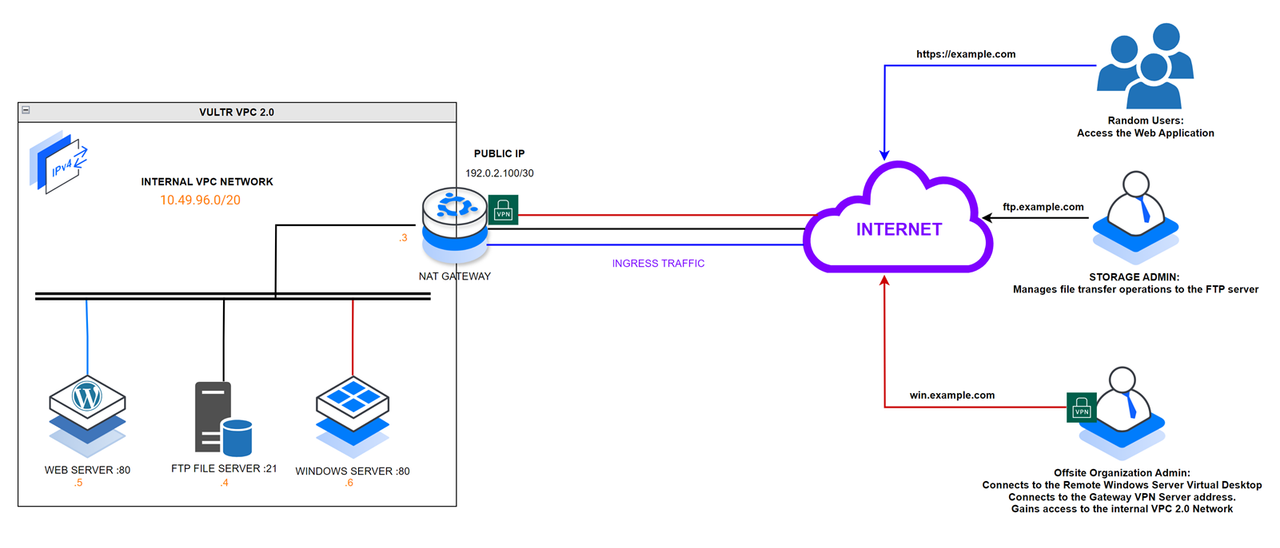
Within the VPC 2.0 network:
Host 1(Ubuntu 20.04): Works as the NAT router and the internal DNS server. It forwards internal requests to the respective VPC 2.0 host while external requests to the server translate to the host public IPV4 address192.0.2.100. In addition, external IPV6 network requests from the VPC 2.0 network route through the public interface IP.- Host 2 (Rocky Linux): Runs as the internal FTP server and accepts incoming requests on the TCP port
21. - Host 3 (Ubuntu 22.04): Works as the internal web server running the Nginx web server package and accepts connections on the HTTP port
80. - Host 4 (Windows Server): Runs as the internal virtual desktop server and accepts RDP requests on port
3389.
Internal requests:
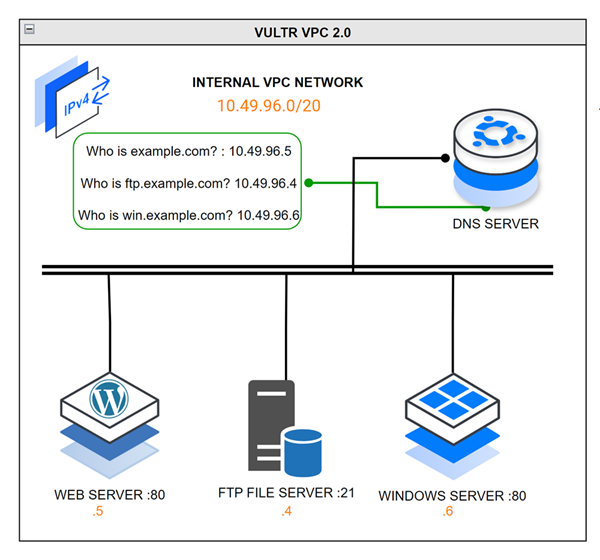
All VPC 2.0 hosts internally communicate with each other using the following IP addresses and domains respectively:
- Host 1:
10.49.96.3 - Host 2:
10.49.96.4,ftp.example.com - Host 3:
10.49.96.5,example.com - Host 4:
10.49.96.6,win.example.com
Based on the above IP addressing scheme, all internal domain requests route to the respective internal hosts without public IP address translation on host 1. For example, when host 1 creates a new example.com request, host 6 responds to the internal network request instead of host 1.
Incoming External Network Requests:
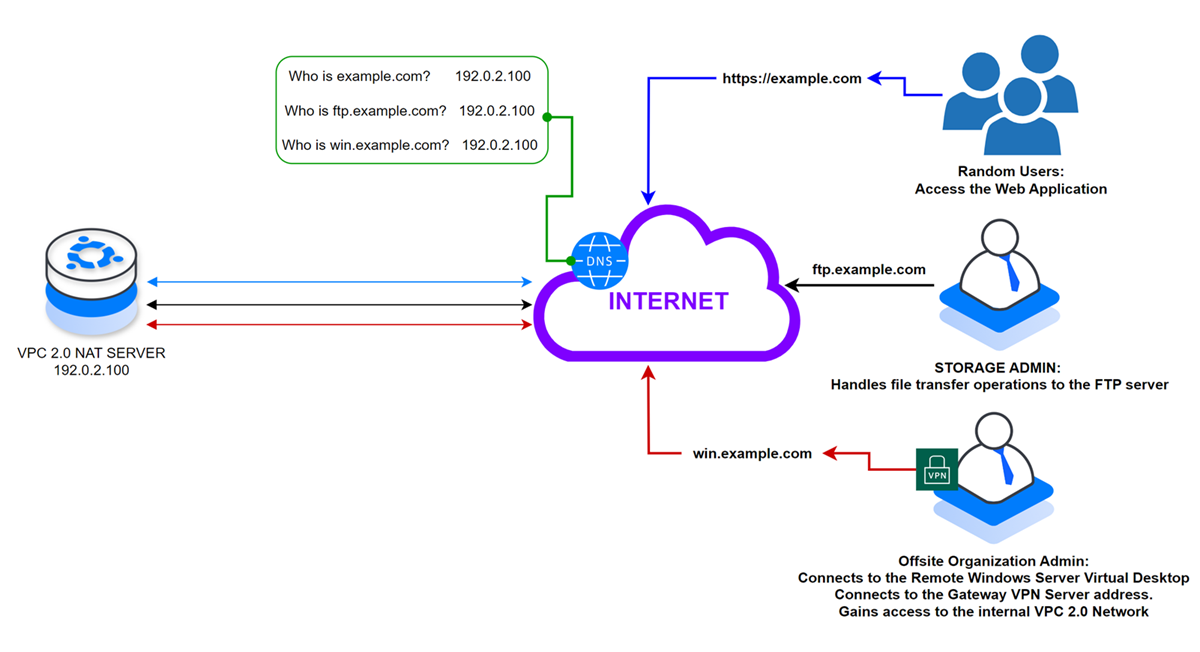
All external requests from the internet to the internal VPC host domains translate to the host 1 public IP address but processed by the respective internal VPC hosts. For example, all external requests to the domain example.com translate to host 1, but host 4 accepts and serves the request. In summary, the NAT instance runs as a reverse proxy and forwards all incoming network requests to the respective VPC hosts.
Depending on your internal VPC 2.0 network topology, when multiple hosts share the same port such as the HTTP port 80, install a reverse proxy application such as Nginx to map specific requests to the respective hosts.
Prerequisites
Before you begin:
Deploy a Vultr Ubuntu 20.04 server to use as the
host 1and NAT routing instance.Access your domain DNS provider and create multiple A records that point to your
host 1public IPV4 address. For example:- example.com:
192.0.2.100 - ftp.example.com:
192.0.2.100 - win.example.com:
192.0.2.100
- example.com:
Disable the public IPV4 and IPV6 interfaces and enable VPC 2.0 for each of the following instances:
- Deploy a Rocky Linux server to use as
host 2. - Deploy a Ubuntu 22.04 server to use as
host 3. - Deploy a Windows server to use as
host 4.
Set Up the main VPC NAT server
Access the main VPC server using SSH.
console$ ssh root@192.0.2.100
Create a non-root user with sudo privileges. For example
sysadmin.console# adduser sysadmin && adduser sysadmin sudoWhen prompted, enter a strong password to assign to the user account.
Switch to the sudo user account.
console# su sysadminView all server network interfaces using the IP utility and note the VPC 2.0 network interface addresses.
console$ ip a
Your output should be similar to the one below:
1: lo: <LOOPBACK,UP,LOWER_UP> mtu 65536 qdisc noqueue state UNKNOWN group default qlen 1000
    link/loopback 00:00:00:00:00:00 brd 00:00:00:00:00:00
    inet 127.0.0.1/8 scope host lo
       valid_lft forever preferred_lft forever
    inet6 ::1/128 scope host
       valid_lft forever preferred_lft forever
2: enp1s0: <BROADCAST,MULTICAST,UP,LOWER_UP> mtu 1500 qdisc fq_codel state UP group default qlen 1000
    link/ether 56:00:04:d4:6d:0a brd ff:ff:ff:ff:ff:ff
    inet 192.0.2.100/23 brd 192.0.2.255 scope global dynamic enp1s0
       valid_lft 70923sec preferred_lft 70923sec
    inet6 2a05:f480:3000:271c:5400:4ff:fed4:6d0a/64 scope global dynamic mngtmpaddr noprefixroute
       valid_lft 2591531sec preferred_lft 604331sec
    inet6 fe80::5400:4ff:fed4:6d0a/64 scope link
       valid_lft forever preferred_lft forever
3: enp8s0: <BROADCAST,MULTICAST,UP,LOWER_UP> mtu 1450 qdisc mq state UP group default qlen 1000
    link/ether 5a:00:04:d4:6d:0a brd ff:ff:ff:ff:ff:ff
    inet 10.49.96.3/20 brd 10.49.111.255 scope global enp8s0
       valid_lft forever preferred_lft forever
    inet6 fe80::5800:4ff:fed4:6d0a/64 scope link
       valid_lft forever preferred_lft forever
Based on the above output, the server uses
enp1s0as the main public interface andenp8s0as the internal VPC 2.0 network interface with the following addresses:- enp1s0:
192.0.2.100,2a05:f480:3000:271c:5400:4ff:fed4:6d0a - enp8s0:
10.49.96.3,fe80::5800:4ff:fed4:6d0a
- enp1s0:
Try connecting to each VPC 2.0 host and verify the connection status using the Ping utility.
Host 2:
console$ ping -c 4 10.49.96.4
Output:
PING 10.49.144.3 (10.49.144.4) 56(84) bytes of data.
64 bytes from 10.49.144.4: icmp_seq=1 ttl=64 time=0.025 ms
64 bytes from 10.49.144.4: icmp_seq=2 ttl=64 time=0.058 ms
64 bytes from 10.49.144.4: icmp_seq=3 ttl=64 time=0.062 ms
64 bytes from 10.49.144.4: icmp_seq=4 ttl=64 time=0.052 ms

--- 10.49.144.3 ping statistics ---
4 packets transmitted, 4 received, 0% packet loss, time 3078ms
rtt min/avg/max/mdev = 0.025/0.049/0.062/0.014 ms
Host 3:
console$ ping -c 4 10.49.96.5
Output:
PING 10.49.144.5 (10.49.144.5) 56(84) bytes of data.
64 bytes from 10.49.144.5: icmp_seq=1 ttl=62 time=1221 ms
64 bytes from 10.49.144.5: icmp_seq=2 ttl=62 time=197 ms
64 bytes from 10.49.144.5: icmp_seq=3 ttl=62 time=0.642 ms
64 bytes from 10.49.144.5: icmp_seq=4 ttl=62 time=0.597 ms

--- 10.49.144.5 ping statistics ---
4 packets transmitted, 4 received, 0% packet loss, time 3040ms
rtt min/avg/max/mdev = 0.597/354.654/1220.733/506.394 ms, pipe 2
Host 4:
console$ ping -c 10.49.96.6
Output:
PING 10.49.144.6 (10.49.144.6) 56(84) bytes of data.
From 192.0.0.8 icmp_seq=1 Destination Host Unreachable
From 192.0.0.8 icmp_seq=2 Destination Host Unreachable
From 192.0.0.8 icmp_seq=3 Destination Host Unreachable
From 192.0.0.8 icmp_seq=4 Destination Host Unreachable

--- 10.49.144.6 ping statistics ---
4 packets transmitted, 0 received, +4 errors, 100% packet loss, time 3051ms
pipe 4
Connection requests to the Windows Server (Host 4) should fail because Vultr Windows Servers require a manual configuration of the VPC 2.0 interface. To enable connections to the server, access the server using RDP, and set up the VPC 2.0 interface.
Enable NAT routing
Follow the steps below to enable NAT routing on the Linux server by modifying the sysctl and iptables kernel utilities to forward connection requests from the internal VPC interface to the public network interface.
Enable IPV4 forwarding.
console$ sudo sysctl -w net.ipv4.ip_forward=1
The above command modifies the
/etc/sysctl.conffile and enables forwarding of IPV4 network requests on the server.Enable IPV6 forwarding.
console$ sudo sysctl -w net.ipv6.conf.all.forwarding=1
Enable source NAT on the public network interface using the iptables utility.
console$ sudo iptables -t nat -A POSTROUTING -o enp1s0 -j MASQUERADE
The above command enables NAT routing and forwards all unresolved network requests through the public network interface. Within the above iptables command:
-t nat: Sets the NAT table as the target IP table to apply the new rule.-A POSTROUTING: Adds the rule to the NAT table post-routing chain to process the network request before address translation.-o enp1s0: Sets the server public network interfaceenp1s0as the outgoing interface to forward all network requests.-j MASQUERADE: Enables masquerading on the interface and modifies each network request source IP address to match the target interface address. For example, an IP request header with a10.49.96.1address is modified to the public interface IP192.0.2.100before forwarding. As a result, the internal IP10.49.96.1masquerades as192.0.2.100for external network requests through the server's public interface.
Install the iptables persistent package to permanently save NAT rules even after a reboot.
console$ sudo apt install iptables-persistent -y
Save all iptables NAT rules.
console$ sudo iptables-save | sudo tee /etc/iptables/rules.v4
Reload iptables to apply changes.
console$ sudo systemctl restart iptables
Enable Port Forwarding
Port forwarding translates all defined external port requests to your target internal host addresses or port numbers. Follow the steps below to enable dynamic routing (DNAT) and forward specific requests from the public IP interface to the destination internal VPC host address and port using iptables.
Forward all HTTP port
80requests to the web server address and port.console$ sudo iptables -t nat -A PREROUTING -i enp1s0 -p tcp --dport 80 -j DNAT --to-destination 10.49.96.5:80
Forward all HTTPS port
443requests to the internal web application server.console$ sudo iptables -t nat -A PREROUTING -i enp1s0 -p tcp --dport 443 -j DNAT --to-destination 10.49.96.5:443
Forward the FTP port
21to the internal FTP server address and port.console$ sudo iptables -t nat -A PREROUTING -i enp1s0 -p tcp --dport 21 -j DNAT --to-destination 10.49.96.4:21
Forward the RDP port
3389to the internal Windows Server address and port.console$ sudo iptables -t nat -A PREROUTING -i enp1s0 -p tcp --dport 3389 -j DNAT --to-destination 10.49.96.6:3389
Save the new iptables dynamic NAT rules.
console$ sudo iptables-save | sudo tee /etc/iptables/rules.v4
Configure Firewall Rules
Uncomplicated Firewall (UFW) is active and available by default on Vultr Ubuntu servers. Follow the steps below to configure the firewall and enable access to all internal VPC host service ports.
Allow the HTTP port
80.console$ sudo ufw allow 80/tcp
Allow the HTTPS port
443.console$ sudo ufw allow 443/tcp
Allow the RDP port
3389.console$ sudo ufw allow 3389/tcp
Allow the FTP port
21.console$ sudo ufw allow 21/tcp
Reload the Firewall table to apply changes.
console$ sudo ufw reload
View the Firewall table to verify all available rules.
console$ sudo ufw status
Output:
Status: active

To                         Action      From
--                         ------      ----
22/tcp                     ALLOW       Anywhere
80/tcp                     ALLOW       Anywhere
443/tcp                    ALLOW       Anywhere
3389/tcp                   ALLOW       Anywhere
21/tcp                     ALLOW       Anywhere
22/tcp (v6)                ALLOW       Anywhere (v6)
80/tcp (v6)                ALLOW       Anywhere (v6)
443/tcp (v6)               ALLOW       Anywhere (v6)
3389/tcp (v6)              ALLOW       Anywhere (v6)
21/tcp (v6)                ALLOW       Anywhere (v6)
Create a DNS Server
A Domain Naming Server (DNS) translates human-readable domain names to IP addresses. Within the VPC 2.0 network, a DNS server translates all local domain names to the respective VPC network addresses while forwarding non-registered records to external DNS servers. Follow the steps below to install a DNS server application on the main NAT instance and configure all internal VPC host domains.
Update the server.
console$ sudo apt update
Install the Bind DNS server package.
console$ sudo apt install bind9 -y
View the Bind system service status and verify that it's actively running.
console$ sudo service bind9 status
Output:
● named.service - BIND Domain Name Server
     Loaded: loaded (/lib/systemd/system/named.service; enabled; vendor preset: enabled)
     Active: active (running) since Thu 2024-03-28 00:39:01 UTC; 1min 5s ago
       Docs: man:named(8)
   Main PID: 3802 (named)
      Tasks: 6 (limit: 1041)
     Memory: 12.7M
     CGroup: /system.slice/named.service
             └─3802 /usr/sbin/named -f -u bind

     ....................................
Navigate to the Bind configuration files directory.
console$ cd /etc/bind/
List the directory files to verify the available Bind configurations structure.
console$ lsYour output should be similar to the one below:
bind.keys db.0 db.127 db.255 db.empty db.local named.conf named.conf.default-zones named.conf.local named.conf.options rndc.key zones.rfc1918Based on the above output, the Bind DNS server uses
named.confas the main configuration andnamed.options,named.localas additional configuration files. To avoid configuration conflicts, modify the additional files instead of the main configuration file.Open the
named.conf.optionsfile using a text editor such as Nano.console$ sudo nano named.conf.options
Find the
forwarders {section.sh// forwarders { // 0.0.0.0; // };
Uncomment the section directives and replace
0.0.0.0with8.8.8.8.shforwarders { 8.8.8.8; };
Add the following DNS zone configurations at the end of the file.
shzone "example.com" { type master; notify no; file "/etc/bind/zones/example.com.zone"; }; zone "ftp.example.com" { type master; notify no; file "/etc/bind/zones/ftp.example.com.zone"; }; zone "win.example.com" { type master; notify no; file "/etc/bind/zones/win.example.com.zone"; };
Save and close the file.
The above configuration creates new DNS entries for the VPC domains
example.com,ftp.example.com, andwin.example.comusing zone files in the/etc/bind/zonesdirectory.Test the Bind configuration file for errors.
console$ sudo named-checkconf /etc/bind/named.conf.options
Create the DNS zones directory to store your domain DNS information.
console$ sudo mkdir /etc/bind/zones/
Switch to the directory.
console$ cd /etc/bind/zones/
Create a new domain DNS zone file
example.com.zone.console$ sudo nano example.com.zone
Add the following contents to the file.
sh$TTL 4H @ IN SOA ns.example.com. vpc.example.com. ( 2009072215 ; Serial 3600 ; Refresh 600 ; Retry 604800 ; Expire 3600 ) ; Minimum ; NS ns IN NS ns.example.com. example.com IN A 10.49.144.3 ns IN A 10.49.144.3
Save and close the file.
Create another DNS zone file
ftp.example.com.zone.console$ sudo nano ftp.example.com.zone
Add the following contents to the file.
sh$TTL 4H @ IN SOA ns.ftp.example.com. vpc.example.com. ( 2009072215 ; Serial 3600 ; Refresh 600 ; Retry 604800 ; Expire 3600 ) ; Minimum ; NS ns IN NS ns.ftp.example.com. ftp.example.com IN A 10.49.144.6 ns IN A 10.49.144.6
Save and close the file.
Create the host 4 domain zone file
win.example.com.zone.console$ sudo nano win.example.com.zone
Add the following contents to the file.
sh$TTL 4H @ IN SOA ns.win.example.com. vpc.example.com. ( 2009072215 ; Serial 3600 ; Refresh 600 ; Retry 604800 ; Expire 3600 ) ; Minimum ; NS ns IN NS ns.win.example.com. win.example.com IN A 10.49.144.6 ns IN A 10.49.144.6
Save and close the file.
Restart the Bind DNS server to apply the configuration changes.
console$ sudo service bind9 restart
Verify the Bind system service status.
console$ sudo service bind9 status
Edit the hosts file to define the respective VPC address for each domain record.
console$ sudo nano /etc/hosts
Add the following directives at the end of the file.
sh10.49.96.5 example.com 10.49.96.4 ftp.example.com 10.49.96.6 win.example.com
Save and close the above.
The above host configuration defines the internal VPC address associated with each domain record. The DNS server prioritizes local records before resolving domains using an external DNS server. As a result, all internal DNS requests resolve to the respective VPC host addresses.
Test the DNS records for each VPC host domain using the Dig utility.
Example.com
console$ dig example.com
Output:
; <<>> DiG 9.16.48-Ubuntu <<>> example.com
;; global options: +cmd
;; Got answer:
;; ->>HEADER<<- opcode: QUERY, status: NOERROR, id: 20983
;; flags: qr rd ra; QUERY: 1, ANSWER: 1, AUTHORITY: 0, ADDITIONAL: 1

;; OPT PSEUDOSECTION:
; EDNS: version: 0, flags:; udp: 65494
;; QUESTION SECTION:
;example.com.      IN      A

;; ANSWER SECTION:
example.com. 0     IN      A       10.49.144.5

;; Query time: 0 msec
;; SERVER: 127.0.0.53#53(127.0.0.53)
;; WHEN: Thu Mar 28 00:59:51 UTC 2024
;; MSG SIZE  rcvd: 69
ftp.example.com
console$ dig ftp.example.com
Output:
; <<>> DiG 9.16.48-Ubuntu <<>> ftp.example.com
;; global options: +cmd
;; Got answer:
;; ->>HEADER<<- opcode: QUERY, status: NOERROR, id: 20983
;; flags: qr rd ra; QUERY: 1, ANSWER: 1, AUTHORITY: 0, ADDITIONAL: 1

;; OPT PSEUDOSECTION:
; EDNS: version: 0, flags:; udp: 65494
;; QUESTION SECTION:
;ftp.example.com.      IN      A

;; ANSWER SECTION:
ftp.example.com. 0     IN      A       10.49.144.4

;; Query time: 0 msec
;; SERVER: 127.0.0.53#53(127.0.0.53)
;; WHEN: Thu Mar 28 00:59:51 UTC 2024
;; MSG SIZE  rcvd: 69
win.example.com
console$ dig win.example.com
Output:
; <<>> DiG 9.16.48-Ubuntu <<>> win.example.com
;; global options: +cmd
;; Got answer:
;; ->>HEADER<<- opcode: QUERY, status: NOERROR, id: 20983
;; flags: qr rd ra; QUERY: 1, ANSWER: 1, AUTHORITY: 0, ADDITIONAL: 1

;; OPT PSEUDOSECTION:
; EDNS: version: 0, flags:; udp: 65494
;; QUESTION SECTION:
;win.example.com.      IN      A

;; ANSWER SECTION:
win.example.com. 0     IN      A       10.49.144.6

;; Query time: 0 msec
;; SERVER: 127.0.0.53#53(127.0.0.53)
;; WHEN: Thu Mar 28 00:59:51 UTC 2024
;; MSG SIZE  rcvd: 69
Based on the above DNS resolution results, the DNS server is active and resolve internal domains to the respective the VPC 2.0 host addresses.
Set Up the Internal VPC Hosts
Based on the example VPC 2.0 network topology, all internal hosts run with a single VPC 2.0 interface and no public interfaces. Access each of the Linux servers from the host 1 main VPC server session and use the Vultr instance console to access the Windows Server session. On each server, enable the VPC interface, enable the host 1 VPC 2.0 IPV4 and IPV6 addresses as the default gateway routes to the internet.
Host 2 (FTP Server)
Access host 2 using the internal VPC 2.0 address or domain name.
console$ ssh root@10.49.96.4
Create a new non-root user.
console# adduser sysadmin-ftpAssign the user a strong password.
console# passwd sysadmin-ftpAdd the user to the privileged users group.
console# usermod -aG wheel sysadmin-ftpSwitch to the user account.
console# su sysadmin-ftpTest connectivity to the
host 1NAT server VPC address using the Ping utility.console$ ping -c 4 10.49.96.3
Output:
PING 10.49.144.3 (10.49.144.3) 56(84) bytes of data.
64 bytes from 10.49.144.3: icmp_seq=1 ttl=62 time=0.401 ms
64 bytes from 10.49.144.3: icmp_seq=2 ttl=62 time=0.547 ms
64 bytes from 10.49.144.3: icmp_seq=3 ttl=62 time=0.477 ms
64 bytes from 10.49.144.3: icmp_seq=4 ttl=62 time=0.525 ms

--- 10.49.144.3 ping statistics ---
4 packets transmitted, 4 received, 0% packet loss, time 3049ms
rtt min/avg/max/mdev = 0.401/0.487/0.547/0.055 ms
Open the
/etc/hostsfile.console$ sudo nano /etc/hosts
Add the following localhost domain record at the end of the file.
sh127.0.0.1 ftp.example.com
Save and close the file.
The above host declaration resolves the host domain to the localhost loopback address
127.0.0.1instead of sending a new request to the DNS server.Open the DNS resolver configuration file
/etc/resolv.conf.console$ sudo nano /etc/resolv.conf
Comment the default
nameserver 127.0.0.53value and add a newnameserverdirective with yourhost 1DNS server VPC 2.0 IP address as the value to resolve all DNS records using the server.shnameserver 10.49.96.3 fe80::5800:4ff:fed4:6d0a
Save and close the file.
Add a new IPV4 static route using the
host 1VPC 2.0 address as the default gateway.console$ sudo ip route add default via 10.49.96.3
The above routing rule forwards all unknown IP requests to the
host 1NAT server. For example, a network request to the IP1.1.1.1is forwarded to the default gateway unless a static route to the address is available on the server.Add a new IPV6 static route using the
host 1VPC 2.0 address as the default gateway.console$ sudo ip -6 route add default via fe80::5800:4ff:fed4:6d0a
Test access to the external network resources using a routable domain such as
google.com.consoleping -c 4 google.com
Output:
PING google.com (142.251.47.110) 56(84) bytes of data.
64 bytes from jnb03s08-in-f14.1e100.net (142.251.47.110): icmp_seq=1 ttl=58 time=2.38 ms
64 bytes from jnb03s08-in-f14.1e100.net (142.251.47.110): icmp_seq=2 ttl=58 time=1.54 ms
64 bytes from jnb03s08-in-f14.1e100.net (142.251.47.110): icmp_seq=3 ttl=58 time=1.55 ms
64 bytes from jnb03s08-in-f14.1e100.net (142.251.47.110): icmp_seq=4 ttl=58 time=1.49 ms

--- google.com ping statistics ---
4 packets transmitted, 4 received, 0% packet loss, time 3005ms
rtt min/avg/max/mdev = 1.489/1.740/2.381/0.370 ms
View the host 2 IP routing table and verify the new default gateway routes.
console$ ip route show
Output:
default via 10.49.144.3 dev enp8s0
default via fe80::5800:4ff:fed4:6d0a dev enp8s0
10.49.144.0/20 dev enp8s0 proto kernel scope link src 10.49.144.4
Configure FTP on Host 2
Update the server.
console$ sudo dnf update
Install the FTP server application package.
console$ sudo dnf install vsftpd -y
Start the FTP daemon.
console$ sudo systemctl start vsftpd
View the FTP server status and verify that it's actively running.
console$ sudo systemctl status vsftpd
Output:
● vsftpd.service - Vsftpd ftp daemon
     Loaded: loaded (/usr/lib/systemd/system/vsftpd.service; disabled; preset: disabled)
     Active: active (running) since Thu 2024-03-28 03:11:52 UTC; 50s ago
    Process: 115765 ExecStart=/usr/sbin/vsftpd /etc/vsftpd/vsftpd.conf (code=exited, status=0/SUCCESS)
   Main PID: 115766 (vsftpd)
      Tasks: 1 (limit: 5784)
     Memory: 716.0K
        CPU: 3ms
     CGroup: /system.slice/vsftpd.service
             └─115766 /usr/sbin/vsftpd /etc/vsftpd/vsftpd.conf

Mar 28 03:11:52 Host2 systemd[1]: Starting Vsftpd ftp daemon...
Allow the FTP port
21through the firewall.console$ sudo firewall-cmd --permanent --add-service=ftp
Reload the firewall to save changes.
console$ sudo firewall-cmd --reload
Test access to the FTP port
21and verify that the FTP server accepts connection requests to the port.console$ curl 127.0.0.1:21
Output:
curl: (1) Received HTTP/0.9 when not allowed
Host 3 (Web Server)
Access host 4 using the VPC 2.0 address or associated domain.
console$ ssh root@10.49.96.5
Create a new non-root user with sudo privileges
console# adduser sysadmin-web && adduser sysadmin-web sudoSwitch to the user
console# su sysadmin-webTest connectivity to the NAT server using the Ping utility.
console$ ping 10.49.96.3
Output:
PING 10.49.96.3 (10.49.96.3) 56(84) bytes of data.
64 bytes from 10.49.96.3: icmp_seq=1 ttl=64 time=0.290 ms
64 bytes from 10.49.96.3: icmp_seq=2 ttl=64 time=0.379 ms
64 bytes from 10.49.96.3: icmp_seq=3 ttl=64 time=0.321 ms
64 bytes from 10.49.96.3: icmp_seq=4 ttl=64 time=0.459 ms

--- 10.49.96.3 ping statistics ---
4 packets transmitted, 4 received, 0% packet loss, time 3074ms
rtt min/avg/max/mdev = 0.290/0.362/0.459/0.064 ms
Open the
/etc/hostsfile.console$ sudo nano /etc/hosts
Add a new
127.0.0.1host directive with your domain as the value.sh127.0.0.1 example.com
Save and close the file.
Open the
/etc/resolv.conffile.console$ sudo nano /etc/resolv.conf
Add the following
nameserverdirective to the file and comment thenameserver 127.0.0.53using#to disable the default value.shnameserver 10.49.96.3 fe80::5800:4ff:fed4:6d0a
Save and close the file.
Add a new IPV4 static route to the
host 1VPC 2.0 address as the default gateway.console$ sudo ip route add default via 10.49.96.3
Add a new IPV6 static route to the
host 1VPC 2.0 address as the default gateway.console$ sudo ip -6 route add default via fe80::5800:4ff:fed4:6d0a
Set Up the Web Server
Update the server.
console$ sudo apt update
Install the Nginx web server package.
console$ sudo apt install nginx -y
View the Nginx service status and verify that it's active and running.
console$ sudo service nginx status
Output:
● nginx.service - A high performance web server and a reverse proxy server
     Loaded: loaded (/lib/systemd/system/nginx.service; enabled; vendor preset: enabled)
     Active: active (running) since Thu 2024-03-28 02:54:46 UTC; 21min ago
       Docs: man:nginx(8)
    Process: 1794 ExecStartPre=/usr/sbin/nginx -t -q -g daemon on; master_process on; (code=exited, status=0/SUCCESS)
    Process: 1795 ExecStart=/usr/sbin/nginx -g daemon on; master_process on; (code=exited, status=0/SUCCESS)
   Main PID: 1886 (nginx)
      Tasks: 2 (limit: 1005)
     Memory: 7.9M
        CPU: 25ms
     CGroup: /system.slice/nginx.service
             ├─1886 "nginx: master process /usr/sbin/nginx -g daemon on; master_process on;"
             └─1887 "nginx: worker process" "" "" "" "" "" "" "" "" "" "" "" "" "" "" "" "" "" "" "" "" "" "" "" "" "" "" ""

........ Host-3 systemd[1]: Starting A high performance web server and a reverse proxy server...
Allow the HTTP port
80through the firewall.console$ sudo ufw allow 80/tcp
Allow the HTTPS port
443through the firewall.console$ sudo ufw allow 443/tcp
Restart the firewall to save changes.
console$ sudo ufw reload
Test access to the localhost port
80using the Curl utility.console$ curl 127.0.0.1:80
Output:
html<body> <h1>Welcome to nginx!</h1> <p>If you see this page, the nginx web server is successfully installed and working. Further configuration is required.</p> <p>For online documentation and support please refer to <a href="http://nginx.org/">nginx.org</a>.<br/> Commercial support is available at <a href="http://nginx.com/">nginx.com</a>.</p>
You have installed and enabled the Nginx web server on host 3. The server accepts all HTTP requests to the
example.comand delivers the hosted web application.
Generate SSL Certificates to Secure the Web Application Domain
Install the Certbot Let's Encrypt client tool.
console$ sudo apt install python3-certbot-nginx -y
Generate trusted SSL certificates using your web server domain. Replace
admin@examplevpc.comwith your valid email address.console$ sudo certbot --nginx -d example.com -m admin@examplevpc.com --agree-tos
Verify that the certificate generation process is successful similar to the output below:
Successfully received certificate.
Certificate is saved at: /etc/letsencrypt/live/example.com/fullchain.pem
Key is saved at:         /etc/letsencrypt/live/example.com/privkey.pem
This certificate expires on 2024-06-26.
These files will be updated when the certificate renews.
Certbot has set up a scheduled task to automatically renew this certificate in the background.

Deploying certificate
Successfully deployed certificate for example.com to /etc/nginx/sites-enabled/default
Congratulations! You have successfully enabled HTTPS on https://example.com
Test the Certbot SSL certificate auto-renewal process.
console$ sudo certbot renew --dry-run
Host 4 (Windows Server)
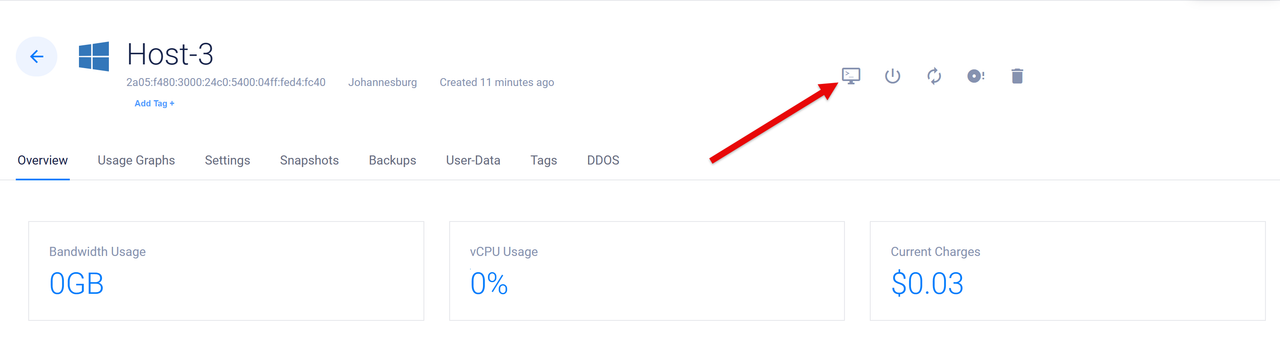
Access the Vultr Console and open your Windows server instance page.
Click View Console on the top right bar to access the Vultr instance console.
Log in using your Administrator account to access the Windows Server.
Click the Vultr Console options menu and send a
Ctrl + Alt + Delsignal to unlock the Windows server.
Right-click the Network icon on the bottom right taskbar and select Network & internet from the list of options to access the network settings page.
Click Ethernet within the settings window and verify the available network interfaces.

Click Unidentified Network (No internet) to edit the VPC network interface
Click Edit within the IP settings section to modify the interface network address.
Click the Automatic (DHCP) drop-down and select Manual from the list of options.
Toggle IPV4 to On, then enter your Windows instance VPC 2.0 network address in the IP address field.
Enter your VPC 2.0 network subnet in the Subnet mask field.
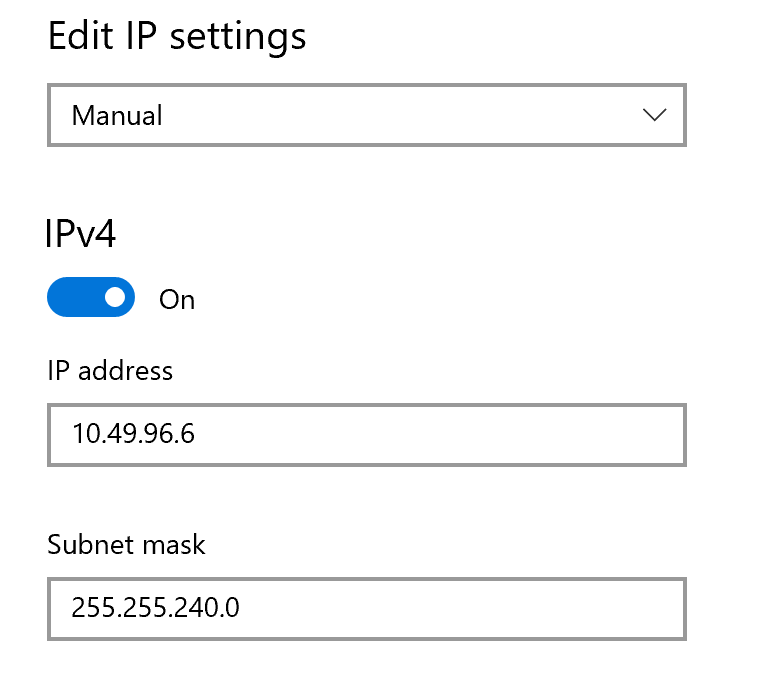
Enter your
host 1server VPC 2.0 address in the Default Gateway and Preferred DNS fields.Scroll and click to activate the IPV6 option.
Enter your VPC 2.0 IPV6 address in the IP address field.
Enter the subnet prefix in the Subnet prefix length field.
Enter your
host 1VPC 2.0 IPV6 address in the Gateway and Preferred DNS fields.Click Save to apply the new VPC 2.0 network interface changes.
Click Yes in the Networks pop-up sidebar to enable the VPC 2.0 network as a trusted Windows Server interface.

Open the Windows start menu and click Windows Powershell to start a new command line session.
Try connecting to the
host 1VPC 2.0 IP address to test access the server using the Ping utility.console> ping 10.49.96.3
Output:
64 bytes from 10.49.96.3: icmp_seq=1 ttl=64 time=0.239 ms
64 bytes from 10.49.96.3: icmp_seq=2 ttl=64 time=0.387 ms
64 bytes from 10.49.96.3: icmp_seq=3 ttl=64 time=0.447 ms
64 bytes from 10.49.96.3: icmp_seq=4 ttl=64 time=0.447 ms

--- 10.49.96.3 ping statistics ---
4 packets transmitted, 4 received, 0% packet loss, time 3058ms
rtt min/avg/max/mdev = 0.239/0.380/0.447/0.085 ms
You have enabled the Windows server VPC 2.0 network and configured the interface to route all network requests using
host 1as the default gateway to external networks such as the internet.
Test the Internal VPC 2.0 Connectivity
All VPC 2.0 must communicate and share resources internally without using the host 1 NAT external network interface link. For example, all domains route to the respective internal VPC 2.0 addresses instead of the NAT server IP address. Follow the steps below to test the internal network connections between all internal VPC 2.0 hosts.
Test Host 1 (NAT router):
Test access to the host 2 domain
ftp.example.comand verify the VPC address in the response data.console$ ping -c 4 ftp.example.com
Output:
PING ftp.example.com (10.49.96.4) 56(84) bytes of data.
64 bytes from ftp.example.com (10.49.96.4): icmp_seq=1 ttl=64 time=0.570 ms
64 bytes from ftp.example.com (10.49.96.4): icmp_seq=2 ttl=64 time=0.531 ms
64 bytes from ftp.example.com (10.49.96.4): icmp_seq=3 ttl=64 time=0.573 ms
64 bytes from ftp.example.com (10.49.96.4): icmp_seq=4 ttl=64 time=0.512 ms

--- ftp.example.com ping statistics ---
4 packets transmitted, 4 received, 0% packet loss, time 3052ms
rtt min/avg/max/mdev = 0.512/0.546/0.573/0.025 ms
Test access to the host 3 domain
example.com.console$ ping -c 4 example.com
Output:
PING example.com (10.49.96.5) 56(84) bytes of data.
64 bytes from example.com (10.49.96.5): icmp_seq=1 ttl=64 time=0.570 ms
64 bytes from example.com (10.49.96.5): icmp_seq=2 ttl=64 time=0.531 ms
64 bytes from example.com (10.49.96.5): icmp_seq=3 ttl=64 time=0.573 ms
64 bytes from example.com (10.49.96.5): icmp_seq=4 ttl=64 time=0.512 ms

--- ftp.example.com ping statistics ---
4 packets transmitted, 4 received, 0% packet loss, time 3052ms
rtt min/avg/max/mdev = 0.512/0.546/0.573/0.025 ms
Test access to the host 4 domain
win.example.comconsole$ ping -c 4 win.example.com
Output:
PING win.example.com (10.49.96.6) 56(84) bytes of data.
64 bytes from win.example.com (10.49.96.6): icmp_seq=1 ttl=64 time=0.570 ms
64 bytes from win.example.com (10.49.96.6): icmp_seq=2 ttl=64 time=0.531 ms
64 bytes from win.example.com (10.49.96.6): icmp_seq=3 ttl=64 time=0.573 ms
64 bytes from win.example.com (10.49.96.6): icmp_seq=4 ttl=64 time=0.512 ms

--- ftp.example.com ping statistics ---
4 packets transmitted, 4 received, 0% packet loss, time 3052ms
rtt min/avg/max/mdev = 0.512/0.546/0.573/0.025 ms
Test Host 2 ( FTP Server)
Test access to an external domain such as
google.comto verify external access to the internet.console$ ping -c 4 google.com
Output:
PING google.com (142.250.74.142) 56(84) bytes of data.
64 bytes from arn11s11-in-f14.1e100.net (142.250.74.142): icmp_seq=1 ttl=54 time=3.87 ms
64 bytes from arn11s11-in-f14.1e100.net (142.250.74.142): icmp_seq=2 ttl=54 time=3.84 ms
64 bytes from arn11s11-in-f14.1e100.net (142.250.74.142): icmp_seq=3 ttl=54 time=3.85 ms
64 bytes from arn11s11-in-f14.1e100.net (142.250.74.142): icmp_seq=4 ttl=54 time=3.88 ms

--- google.com ping statistics ---
4 packets transmitted, 4 received, 0% packet loss, time 3004ms
rtt min/avg/max/mdev = 3.842/3.860/3.877/0.013 ms
Test access to the host 2 domain
ftp.example.comand verify that the reply originates from loopback address127.0.0.1(same host)console$ ping -c 4 ftp.example.com
Output:
PING ftp.example.com (127.0.0.1) 56(84) bytes of data.
64 bytes from localhost (127.0.0.1): icmp_seq=1 ttl=64 time=0.031 ms
64 bytes from localhost (127.0.0.1): icmp_seq=2 ttl=64 time=0.041 ms
64 bytes from localhost (127.0.0.1): icmp_seq=3 ttl=64 time=0.032 ms
64 bytes from localhost (127.0.0.1): icmp_seq=4 ttl=64 time=0.038 ms

--- ftp.example.com ping statistics ---
4 packets transmitted, 4 received, 0% packet loss, time 3061ms
rtt min/avg/max/mdev = 0.031/0.035/0.041/0.004 ms
Test access to the host 3 domain
example.com.console$ ping -c 4 example.com
Output:
PING example.com (10.49.96.5) 56(84) bytes of data.
64 bytes from example.com (10.49.96.5): icmp_seq=1 ttl=64 time=0.570 ms
64 bytes from example.com (10.49.96.5): icmp_seq=2 ttl=64 time=0.531 ms
64 bytes from example.com (10.49.96.5): icmp_seq=3 ttl=64 time=0.573 ms
64 bytes from example.com (10.49.96.5): icmp_seq=4 ttl=64 time=0.512 ms

--- ftp.example.com ping statistics ---
4 packets transmitted, 4 received, 0% packet loss, time 3052ms
rtt min/avg/max/mdev = 0.512/0.546/0.573/0.025 ms
Test access to the host 4 domain
win.example.com.console$ ping -c 4 win.example.com
Output:
PING win.example.com (10.49.96.6) 56(84) bytes of data.
64 bytes from win.example.com (10.49.96.6): icmp_seq=1 ttl=64 time=0.570 ms
64 bytes from win.example.com (10.49.96.6): icmp_seq=2 ttl=64 time=0.531 ms
64 bytes from win.example.com (10.49.96.6): icmp_seq=3 ttl=64 time=0.573 ms
64 bytes from win.example.com (10.49.96.6): icmp_seq=4 ttl=64 time=0.512 ms

--- ftp.example.com ping statistics ---
4 packets transmitted, 4 received, 0% packet loss, time 3052ms
rtt min/avg/max/mdev = 0.512/0.546/0.573/0.025 ms
Test Host 3 (Web Server)
Test access to an external domain such as
vultr.com.console$ ping vultr.com
Output:
PING  (108.61.13.174) from 10.49.96.4 enp8s0: 56(84) bytes of data.
64 bytes from 108-61-13-174.choopa.net (108.61.13.174): icmp_seq=1 ttl=53 time=223 ms
64 bytes from 108-61-13-174.choopa.net (108.61.13.174): icmp_seq=2 ttl=53 time=223 ms
64 bytes from 108-61-13-174.choopa.net (108.61.13.174): icmp_seq=3 ttl=53 time=223 ms
64 bytes from 108-61-13-174.choopa.net (108.61.13.174): icmp_seq=4 ttl=53 time=223 ms

---  ping statistics ---
4 packets transmitted, 4 received, 0% packet loss, time 3004ms
rtt min/avg/max/mdev = 222.687/222.789/222.853/0.066 ms
Test access to the host 2 domain
ftp.example.com.console$ ping -c 4 ftp.example.com
Output:
PING ftp.example.com (10.49.96.4) 56(84) bytes of data.
64 bytes from ftp.example.com (10.49.96.4): icmp_seq=1 ttl=64 time=0.414 ms
64 bytes from ftp.example.com (10.49.96.4): icmp_seq=2 ttl=64 time=0.418 ms
64 bytes from ftp.example.com (10.49.96.4): icmp_seq=3 ttl=64 time=0.480 ms
64 bytes from ftp.example.com (10.49.96.4): icmp_seq=4 ttl=64 time=0.520 ms

--- ftp.example.com ping statistics ---
4 packets transmitted, 4 received, 0% packet loss, time 3076ms
rtt min/avg/max/mdev = 0.414/0.458/0.520/0.044 ms
Test access to the host 3 domain
example.comand verify the loopback address127.0.0.1in the response data.console$ ping -c 4 example.com
Output:
PING localhost (127.0.0.1) 56(84) bytes of data.
64 bytes from localhost (127.0.0.1): icmp_seq=1 ttl=64 time=0.022 ms
64 bytes from localhost (127.0.0.1): icmp_seq=2 ttl=64 time=0.069 ms
64 bytes from localhost (127.0.0.1): icmp_seq=3 ttl=64 time=0.072 ms
64 bytes from localhost (127.0.0.1): icmp_seq=4 ttl=64 time=0.067 ms

--- localhost ping statistics ---
4 packets transmitted, 4 received, 0% packet loss, time 3065ms
rtt min/avg/max/mdev = 0.022/0.057/0.072/0.020 ms
Test access to the host 4 domain
win.example.com.console$ ping -c 4 win.example.com
Output:
PING win.example.com (10.49.96.6) 56(84) bytes of data.
64 bytes from win.example.com (10.49.96.6): icmp_seq=1 ttl=64 time=0.414 ms
64 bytes from win.example.com (10.49.96.6): icmp_seq=2 ttl=64 time=0.418 ms
64 bytes from win.example.com (10.49.96.6): icmp_seq=3 ttl=64 time=0.480 ms
64 bytes from win.example.com (10.49.96.6): icmp_seq=4 ttl=64 time=0.520 ms

--- ftp.example.com ping statistics ---
4 packets transmitted, 4 received, 0% packet loss, time 3076ms
rtt min/avg/max/mdev = 0.414/0.458/0.520/0.044 ms
Host 4 (Windows Server)
Test access to an external domain such as
wikipedia.com.console> ping wikipedia.com
Output:
Pinging wikipedia.com [185.15.59.226] with 32 bytes of data:
Reply from 185.15.59.226: bytes=32 time=253ms TTL=52
Reply from 185.15.59.226: bytes=32 time=251ms TTL=52
Reply from 185.15.59.226: bytes=32 time=681ms TTL=52
Reply from 185.15.59.226: bytes=32 time=273ms TTL=52

Ping statistics for 185.15.59.226:
    Packets: Sent = 4, Received = 4, Lost = 0 (0% loss),
Approximate round trip times in milli-seconds:
    Minimum = 251ms, Maximum = 681ms, Average = 364ms
Test access to the host 2 domain
ftp.example.com.console> ping ftp.example.com
Output:
Pinging ftp.example.com [10.49.96.4] with 32 bytes of data.
Reply from 10.49.96.4: bytes=32 time=253ms TTL=52
Reply from 10.49.96.4: bytes=32 time=251ms TTL=52
Reply from 10.49.96.4: bytes=32 time=681ms TTL=52
Reply from 10.49.96.4: bytes=32 time=273ms TTL=52

Ping statistics for 10.49.96.4:
    Packets: Sent = 4, Received = 4, Lost = 0 (0% loss),
Approximate round trip times in milli-seconds:
    Minimum = 251ms, Maximum = 681ms, Average = 364ms
Test access to the host 3 domain
example.com.console> ping example.com
Output:
Pinging example.com [10.49.96.5] with 32 bytes of data.
Reply from 10.49.96.5: bytes=32 time=253ms TTL=52
Reply from 10.49.96.5: bytes=32 time=251ms TTL=52
Reply from 10.49.96.5: bytes=32 time=681ms TTL=52
Reply from 10.49.96.5: bytes=32 time=273ms TTL=52

Ping statistics for 10.49.96.5:
    Packets: Sent = 4, Received = 4, Lost = 0 (0% loss),
Approximate round trip times in milli-seconds:
    Minimum = 251ms, Maximum = 681ms, Average = 364ms
Test access to the host 4 domain
win.example.com.console> ping win.example.com
Output:
Pinging win.example.com [127.0.0.1] with 32 bytes of data:
Reply from 127.0.0.1: bytes=32 time<1ms TTL=128
Reply from 127.0.0.1: bytes=32 time<1ms TTL=128
Reply from 127.0.0.1: bytes=32 time<1ms TTL=128
Reply from 127.0.0.1: bytes=32 time<1ms TTL=128

Ping statistics for 127.0.0.1:
    Packets: Sent = 4, Received = 4, Lost = 0 (0% loss),
Approximate round trip times in milli-seconds:
    Minimum = 0ms, Maximum = 0ms, Average = 0ms
Open a web browser such as Edge on the server and visit the web server domain to verify access to the web application.

Test External Traffic to the VPC 2.0 Network
The main VPC 2.0 NAT server handles all Ingress Traffic (Incoming network requests to the Vultr VPC 2.0 hosts) and routes all packets to the respective internal hosts. Follow the steps below to test external access to your Vultr VPC 2.0 network over the internet.
Open a new web browser such as Firefox on your local computer and visit the web server domain
example.com.https://example.comVerify your web server application displays correctly in your browser session.
Open an FTP client such as FileZilla and connect to your FTP server
ftp.example.com.Enter your FTP server login details when prompted to access the hosted files.
Open a remote desktop client such as Microsoft remote desktop, enter your VPC Windows server domain
win.example.com, and press Enter to connect to the server.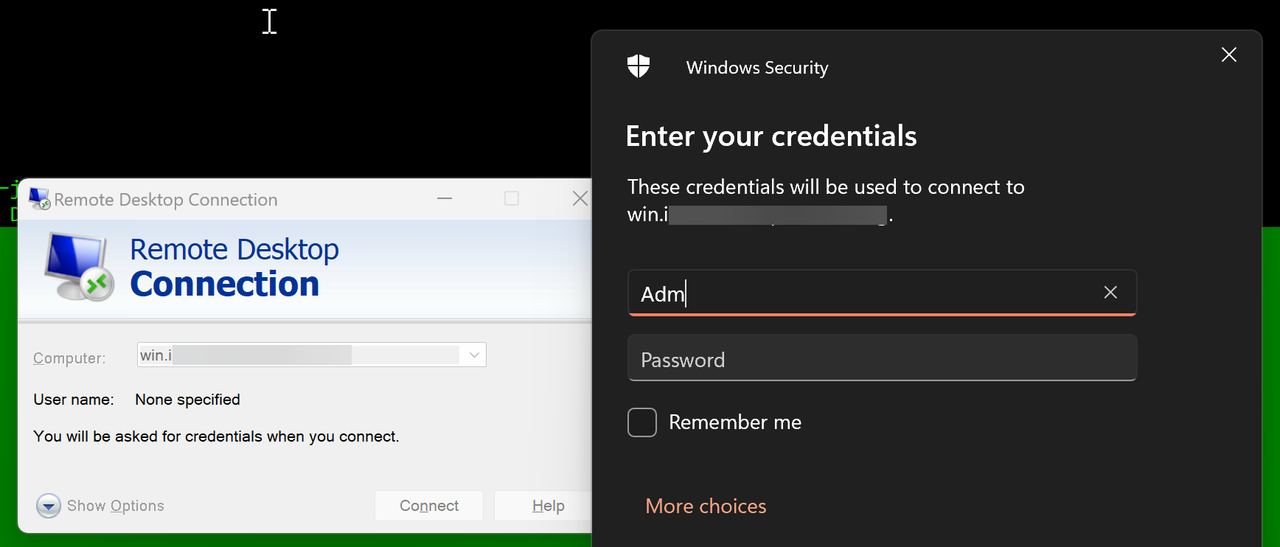
Log in using your Windows server username and password to access the remote desktop.
Conclusion
You have created a NAT router in a Vultr VPC 2.0 network and tested Ingress traffic to all host instances. For the best results, use a dedicated router instance such as VyOS or Pfsense instead of a Linux server as your main NAT router when running multiple hosts in the VPC 2.0 network. For more information about the Vultr VPC 2.0 networking functionalities, visit the official documentation.