
Connect an On-Premises Network to a Vultr VPC with an IPsec VPN

Introduction
This article explains how to connect an On-Premises network to a Vultr Virtual Private Cloud (VPC) network using Internet Protocol Security (IPsec) to create a site-to-site tunnel. Internet Key Exchange (IKE) V2 is used to create and authenticate the secure IPsec tunnel between hosts as it supports more features, is more secure, and faster than IKEV1.
IPsec is a group of network protocols that create a secure connection between two or more devices by authenticating and encrypting packets over Internet Protocol (IP) networks such as the Internet. To establish a Virtual Private Network (VPN) tunnel between devices, IPSec uses multiple protocols, including the following.
- Authentication Header (AH): Ensures that data packets are not tampered with and come from a secure source device.
- Encapsulating Security Protocol (ESP): Encrypts the IP header and payload for each data packet by adding a new header and trailer.
- Security Association (SA): Negotiates encryption keys and algorithms between devices in a tunnel using protocols such as Internet Key Exchange (IKE), and the Internet Security Association and Key Management Protocol (ISAKMP)
Prerequisites
Before you begin, make sure you have:
An active Vultr account. If not, sign up for one today.
An On-Premises or office network with a static public IP address.
An active domain name. This article uses
vpn.example.com. Replace all occurrences with your actual domain name.IPsec IKEV2 requires valid SSL certificates for host authentication within a tunnel. For production, an active domain name masks the main server IP address and is used in self-signed certificates.
Scenario
This article follows the example network simulation in the graphic below. The On-Premises network has two hosts as deployed with the local network address 192.168.1.0/24 and the public network with example IP address 192.0.2.0/24. The Vultr VPC has two hosts with the local network address 203.0.113.0/24, and the public IP address 198.51.100.0/24.
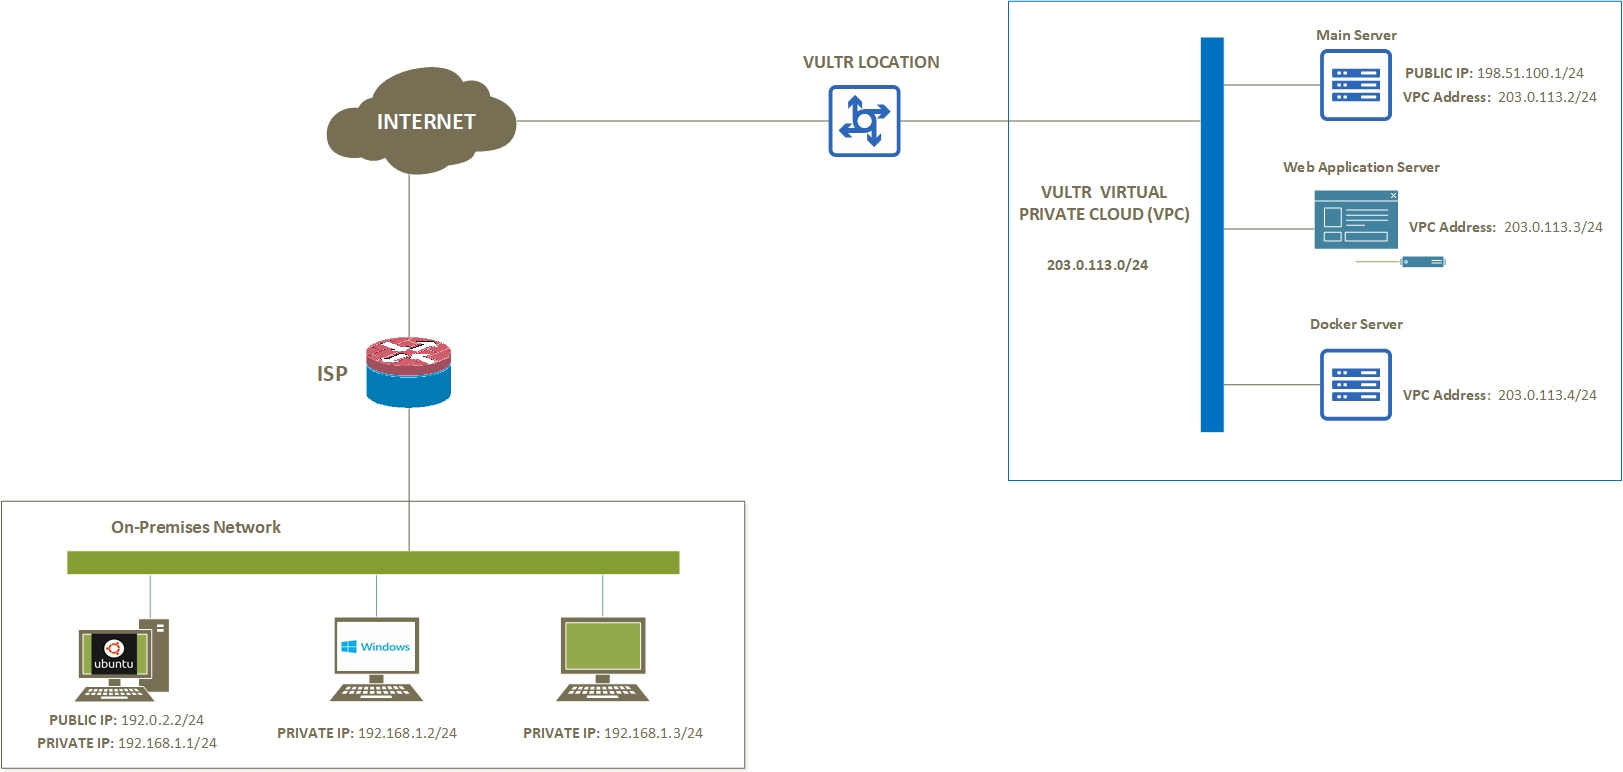
Replace all example IP addresses used in this article with your real-world public and private IP addresses on both networks, respectively.
Getting Started
In a single Vultr location:
- Deploy a Ubuntu 22.04 instance to work as the main server.
- Deploy a Debian 11 instance to work as an application server.
- Add both servers to the same Vultr Virtual Private Cloud (VPC).
At the On-Premises network:
- Deploy a Ubuntu 22.04 server to work as the main network server.
- Deploy a Windows client machine to work as a client device.
Set up the main Vultr VPC Server
To set up IPsec on the server, install an open-source implementation tool such as Openswan, Libreswan, or strongSwan on the server. For purposes of this article, install strongSwan (strong secure wan), which uses the native IPsec stack, and is actively maintained. It supports both Internet Key exchange (IKE) protocols, IKEV1 and IKEV2 protocols, to create an IPsec tunnel between two or more hosts.
Update the server.
$ sudo apt updateInstall strongSwan and all required packages.
$ sudo apt install strongswan strongswan-pki libcharon-extra-plugins libcharon-extauth-plugins libstrongswan-extra-plugins -yEnable strongSwan to start at boot time.
$ sudo systemctl enable strongswanStart strongSwan.
$ sudo systemctl start strongswanVerify that the strongSwan daemon is up and running.
$ sudo systemctl status strongswanVerify the IPsec tunnel status.
$ sudo ipsec statusOutput:
 Security Associations (0 up, 0 connecting):
 none
Generate SSL certificates for the Server
A valid SSL certificate allows the server to identify itself to clients and mask its public IP address. For compatibility with the strongSwan configurations, generate self-signed SSL certificates on the server using the strongswan-pki utility.
Create a private key for the root Certificate Authority (CA).
$ sudo ipsec pki --gen --size 4096 --type rsa --outform pem > /etc/ipsec.d/private/ca.key.pemCreate and sign the root CA using the key generated above.
$ sudo ipsec pki --self --in /etc/ipsec.d/private/ca.key.pem --type rsa --dn "CN=Vultr VPC VPN Server" --ca --lifetime 3650 --outform pem > /etc/ipsec.d/cacerts/ca.cert.pemCreate the VPN server private key.
$ sudo ipsec pki --gen --size 4096 --type rsa --outform pem > /etc/ipsec.d/private/server.key.pemGenerate and sign the VPN server certificate using the CA key using the following command. Replace
vpn.example.comwith your actual domain name.$ sudo ipsec pki --pub --in /etc/ipsec.d/private/server.key.pem --type rsa | ipsec pki --issue --lifetime 2750 --cacert /etc/ipsec.d/cacerts/ca.cert.pem --cakey /etc/ipsec.d/private/ca.key.pem --dn "CN=vpn.example.com" --san="vpn.example.com" --flag serverAuth --flag ikeIntermediate --outform pem > /etc/ipsec.d/certs/server.cert.pem
Configure IPsec
Back up the original IPsec configuration file.
$ sudo mv /etc/ipsec.conf /etc/ipsec.ORIGCreate a new configuration file.
$ sudo touch /etc/ipsec.confUsing a text editor, open and edit the file.
$ sudo nano /etc/ipsec.confAdd the following configurations to the file. Replace
vpn.example.comwith your domain name.config setup charondebug="ike 2, knl 2, cfg 2, net 2, esp 2, dmn 2, mgr 2" strictcrlpolicy=no uniqueids=yes cachecrls=no conn vultr-onpremises-vpn auto=start compress=no type=tunnel keyexchange=ikev2 fragmentation=yes forceencaps=yes dpdaction=clear dpddelay=300s rekey=no leftauth=pubkey left=%any leftid=@vpn.example.com leftcert=server.cert.pem leftsendcert=always leftsubnet=203.0.113.2/24 right=192.0.2.2 rightid=vultruser rightsubnet=192.168.1.1/24 rightauth=eap-mschapv2 rightsendcert=never eap_identity=%identitySave and close the file.
Here is what key configuration lines represent:
auto=: The automatic operation starts with the IPsec daemon,startloads and starts up the IPsec connection,addloads a connection but does not start it,ignoreignores the connection until started by the user.type=: The type of IPsec connection,tunnelrepresents host to host,transporthost to host transport mode,dropdiscards all signifying packets.keyexchange=: Method of exchange to use in the IPsec connection,ikedefaults to ikev2,ikev1assigns IKEV1 to the connection.leftauth=: The local server authentication type, accepted values includepubkey,psk,xauth, andeap.left=: The local server's public IP address.leftcert=: Server certificate located in the/etc/ipsec.d/certsdirectory.leftsubnet=: Local IP address of the Vultr VPC network interface.right=: The Remote Server's public IP address. For this article, the On-Premises server's IP address.rightid=: How the remote On-Premises server authenticates.vultruserrepresents the username in your secrets file. Other accepted values can be the IP address, or a fully qualified domain name (FQDN)rightsubnet=: The Local On-Premises network behind the main server or gateway.rightauth=: The remote server authentication type, IKEV2 supports multiple methods such aseap-mschapv2, IKEV1 only supportsXAuth.
Back up the original IPsec secrets file.
$ sudo mv /etc/ipsec.secrets /etc/ipsec.ORIGCreate a new secrets file.
$ sudo touch /etc/ipsec.secretsOpen and edit the file.
$ sudo nano /etc/ipsec.secretsAdd the following configurations to the file. Replace
vpn.example.comwith your domain name.vpn.example.com : RSA server.key.pem vultruser : EAP "strong-password"Save and close the file.
You can create multiple users in the
user : EAP passwordformat.Restart the IPsec daemon.
$ sudo ipsec restart
Enable Forwarding
To allow the On-Premises server to communicate with hosts on your Vultr VPC network, enable kernel packet forwarding on the server as described below.
Back up the original
sysctl.confconfiguration file.$ sudo cp /etc/sysctl.conf /etc/sysctl.ORIGAdd new forwarding rules to the file using the following command.
  $ sudo echo " net.ipv4.ip_forward = 1
                net.ipv6.conf.all.forwarding = 1
                net.ipv4.conf.all.accept_redirects = 0
                net.ipv4.conf.all.send_redirects = 0 " > /etc/sysctl.conf
Reload kernel settings using the
sysctlutility.$ sudo sysctl -pView all the server network interfaces.
$ ip addrYour output should look like the one below.
  1: lo: <LOOPBACK,UP,LOWER_UP> mtu 65536 qdisc noqueue state UNKNOWN group default qlen 1000
       link/loopback 00:00:00:00:00:00 brd 00:00:00:00:00:00
       inet 127.0.0.1/8 scope host lo
         valid_lft forever preferred_lft forever
       inet6 ::1/128 scope host
         valid_lft forever preferred_lft forever
  2: enp1s0: <BROADCAST,MULTICAST,UP,LOWER_UP> mtu 1500 qdisc fq_codel state UP group default qlen 1000
        link/ether 56:00:04:27:fb:84 brd ff:ff:ff:ff:ff:ff
        inet 198.51.100.1/24 brd 198.51.100.255 scope global dynamic enp1s0
           valid_lft 47693sec preferred_lft 47693sec
  3: enp6s0: <BROADCAST,MULTICAST,UP,LOWER_UP> mtu 1450 qdisc mq state UP group default qlen 1000
        link/ether 5a:00:04:27:fb:84 brd ff:ff:ff:ff:ff:ff
        inet 203.0.113.2/24 brd 203.0.113.255 scope global enp6s0
           valid_lft forever preferred_lft forever
Using the
iptablesutility, forward all incoming network requests to the VPC network interface.$ sudo iptables -t nat -A POSTROUTING -o enp6s0 -j MASQUERADETo enable internet access on the IPsec tunnel, also forward network traffic to the public network interface.
$ sudo iptables -t nat -A POSTROUTING -o enp1s0 -j MASQUERADERestart the IPsec daemon.
$ sudo ipsec restart
Security
By default, Uncomplicated Firewall (UFW) is pre-configured, and active on Vultr Ubuntu servers, configure the firewall to allow IPsec traffic to the server.
Verify that the firewall is running.
$ sudo ufw statusIf inactive, activate it using the following command.
$ sudo ufw enableAllow IPsec connections on UDPs port
500, and4500.$ sudo ufw allow 500,4500/udpVerify the rules in your firewall table.
$ sudo ufw statusYour output should look like the one below.
  Status: active

  To                         Action      From
  --                         ------      ----
  22                         ALLOW       Anywhere
  500,4500/udp               ALLOW       Anywhere
  22 (v6)                    ALLOW       Anywhere (v6)
  500,4500/udp (v6)          ALLOW       Anywhere (v6)
Restart the firewall to load changes.
$ sudo ufw reload
Configure Hosts in the Vultr VPC
Using SSH, access the Debian Vultr VPC application server.
$ ssh example-user@198.51.100.2Ping the main Vultr server VPC address.
$ ping 203.0.113.2Output:
  PING 203.0.113.2 (203.0.113.2) 56(84) bytes of data.
  64 bytes from 203.0.113.2: icmp_seq=1 ttl=63 time=21.0 ms
  64 bytes from 203.0.113.2: icmp_seq=2 ttl=63 time=17.7 ms
  64 bytes from 203.0.113.2: icmp_seq=3 ttl=63 time=17.7 ms
  64 bytes from 203.0.113.2: icmp_seq=4 ttl=63 time=19.4 ms
  ^C
  --- 203.0.113.2 ping statistics ---
  4 packets transmitted, 4 received, 0% packet loss, time 3004ms
Press Control + C to stop the utility replies.
Verify your VPC network interface IP address.
$ ip addrDefine a route to the On-Premises network with the main Vultr VPC server as the next hop.
$ sudo ip route add 192.168.1.0/24 via 203.0.113.2 dev eth1 src 203.0.113.3Apply the above configuration on all hosts in the Vultr VPC network.
For purposes of this article, set up a basic web application on the server. First, install Nginx as the web server application.
$ sudo apt install nginx -yStart Nginx.
$ sudo systemctl start nginxCreate a new
index.htmlfile in the/var/www/htmlweb root directory.$ sudo touch /var/www/html/index.htmlOpen and edit the file.
$ sudo nano /var/www/html/index.htmlAdd the following contents to the file.
  <html>
  <head>
  <title>Sample web application on a Debian Vultr VPC server</title>
  <style>

  h1{
  text-align:center;
  font-size: 8em;
  margin: 0;
  margin-top: 1em;
  margin-bottom: 0;
  font-style: bold;
  color: red;
  }

  </style>
  </head>

  <body>

  <div>
  <h1>Awesome!!!! The Vultr IPsec tunnel works!!!! </h1>
  </div>

  </body>
  </html>
Save and close the file.
Allow HTTP traffic on port
80through the firewall.$ sudo ufw allow 80/tcpRestart Nginx.
$ sudo systemctl restart nginx
Setup the On-Premises Server
This section describes configurations you should apply on the main On-Premises server. These should be like those set on the main Vultr VPC server to create an IPsec tunnel successfully.
Use SSH to access a terminal session of your On-Premises server, or open a terminal session (Ctrl + Alt + T) if the server runs a desktop environment.
Install strongSwan and its extra plugins.
$ sudo apt install strongswan libcharon-extra-plugins -yUsing a secure terminal file transfer utility such as
SCPorSFTP, connect to the Vultr VPC server and download theca.cert.pemfile to your server.$ sudo scp user@198.51.100.1:/etc/ipsec.d/cacerts/ca.cert.pem /etc/ipsec.d/cacerts/Back up the IPsec configuration file.
$ sudo mv /etc/ipsec.conf /etc/ipsec.ORIGCreate a new configuration file.
$ sudo touch /etc/ipsec.confOpen and edit the file.
$ sudo nano /etc/ipsec.confAdd the following configurations to the file. Replace
192.0.2.2with your static public server IP address, and192.168.1.1/24with your actual local On-Premises network.conn onpremises-to-vultr-vpc auto=start right=vpn.example.com rightid=vpn.example.com rightsubnet=203.0.113.2/24 rightauth=pubkey left=192.0.2.2 leftid=vultruser leftsubnet=192.168.1.1/24 leftauth=eap-mschapv2 eap_identity=%identitySave and close the file.
Back up the IPsec secrets file.
$ sudo mv /etc/ipsec.secrets /etc/ipsec-secrets.ORIGCreate a new file.
$ sudo touch /etc/ipsec.secretsOpen and edit the file.
$ sudo nano /etc/ipsec.secretsAdd the following configurations to the file.
vultruser : EAP "strong-password"Save and close the file.
Make sure the username and password records match (except for the certificate directive) with those in the Vultr VPC server
ipsec.secretsfile.Restart the IPsec daemon.
$ sudo ipsec restart
Configure the Firewall
Allow SSH port
22through the firewall.$ sudo ufw allow 22/tcpEnable UFW on the On-Premises Ubuntu server if it's inactive.
$ sudo ufw enableAllow IPsec UDP ports
500and4500.$ sudo ufw allow 500,4500/udpVerify the rules in your firewall table.
$ sudo ufw statusRestart the firewall to load changes.
$ sudo ufw reload
Setup Forwarding
Back up the original
systcl.conffile.$ sudo cp /etc/sysctl.conf /etc/sysctl.ORIG.BAKCreate and edit a new configuration file.
$ sudo nano /etc/sysctl.confAdd forwarding rules to the file using the following command.
  $ sudo echo " net.ipv4.ip_forward = 1
                net.ipv6.conf.all.forwarding = 1
                net.ipv4.conf.all.accept_redirects = 0
                net.ipv4.conf.all.send_redirects = 0 " > /etc/sysctl.conf
Save and close the file.
Verify changes and reload settings.
$ sudo sysctl -pView the server network interfaces, and keep note of the local interface.
$ ip addrUsing iptables, forward incoming requests to the local network interface.
$ sudo iptables -t nat -A POSTROUTING -o eth1 -j MASQUERADE
Configure Hosts on the On-Premises Network
Access the Windows client machine on the host network.
Open the Windows command prompt or PowerShell from the start menu.
Ping the main On-Premises server local interface address.
> ping 192.168.1.1Output:
  PING 192.168.1.1 (192.168.1.1) 56(84) bytes of data.
  64 bytes from 192.168.1.1: icmp_seq=1 ttl=63 time=21.0 ms
  64 bytes from 192.168.1.1: icmp_seq=2 ttl=63 time=17.7 ms
  64 bytes from 192.168.1.1: icmp_seq=3 ttl=63 time=17.7 ms
  64 bytes from 192.168.1.1: icmp_seq=4 ttl=63 time=19.4 ms

  --- 192.168.1.1 ping statistics ---
  4 packets transmitted, 4 received, 0% packet loss, time 3004ms
Add a static route to the Vultr VPC network with the main OnPremises server as the next hop.
> route ADD 203.0.113.0 MASK 255.255.255.0 192.168.1.1View the Windows routing table.
> route print
Test the IPsec Tunnel
This section describes steps to test a successful connection between the On-Premises network and the Vultr VPC. If you have followed all steps correctly, you should be able to ping the main Vultr VPC server network address and access the internet through the IPsec tunnel. Likewise, the Vultr server should reach your On-Premises server's private address.
Hosts on both the On-Premises network must be able to reach hosts in the Vultr VPC. For this article, the Windows client machine should be able to reach the Debian application server. Likewise, the Debian server should be able to reach the Windows client machine.
On-Premises Network to Vultr VPC
Access the main On-Premises server.
Restart the IPsec daemon.
$ sudo ipsec restartConnect to the IPsec tunnel profile as defined in your configuration file.
$ sudo ipsec up onpremises-to-vultr-vpcA successful connection output should look like the one below:
  ipsec up onpremises-to-vultr-vpc
  establishing CHILD_SA onpremises-to-vultr-vpc{9}
  generating CREATE_CHILD_SA request 8 [ SA No TSi TSr ]
  sending packet: from 192.0.2.2[4500] to 198.51.100.1[4500] (256 bytes)
  received packet: from 198.51.100.1[4500] to 192.0.2.2[4500] (208 bytes)
  parsed CREATE_CHILD_SA response 8 [ SA No TSi TSr ]
  selected proposal: ESP:AES_CBC_128/HMAC_SHA2_256_128/NO_EXT_SEQ
  CHILD_SA onpremises-to-vultr-vpc{9} established with SPIs c67cbf3e_i c42445d9_o and TS 203.0.113.3/24 === 192.168.1.0/24
  connection 'onpremises-to-vultr-vpc' established successfully
If the tunnel connection fails, details of the error display in your command output.
Verify the IPsec tunnel status.
$ sudo ipsec statusYour output should look like the one below:
  onpremises-to-vultr-vpc[1]: ESTABLISHED 5 seconds ago, 192.0.2.2[vultruser]...198.51.100.1[vpn.example.com]
  onpremises-to-vultr-vpc{1}:  INSTALLED, TUNNEL, reqid 1, ESP in UDP SPIs: c17666e4_i cfd39c84_o
  onpremises-to-vultr-vpc{1}:   192.168.0.0/24 === 203.0.113.0/24
Using the
pingutility, test the connection to the Vultr VPC interface.$ ping 203.0.113.2Output:
  PING 203.0.113.2 (203.0.113.2) 56(84) bytes of data.
  64 bytes from 203.0.113.2: icmp_seq=1 ttl=63 time=21.0 ms
  64 bytes from 203.0.113.2: icmp_seq=2 ttl=63 time=17.7 ms
  64 bytes from 203.0.113.2: icmp_seq=3 ttl=63 time=17.7 ms
  64 bytes from 203.0.113.2: icmp_seq=4 ttl=63 time=19.4 ms

  --- 203.0.113.2 ping statistics ---
  4 packets transmitted, 4 received, 0% packet loss, time 3004ms
Test the connection to your Vultr VPC web application server.
$ ping 203.0.113.3Output:
  PING 203.0.113.3 (203.0.113.3) 56(84) bytes of data.
  64 bytes from 203.0.113.3: icmp_seq=1 ttl=63 time=21.0 ms
  64 bytes from 203.0.113.3: icmp_seq=2 ttl=63 time=17.7 ms
  64 bytes from 203.0.113.3: icmp_seq=3 ttl=63 time=17.7 ms
  64 bytes from 203.0.113.3: icmp_seq=4 ttl=63 time=19.4 ms

  --- 203.0.113.3 ping statistics ---
  4 packets transmitted, 4 received, 0% packet loss, time 3004ms
Vultr VPC to On-Premises Network
Access the main Vultr VPC server.
Verify that the IPsec tunnel is up.
$ sudo ipsec statusOutput:
  vultr-onpremises-vpn[7]: ESTABLISHED 6 minutes ago, 198.51.100.1[vpn.example.com]...192.0.2.2[vultruser]
  vultr-onpremises-vpn{5}:  INSTALLED, TUNNEL, reqid 1, ESP in UDP SPIs: cfd39c84_i c17666e4_o
  vultr-onpremises-vpn{5}:   203.0.113.0/24 === 192.168.1.0/24
Ping the main On-Premises server private IP address.
$ ping 192.168.1.1Output:
  PING 192.168.1.1 (192.168.1.1) 56(84) bytes of data.
  64 bytes from 192.168.1.1: icmp_seq=1 ttl=63 time=21.0 ms
  64 bytes from 192.168.1.1: icmp_seq=2 ttl=63 time=17.7 ms
  64 bytes from 192.168.1.1: icmp_seq=3 ttl=63 time=17.7 ms
  64 bytes from 192.168.1.1: icmp_seq=4 ttl=63 time=19.4 ms

  --- 192.168.1.1 ping statistics ---
  4 packets transmitted, 4 received, 0% packet loss, time 3004ms
Ping the Windows client machine.
$ ping 192.169.1.2Output:
  PING 192.168.1.2 (192.168.1.2) 56(84) bytes of data.
  64 bytes from 192.168.1.2: icmp_seq=1 ttl=63 time=21.0 ms
  64 bytes from 192.168.1.2: icmp_seq=2 ttl=63 time=17.7 ms
  64 bytes from 192.168.1.2: icmp_seq=3 ttl=63 time=17.7 ms
  64 bytes from 192.168.1.2: icmp_seq=4 ttl=63 time=19.4 ms

  --- 192.168.1.2 ping statistics ---
  4 packets transmitted, 4 received, 0% packet loss, time 3004ms
Vultr VPC Host to On-Premises Network Host
Access the Vultr VPC application server.
Ping the main On-Premises server private IP address.
$ ping 192.168.1.1Ping the Windows client machine.
$ ping 192.168.1.2
On-Premises to Vultr VPC Host
Access the On-Premises Windows client machine.
Open the Windows command prompt.
Ping the Debian application server.
> ping 203.0.113.3Output:
  PING 203.0.113.3 (203.0.113.3) 56(84) bytes of data.
  64 bytes from 203.0.113.3: icmp_seq=1 ttl=63 time=21.0 ms
  64 bytes from 203.0.113.3: icmp_seq=2 ttl=63 time=17.7 ms
  64 bytes from 203.0.113.3: icmp_seq=3 ttl=63 time=17.7 ms
  64 bytes from 203.0.113.3: icmp_seq=4 ttl=63 time=19.4 ms

  --- 203.0.113.3 ping statistics ---
  4 packets transmitted, 4 received, 0% packet loss, time 3004ms
Using a web browser such as Chrome, visit the Vultr web application server VPC address.
http://203.0.113.3Your Web Application should display in the browser window.
Connect Road Warriors (Remote Users) to the IPsec Tunnel
Road Warriors are devices that are not directly connected to the On-Premises Network. For example, multiple remote users who work from home, another office, or a public place such as a coffee shop or restaurant.
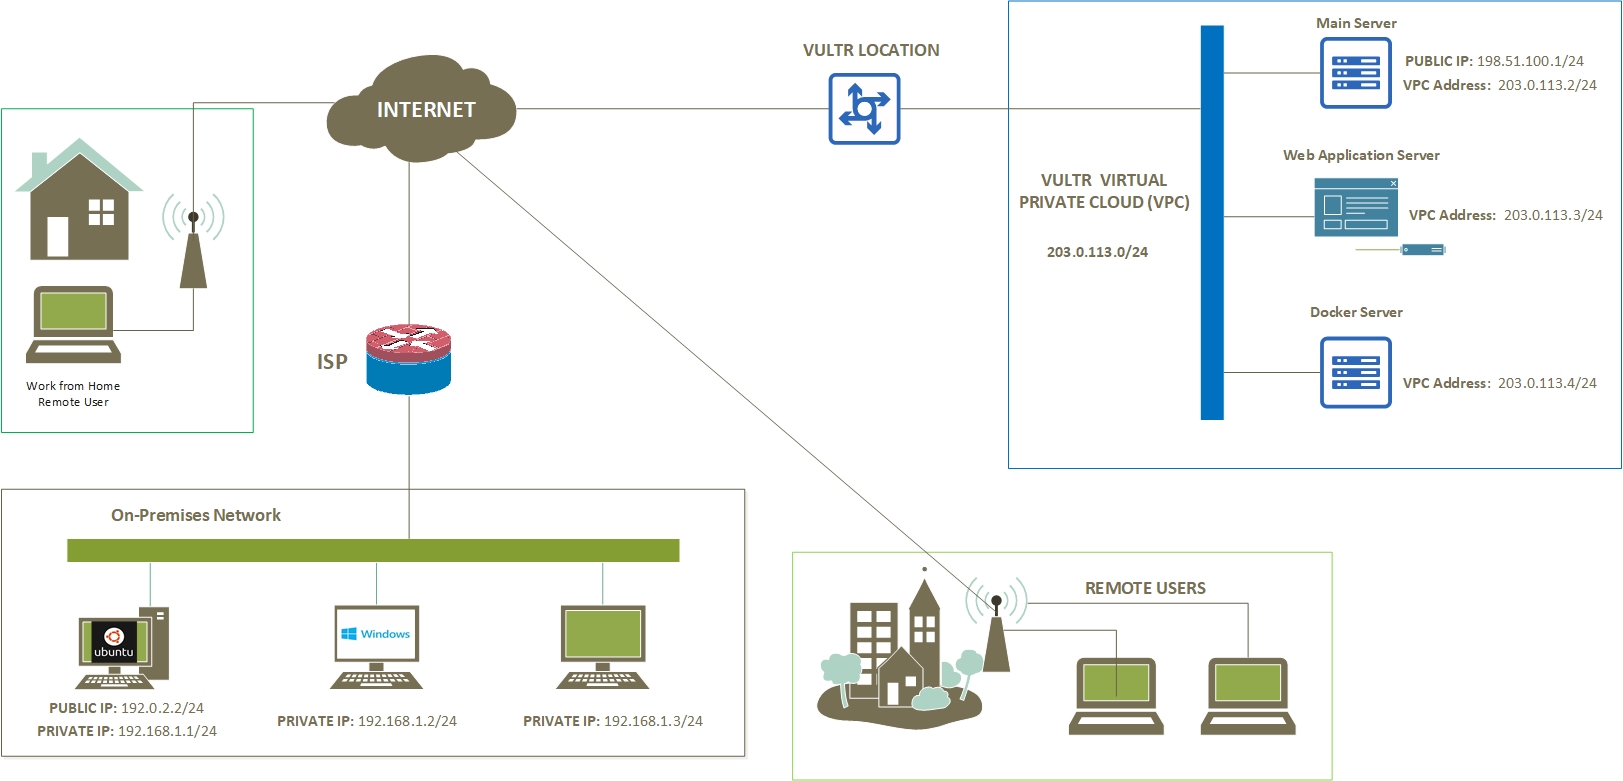
This section describes how you can allow Road Warriors to access the On-Premises to Vultr VPC network tunnel resources. These include a secure Internet connection through the VPC server and the ability to reach all hosts on both sides of the tunnel.
Access the main Vultr VPC server.
Back up the IPsec configuration file.
$ sudo cp /etc/ipsec.conf /etc/ipsec.conf.BAKOpen and edit the IPsec configuration file.
$ sudo nano /etc/ipsec.confAdd the following configurations at the end of the file.
  conn remote-to-vultr-to-onpremises
          auto=start
          compress=no
          type=tunnel
          keyexchange=ikev2
          fragmentation=yes
          forceencaps=yes
          dpdaction=clear
          dpddelay=300s
          rekey=no

          left=vpn.example.com
          leftid=@vpn.example.com
          leftcert=server.cert.pem
          leftsendcert=always
          leftsubnet=0.0.0.0/0

          right=%any
          rightid=%any
          rightauth=eap-mschapv2
          rightsourceip=192.5.2.0/24
          rightdns=1.1.1.1
          rightsendcert=never
          eap_identity=%identity
Save and close the file.
The above configuration creates a new IPsec tunnel profile with different settings from the main On-Premises to Vultr VPC tunnel.
Open and edit the
ipsec.secretsfile.$ sudo nano /etc/ipsec.secretsAdd the following directives at the end of the file to add new users.
  user1 : EAP "22"
  user2 : EAP "22"
  remoteuser3 : EAP "22"
Save and close the file.
Your edited file should look like the one below.
  vpn.example.com : RSA server.key.pem
  vultr-user : EAP "strong-password"
  user1 : EAP "22"
  user2 : EAP "22"
  remoteuser3 : EAP "22"
Restart IPsec.
$ sudo ipsec restartVerify the IPsec status and confirm that the main On-Premises to Vultr tunnel is active.
$ sudo ipsec statusIf disconnected, re-establish the tunnel using the following command.
$ sudo ipsec up vultr-onpremises-vpn
Connect Road Warriors
This section describes how Road Warriors can connect to the main Vultr VPC through a different IPsec tunnel that interconnects to the main On-Premises network tunnel. IPsec supports all types of devices, and on a smartphone, you should download the strongSwan application from the respective device store.
For a road warrior to successfully establish a tunnel connection, you must import the Vultr VPC server certificate to the device, then enter a valid username and password combination as set in the ipsec.secrets file. This article connects a macOS road warrior device to the Vultr VPC network through the following steps.
Open the Terminal application.
Using
SCP, download the Vultr VPC serverchain.pemcertificate.% scp root@138.68.87.87:/etc/ipsec.d/cacerts/ca.cert.pem warrior.pemEnter your server SSH password when prompted.
Open the mac Finder Application.
Navigate to the directory where you downloaded the server certificate.
Double-click the certificate to open the Keychain access application and add it to your trusted server certificates.
In the Keychain access window, click
Certificatesin the left bottom Category section.Enter your domain name in the search field to reveal your server certificate on the list.
Double-click the server certificate to open a separate pop-up window.
Expand Trust, and click the drop-down field next to IP Security (IPsec), then select Always Trust from the list of options.
Close the window and enter your mac user password to update settings.
Open System Preferences and navigate to Network.
Click the +
create a new servicesymbol in the bottom left corner.Click the Interface: drop-down and select VPN from the list.
Keep IKEV2 as the VPN type, and enter a custom Service Name: for your network.
Enter your domain name in the Server Address:, Remote ID: fields, then, enter your username in the Local ID: field.
Click Authentication Settings…, keep Username selected, then enter your username and associated password.
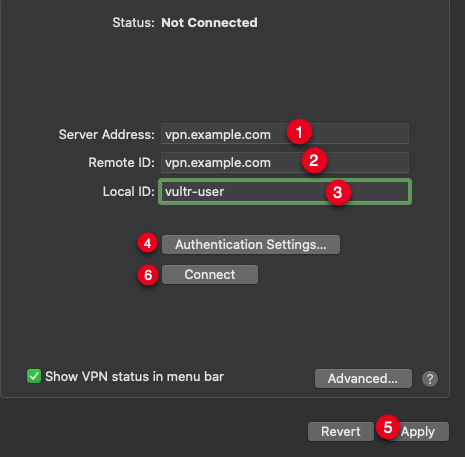
Click Apply, then click Connect to establish a connection to the Vultr VPC server.
When successful, open the Terminal app, then ping the main On-Premises server local address.
$ ping 192.168.1.1Ping the On-Premises Windows host.
$ ping 192.168.1.2Ping the Vultr VPC web application server.
$ ping 203.0.113.3All requests should be successful, and users should be able to access both On-Premises, and Vultr VPC networks.
On other devices, such as Windows, or Linux desktop, find the VPN network settings from your Network and Sharing menu.
Troubleshooting
Failed communication between hosts after server reboot
Define static routes on each direct local network host with the main server as the next hop.
$ sudo ip route add 192.168.1.0/24 via 203.0.113.2 dev eth1 src 203.0.113.3

$ sudo ip route add 203.0.113.0/24 via 192.168.1.1 dev eth1 src 192.168.1.2
Setup proper iptables forwarding to the correct local network interface on both main tunnel servers.
$ sudo iptables -t nat -A POSTROUTING -o eth1 -j MASQUERADE

$ sudo iptables -t nat -A POSTROUTING -o enp6s0 -j MASQUERADE
Install and configure the iptables persistent package to load forwarding rules even after a restart.
Oct  4 10:51:13 example charon: 13[IKE] IKE_SA vultr-onpremises-vpn[2] state change: CONNECTING => ESTABLISHED
Oct  4 10:51:13 example charon: 13[CFG] looking for a child config for 203.0.113.3/24 === 192.0.2.2/32
Oct  4 10:51:13 example charon: 13[CFG] proposing traffic selectors for us:
Oct  4 10:51:13 example charon: 13[CFG]  203.0.113.3/24
Oct  4 10:51:13 example charon: 13[CFG] proposing traffic selectors for other:
Oct  4 10:51:13 example charon: 13[CFG]  10.24.96.0/20
Oct  4 10:51:13 example charon: 13[IKE] traffic selectors 203.0.113.3/24 === 192.0.2.2/32 unacceptable`
Verify that you set the correct leftsubnet= and rightsubnet= network values in both main server configuration files.
$ sudo cat /etc/ipsec.conf

Oct  4 11:30:37 example charon: 11[NET] received packet: from 192.0.2.2[4500] to 198.51.100.1[4500] (208 bytes)
Oct  4 11:30:37 example charon: 11[ENC] parsed IKE_AUTH response 1 [ IDr SA TSi TSr N(AUTH_LFT) N(MOBIKE_SUP) N(ADD_4_ADDR) ]
Oct  4 11:30:37 example charon: 11[IKE] do not allow non-mutual EAP-only authentication
Oct  4 11:30:37 example charon: 11[ENC] generating INFORMATIONAL request 2 [ N(AUTH_FAILED) ]`
Verify that you set the correct rightid, and the ipsec.secrets file settings are correct on both servers.
$ sudo cat /etc/ipsec.secretsConclusion
You have configured and connected your On-Premises network to a Vultr Virtual Private Cloud (VPC). The IPsec tunnel remains connected until the daemon receives a user action, such as shutting down or restarting the tunnel.
IPsec also supports multiple gateway devices, such as routers and firewalls, if your On-Premises network uses a static address on the main gateway interface, please visit the router documentation to connect your network to the Vultr VPC. For more information, please visit the following articles.