Introduction
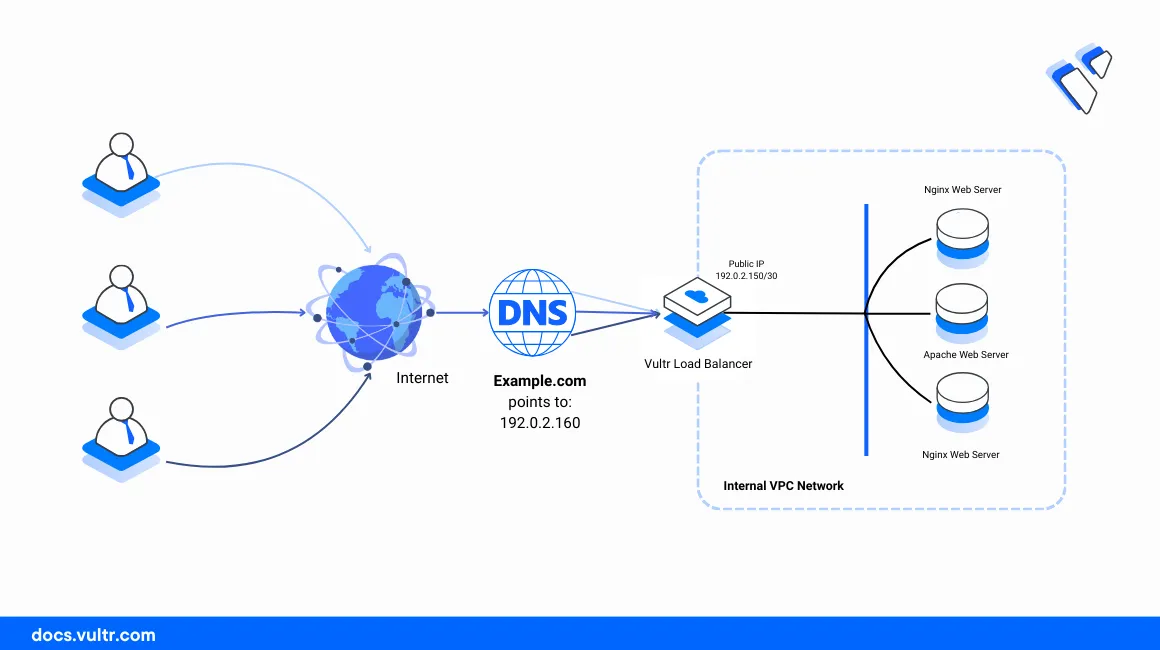
Vultr Load Balancer is a network service that distributes traffic across multiple servers connected to optimize the performance, reliability, and availability of hosted applications or services. A Vultr Load Balancer connects directly to all target host servers using a backend network interface. In a VPC 2.0 network, a Vultr load balancer securely exposes internal Vultr VPC2.0 network hosts by forwarding and distributing specific external network traffic to the internal VPC host services.
This article explains how to expose services using a Vultr Load Balancer in a VPC 2.0 network. You will set up multiple servers in a Vultr VPC 2.0 network, run similar services on each server, and securely expose all hosts using a Vultr Load Balancer.
Example VPC2.0 Network Topology
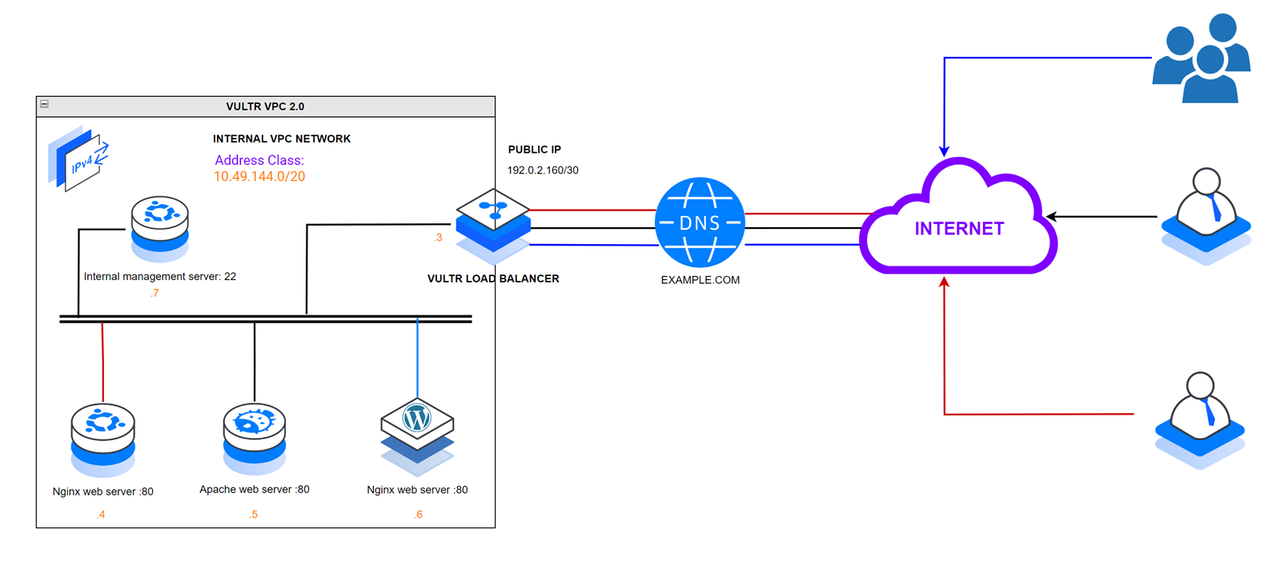
Within the VPC 2.0 network:
- Vultr Load Balancer: Works as the default gateway to all internal VPC 2.0 host services. All external requests to the public IP address
192.0.2.160or the associated domainexample.comtranslate to the respective VPC 2.0 services. - Host 1: Runs the main internal web server using Nginx and accepts incoming connections on the HTTP port
80. - Host 2: Works as a backup web server using Apache.
- Host 3: Works as a backup web server using Nginx.
- Host 4: Works as the internal VPC 2.0 host management workstation. A public network interface is available on the server with the IP address
192.0.2.100and connects to all internal hosts over SSH using the VPC 2.0 interface.
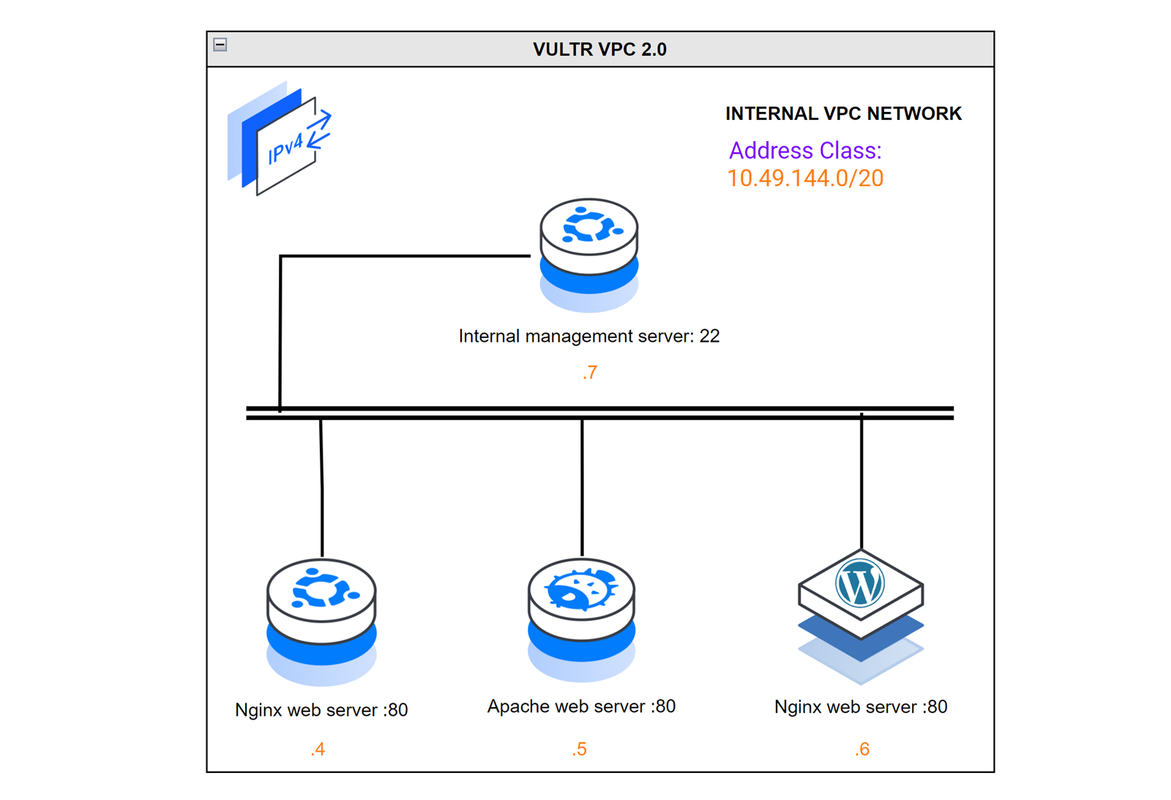
Internal VPC 2.0 host network addresses:
- Vultr Load Balancer:
10.49.144.3 - Host 1:
10.49.144.4 - Host 2:
10.49.144.5 - Host 3:
10.49.144.6 - Host 4:
10.49.144.7
Prerequisites
In a single Vultr location:
- Deploy a Vultr Load Balancer and attach it to a Vultr VPC 2.0 network.
- Create a new domain A record that points to the Vultr Load Balancer public IP address.
- Deploy a Ubuntu 20.04 server to use as the management workstation
host 4. - Deploy a Ubuntu instance to use as the
host 1Nginx web server. - Deploy a Rocky Linux instance to use as the
host 2Apache web server. - Deploy a Debian server to use as the
host 3Nginx web server.
Attach VPC 2.0 Hosts to the Vultr Load Balancer
Open the Vultr Customer Portal.
Navigate to Products and click Load Balancers on the main navigation menu.
Click your target load balancer to open the instance control panel.
Click Add Instance within the Linked Instances within the Overview Tab.

Select your target VPC host from the list within the Add Instance pop-up. For example,
Host 1and click Attach instance to add the instance to your load balancer.Repeat the process for all VPC 2.0 hosts
host 2andhost 3to attach them to the load balancer.Verify that all instances are attached to the load balancer and listed in the Linked Instances section.

Configure the VPC 2.0 Host Management Server
Configure the VPC 2.0 management server to set up access to all internal hosts that run similar services to expose with the Vultr Load Balancer. Based on the example network topology, the host 4 management server is not attached to the load balancer, has a public network interface, and accepts outgoing SSH connections to manage other internal hosts.
Access the Ubuntu internal VPC 2.0 management server using SSH.
console$ ssh root@192.0.2.100
Create a new standard user account with sudo privileges. For example,
vpcadmin.console# adduser vpcadmin && adduser vpcadmin sudo
Switch to the user.
console# su vpcadmin
View the server network interfaces and verify that the VPC 2.0 network interface is active with a private IP address.
console$ ip a
Output:
1: lo: <LOOPBACK,UP,LOWER_UP> mtu 65536 qdisc noqueue state UNKNOWN group default qlen 1000
    link/loopback 00:00:00:00:00:00 brd 00:00:00:00:00:00
    inet 127.0.0.1/8 scope host lo
       valid_lft forever preferred_lft forever
    inet6 ::1/128 scope host
       valid_lft forever preferred_lft forever
2: enp1s0: <BROADCAST,MULTICAST,UP,LOWER_UP> mtu 1500 qdisc fq_codel state UP group default qlen 1000
    link/ether 56:00:04:d5:77:b6 brd ff:ff:ff:ff:ff:ff
    inet 192.0.2.100/23 metric 100 brd 192.0.2.255 scope global dynamic enp1s0
       valid_lft 85764sec preferred_lft 85764sec
    inet6 2a05:f480:3000:2321:5400:4ff:fed5:77b6/64 scope global dynamic mngtmpaddr noprefixroute
       valid_lft 2591659sec preferred_lft 604459sec
    inet6 fe80::5400:4ff:fed5:77b6/64 scope link
       valid_lft forever preferred_lft forever
3: enp8s0: <BROADCAST,MULTICAST,UP,LOWER_UP> mtu 1450 qdisc mq state UP group default qlen 1000
    link/ether 5a:01:04:d5:77:b6 brd ff:ff:ff:ff:ff:ff
    inet 10.49.144.7/20 brd 10.49.159.255 scope global enp8s0
       valid_lft forever preferred_lft forever
    inet6 fe80::5801:4ff:fed5:77b6/64 scope link
       valid_lft forever preferred_lft forever
Test access to the Vultr Load Balancer internal IP using the Ping utility.
console$ ping 10.49.144.3
Output:
PING 10.49.144.3 (10.49.144.3) 56(84) bytes of data.
64 bytes from 10.49.144.3: icmp_seq=1 ttl=62 time=211 ms
64 bytes from 10.49.144.3: icmp_seq=2 ttl=62 time=0.868 ms
64 bytes from 10.49.144.3: icmp_seq=3 ttl=62 time=0.806 ms

--- 10.49.144.3 ping statistics ---
3 packets transmitted, 3 received, 0% packet loss, time 2002ms
rtt min/avg/max/mdev = 0.806/71.053/211.487/99.301 ms
Allow SSH access on the server using the default UFW firewall.
console$ sudo ufw allow ssh
Block all incoming network connections on the server.
console$ sudo ufw default deny incoming
Output:
Default incoming policy changed to 'deny'
(be sure to update your rules accordingly)
Reload the UFW table rules to apply the firewall changes.
console$ sudo ufw reload
The VPC 2.0 management server acts as the main gateway to the internal network hosts over SSH while the Vultr Load Balancer acts as the external gateway depending on the exposed ports. Follow the additional sections below to use the management server to establish SSH connections, install services, and apply configuration changes on each of the target internal hosts.
Set Up the Internal VPC 2.0 Host Services
Host 1 (Main Web Server)
Access the Ubuntu server using SSH.
console$ ssh root@10.49.144.4
Create a non-root user with sudo privileges.
console# sudo adduser sysadmin && adduser sysadmin sudo
Switch to the new user.
console# su - sysadmin
View the server network interfaces and note the public network interface name.
console$ ip a
Output:
1: lo: <LOOPBACK,UP,LOWER_UP> mtu 65536 qdisc noqueue state UNKNOWN group default qlen 1000
    link/loopback 00:00:00:00:00:00 brd 00:00:00:00:00:00
    inet 127.0.0.1/8 scope host lo
       valid_lft forever preferred_lft forever
    inet6 ::1/128 scope host
       valid_lft forever preferred_lft forever
2: enp1s0: <BROADCAST,MULTICAST,UP,LOWER_UP> mtu 1500 qdisc fq_codel state UP group default qlen 1000
    link/ether 56:00:04:d5:77:b6 brd ff:ff:ff:ff:ff:ff
    inet 192.0.2.101/23 metric 100 brd 192.0.2.255 scope global dynamic enp1s0
       valid_lft 85764sec preferred_lft 85764sec
    inet6 2a05:f480:3000:2321:5400:4ff:fed5:77b6/64 scope global dynamic mngtmpaddr noprefixroute
       valid_lft 2591659sec preferred_lft 604459sec
    inet6 fe80::5400:4ff:fed5:77b6/64 scope link
       valid_lft forever preferred_lft forever
3: enp8s0: <BROADCAST,MULTICAST,UP,LOWER_UP> mtu 1450 qdisc mq state UP group default qlen 1000
    link/ether 5a:01:04:d5:77:b6 brd ff:ff:ff:ff:ff:ff
    inet 10.49.144.4/20 brd 10.49.159.255 scope global enp8s0
       valid_lft forever preferred_lft forever
    inet6 fe80::5801:4ff:fed5:77b6/64 scope link
       valid_lft forever preferred_lft forever
Test access to the Vultr Load Balancer VPC address using the Ping utility.
console$ ping 10.49.144.3
Output:
PING 10.49.144.3 (10.49.144.3) 56(84) bytes of data.
64 bytes from 10.49.144.3: icmp_seq=1 ttl=62 time=211 ms
64 bytes from 10.49.144.3: icmp_seq=2 ttl=62 time=0.868 ms
64 bytes from 10.49.144.3: icmp_seq=3 ttl=62 time=0.806 ms

--- 10.49.144.3 ping statistics ---
3 packets transmitted, 3 received, 0% packet loss, time 2002ms
rtt min/avg/max/mdev = 0.806/71.053/211.487/99.301 ms
Update the server packages.
console$ sudo apt update
Install the Nginx web server application.
console$ sudo apt install nginx -y
Verify the Nginx system service status.
console$ sudo systemctl status nginx
Output:
● nginx.service - A high performance web server and a reverse proxy server
     Loaded: loaded (/lib/systemd/system/nginx.service; enabled; vendor preset: enabled)
     Active: active (running) since Fri 2024-03-29 02:36:09 UTC; 15min ago
       Docs: man:nginx(8)
    Process: 1901 ExecStartPre=/usr/sbin/nginx -t -q -g daemon on; master_process on; (code=exited, status=0/SUCCESS)
    Process: 1902 ExecStart=/usr/sbin/nginx -g daemon on; master_process on; (code=exited, status=0/SUCCESS)
   Main PID: 1991 (nginx)
      Tasks: 2 (limit: 1005)
     Memory: 7.6M
        CPU: 33ms
     CGroup: /system.slice/nginx.service
             ├─1991 "nginx: master process /usr/sbin/nginx -g daemon on; master_process on;"
             └─1994 "nginx: worker process" "" "" "" "" "" "" "" "" "" "" "" "" "" "" "" "" "" "" "" "" "" "" "" "" "" "" ""

Mar 29 02:36:09 Host-1 systemd[1]: Starting A high performance web server and a reverse proxy server...
Mar 29 02:36:09 Host-1 systemd[1]: Started A high performance web server and a reverse proxy server.
Allow incoming connections from the VPC 2.0 network address class to the server HTTP port
80through the firewall.console$ sudo ufw allow from 10.49.144.0/20 to any port 80
Restart the firewall to apply changes.
console$ sudo ufw reload
View the firewall table to verify the new VPC network rule.
console$ sudo ufw status
Output:
Status: active

To                         Action      From
--                         ------      ----
22/tcp                     ALLOW       Anywhere
80                         ALLOW       10.49.144.0/20
22/tcp (v6)                ALLOW       Anywhere (v6)
Navigate to the Nginx web root directory
/var/www/html.console$ cd /var/www/html
Edit the default Nginx HTML file using a text editor such as Nano.
console$ nano index.nginx-debian.html
Change the default HTML
<h1>tag value to a custom message such asServed from Host 1.html<h1>Served by Host 1!</h1>
Save and close the file.
Restart Nginx to apply the file changes.
console$ sudo systemctl restart nginx
Disable the public network interface.
$ sudo ip link set enp1s0 down
Host 2 (Backup Web Server)
Access the Rocky Linux server using SSH.
console$ ssh root@10.49.144.5
Create a new non-root user.
console# adduser dbadmin
Assign the user a strong password.
console# passwd dbadmin
Add the user to the privileged
wheelgroup.console# usermod -aG wheel dbadmin
Switch to the user.
console# su - dbadmin
View the server network interfaces and verify the VPC 2.0 interface name.
console$ ip a
Output:
1: lo: <LOOPBACK,UP,LOWER_UP> mtu 65536 qdisc noqueue state UNKNOWN group default qlen 1000
    link/loopback 00:00:00:00:00:00 brd 00:00:00:00:00:00
    inet 127.0.0.1/8 scope host lo
       valid_lft forever preferred_lft forever
    inet6 ::1/128 scope host
       valid_lft forever preferred_lft forever
2: enp1s0: <BROADCAST,MULTICAST,UP,LOWER_UP> mtu 1500 qdisc fq_codel state UP group default qlen 1000
    link/ether 56:00:04:d5:77:bc brd ff:ff:ff:ff:ff:ff
    inet 192.0.2.102/23 brd 192.0.2.255 scope global dynamic noprefixroute enp1s0
       valid_lft 85324sec preferred_lft 85324sec
    inet6 2a05:f480:3000:29a0:5400:4ff:fed5:77bc/64 scope global dynamic noprefixroute
       valid_lft 2591636sec preferred_lft 604436sec
    inet6 fe80::5400:4ff:fed5:77bc/64 scope link noprefixroute
       valid_lft forever preferred_lft forever
3: enp8s0: <BROADCAST,MULTICAST,UP,LOWER_UP> mtu 1450 qdisc mq state UP group default qlen 1000
    link/ether 5a:01:04:d5:77:bc brd ff:ff:ff:ff:ff:ff
    inet 10.49.144.5/20 brd 10.49.159.255 scope global noprefixroute enp8s0
       valid_lft forever preferred_lft forever
    inet6 fe80::5801:4ff:fed5:77bc/64 scope link
       valid_lft forever preferred_lft forever
Test access to the Vultr Load Balancer VPC 2.0 network address.
console$ ping -c 3 10.49.144.3
Output:
PING 10.49.144.3 (10.49.144.3) 56(84) bytes of data.
64 bytes from 10.49.144.3: icmp_seq=1 ttl=62 time=0.686 ms
64 bytes from 10.49.144.3: icmp_seq=2 ttl=62 time=0.731 ms
64 bytes from 10.49.144.3: icmp_seq=3 ttl=62 time=0.756 ms

--- 10.49.144.3 ping statistics ---
3 packets transmitted, 3 received, 0% packet loss, time 2054ms
rtt min/avg/max/mdev = 0.686/0.724/0.756/0.028 ms
Update the server packages.
console$ sudo dnf update
Install the Apache web server application.
console$ sudo dnf install httpd
Start the Apache web server.
console$ sudo systemctl start httpd
Configure the default Firewalld application to allow connections to the HTTP port
80from the internal VPC 2.0 network.console$ sudo firewall-cmd --permanent --zone=public --add-rich-rule=' rule family="ipv4" source address="10.49.144.0/20" port protocol="tcp" port="80" accept'
Reload Firewalld to apply the new firewall rule.
console$ sudo firewall-cmd --reload
Disable the public network interface.
$ sudo ip link set enp1s0 down
Host 3 (Backup Web Server)
Access the Debian server using SSH.
console$ ssh root@10.44.144.6
Create a new non-root user with sudo privileges.
console# sudo adduser webadmin && adduser webadmin sudo
Switch to the new user account.
console# su - webadmin
View the server network interfaces and verify the associated VPC 2.0 network interface.
console$ ip a
Output:
1: lo: <LOOPBACK,UP,LOWER_UP> mtu 65536 qdisc noqueue state UNKNOWN group default qlen 1000
    link/loopback 00:00:00:00:00:00 brd 00:00:00:00:00:00
    inet 127.0.0.1/8 scope host lo
       valid_lft forever preferred_lft forever
    inet6 ::1/128 scope host
       valid_lft forever preferred_lft forever
2: enp1s0: <BROADCAST,MULTICAST,UP,LOWER_UP> mtu 1500 qdisc fq_codel state UP group default qlen 1000
         ..........................................
       valid_lft forever preferred_lft forever
3: enp8s0: <BROADCAST,MULTICAST,UP,LOWER_UP> mtu 1450 qdisc mq state UP group default qlen 1000
    link/ether 5a:01:04:d5:77:b6 brd ff:ff:ff:ff:ff:ff
    inet 10.49.144.6/20 brd 10.49.159.255 scope global enp8s0
       valid_lft forever preferred_lft forever
    inet6 fe80::5801:4ff:fed5:77b6/64 scope link
       valid_lft forever preferred_lft forever
Test access to the Vultr Load Balancer VPC address using the Ping utility.
console$ ping 10.49.144.3
Output:
 PING 10.49.144.3 (10.49.144.3) 56(84) bytes of data.
 64 bytes from 10.49.144.3: icmp_seq=1 ttl=62 time=211 ms
 64 bytes from 10.49.144.3: icmp_seq=2 ttl=62 time=0.868 ms
 64 bytes from 10.49.144.3: icmp_seq=3 ttl=62 time=0.806 ms

 --- 10.49.144.3 ping statistics ---
 3 packets transmitted, 3 received, 0% packet loss, time 2002ms
 rtt min/avg/max/mdev = 0.806/71.053/211.487/99.301 ms
Update the server.
console$ sudo apt update
Install Nginx.
console$ sudo apt install nginx -y
Verify the Nginx system service status.
console$ sudo systemctl status nginx
Allow connections to the HTTP port
80from the internet VPC 2.0 network through the firewall.console$ sudo ufw allow from 10.49.144.0/20 to any port 80
Restart the firewall to apply changes.
console$ sudo ufw reload
Navigate to the Nginx web root directory
/var/www/html.console$ cd /var/www/html
Edit the default Nginx file.
console$ nano index.nginx-debian.html
Change the default HTML
<h1>tag value toServed from Host 3.html<h1>Served by Host 3!</h1>
Save and close the file.
Restart Nginx to synchronize the file changes.
console$ sudo systemctl restart nginx
Disable the public network interface.
$ sudo ip link set enp1s0 down
Set Up the Vultr Load Balancer Forwarding Rules to Expose VPC 2.0 Host Services
Access your Vultr Load Balancer instance control panel.
Navigate to the Configuration tab.
Click Forwarding Rules to access the port translation options.
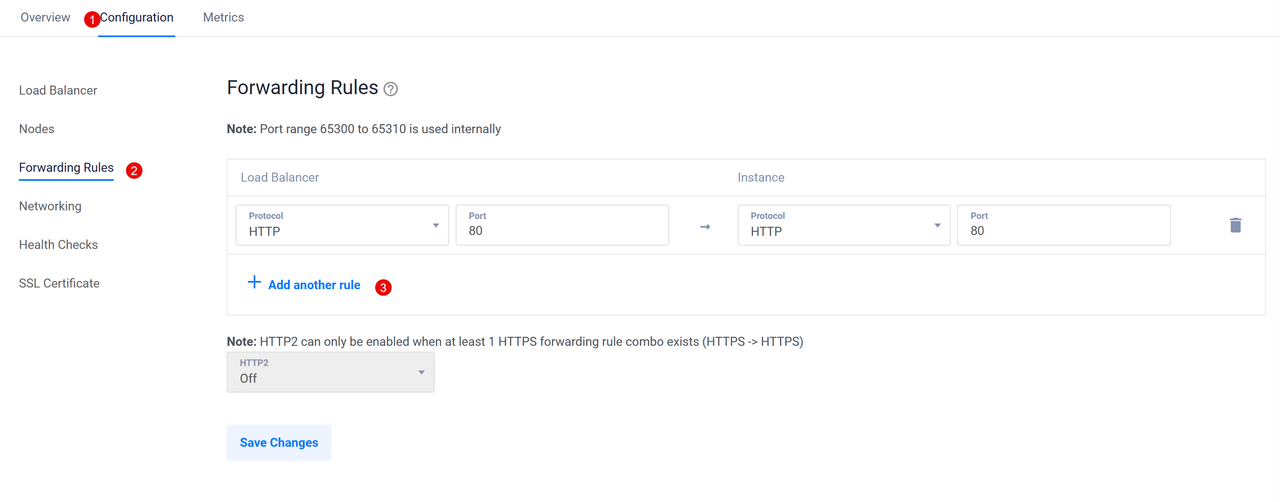
Verify that the default HTTP port
80rule is available, and click Add another rule to set up any additional port forwarding rules.Click Save Changes to apply the Vultr Load Balancer forwarding changes.
Test Access to the VPC 2.0 Host Services
A Vultr Load Balancer accepts all external network requests and distributes traffic to the respective internal VPC network ports depending on the load-balancing strategy and forwarding rules. Follow the sections below to verify that the load balancer distributes traffic to all internal VPC 2.0 web servers.
Visit your domain
example.comusing a web browser such as Chrome.http://example.comVerify that the host 1 web page displays in your browser.

Open a new browser window and visit your domain
example.comagain.http://example.comVerify that the host 2 Apache default web page displays in your browser session.

Open another browser window and visit the domain again.
http://example.comVerify that the host 3 web page displays in your browser.
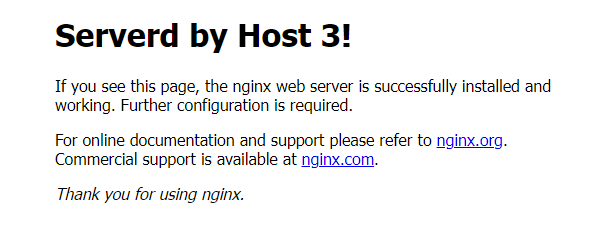
Based on the above web server results, the load balancer distributes traffic between the main web server and the backup servers using the default
round-robinalgorithm. As a result, all web servers effectively act as one which improves the general web application availability. If one of the servers goes down, the load balancer distributes traffic to other servers within the VPC 2.0 network.
Best Practices
The Vultr Load Balancer accepts multiple connections to internal VPC 2.0 network hosts and distributes traffic based on the defined load balancing algorithm. For the best results, follow the best practices below to secure and correctly distribute traffic to all internal host servers.
Add your domain SSL certificate to the Vultr Load Balancer to enable secure HTTPS connections to your web application. Enable the Force HTTP to HTTPS option within the load balancer configuration to activate automatic HTTP to HTTPS redirections.
Set up Vultr Load Balancer firewall rules and limit access to special ports such as the SSH port to your IP address or a specific IP range.
Configure the Vultr Load Balancer health checks to automatically perform instance checks based on your defined intervals.

Conclusion
You have exposed VPC 2.0 host services using a Vultr Load Balancer and forwarded all external network requests to the internal network. Depending on your host services, the load balancer securely exposes all services depending on your forwarding rules. For the best results and improved server security, disable the public interfaces on each server and only enable the interface while updating or installing packages.