
How to use the Linux IP Command to Manage Server Network Interfaces
The ip command is a built-in network management utility that offers a wide range of features and tools to manage Linux network interfaces. It's an improved utility that combines the functionalities of legacy commands such as ifconfig, arp, and route to offer improved management, monitoring, and troubleshooting of your server network interfaces.
This article explains how to use the ip command to manage server network interfaces and ip objects such as links, addresses, rules, and neighbors. You will perform basic ip command functions such as interface configuration, routing, link, and network address management to efficiently manage your server interfaces.
Prerequisites
Before you begin, you need to:
- Deploy an Ubuntu 24.04 server instance to test the
ipcommand functionalities. - Attach the server to a VPC network.
- Access the server using SSH as a non-root user with sudo privileges.
How to use the IP Command
The ip command uses the following syntax to manage network information and interfaces on your server.
$ ip [OPTIONS] OBJECT COMMAND [ARGUMENTS]
Within the above command:
- OPTIONS: Sets the
ipcommand operation mode. - OBJECT: Specifies the type of network object to view or manage. For example,
link,address,route. - COMMAND: Defines the action to perform on the specified object. For example,
add,del,show. - ARGUMENTS: Sets additional options to execute with the command.
View Network Interface Information
The ip command displays network interface information at varying levels of detail depending on the object and options used.
Use the
ip link showcommand to view information about all network interfaces available on the server.console$ ip link show
Your output should be similar to the one below.
1: lo: <LOOPBACK,UP,LOWER_UP> mtu 65536 qdisc noqueue state UNKNOWN mode DEFAULT group default qlen 1000
    link/loopback 00:00:00:00:00:00 brd 00:00:00:00:00:00
2: enp1s0: <BROADCAST,MULTICAST,UP,LOWER_UP> mtu 1500 qdisc mq state UP mode DEFAULT group default qlen 1000
    link/ether 56:00:04:ef:40:23 brd ff:ff:ff:ff:ff:ff
3: enp8s0: <BROADCAST,MULTICAST,UP,LOWER_UP> mtu 1450 qdisc mq state UP mode DEFAULT group default qlen 1000
    link/ether 5a:00:04:ef:40:23 brd ff:ff:ff:ff:ff:ff
Based on the above output, the command displays the total number of available interfaces, the MTU value, state, and MAC address for each interface. Active interfaces use the
UPstate while inactive interfaces use theDOWNstate. Interfaces with aDOWNstate cannot send or receive network traffic on the server unless enabled.Display network interfaces in an active and running state.
console$ ip link show up
Output:
1: lo: <LOOPBACK,UP,LOWER_UP> mtu 65536 qdisc noqueue state UNKNOWN mode DEFAULT group default qlen 1000
    link/loopback 00:00:00:00:00:00 brd 00:00:00:00:00:00
2: enp1s0: <BROADCAST,MULTICAST,UP,LOWER_UP> mtu 1500 qdisc mq state UP mode DEFAULT group default qlen 1000
    link/ether 56:00:04:ef:40:23 brd ff:ff:ff:ff:ff:ff
3: enp8s0: <BROADCAST,MULTICAST,UP,LOWER_UP> mtu 1450 qdisc mq state UP mode DEFAULT group default qlen 1000
    link/ether 5a:00:04:ef:40:23 brd ff:ff:ff:ff:ff:ff
Use the
-broption to display only important information about the network interfaces.console$ ip -br link show
Output:
lo               UNKNOWN        00:00:00:00:00:00 <LOOPBACK,UP,LOWER_UP>
enp1s0           UP             56:00:04:ef:40:23 <BROADCAST,MULTICAST,UP,LOWER_UP>
enp8s0           UP             5a:00:04:ef:40:23 <BROADCAST,MULTICAST,UP,LOWER_UP>
Use the
addroption, or itsashorthand, with theipcommand to view the full information including IP addresses on all network interfaces.console$ ip a
Your output should look like the one below.
1: lo: <LOOPBACK,UP,LOWER_UP> mtu 65536 qdisc noqueue state UNKNOWN group default qlen 1000
    link/loopback 00:00:00:00:00:00 brd 00:00:00:00:00:00
    inet 127.0.0.1/8 scope host lo
       valid_lft forever preferred_lft forever
    inet6 ::1/128 scope host
       valid_lft forever preferred_lft forever
2: enp1s0: <BROADCAST,MULTICAST,UP,LOWER_UP> mtu 1500 qdisc mq state UP group default qlen 1000
    link/ether 56:00:04:ef:40:23 brd ff:ff:ff:ff:ff:ff
    inet 192.0.2.100/23 brd 192.0.2.255 scope global dynamic enp1s0
       valid_lft 78163sec preferred_lft 78163sec
    inet6 2a05:f480:2c00:1ef7:5400:4ff:feef:4023/64 scope global dynamic mngtmpaddr noprefixroute
       valid_lft 2591891sec preferred_lft 604691sec
    inet6 fe80::5400:4ff:feef:4023/64 scope link
       valid_lft forever preferred_lft forever
3: enp8s0: <BROADCAST,MULTICAST,UP,LOWER_UP> mtu 1450 qdisc mq state UP group default qlen 1000
    link/ether 5a:00:04:ef:40:23 brd ff:ff:ff:ff:ff:ff
    inet 10.50.112.3/20 brd 10.50.127.255 scope global enp8s0
       valid_lft forever preferred_lft forever
    inet6 fe80::5800:4ff:feef:4023/64 scope link
       valid_lft forever preferred_lft forever
To view specific information about a specific network interface, include the interface name after the
ipcommand. For example, view information about the VPC interface,enp8s0.console$ ip addr show enp8s0
Output:
3: enp8s0: <BROADCAST,MULTICAST,UP,LOWER_UP> mtu 1450 qdisc mq state UP group default qlen 1000
    link/ether 5a:00:04:ef:40:23 brd ff:ff:ff:ff:ff:ff
    inet 10.50.112.3/20 brd 10.50.127.255 scope global enp8s0
       valid_lft forever preferred_lft forever
    inet6 fe80::5800:4ff:feef:4023/64 scope link
       valid_lft forever preferred_lft forever
Run the following command to view detailed statistics about a specific network interface. For example,
enp8s0.console$ ip -s link show enp8s0
Your output should be similar to the one below.
3: enp8s0: <BROADCAST,MULTICAST,UP,LOWER_UP> mtu 1450 qdisc pfifo_fast state UP mode DEFAULT group default qlen 1000
    link/ether 5a:00:04:ef:40:23 brd ff:ff:ff:ff:ff:ff
    RX:  bytes packets errors dropped  missed   mcast
      25426631   61808      0       0       0       0
    TX:  bytes packets errors dropped carrier collsns
       4351567   40677      0       0       0       0
Manage Interface IP Addresses using the IP Command
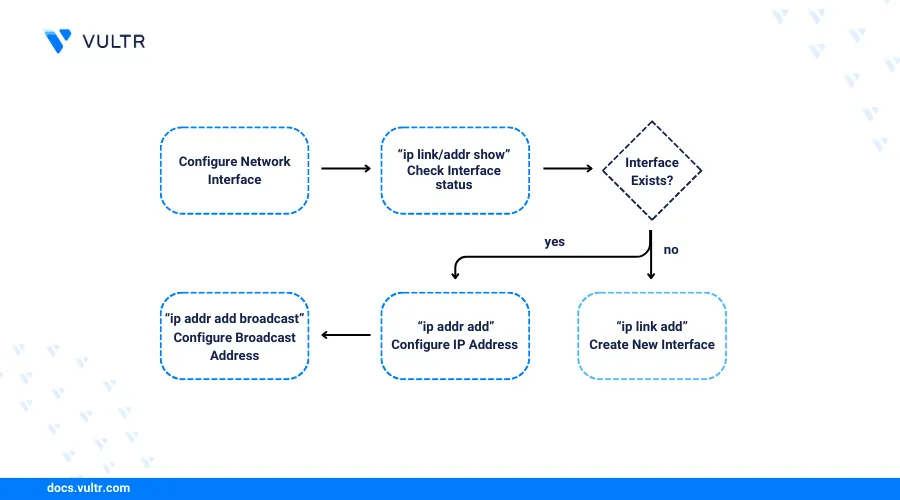
IP addresses can be assigned to network interfaces using the Dynamic Host Configuration Protocol (DHCP) or static addressing to enable network connections on the interface. DHCP is the default address assignment protocol on most servers, but static IP addressing may be required when working with multiple addresses or new interfaces on your server. Follow the steps below to add or remove IP addresses on your server network interfaces.
Run the following command to add a new IP address on your network interface. Replace
enp8s0with your desired interface name.console$ sudo ip addr add 192.168.1.10/24 dev enp8s0
The above command adds a new private network address
192.168.1.10to theenp8s0interface. Depending on your addressing scheme, the interface can run with multiple IP addresses that offer different functions or services on your server.View the interface information to verify that the new IP address is available.
console$ ip addr show enp8s0
Output:
3: enp8s0: <BROADCAST,MULTICAST,UP,LOWER_UP> mtu 1450 qdisc mq state UP group default qlen 1000
    link/ether 5a:00:04:ef:40:23 brd ff:ff:ff:ff:ff:ff
    inet 10.50.112.3/20 brd 10.50.127.255 scope global enp8s0
       valid_lft forever preferred_lft forever
    inet 192.168.1.10/24 scope global enp8s0
       valid_lft forever preferred_lft forever
    inet6 fe80::5800:4ff:feef:4023/64 scope link
       valid_lft forever preferred_lft forever
When using multiple IP addresses, you may need to configure routing to enable specific network connections to use the interface IP address.
Use the
deloption to remove IP addresses on network interfaces. For example, remove the192.168.1.10/24address on theenp8s0interface.console$ sudo ip addr del 192.168.1.10/24 dev enp8s0
View the interface address information to verify that the address is removed.
console$ ip addr show enp8s0
Output:
3: enp8s0: <BROADCAST,MULTICAST,UP,LOWER_UP> mtu 1450 qdisc mq state UP group default qlen 1000
    link/ether 5a:00:04:ef:40:23 brd ff:ff:ff:ff:ff:ff
    inet 10.50.112.3/20 brd 10.50.127.255 scope global enp8s0
       valid_lft forever preferred_lft forever
    inet6 fe80::5800:4ff:feef:4023/64 scope link
       valid_lft forever preferred_lft forever
Configure Static Routing using the IP Command
Static routing directs traffic to remote networks through a specific network interface or IP address as the next hop to reach the network. Network requests to unmatched destinations are directed through the default route via the main server interface, while requests to unknown routes may fail due to missing route information. Follow the steps below to configure static routes using the ip command on your server.
View the default IP routing table.
console$ ip route show
Your output should be similar to the one below.
default via 192.0.2.100 dev enp1s0 proto dhcp src 192.0.2.100 metric 100
10.50.112.0/20 dev enp8s0 proto kernel scope link src 10.50.112.3
192.0.2.0/23 dev enp1s0 proto kernel scope link src 192.0.2.100
169.254.169.254 via 192.0.2.100 dev enp1s0 proto dhcp src 192.0.2.100 metric 100
Based on the above output, direct network addresses use the
devoption while non-linked addresses use theviaoption to direct network traffic using the specified address as the next hop. Thedefaultroute handles all unknown routes on the server unless specified in the routing table.Add a new static route to a remote network such as
10.0.0.0/16accessible through a server on the VPC network at10.50.112.4as the next hop.console$ sudo ip route add 10.0.0.0/16 via 10.50.112.4
View the routing table again to verify that the new route is available.
console$ ip route show
Output:
default via 192.0.2.100 dev enp1s0 proto dhcp src 192.0.2.100 metric 100
10.0.0.0/16 via 10.50.112.4 dev enp8s0
10.50.112.0/20 dev enp8s0 proto kernel scope link src 10.50.112.3
192.0.2.0/23 dev enp1s0 proto kernel scope link src 192.0.2.100
169.254.169.254 via 192.0.2.100 dev enp1s0 proto dhcp src 192.0.2.100 metric 100
Enable or Disable Network Interfaces
Disabling a network interface stops it from sending or receiving traffic without removing its configuration, which is useful for maintenance or troubleshooting.
Use the
ip link setcommand to modify the status of a network interface with a specific option. For example, run the following command to disable theenp8s0interface.console$ sudo ip link set dev enp8s0 down
View the network interface status and verify that the state is
DOWN.console$ ip link show enp8s0
Output:
3: enp8s0: <BROADCAST,MULTICAST> mtu 1450 qdisc mq state DOWN mode DEFAULT group default qlen 1000
    link/ether 5a:00:04:ef:40:23 brd ff:ff:ff:ff:ff:ff
Enable the network interface.
console$ sudo ip link set dev enp8s0 up
View the interface information to verify the new status.
console$ ip link show enp8s0
Output:
3: enp8s0: <BROADCAST,MULTICAST,UP,LOWER_UP> mtu 1450 qdisc mq state UP mode DEFAULT group default qlen 1000
    link/ether 5a:00:04:ef:40:23 brd ff:ff:ff:ff:ff:ff
Managing the Network Interface MTU (Maximum Transmission Unit)
MTU is the maximum size of a packet in bytes that can be transmitted over a network interface without fragmentation. The default MTU value on most network interfaces is 1500. Depending on your needs, modify the value to allow the transfer of large or small data packets on private networks such as a VPC network, as described in the following steps.
View your target interface MTU value. For example, the VPC interface
enp8s0.console$ ip link show enp8s0
Verify the MTU value in your output similar to the one below.
3: enp8s0: <BROADCAST,MULTICAST,UP,LOWER_UP> mtu 1450 qdisc pfifo_fast state UP mode DEFAULT group default qlen 1000
    link/ether 5a:00:04:ef:40:23 brd ff:ff:ff:ff:ff:ff
Set a new MTU value on the interface. For example,
3000to transfer large data packets and improve efficiency with other servers in the VPC network.console$ sudo ip link set dev enp8s0 mtu 3000
View the interface information again and verify the new MTU value.
console$ ip link show enp8s0
Output:
3: enp8s0: <BROADCAST,MULTICAST,UP,LOWER_UP> mtu 3000 qdisc mq state UP mode DEFAULT group default qlen 1000
    link/ether 5a:00:04:ef:40:23 brd ff:ff:ff:ff:ff:ff
Conclusion
You have explored the ip command on your Linux server and performed basic network interface management tasks. The ip command is important when troubleshooting, setting up IP addresses, and optimizing your server network connections. For more information and configuration options, run man ip to view the ip command manual.