
Return a Vultr Server to the Default DHCP Configuration
Introduction
When you deploy a Vultr virtual cloud server, it receives an IP address assignment automatically with DHCP. Usually, you do not need to change the network settings. However, if you are configuring BGP or private networks, you may need to set a static IP address for your server.
When you restore a server backup that used a static IP, it must be reset to DHCP to receive a working IP address. If you need to reset the network after restoring a snapshot, follow this guide which explains how to return a Vultr server to the default DHCP configuration.
Getting Started
Before proceeding, follow these steps to locate your server's network adapter name.
- Log in through the Vultr Web Console as root.
- Follow these steps to find your network adapter name.
- Make a note of your adapter name and follow the instructions for your OS.
CentOS 7
List your network configuration files. If your adapter name is eth0, you'll see:
# ls /etc/sysconfig/network-scripts/ifcfg-*

ifcfg-eth0   ifcfg-lo
You may see other adapter names if you previously deployed this server on a different Vultr host. If you have configuration files that do not match your current adapter names, it's a good practice to move them to a backup location.
Edit or create a new configuration file named ifcfg-{your adapter name}.
# nano /etc/sysconfig/network-scripts/ifcfg-eth0Replace any existing content with the following. Replace eth0 with your adapter name.
DEVICE="eth0"
BOOTPROTO="dhcp"
ONBOOT="yes"
TYPE="Ethernet"
NM_CONTROLLED="no"
IPV6_AUTOCONF="yes"
IPV6INIT="yes"
NOZEROCONF="yes"
See if a static route configuration exists.
# ls /etc/sysconfig/network-scripts/route-*

route-eth0
If there is a static route for your interface name, remove it.
# rm /etc/sysconfig/network-scripts/route-eth0Restart networking or reboot.
# service network restartCentOS 8
List your network configuration files. If your adapter name is enp1s0, you may see:
# ls /etc/sysconfig/network-scripts/ifcfg-*

ifcfg-enp1s0
You may see other adapter names if you previously deployed this server on a different Vultr host. If you have configuration files that do not match your current adapter names, it's a good practice to move them to a backup location.
Edit or create a new configuration file named ifcfg-{your adapter name}.
# nano /etc/sysconfig/network-scripts/ifcfg-enp1s0Replace any existing content with the following. Replace enp1s0 with your adapter name.
TYPE="Ethernet"
DEVICE="enp1s0"
ONBOOT="yes"
BOOTPROTO="dhcp"
IPV6INIT="yes"
IPV6_AUTOCONF="yes"
Restart the connection or reboot. Replace enp1s0 with your adapter name in the commands below.
# nmcli con load /etc/sysconfig/network-scripts/ifcfg-enp1s0
# nmcli con up 'System enp1s0'
Debian 9 & 10
Edit your network interface file.
# nano /etc/network/interfacesReplace the contents with the Vultr default information. Replace enp1s0 with your adapter name in three places.
# This file describes the network interfaces available on your system

#source /etc/network/interfaces.d/*

auto lo
iface lo inet loopback

allow-hotplug enp1s0
iface enp1s0 inet dhcp
iface enp1s0 inet6 auto
Restart networking or reboot.
systemctl restart networking.serviceFedora
Run the following commands to return your system to DHCP. Replace enp1s0 with your adapter name.
# nmcli connection modify enp1s0 ipv4.method auto
# nmcli connection down enp1s0
# nmcli connection up enp1s0
FreeBSD
Edit /etc/rc.conf.
# vi /etc/rc.confPopulate the file with the following.
    hostname="example"
    sshd_enable="YES"
    ntpd_enable="YES"
    static_routes="linklocal"
    devmatch_blacklist="virtio_random.ko"
    sendmail_submit_enable="NO"
ifconfig_vtnet0="DHCP"- Make sure to replace
hostname="example"with your hostname. - Adjust vtnet0 in the
ifconfig_vtnet0="DHCP"line for your adapter name, if needed.
Reboot the system.
# rebootOpenBSD 6.9
Edit /etc/hostname.vio0.
# vi /etc/hostname.vio0Delete everything in this file and replace it with a single line:
dhcpReboot, or restart the networking subsystem.
# reboot

# sh /etc/netstart
Ubuntu
List your network configuration files. If your adapter name is enp1s0, you'll see:
# ls /etc/netplan/

10-enp1s0.yaml
You may see other adapter names if you previously deployed this server on a different Vultr host. If you have configuration files that do not match your current adapter names, it's a good practice to move them to a backup location.
Edit or create a new configuration file named 10-{your adapter name}.yaml.
# nano /etc/netplan/10-enp1s0.yamlReplace any existing content with the following. Replace enp1s0 with your adapter name. YAML files require proper indentation. Pay attention to the formatting.
network:
  version: 2
  renderer: networkd
  ethernets:
    enp1s0:
      dhcp4: yes
Update networking or reboot.
# netplan applyWindows
Use the web console to connect to the server desktop. (Changes to the network will disconnect you if you use Remote Desktop.)
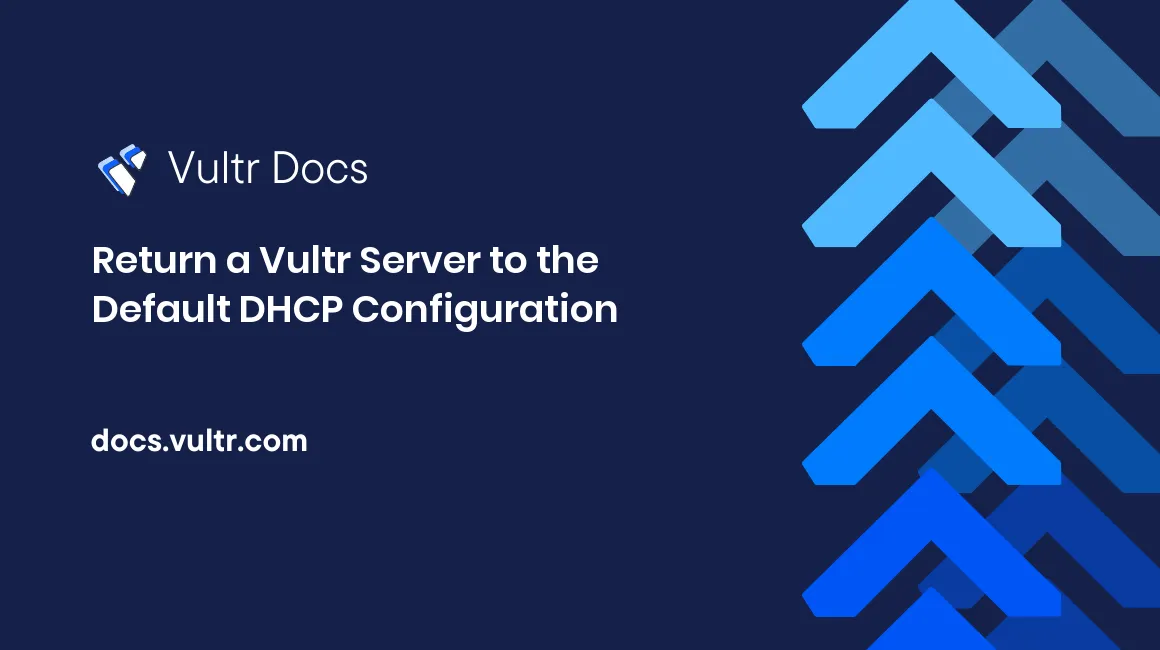
Open Control Panel.
Click Network and Internet.
Click Network and Sharing Center.
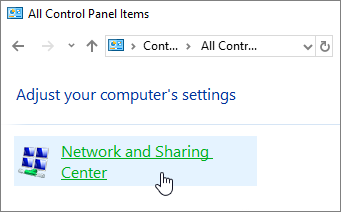
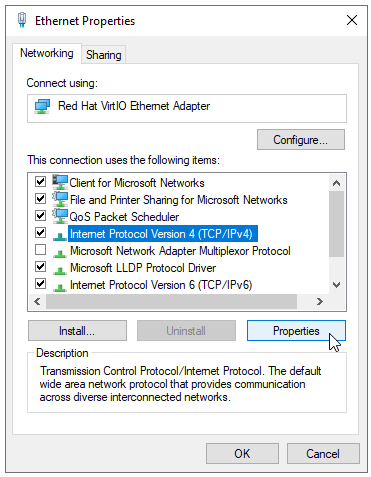
Click the Ethernet connection to open the Ethernet Status dialog.
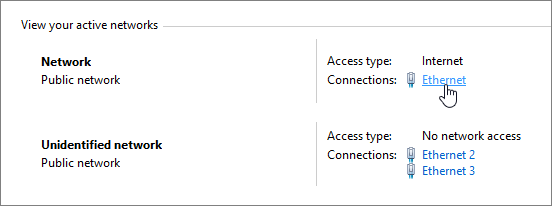
Click the Properties button.
Select Internet Protocol Version 4, then click the Properties button.
Set the adapter to Obtain an IP address automatically.
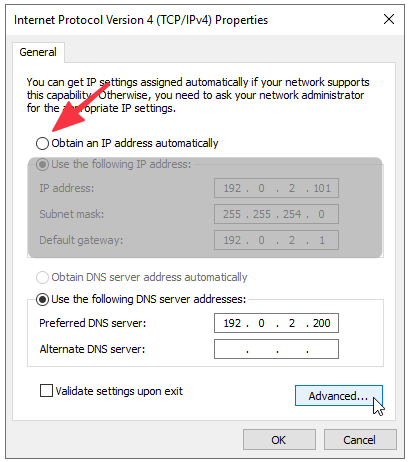
Click OK to save the settings.