

Introduction
WordPress is a popular open-source content management system (CMS) that powers millions of websites on the Internet. While it offers a user-friendly management interface and powerful tools to build web applications, it’s a common target for hackers, bots, and malicious users. Millions of attacks targeting WordPress websites are registered every month on the Internet.
As a standard, major WordPress updates are rolled out every 4 to 5 months as a basic method to fix all potential security issues. To harden WordPress security, you must take an extra step as a site administrator to perform scans and improve your site security to protect it from any potential attacks.
In this article, you will harden WordPress Security with the Vultr Firewall and Cloudflare to protect your site from most types of attacks. Popularly, Denial of Service (DOS), password dictionary cracking, script injections, and SSH brute force attacks target WordPress sites.

Prerequisites
Before you begin:
- Deploy a WordPress Server instance using the Vultr Marketplace Application.
If you have an existing WordPress server, skip this step, and prepare your Cloudflare account.
- Create or log in to your Cloudflare account.
- Migrate your domain nameservers to Cloudflare.
Cloudflare requires your domain linked to your account before protecting all domain DNS records. To migrate your domain nameservers, log in to your domain provider, and change the nameservers to the Cloudflare records listed in your account. Set up your domain A record to point to your Vultr WordPress server.
Set up Cloudflare Rules
Cloudflare offers multiple layers of protection for proxied DNS entries on your account. Through proxied entries, Cloudflare hides your WordPress server IP Address and returns dedicated IP Addresses to the client keeping your server identity safe.
Additionally, SSL/TLS encryption, DDOS, Known Bots, CAPTCHA challenge (Turnstile), and Web Application Firewall (WAF) security rules can be added to your account to grant Cloudflare filtering privileges when forwarding incoming traffic for your WordPress site.
In this section, set up Cloudflare rules to harden your WordPress security by increasing the SSL certificate encryption mode, limit known bot activity, and enable human verification on your site’s comment sections as described below.
Enable Proxying to hide the WordPress Server IP
A domain A record points to the WordPress server IP, by proxying it, all requests are served through the dedicated Cloudflare IP Addresses. Enable proxying to hide the server IP as described in the steps below.
Access your Cloudflare account.
Navigate to Websites.
Click your WordPress site domain name to launch its configuration page.
On the left navigation menu, click the DNS dropdown.
On the Records page, find the DNS management section.
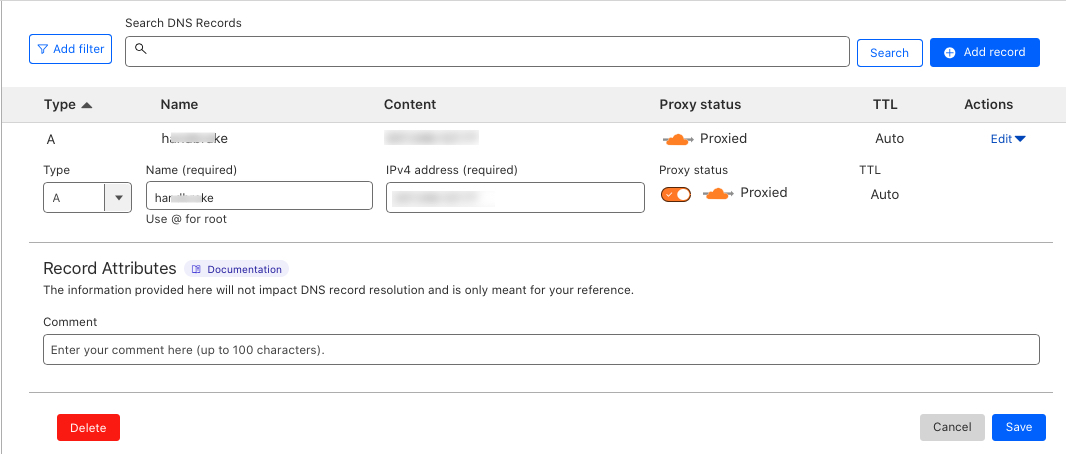
Find the domain record with the Type set to A, and click Edit under Actions.
Toggle the Proxy Status button to ON, and verify that it changes to
Proxied.Click Save to apply changes and enable proxying on your domain A record.
To test that your real WordPress server IP Address is hidden from the site visitors, open a terminal session and ping your domain name as below.
$ ping example.comCloudflare IP replies are returned similar to the output below:
 $ ping example.com -c 4

 PING example.com (104.21.19.3): 56 data bytes
 64 bytes from 104.21.19.3: icmp_seq=0 ttl=53 time=94.955 ms
 64 bytes from 104.21.19.3: icmp_seq=1 ttl=53 time=146.373 ms
 64 bytes from 104.21.19.3: icmp_seq=2 ttl=53 time=90.532 ms
 64 bytes from 104.21.19.3: icmp_seq=3 ttl=53 time=158.229 ms

 --- example.com ping statistics ---
Before proxying, pings to your domain name return the actual server IP.
 $ ping example.com -c 4

 PING example.com (192.0.2.100): 56 data bytes
 64 bytes from 192.0.2.100: icmp_seq=0 ttl=53 time=94.955 ms
 64 bytes from 192.0.2.100: icmp_seq=1 ttl=53 time=146.373 ms
 64 bytes from 192.0.2.100: icmp_seq=2 ttl=53 time=90.532 ms
 64 bytes from 192.0.2.100: icmp_seq=3 ttl=53 time=158.229 ms

 --- example.com ping statistics ---
Set the SSL/TLS Encryption mode
Cloudflare encrypts traffic between the visitor’s browser and the WordPress server depending on your SSL encryption mode setting. The available options include Flexible, Full, and `Full (strict), and require an SSL certificate available on your server.
When enabled, the Cloudflare SSL certificate is returned to your website visitors, and the actual server certificate is used to encrypt the Cloudflare edge connection. In this section, set the maximum SSL encryption mode as described in the following steps.
On the domain management page, click the SSL/TLS dropdown on the left navigation menu.
Click Full (Strict) to enable end-to-end encryption between your WordPress server, Cloudflare, and the visitor’s browser.
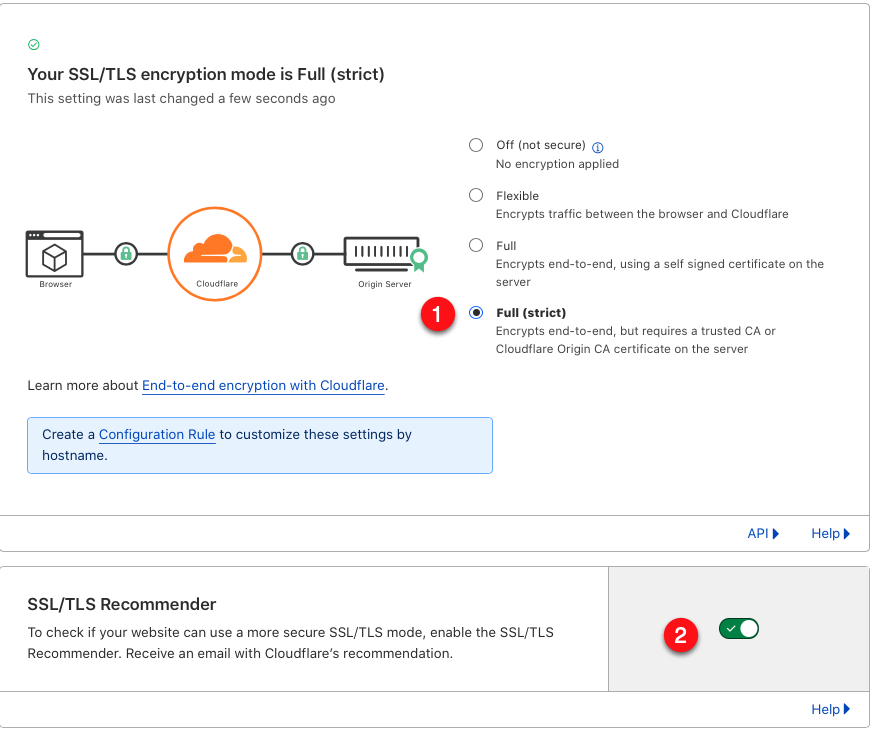
Make sure your WordPress server has a valid Let’s Encrypt SSL certificate for the encryption mode to work well. If the server certificate is expired, Cloudflare will return an SSL misconfiguration error to your site visitors.
Scroll to the SSL/TLS Recommender section, and toggle the enable button to ON. You will receive Cloudflare SSL certificate recommendations in case your SSL settings require improvements.
To further encrypt your connection, you can replace Let’s Encrypt Certificates on your server with origin SSL certificates by protecting your server using Cloudflare and the Vultr Firewall.
Configure Web Application Firewall (WAF) rules
Cloudflare offers a free basic Web Application Firewall (WAF), you can set WAF rules to execute conditions when a match is detected. In this section, block potential cross-site scripting (XSS) requests in the following steps.
On the left navigation menu, click the Security dropdown.
Click WAF from the list of options.
In the Custom rules section, click Create rule to setup a new condition.
Enter a name for your new rule in the Rule name field.
Click the Field dropdown, and select your desired function. For this article, select
URI Full.Keep the Operator value set to
equals.Enter
https://example.com/wp-admin/*script*in the Value field.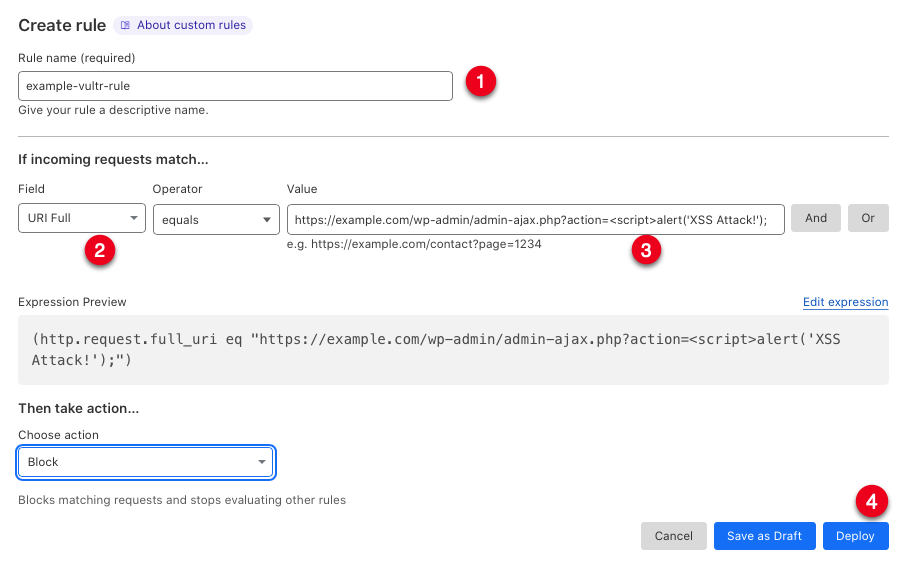
The above value matches any user request that contains a script tag in a request. For example,
https://example.com/wp-admin/admin-ajax.php?action=<script>alert('XSS Attack!');matches the value, and your Cloudflare action is called.Scroll to the Choose Action dropdown, and select your preferred action. For this article, choose
Block.Click Deploy to apply the new WAF rule.
To fine-tune your security, add more WAF rules depending on potential attacks you can simulate on the WordPress website. For example, you can block some countries from accessing your WordPress site by choosing
Countryin the Incoming requests match…. section.
DDOS and extra Cloudflare security
Distributed Denial of Service (DDOS) attacks are mostly aimed at breaking your WordPress server, and forcing users to receive errors when retrieving content on your site. To protect your site from any potential attacks, set up DDOS triggers as below.
On the Settings dropdown, click DDOS.
In the HTTP DDoS attack protection section, click Deploy a DDoS override.
Enter a name in the Overide name section, scroll and keep the DDoS L7 ruleset configuration values at
default.Scroll to the Rule configuration section, and click the Browse Rules button.
Click the checkbox on every rule you wish to activate, when ready, click the set action button, and select
Block.Scroll down and click Next to save your rules.
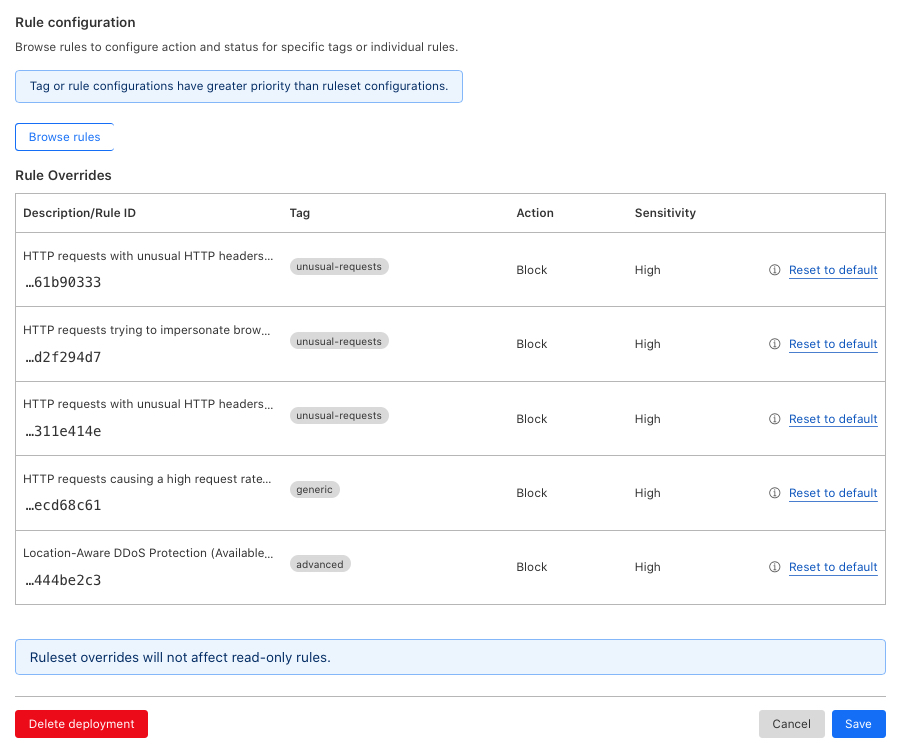
Verify that the overrides are added to your Rule configuration, then click Save to save your DDoS configuration.
Verify that your new DDoS
To fine-tune other Cloudflare security options, click Settings from the security drop-down list.
Set the Security mode, and Challenge Passage options to your desired setting. Scroll, and keep the Browser Integrity Check, Privacy Pass Support buttons activated to save changes.
Enable CAPTCHA (Cloudflare Turnstile)
Turnstile is the Cloudflare implementation of CAPTCHA that presents users with either visible or invisible challenges when visiting your WordPress site. Most importantly, enable Turnstile CAPTCHA challenges in your WordPress comments section to block bots from auto-commenting on your pages and posts as described below.
Access your main Cloudflare account dashboard.
Find and click Turnstile on the left navigation menu.
Click the Add site button to set up a new site.
Enter your WordPress website name in the Site name field.
Click the Domain drop-down, and select your target domain name to implement challenges on.
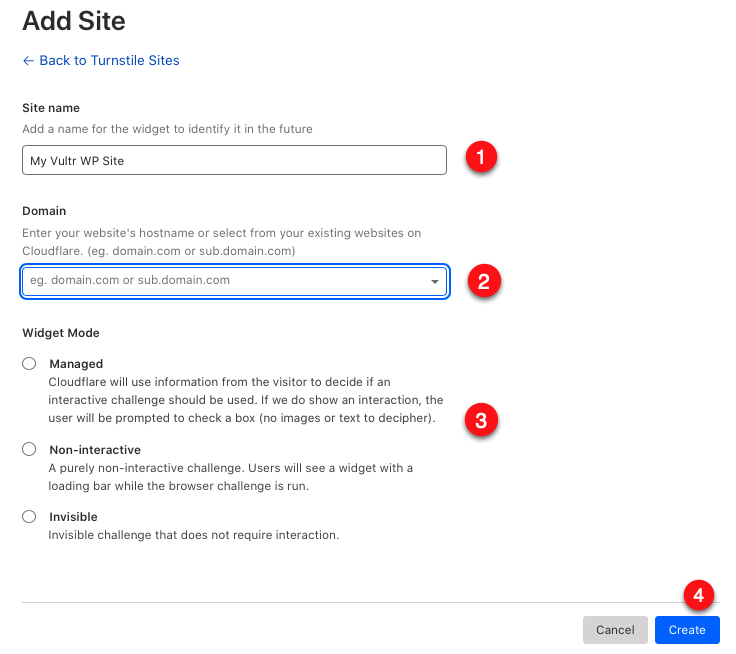
In the Widget mode section, select Managed to show non-image or text challenges when the visitor’s threat score is high.
Click Create to create your Turnstile widget.
Copy the generated Site Key, and Secret Key (You will need them when integrating your WordPress comments).
Activate Turnstile Challenges on your WordPress comments and Login Form
You can activate Cloudflare Turnstile challenges on your WordPress comments, login form, password reset, and any other forms in two ways, through a plugin, or by editing theme files. In this section, activate your Cloudflare challenges using the Simple Cloudflare Turnstile WordPress plugin as described below.
Log in to your WordPress dashboard using an administrator account.
Navigate to Plugins, and click Add New.
In the
search pluginsfield, enter the keywordSimple Cloudflare Turnstile.In the search results, find the plugin, and click Install Now.
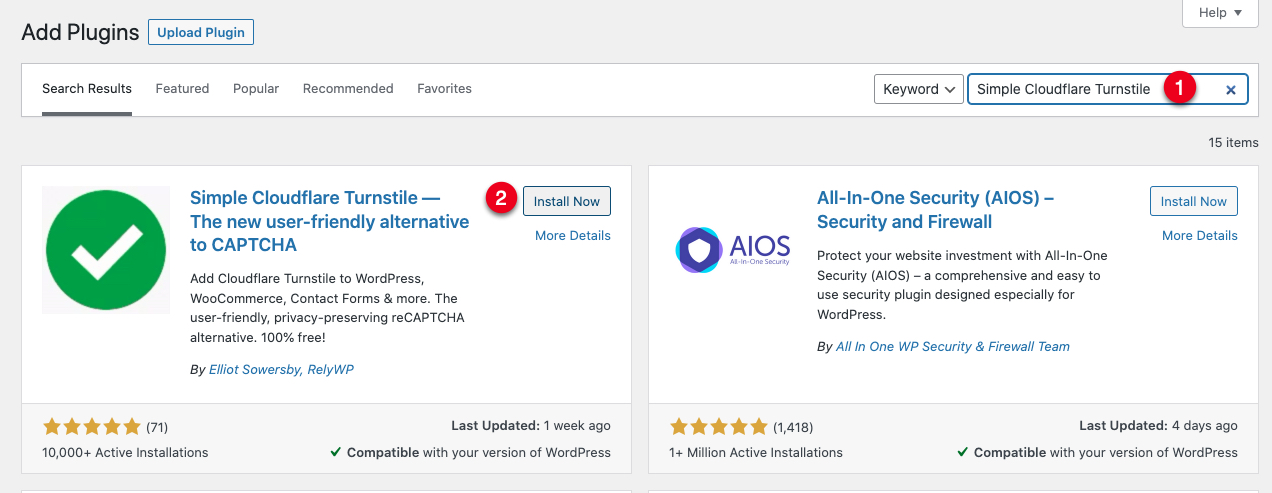
Click Activate to enable the plugin, and auto-load the setup page.
In the API Key Settings section, paste the Cloudflare Site Key, and Secret Key you copied earlier.
Scroll, and set the widget theme, appearance mode, and a custom error message to display when a challenge is required.
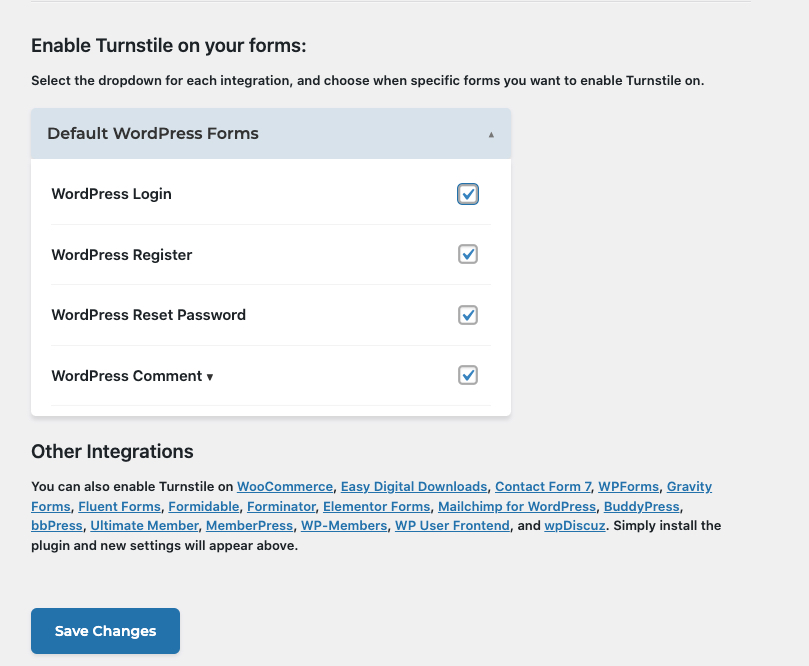
Scroll to the Enable Turnstile on your Forms section, and check all forms you want to activate challenges on.
Click Save Changes to apply your settings.
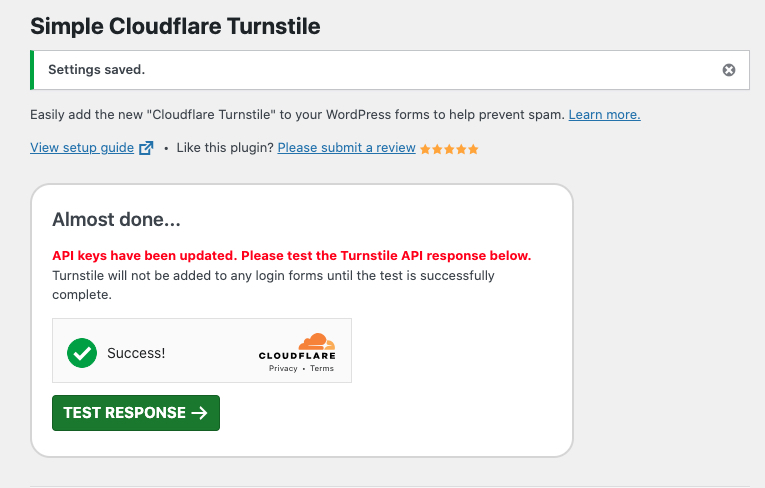
In the Almost done…. pop-up, click Test Response to test that your Cloudflare Turnstile challenges work, and validate your account keys.
When the connection is successful, you will receive the
Success! Turnstile is working correctly with your API keys.alert.
Configure the Vultr Firewall
Cloudflare is a Content Delivery Network (CDN) and DDoS mitigation service that operates between your WordPress server, the Cloudflare Edge, and you’re visitor’s web browser. This means, there is a backdoor for potential attacks to your WordPress server from the server side. The Vultr Firewall is a network-mode firewall that operates on top of your Vultr server and filters any incoming requests based on IP addresses, ports, and protocols.
To harden your WordPress server security, configure the Vultr Firewall to limit server access to Cloudflare and any administrative users that manage the server as described in the following steps.
Log in to the Vultr customer portal.
On the Products page, navigate to Network.
Click Firewall on the left navigation menu.
Click Add Firewall Group to set up a new firewall resource.
Enter a description for your new firewall group, and click Add Firewall Group to create the resource.
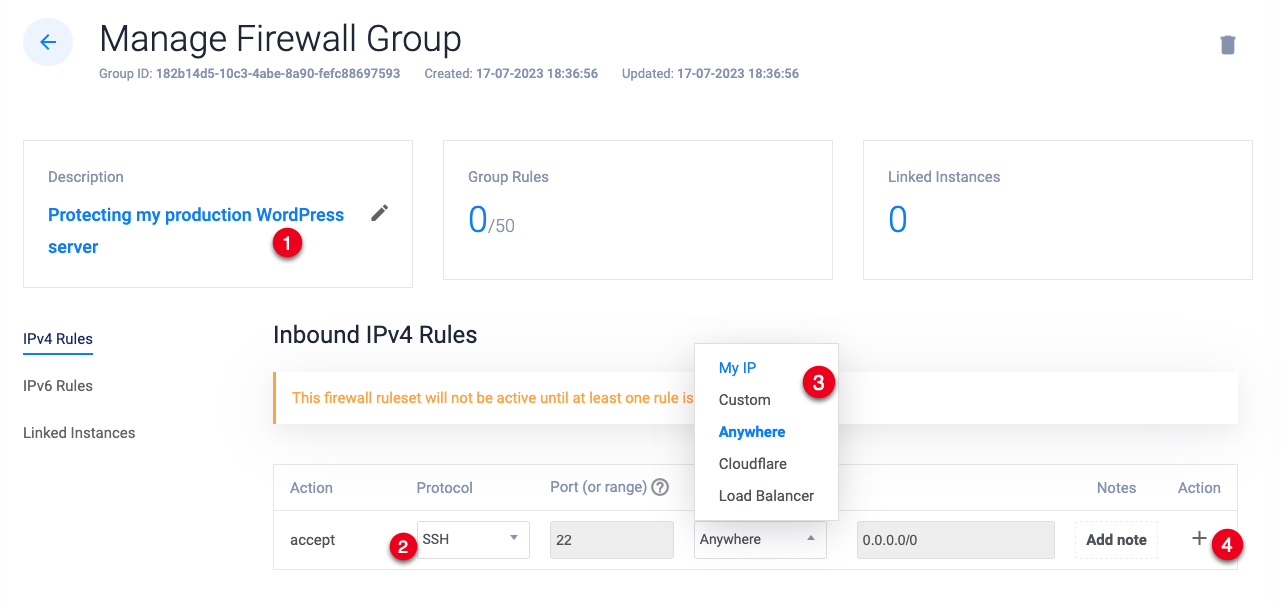
Navigate to the Inbound IPV4 Rules section on the Manage Firewall Group page.
Keep SSH selected as the protocol, click the Source dropdown and select
MY IPfrom the list.The above setting blocks all SSH connections to your server except for connection requests from your IP Address.
Click the + action button to add the new firewall rule.
When the
SSHrule is added, click the Protocol dropdown, and select HTTP from the list.Click the Source dropdown, select
Cloudflarefrom the list, and click the + action button to add the new firewall rule.The above rule blocks all incoming HTTP requests to your server except for those from Cloudflare which proxies the requests to your site visitors.
When added, click the Protocol dropdown, select HTTPS from the list, and click the Source dropdown to select
Cloudflare.Click the + action button to add the new HTTPS rule to your Firewall group.
To add a custom port such as the cPanel port
2083, click the Protocol dropdown and select TCP, In the Port field, enter the port number, and set the Source to your IP.Click the + action bar to save the firewall rule.
Verify that a
drop any 0-65535rule is added to your Firewall group.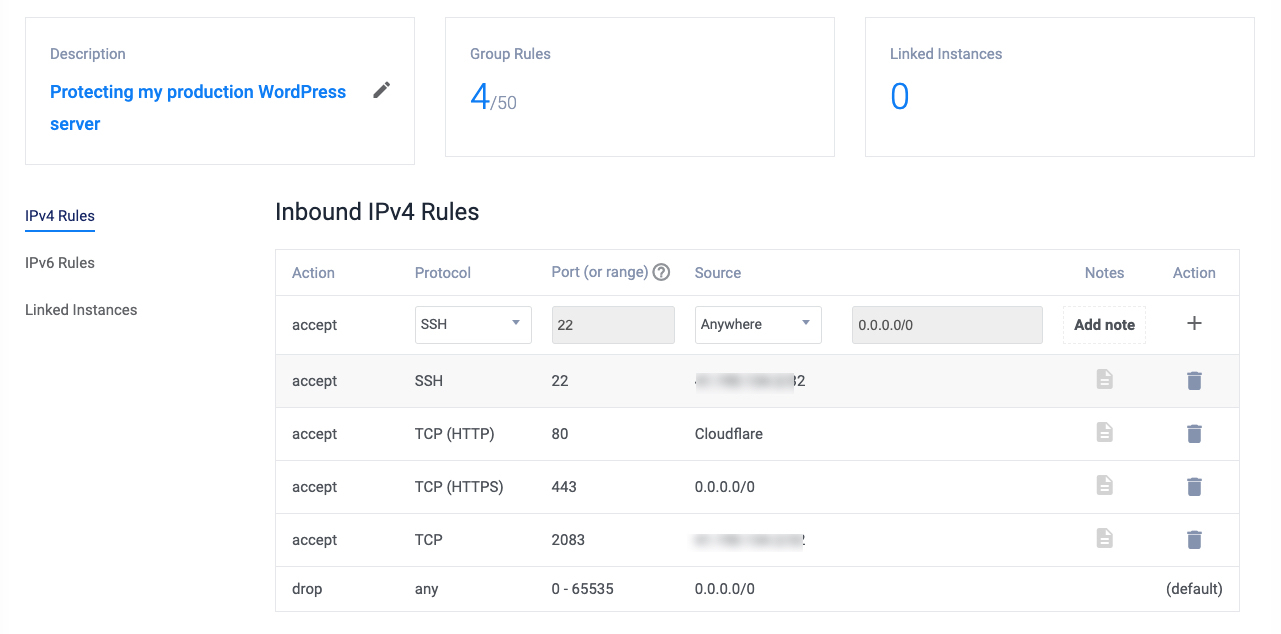
The
drop anyrule will block any other ports on your server. Verify that all essential ports are allowed through the firewall, and every administrative user is allowed to access the server.Click Linked Instances on the left navigation menu.
Click the Server dropdown, and select your WordPress server from the list.
Click the + add linked instance button to add your server to the firewall group.
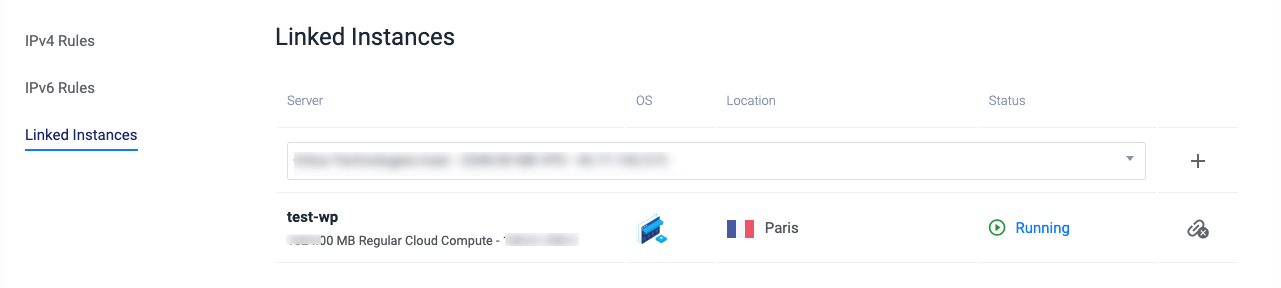
Verify that your server is added successfully, and test that you have SSH access to the server, and any other allowed ports for your IP Address.
Set up the WordPress Firewall
The Vultr Firewall, and Cloudflare all filter traffic to your WordPress server, but some security threats, can bypass both checkpoint filters and compromise your WordPress site. To harden security at all points, install a WordPress firewall to filter some requests made to your server, and implement 2-Factor Authentication for all WordPress administrator accounts.
In this section, install the WordFence Firewall plugin for WordPress and configure it to block multiple login failures for 2 months, and enable 2FA for the WordPress users as described in the steps below.
Log in to your WordPress dashboard using an administrator account.
Navigate to the Plugins page and click Add New.
In the Search Plugins field, enter the keyword
Wordfence.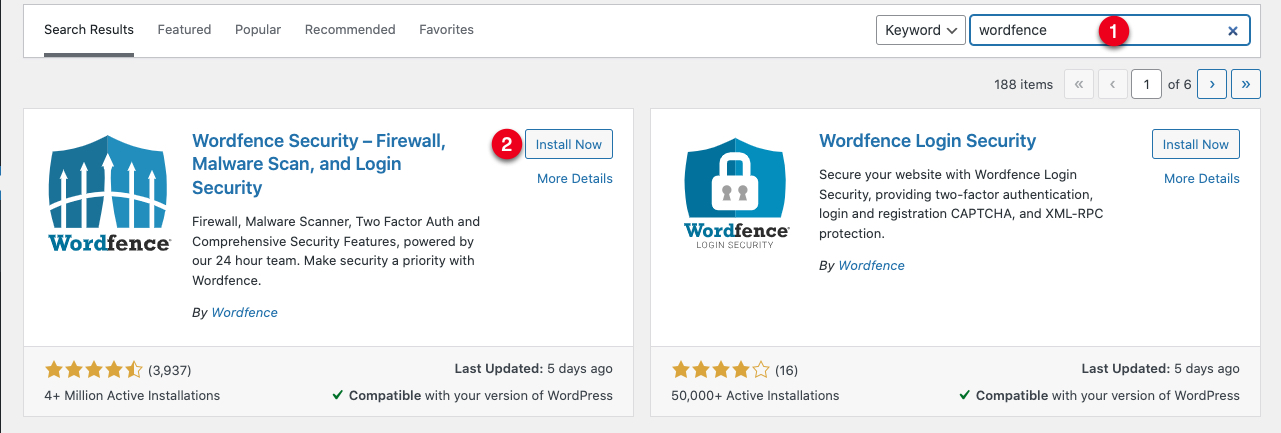
In the search results, find the WordFence Security plugin, and click Install Now.
Click Activate to enable the plugin.
Click Get Your WordFence License to get a free license, and complete the plugin installation.
When successful, go to the WordFence dashboard to start configuring the firewall.
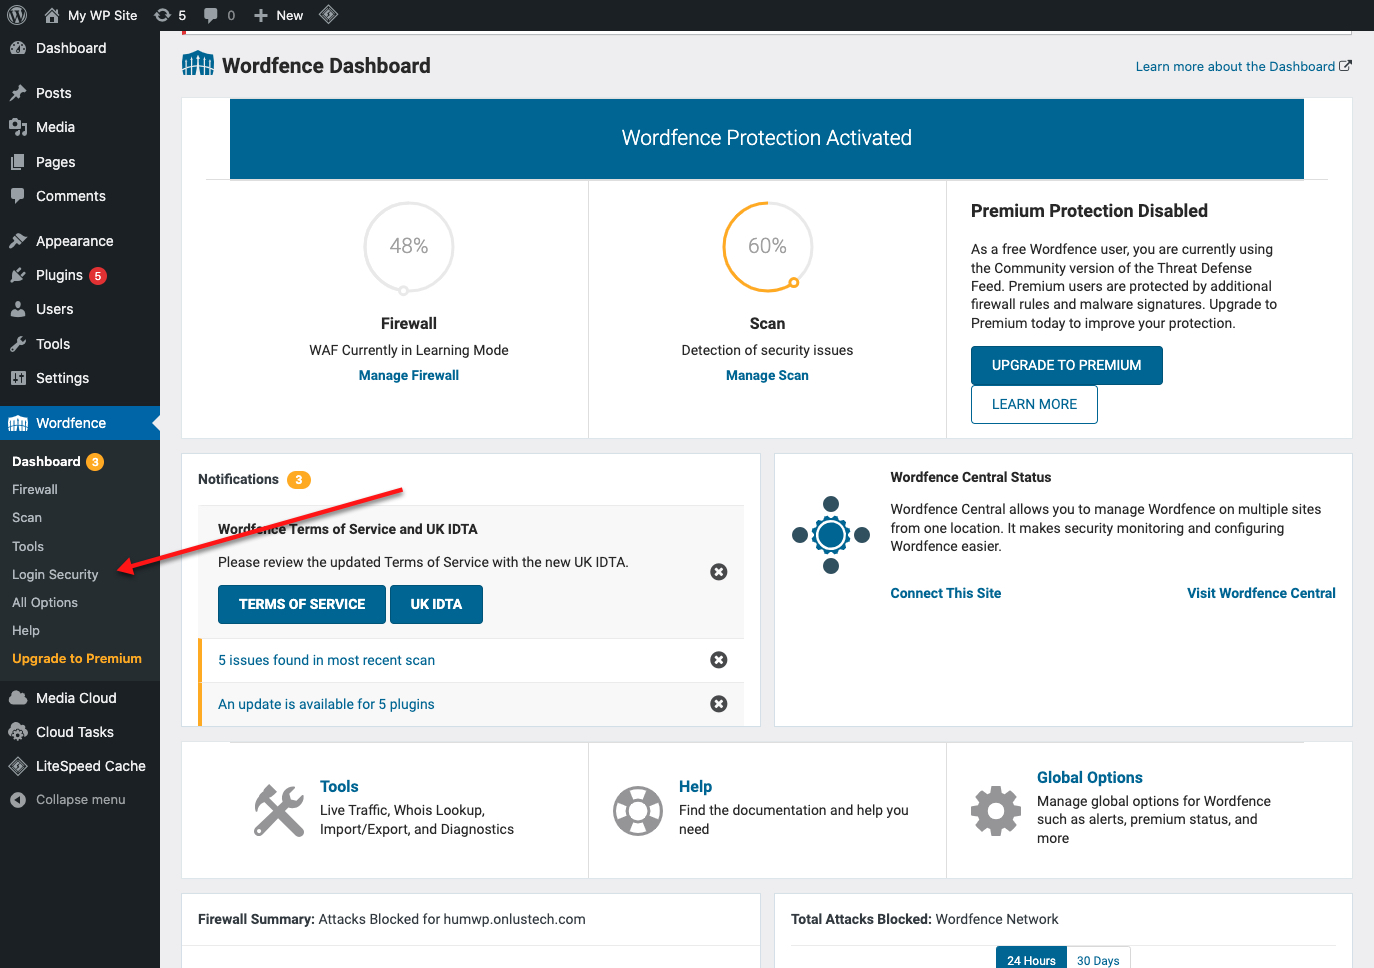
Click Login Security from the plugin dropdown menu.
In the Two-Factor Authentication section, scan the unique QR code generated for your WordPress user using a compatible mobile application such as
Authenticator.
Download the generated recovery codes to a safe location on your computer.
Enter the 2FA code generated by your mobile application.
Click the Activate button to enable 2-Factor Authentication for your WordPress user account.
To enforce 2FA for every WordPress user, navigate to Settings, and enable 2FA Roles on target user categories by changing
DisabledtoRequired.Navigate to Firewall, and click All Firewall Options to access the configuration page.
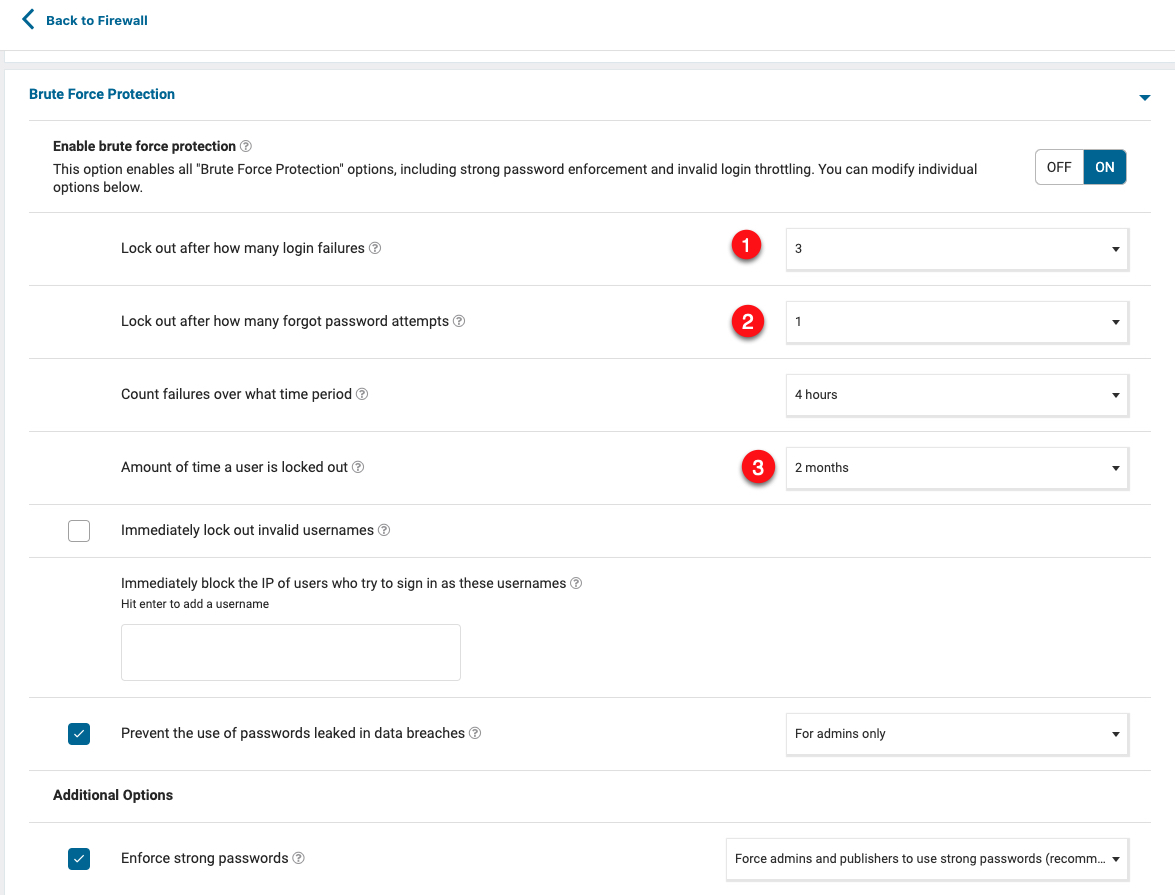
Click Brute Force Protection, and change the
Lock out after how many login failuresvalue to3, change theLock out after how many forgot password attemptsvalue to1, change theAmount of time a user is locked outto2 months.Click Save Changes to apply your new changes.
You can finetune your Wordfence firewall configuration with rate limiting and advanced options to your desired needs. To verify that your settings work, test your WordPress security.
Test Your WordPress Security
To verify that your Vultr Firewall, Cloudflare, and WordPress firewall work correctly. Use a different web browser, and different IP Address (separate Internet connection) to test your WordPress security as described in this section.
Enter the following URL, and verify that your request is blocked by Cloudflare. Replace
examplewith your actual domain name.https://example.com/wp-admin/admin-ajax.php?action=<script>alert(‘The hacker is here, I need access!');If your request is blocked, your Cloudflare Web Application Firewall (WAF) is working correctly.
Visit your WordPress server IP Address using HTTP. Replace
192.0.2.100with your actual server IP Address.http://192.0.2.100If your request is not processed, then, the Vultr Firewall has blocked your request because it's not from Cloudflare. All Cloudflare requests come through your WordPress domain name and not the direct Server IP Address.
In a different web browser, access your WordPress login form.
https://example.com/wp-adminEnter the following logins 4 times:
 Username: admin
 Password: hacker
You will receive a WordFence lockout screen with a notice that your activity is logged, and your lockout duration to try again is 2 months. To lift the ban, you need to enter an administrator’s Email Address to validate if the lock-out is a mistake.
Visit any of your WordPress posts or pages enabled with comments.
https://example.com/hello-world-postScroll to the comment section, and try writing a comment. Verify that a Cloudflare Widget challenge displays to verify if you are human.
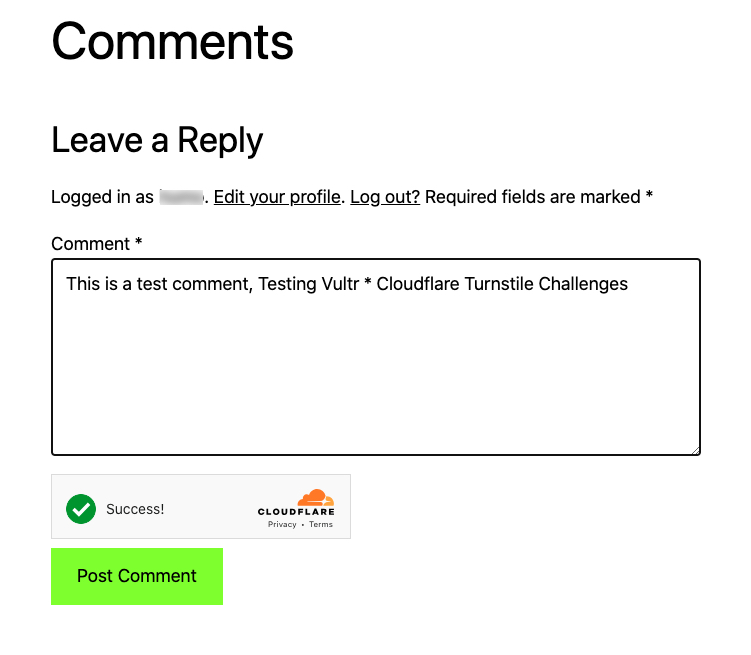
When successful, you can post a comment, when unsuccessful, the widget requires you to verify that you are human. This way, bots are unable to pass any challenge when trying to write or spam comments on your WordPress site.
Conclusion
You have hardened WordPress security with Vultr and Cloudflare, by implementing the steps in this article, your WordPress site is secure from most types of security threats such as bot attacks. Also, filters can block out any bad bots that can attempt to visit your WordPress site making sure every visitor is human.
Next Steps
For more information and WordPress configuration choices, visit the following resources.
No comments yet.