How to Add Swap Memory on Debian 12
Introduction
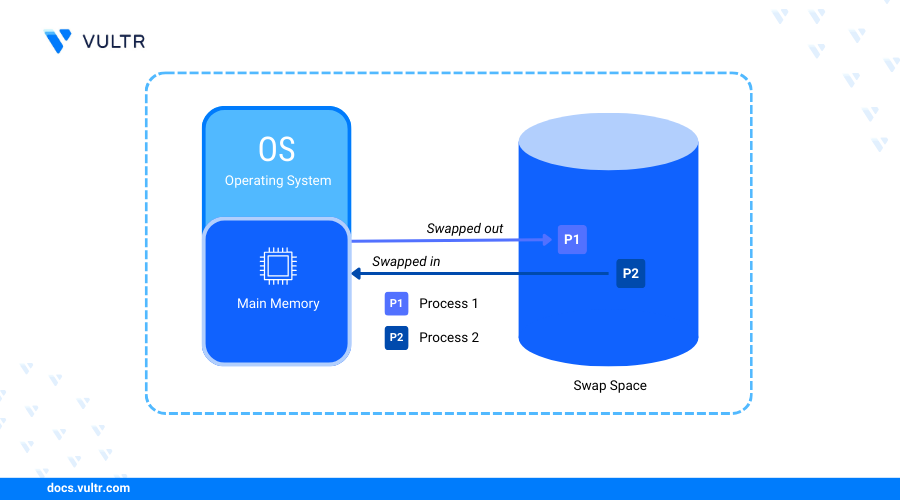
Swap memory, also known as swap space, is a dedicated storage part used as an overflow space for the system's memory. When Random Access Memory (RAM) is fully utilized, the operating system moves inactive pages of memory to the swap space to free up RAM for actively running processes. The swapping process improves system performance and prevents process failures by ensuring that memory is available for active applications.
This article explains how to add swap memory on Debian 12. You will set up swap memory using a dedicated file on your server storage and use Vultr Block Storage as a dedicated swap volume to increase the available server memory.
Prerequisites
Before you begin, you should:
- Deploy a Debian 12 instance on Vultr.
- Deploy a Vultr Block Storage volume and attach it to the server.
- Access the server using SSH as a non-root sudo user with sudo privileges
- Update the server
Check the Existing Swap Memory
View the existing swap memory to determine the available capacity to modify or create on your server. Follow the steps below to use the free utility and view the existing swap memory on your server.
View the available server memory including RAM and Swap.
CONSOLEVerify the total swap memory available on your server similar to the output below.
The above command displays the total, used, and free memory, including swap memory on your server.
Use the
swaponcommand to view a more detailed output of the swap space.CONSOLEYour output should be similar to the one below.
If no output is available, then your server does not have any active swap memory.
Create Swap Memory
Swap memory is dedicated space on a storage device such as your server storage or a block storage volume. Follow the sections below to create swap memory using either a Swapfile or a dedicated Vultr Block Storage volume attached to your server.
Create Swap Memory Using a Swapfile
Create a Swapfile with a specific size of your choice. For example, run the following command to create a swapfile with
2GBusing thefallocateutility in your root directory/.CONSOLEIf
fallocateis unavailable, use theddutility to create the Swapfile.CONSOLEModify the Swapfile permissions to grant only the root user read and write privileges.
CONSOLEFormat the file as swap space using the
mkswapcommand.CONSOLEVerify the new swap memory size, label information, and the
UUIDwhen successful similar to the output below.
Create Swap Memory using Vultr Block Storage
Follow the sections below to create swap memory using a Vultr Block Storage volume attached to the server.
List all storage devices available on your server using the
lsblkutility and verify your Vultr Object Storage device name.CONSOLEOutput:
The
40GBVultr Block Storage volume is attached to the server asvdbbased on the above output with no active partitions.Initialize the block storage volume using the GPT partition table.
CONSOLECreate a new partition using the entire block storage volume.
CONSOLEList the server storage devices again and verify that the new block storage partition is available.
CONSOLEOutput:
Format the block storage as swap memory. Replace
/dev/vdb1with your actual GPT partition path.CONSOLEOutput:
View your block device information and verify that the new swap partition is available.
CONSOLEOutput:
Note the swap partition UUID value to use when mounting the volume automatically at boot time.
Enable Swap Space
Swap space works as dedicated memory when enabled on your server which enables the system to swap processes between the main memory and your swap space. Follow the steps below to enable the swap space you created earlier on your server.
Activate your existing Swapfile as swap memory on your server.
CONSOLEView the swap memory available on your server and verify that your Swapfile is active.
CONSOLEYour output should be similar to the one below.
Enable your Vultr Block Storage swap partition as swap memory. Replace
/dev/vdb1with your actual partition path.CONSOLEView the swap memory available on your server and verify that the swap partition is active.
CONSOLEYour output should be similar to the one below.
Configure the File System Table (fstab) to Enable Automatic Mounting
The File System Table (fstab) enables automatic mounting of volumes and disk partitions on your server using information in the /etc/fstab configuration file. Follow the steps below to configure the file system table and enable automatic mounting of swap memory on your server.
Back up the original
fstabconfiguration on your server.CONSOLEOpen the
/etc/fstabfile using a text editor such asnano.CONSOLEAdd the following directive at the end of the file to enable automatic mounting of swap memory using your Swapfile.
CONSOLESave and close the file.
The above configuration enables automatic mounting using the
/swapfile.imgfile on your server. Within the configuration:swap: Enables the swap file system type.swap: Sets the swap mount point.0: Disables backups on the swap file system.0: Disables file system checks on swap memory.Add the following directive at the end of the file to enable the automatic mounting on the block storage swap partition.
CONSOLESave and close the file.
Configure Swappiness Value
Swappiness is a kernel parameter that determines the balance between using swap space and RAM. Swappiness value range from 0 to 100, where lower values such as 0 reduce swapping and higher values 100 prioritize swapping of processes from RAM to the swap memory.
0: Enables the system to avoid swapping processes out of physical memory.1-49: Enables swapping with reduced usage unless the main memory (RAM) is at capacity.50: Balances swapping and memory caching on the server.51-99: Increases swapping from the main memory to swap memory.100: Prioritizes swapping on the server and processes are continuously moved from RAM to swap.
View the active swappiness value on your server.
CONSOLEYour output should be similar to the one below.
Change the swappiness value to
10. Replace10with your desired swapping level.CONSOLEThe above changes the active swappiness value to
10to enable the system avoid using swap space unless necessary.Output:
Reload the
sysctlconfiguration to apply your configuration changes.CONSOLEView the active swappiness value again and verify that it's set to
10.CONSOLEOutput:
Test and Validate Swap Memory
Swap memory is available on your server. Follow the steps below to test and validate the available volumes actively swapping processes with your server's main memory.
View all available swap volumes on your server.
CONSOLEOutput:
Run the following command to activate all inactive swap volumes enabled in your
/etc/fstabconfiguration.CONSOLEView your available memory and verify the total swap memory active on your server.
CONSOLEOutput:
Remove Swap Memory
Follow the sections below to remove swap memory from your server.
Deactivate the default Swapfile using the
swapoffcommand.CONSOLEDeactivate your block storage swap partition.
CONSOLEDelete the default Swapfile to use your modified swap space.
CONSOLEView all swap volumes on your server and verify that the default Swapfile is disabled.
CONSOLEOutput:
Conclusion
You have added swap memory on your Debian 12 server and extended the default system memory to enable swapping of processes to improve the general system performance. Swap memory may be slower as compared to RAM but improves the server response rate when running memory-intensive applications. Monitor your swap memory regularly to ensure optimal performance and make adjustments depending on your processing needs. For more configuration options, run the man swapon command to view the swap manual on your server.


0 Comments
Be the first to comment and share your perspective with the community.