
How to Automate CI/CD Pipelines for Cypress Testing with GitHub Actions
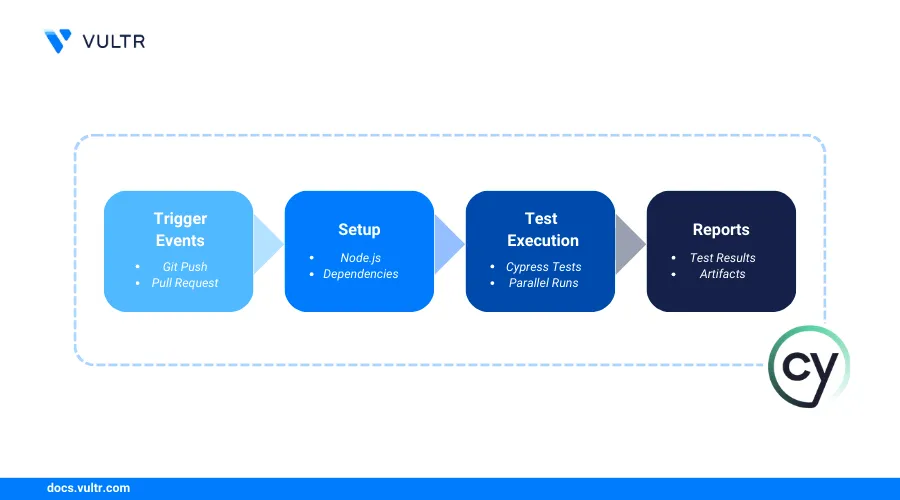
Continuous Integration and Continuous Deployment (CI/CD) pipelines streamline software development by automating code integration, testing, and deployment. Incorporating end-to-end (E2E) testing ensures that code changes align with real user workflows before deployment. GitHub Actions and Cypress offer a seamless solution for automating testing, reducing manual effort, and accelerating feedback cycles.
This article explains automating CI/CD pipelines for Cypress testing with GitHub Actions. You will create a sample Next.js application and configure Cypress to automate a CI/CD pipeline with GitHub actions.
Prerequisites
Before you begin, you need to:
- Create a GitHub repository to store your project and set up new workflows. For example,
cypress-dev-test. - Have access to a Linux desktop workstation such as Ubuntu 24.04.
- Install and initialize Git on your workstation.
- An existing Slack Workspace to receive notifications for Cypress tests.
Create a Sample Next.js Application
Next.js is a React framework that streamlines the development of production-ready web applications with features such as server-side rendering, static site generation, and API routes. Follow the steps below to set up a sample Next.js project to use in your CI/CD pipeline for Cypress testing.
Update the APT package index.
console$ sudo apt update
Install Node.js and NPM.
console$ sudo apt install nodejs npm -y
Verify that the installed Node.js version is
18.xor later.console$ node -v
Your output should be similar to the one below.
v18.19.1Visit How to Install Node.js and NPM on Ubuntu 24.04 if the installed Node.js version is not
18.xor later that's required for Cypress testing.Switch to your user's home directory.
console$ cd
Initialize a Next.js project using
npx. Replacemy-projectwith your desired project name.console$ npx create-next-app@latest my-project
Press Enter when prompted to install the Next.js package.
 Need to install the following packages:
   create-next-app@15.1.7
 Ok to proceed? (y)
Press Enter to keep the default option selected and use the recommended packages in your project.
Would you like to use TypeScript? No / Yes
Would you like to use ESLint? No / Yes
Would you like to use Tailwind CSS? No / Yes
Would you like your code inside a `src/` directory? No / Yes
Would you like to use App Router? (recommended) No / Yes
Would you like to use Turbopack for `next dev`?  No / Yes
Would you like to customize the import alias (`@/*` by default)? No / Yes
What import alias would you like configured? @/*
Output:
added 379 packages, and audited 380 packages in 1m

147 packages are looking for funding
  run `npm fund` for details

found 0 vulnerabilities
Success! Created my-project at /root/example-project/my-project
Switch to the
my-projectdirectory.console$ cd my-project
List all files and verify the project directory structure.
console$ lsOutput:
app                next.config.ts  node_modules  package-lock.json   public     tailwind.config.ts
eslint.config.mjs  next-env.d.ts   package.json  postcss.config.mjs  README.md  tsconfig.json
Allow connections to the Next.js application port
3000through the firewall.console$ sudo ufw allow 3000
Run the following command to install UFW if it's unavailable and allow SSH connections.
console$ sudo apt install ufw -y && sudo ufw allow ssh
Reload UFW to apply the firewall configuration changes.
console$ sudo ufw reload
Start the development server.
console$ npm run dev
Your output should be similar to the one below.
> my-project@0.1.0 dev
> next dev --turbopack

   ▲ Next.js 15.1.6 (Turbopack)
   - Local:        http://localhost:3000
   - Network:      http://<SERVER-IP>:3000

 ✓ Starting...
 ✓ Ready in 826ms
 ○ Compiling / ...
 ✓ Compiled / in 1906ms
Access the Next.js application port
3000using your server's public IP address in a web browser such as Chrome and verify that the default Next.js page displays.http://<SERVER-IP>:3000
Press Ctrl + C in your terminal session to stop the development server.
Create a Contact Form
Follow the steps below to simulate user interactions, allowing end-to-end (E2E) testing to detect usability issues using a contact form with first name, last name, email, and message fields. The contact form logs the output to the console to validate the user input.
Print your working directory and verify it's the Next.js project.
console$ pwd
Your output should be similar to the one below.
/home/linuxuser/my-projectBack up the default
app/page.tsxfile.console$ mv app/page.tsx app/page.tsx.ORIG
Create the
app/page.tsxfile using a text editor such asnano.console$ nano app/page.tsx
Add the following contact form components to the file.
typescript"use client"; import { useState } from "react"; export default function Contact() { const [data, setData] = useState({ firstName: "", lastName: "", email: "", message: "", }); const handleChange = (event: React.SyntheticEvent) => { const target = event.target as HTMLInputElement; setData((prev) => ({ ...prev, [target.name]: target.value })); }; const handleSubmit = async (event: React.SyntheticEvent) => { event.preventDefault(); console.log("Form Submitted:", data); setData({ firstName: "", lastName: "", email: "", message: "" }); }; return ( <main className="w-[100%] h-[100%] absolute top-0 left-0 bg-[#8dd0fa] flex flex-col items-center justify-center"> <h1 className="text-[26px] font-bold mb-4 text-black uppercase"> CONTACT US </h1> <form onSubmit={handleSubmit} className="w-[450px] flex flex-col items-center text-black" > <div className="w-full flex justify-between my-2"> <input type="text" name="firstName" placeholder="First Name" onChange={handleChange} value={data.firstName} required className="outline-none w-[48%] h-10 p-2 rounded shadow-sm" /> <input type="text" name="lastName" placeholder="Last Name" onChange={handleChange} value={data.lastName} required className="outline-none w-[48%] h-10 p-2 rounded shadow-sm" /> </div> <input type="email" name="email" placeholder="Email" onChange={handleChange} value={data.email} required className="outline-none w-full h-10 p-2 rounded my-2 shadow-sm" /> <textarea name="message" id="message" placeholder="Message" rows={5} onChange={handleChange} value={data.message} required className="outline-none w-full p-2 rounded my-2 shadow-sm" /> <button type="submit" className="bg-black text-white m-2 w-full py-2"> Submit </button> </form> </main> ); }
Save and close the file.
The above contact form configuration creates multiple input fields to validate the user input and simulate user interactions.
Start the development server as a background process to keep the application active on port
3000.console$ npm run dev &
Access the application port
3000using your server's IP address in a web browser window and verify that the contact form displays.http://<SERVER-IP>:3000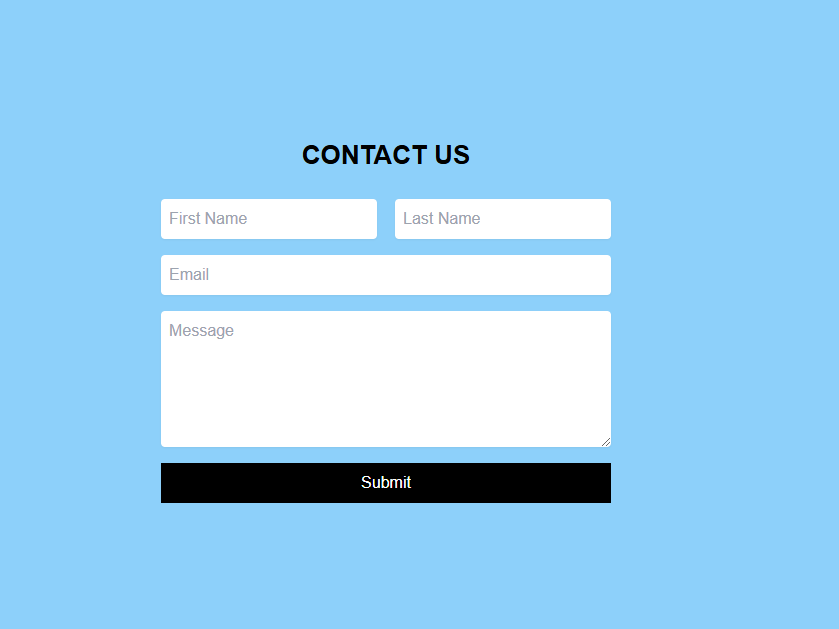
Install and Configure Cypress
Follow the steps below to install and configure Cypress on your workstation.
Install all required dependencies for Cypress.
console$ sudo apt install libgtk2.0-0t64 libgtk-3-0t64 libgbm-dev libnotify-dev libnss3 libxss1 libasound2t64 libxtst6 xauth xvfb -y
Install Cypress as a development dependency.
console$ npm install cypress --save-dev
Run the following command to generate a new Cypress configuration and directory structure.
console$ npx cypress open
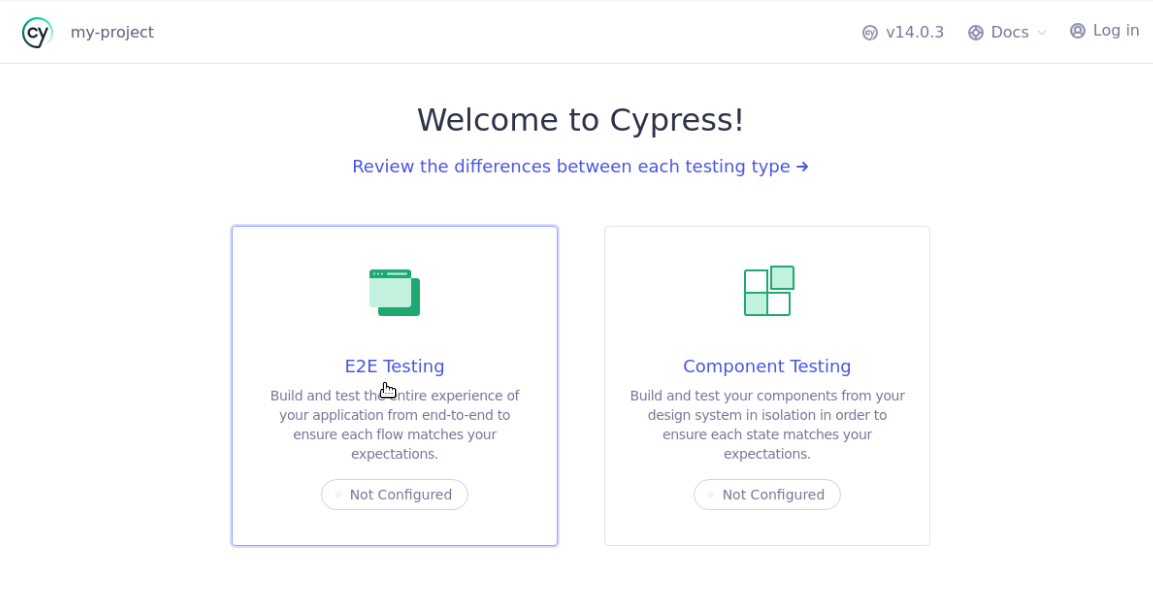
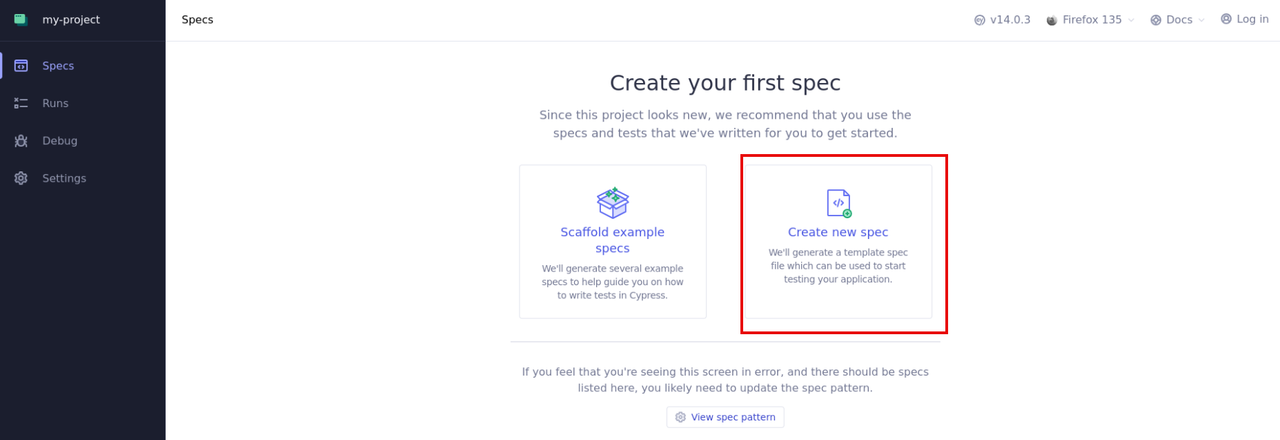
Verify that the Cypress launchpad opens on your desktop workstation and follow the steps below to modify the default settings.
Click Continue within the Cypress release information prompt to continue.
Select E2E Testing within the Cypress launchpad.
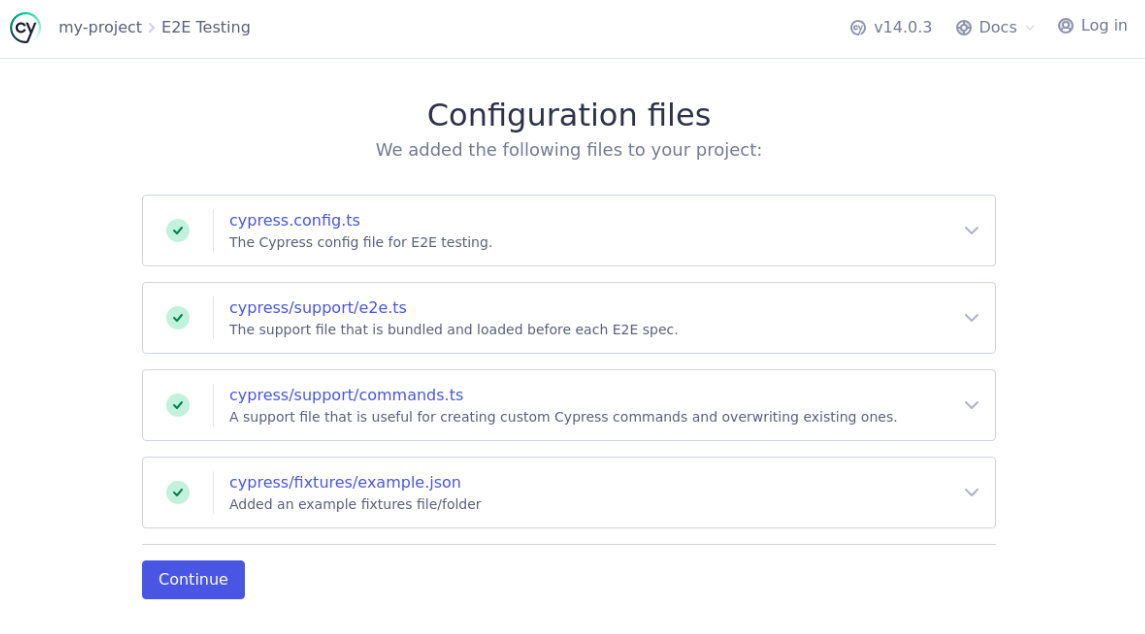
Verify the Cypress configuration files in your project and click Continue.
Select your desired web browser for E2E testing and click Start E2E Testing.
Click Create new spec to generate a new test file.
Replace the default
spec.cy.tsname with your desired filename, such ascontact.cy.ts.Verify that a
Great! The spec was successfully addedprompt displays, and click Okay, run the spec to complete the setup.
Switch to your terminal session.
List all files in your
my_projectdirectory and verify the generated Cypress configurations.console$ lsOutput:
app      cypress.config.ts  next.config.ts  node_modules  package-lock.json   public     tailwind.config.ts
cypress  eslint.config.mjs  next-env.d.ts   package.json  postcss.config.mjs  README.md  tsconfig.json
Open the
cypress.config.tsfile.console$ nano cypress.config.ts
Add the following
baseUrlconfiguration after thee2eblock to specify the default host for all tests on your workstation.typescriptbaseUrl: process.env.BASE_URL || 'http://localhost:3000',
Save and close the file.
Your modified
cypress.config.tsshould look like the one below.typescriptimport { defineConfig } from "cypress"; export default defineConfig({ e2e: { baseUrl: process.env.BASE_URL || 'http://localhost:3000', setupNodeEvents(on, config) { // implement node event listeners here }, }, });
The above configuration specifies the host URL to use in Cypress tests. Specifying a custom URL limits the hardcoding of new URLs in individual test specs.
Write a Cypress Test
Well-structured tests follow three phases, setup, action, and assertion, to define the initial state, execute user actions, and verify the expected outcomes, respectively. Follow the steps below to run an example test that loads the contact page, fills out sample information, and submits the form. Then, tests the expected data in the console log.
Back up the original
contact.cy.tsfile within thecypress/e2edirectory.console$ mv cypress/e2e/contact.cy.ts cypress/e2e/contact.cy.ts.ORIG
Create the
contact.cy.tsfile.console$ nano cypress/e2e/contact.cy.ts
Add the following test code to the file.
typescriptdescribe('Contact Page Tests', () => { beforeEach(() => { cy.visit('/'); }); it('Submits the form successfully', () => { cy.window().then((win) => { cy.spy(win.console, "log").as("consoleLog"); }); cy.get('input[name="firstName"]').type('John'); cy.get('input[name="lastName"]').type('Doe'); cy.get('input[name="email"]').type('john_doe@example.com'); cy.get('textarea[name="message"]').type('This is a test message.'); cy.get('button[type="submit"]').click(); cy.get("@consoleLog").should("be.calledWith", "Form Submitted:", { firstName: "John", lastName: "Doe", email: "john_doe@example.com", message: "This is a test message." }); }); })
Save and close the file.
Run the following command to perform a new cypress test.
console$ npx cypress run
Verify the test results in your output similar to the one below:
  (Results)

  ┌────────────────────────────────────────────────────────────────────────────────────────────────┐
  │ Tests:        1                                                                                │
  │ Passing:      1                                                                                │
  │ Failing:      0                                                                                │
  │ Pending:      0                                                                                │
  │ Skipped:      0                                                                                │
  │ Screenshots:  0                                                                                │
  │ Video:        false                                                                            │
  │ Duration:     4 seconds                                                                        │
  │ Spec Ran:     contact.cy.ts                                                                    │
  └────────────────────────────────────────────────────────────────────────────────────────────────┘


====================================================================================================

  (Run Finished)


       Spec                                              Tests  Passing  Failing  Pending  Skipped
  ┌────────────────────────────────────────────────────────────────────────────────────────────────┐
  │ ✔  contact.cy.ts                            00:04        1        1        -        -        - │
  └────────────────────────────────────────────────────────────────────────────────────────────────┘
    ✔  All specs passed!                        00:04        1        1        -        -        -
If you receive a
Cypress failed to verify that your server is runningerror, run thenpm run devcommand to start the development server and start the Cypress test again.
Save Failed Test Results
Cypress automatically stores screenshots that offer a visual record of all failed tests for debugging purposes. You can reupload the test results as artifacts in GitHub Actions for centralized troubleshooting. Follow the steps below to enable Cypress to store screenshots for all failed tests.
Open the
cypress.config.tsfile.console$ nano cypress.config.ts
Add the following configurations below the
baseUrldirective.typescriptscreenshotOnRunFailure: true, // Enable screenshots screenshotsFolder: "cypress/screenshots", // Save location
Save and close the file.
The above configuration enables Cypress to capture and store screenshots in the specified
cypress/screenshotsdirectory for all failed tests.Your modified
cypress.config.tsshould look like the one below.typescriptimport { defineConfig } from "cypress"; export default defineConfig({ e2e: { baseUrl: process.env.BASE_URL || 'http://localhost:3000', screenshotOnRunFailure: true, // Enable screenshots screenshotsFolder: "cypress/screenshots", // Save location setupNodeEvents(on, config) { // implement node event listeners here }, }, });
Back up the
cypress/e2e/contact.cy.tsfile.console$ cp cypress/e2e/contact.cy.ts cypress/e2e/contact.cy.ts.ORIG
Open the
contact.cy.tsfile to simulate a failed test.console$ nano contact.cy.ts
Find the
cy.get('input[name="email"]').type('john_doe@example.com');field and change the email address tojohn@example.com.typescript... cy.get('input[name="email"]').type('john@example.com'); ...
Save and close the file.
The above configuration simulates a failed test with a wrong email address provided to the contact form application. Cypress captures a screenshot of the failed test when it completes.
Run a new Cypress test and verify that the failed test is detected, a screenshot is stored in your project directory.
console$ npx cypress run
Verify that the test fails with the following output.
  (Screenshots)

  -  /home/linuxuser/my-project/cypress/screenshots/contact.cy.ts/Contact Page Tests -- Sub     (1280x720)
     mits the form successfully (failed).png


====================================================================================================

  (Run Finished)


       Spec                                              Tests  Passing  Failing  Pending  Skipped
  ┌────────────────────────────────────────────────────────────────────────────────────────────────┐
  │ ✖  contact.cy.ts                            00:06        1        -        1        -        - │
  └────────────────────────────────────────────────────────────────────────────────────────────────┘
    ✖  1 of 1 failed (100%)                     00:06        1        -        1        -        -
Open a new file explorer window.
Navigate to
cypress/screenshots/contact.cy.ts/in yourmy_projectdirectory and open the'Contact Page Tests -- Submits the form successfully (failed).png'image to verify the failed Cypress test contents.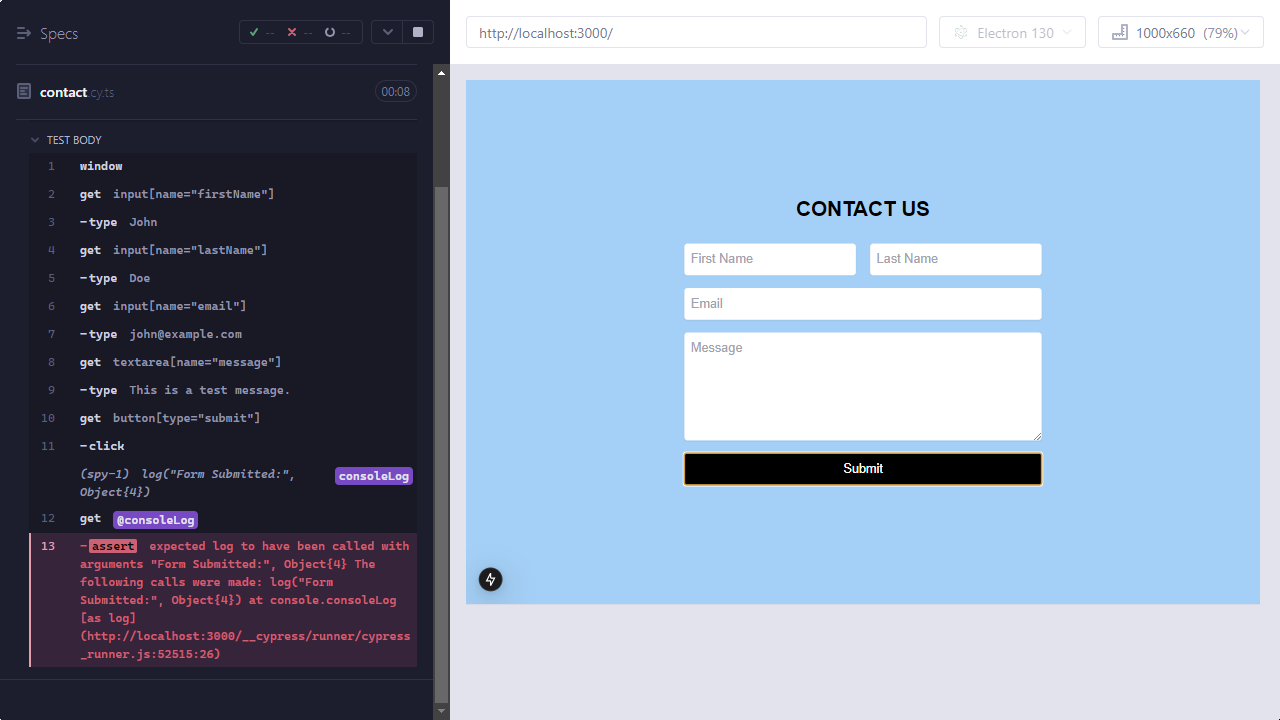
Configure GitHub Actions for CI/CD
GitHub workflows consist of jobs and steps that automate tasks in CI/CD pipelines. A job defines a set of instructions that execute in an isolated environment, while a step represents an individual task within a job, such as running a command. Follow the steps below to create a new workflow using GitHub actions to automate and validate your application's lifecycle.
Create a new
.github/workflowsdirectory.console$ mkdir -p .github/workflows
Create a new
cypress.ymlfile in the.github/workflowsdirectory.console$ nano .github/workflows/cypress.yml
Add the following configuration to the
cypress.ymlfile.yamlname: CI/CD Pipeline on: push: branches: - main jobs: test: runs-on: ubuntu-latest steps: - name: Checkout the repository uses: actions/checkout@v4 - name: Set up Node.js uses: actions/setup-node@v4 with: node-version: 18.x - name: Install dependencies run: npm install - name: Build the Next.js app run: npm run build - name: Run Cypress Tests uses: cypress-io/github-action@v6 with: start: npm start browser: chrome - name: Upload Screenshots if: failure() uses: actions/upload-artifact@v4 with: path: cypress/screenshots
The above configuration automates Cypress end-to-end testing by triggering workflows on pushes to the
mainbranch. It uses theubuntu-latestdevelopment environment and performs the following steps:- Checkout Code: Uses
actions/checkout@v4to retrieve your repository information. - Set up Node.js: Configures Node.js 18 with
actions/setup-node@v4. - Install and Build: Installs all required dependencies with
npm installand runsnpm run buildto build the Next.js application. - Run Tests: Executes tests in Chrome using
cypress-io/github-action@v6and runsnpm startto start the application. - Upload Screenshots: Uses
actions/upload-artifact@v4to store all failed test screenshots.
- Checkout Code: Uses
Initialize Git in your project directory.
console$ git init
Stage all files.
console$ git add .
Commit the changes with a custom message such as
Cypress E2E test workflow.console$ git commit -m "Cypress E2E test workflow"
Add your target GitHub repository to push the changes. Replace
https://github.com/example-user/cypress-dev-testwith your actual repository URL.console$ git remote add origin https://github.com/example-user/cypress-dev-test
Push your code changes to the
mainbranch.console$ git push -u origin main
Analyze Logs in GitHub Actions
GitHub offers built-in logging tools for monitoring Cypress test workflows. Logs display each Cypress test step, allowing you to review all test results and identify possible issues in your application.
Navigate to the Actions tab in your GitHub repository.
Select the workflow run.
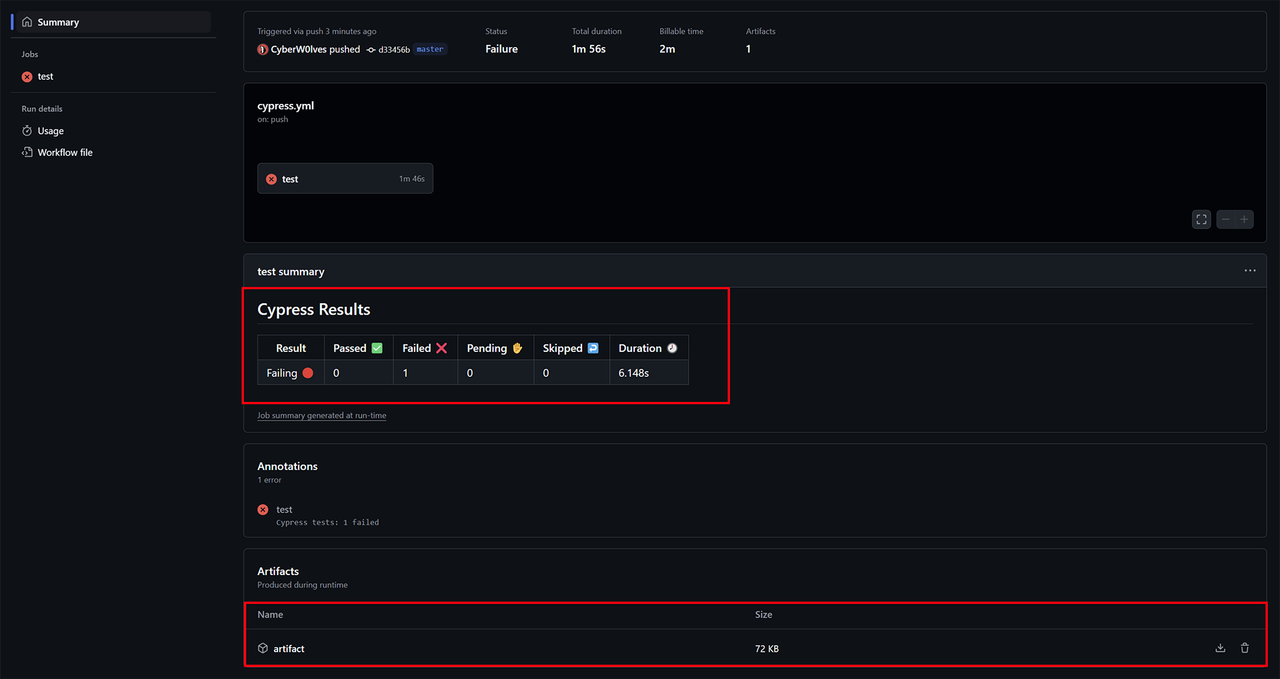
Verify the Cypress test results within the test summary section.
View all test screenshots within the Artifacts section.
Click test within the Jobs section on the left navigation bar to view all executed steps for the job.
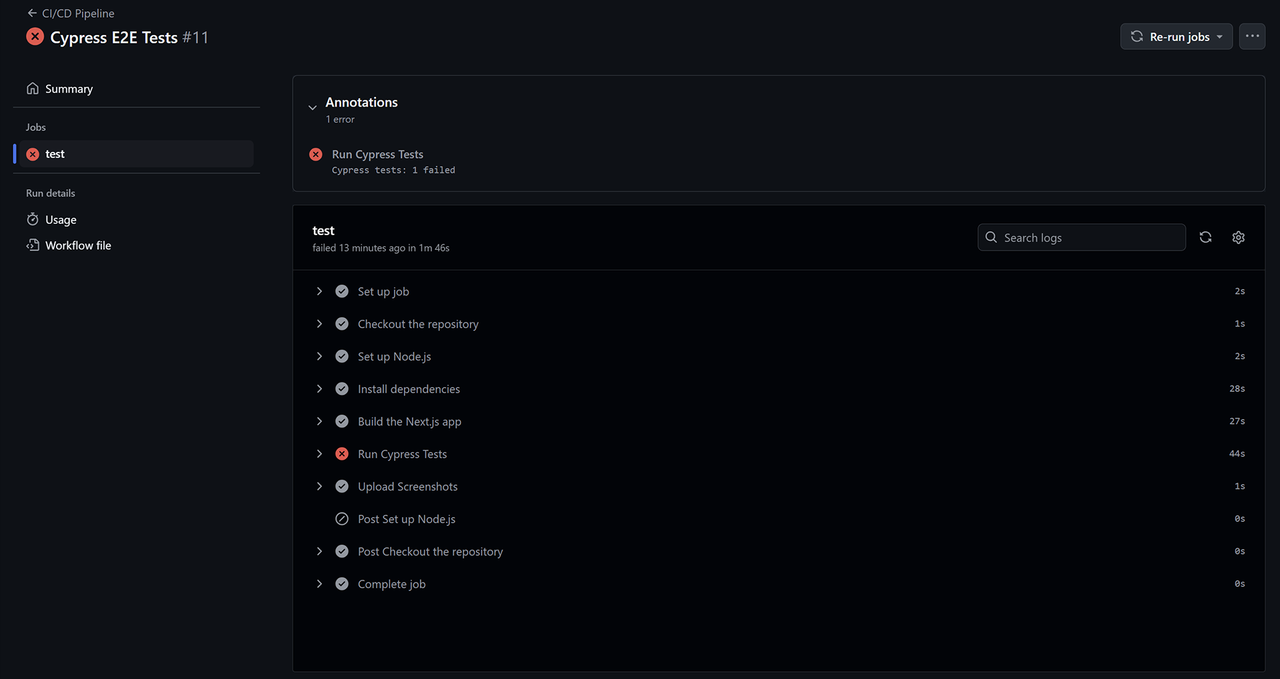
Verify the job's log details, including:
- Commands: CLI instructions executed by the job.
- Outputs: Terminal responses, including test pass/fail messages.
- Timestamps: Duration for each executed step.
Enable Slack Notifications for Cypress Tests
Slack notifications allow you to receive real-time alerts when Cypress tests fail in GitHub Actions. Follow the steps below to integrate Slack notifications to enable real-time prompt issue detection for faster debugging and resolution in your project.
Install the Incoming Webhooks app in your Slack workspace
Configure the webhook for your desired channel (for example,
#ci-cd-alerts).Select your target channel or create a new channel to post all incoming alerts.
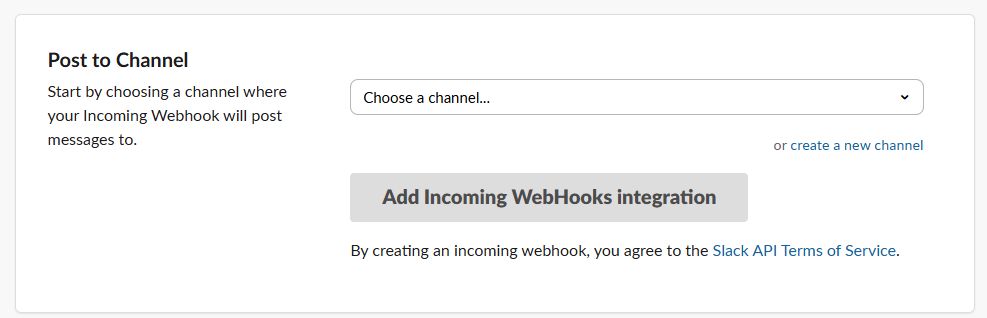
Copy the generated Webhook URL.
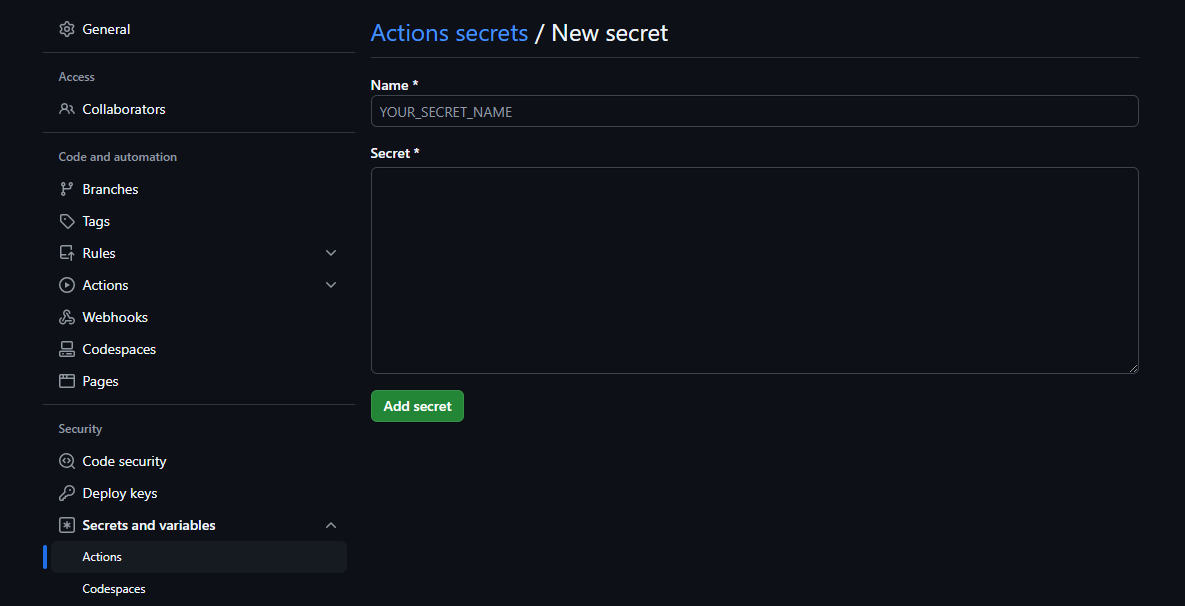
Access your GitHub repository.
Navigate to Settings > Secrets and Variables > Actions.
Click New Repository Secret.
Enter
SLACK_WEBHOOK_URLin the Name field to identify it.Paste the webhook URL you copied from Slack in the Secret field.
Switch to your terminal session.
Open the
cypress.ymlworkflow file.console$ nano .github/workflows/cypress.yml
Add the following configuration at the end of the file.
yaml- name: Notify Slack if: failure() uses: rtCamp/action-slack-notify@v2 env: SLACK_WEBHOOK: ${{ secrets.SLACK_WEBHOOK_URL }} SLACK_COLOR: ${{ job.status }}
Save and close the file.
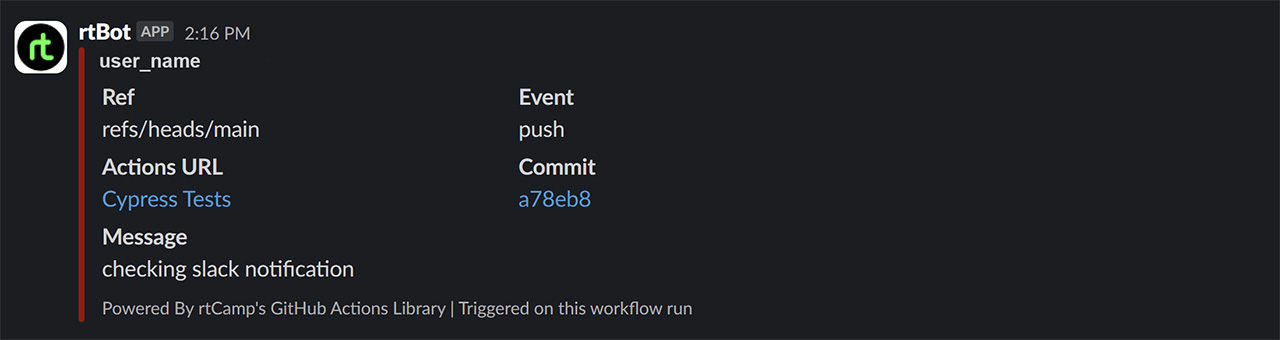
The above configuration uses the
SLACK_WEBHOOK_URLsecret you set earlier to send Slack notifications to your target channel in case of any failures in your workflow.Verify that all failed workflows trigger a Slack notification with a link to the GitHub Actions log.
Conclusion
You have created a CI/CD pipeline using GitHub Actions and automated Cypress end-to-end testing using a sample Next.js project. You automated test execution on push actions to the GitHub main branch, enabled screenshot capturing to debug failed tests, and integrated Slack notifications to receive real-time alerts for all failed tests in your workflow.
Automating your pipeline ensures consistent application quality and accelerated feedback cycles during development. To further streamline deployments and extend your workflow using a Kubernetes cluster for automated application deployment, visit the Implement a CI/CD Pipeline with GitHub Actions and Vultr Kubernetes Engine guide.