
How to Build a Docker Image
Docker is an open-source containerization platform that enables developers to package applications and all their dependencies into lightweight, portable containers that can run consistently across different environments. Docker images are the blueprint for containers. They package your application code, dependencies, environment variables, and runtime configurations into a portable and reproducible format. Building a Docker image allows you to encapsulate your application and run it consistently across different environments.
This article explains how to build Docker images efficiently and create an optimized Dockerfile.
The Short Answer
If you're already familiar with Docker and just need a quick reference, use the following commands:
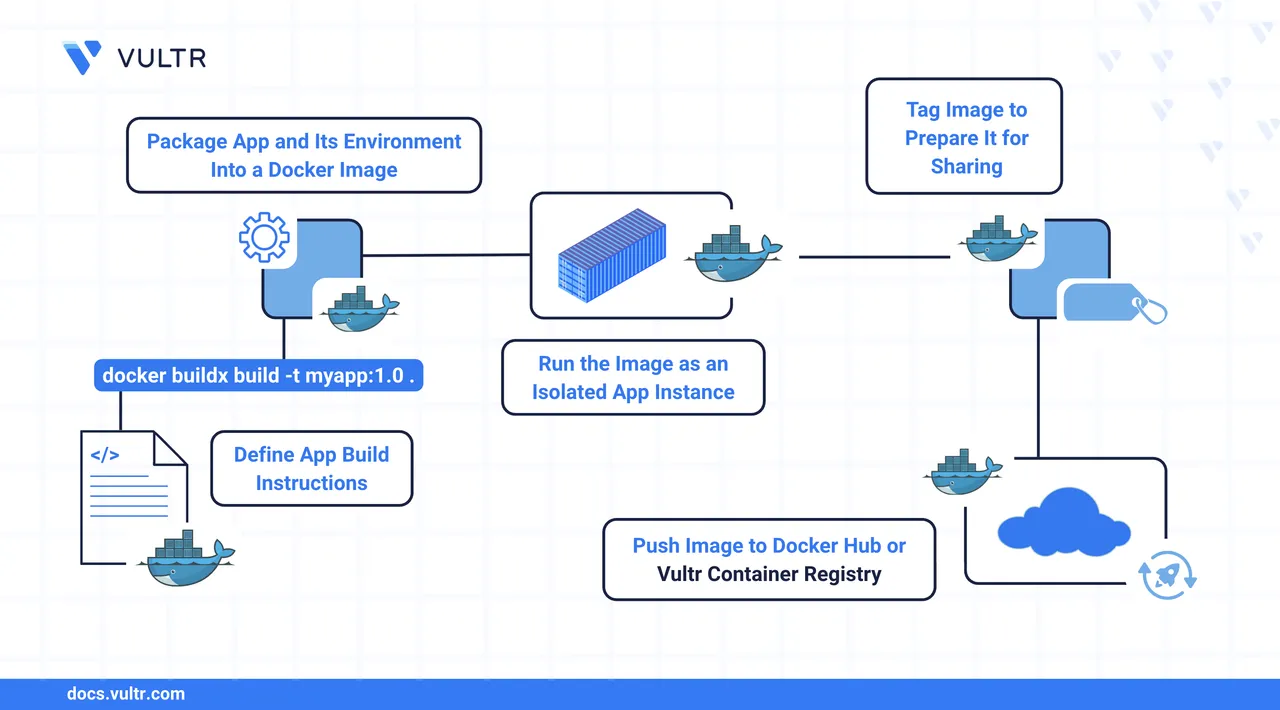
# Build a Docker image from a Dockerfile in the current directory
$ docker buildx build -t <image-name>:<tag> .

# Run a container from the image and map a port
$ docker container run -d -p <host-port>:<container-port> <image-name>:<tag>

# Tag the image for a container registry
$ docker image tag <image-name>:<tag> <registry>/<image-name>:<tag>

# Push your image to a registry (e.g., Docker Hub or Vultr Container Registry)
$ docker image push <registry>/<image-name>:<tag>
Continue reading for detailed explanations and examples of each command.
Create a Dockerfile
To build a Docker image, start by creating a Dockerfile. This file defines the environment, dependencies, and commands needed to build your application into a container image. Follow the steps below to create a Dockerfile for a Node.js web application.
Create a file named
Dockerfilein your project's root directory.console$ vim Dockerfile
Add the following content to the file.
dockerfile# Use Node.js as the base image FROM node:22-alpine # Set the working directory WORKDIR /app # Copy dependency files COPY package*.json ./ # Install dependencies RUN npm install # Copy application source code COPY . . # Expose application port EXPOSE 3000 # Define the startup command CMD ["node", "app.js"]
Save and exit the file.
Breakdown of Dockerfile
- FROM node:22-alpine: Defines node:22-alpine as the base image.
- WORKDIR /app: Sets /app as the working directory inside the container.
- COPY package*.json ./: Copies dependency definition files to the working directory.
- RUN npm install: Installs project dependencies using npm.
- COPY . .: Copies the entire project directory into the container.
- EXPOSE 3000: Declares port 3000 as the container's exposed port.
- CMD ["node", "app.js"]: Defines the startup command to run the application.
The above Dockerfile follows several best practices:
- Uses a specific version of the base image.
- Copies dependency files first to take advantage of Docker’s build cache.
- Uses a minimal Alpine-based image to reduce image size.
- Defines the default command to run the application.
Build The Docker Image
With your Dockerfile ready, use the docker buildx build command to create your image. Docker Buildx enables advanced build features such as multi-platform support, build caching, and pushing to registries.
Command Examples
Basic build with tag
console$ docker buildx build -t my-app:latest .
Build with multiple tags and build arguments.
console$ docker buildx build -t my-app:1.0 -t my-app:latest --build-arg ENV=production .
Multi-platform build and push to registry.
To build images for multiple CPU architectures and push them to a registry, use the
docker buildxcommand to create and bootstrap a builder (one-time setup).console$ docker buildx create \ --name container-builder \ --driver docker-container \ --bootstrap --use
After the
container-builderis running, you can run the multi-platform build.console$ docker buildx build \ --platform linux/amd64,linux/arm64 \ -t my-app:latest \ --push .
Command Breakdown
Explanation of key options used with docker buildx build:
docker buildx build: Uses Docker BuildKit’s extended build command for advanced features like multi-platform builds and better caching.-t my-app:latest: Tags the image with a name (my-app) and version (latest).-t my-app:1.0: Adds another tag (1.0) to the image.--build-arg ENV=production: Passes build-time variable ENV with the value production into the Dockerfile.--platform linux/amd64,linux/arm64: Builds images for multiple CPU architectures (for example, x86_64 and ARM64).--push: Pushes the built and manifest list to the specified container registry.--no-cache: Forces the build to skip caching and build each layer from scratch.--pull: Always pulls the latest version of the base image instead of using the cached one.-f Dockerfile.prod: Specifies a custom Dockerfile (Dockerfile.prod) instead of the default Dockerfile..: Sets the build context to the present directory.
Example Scenario
Follow this example to build and tag a Docker image for a Node.js application:
Clone an example Docker Node.js application repository.
console$ git clone https://github.com/docker/docker-nodejs-sample
Navigate to the cloned project directory.
console$ cd docker-nodejs-sample
Create a
Dockerfileinside the project root directory.console$ vim Dockerfile
Add the following content to the file.
dockerfileFROM node:22-alpine WORKDIR /usr/src/app COPY package*.json ./ RUN npm install COPY . . USER node EXPOSE 3000 CMD ["node", "src/index.js"]
Build the Docker image.
console$ docker buildx build -t my-app:latest .
View the newly built Docker image.
console$ docker image ls
The above command lists all the Docker images available on your system.
How does the Docker Build Work:
- Docker processes the
Dockerfilein a layered fashion. - Starts with the base image (
node:22-alpinein this case). - Creates a temporary container for each instruction (for example,
COPY,RUN,CMD). - Executes the instruction inside the container and commits the result as a new image layer.
- Removes the temporary container.
- Repeats the process for each instruction in the Dockerfile.
- Tags the final image with the names and versions you specified.
Test The Docker Image
After building your Docker image, test it by running a container and verifying that your application behaves as intended.
Run a container from your image.
console$ docker container run -d -p 3000:3000 --name check-list-app my-app:latest
In the above command:
docker container run: Starts a container from an image.-d: Runs the container in detached mode (in the background).-p 3000:3000: Maps port 3000 of the host to port 3000 of the container.--name check-list-app: Assigns a custom name to the container.my-app:latest: Specifies the image and tag to use.
Verify the container is running.
console$ docker container ls
This command lists all running containers. After confirming your container is listed and running, you can access your application to ensure it behaves as expected.
Check the application logs for debugging purposes.
console$ docker container logs check-list-app
This command displays the container's logs, allowing you to verify application startup messages or troubleshoot any issues.
Stop and remove the container.
console$ docker container stop check-list-app $ docker container rm check-list-app
The above commands above stop the running container and then remove it entirely from your system.
Optimize Docker Image Size
Optimizing Docker image size leads to faster deployments, lower storage costs, and improved security. Follow these best practices to create smaller, more efficient Docker images.
Use Multi-Stage Builds
Multi-stage builds let you create lean final images by separating build and runtime environments. Each FROM starts a new build stage, allowing you to copy only necessary artifacts into the final image.
# Build stage
FROM golang:1.17 AS builder
WORKDIR /app
COPY . .
RUN CGO_ENABLED=0 GOOS=linux go build -a -installsuffix cgo -o app .

# Final stage
FROM alpine:latest
RUN apk --no-cache add ca-certificates
WORKDIR /root/
COPY --from=builder /app/app .
CMD ["./app"]
The final image includes only the compiled binary and runtime dependencies, excluding source code and build tools.
Choose Smaller Base Images
Using smaller base images helps reduce Docker image size, improve security, and speed up build and deployment times. Choose a base image that includes only the essential components needed to run your application.
# Builder stage: install dependencies
FROM python:3.9-slim AS builder
WORKDIR /app
COPY requirements.txt .
RUN pip install --no-cache-dir -r requirements.txt --target /app/packages

# Final image: minimal runtime using distroless
FROM gcr.io/distroless/python3
COPY --from=builder /app/packages /packages
ENV PYTHONPATH=/packages
COPY app.py /
CMD ["app.py"]
Best practices:
- Use
alpineorslimbased images as a minimal base for building dependencies. - Use
distrolessfor a secure, production-ready runtime image. - Consider scratch images for statically compiled binaries in languages like
GoorRust. - Apply multi-stage builds to separate build and runtime environments.
- Exclude package managers and shells from the final image.
- Set environment variables like
PYTHONPATHto locate dependencies at runtime.
Reduce Layer Count and Image Size
Each instruction in a Dockerfile creates a new layer. Fewer, optimized layers reduce image size and speed up builds.
Example of Inefficient Dockerfile (Creates Many Layers)
# Bad practice * many layers
FROM ubuntu:20.04
RUN apt-get update
RUN apt-get install -y python3
RUN apt-get install -y python3-pip
RUN pip install flask
In the above Dockerfile:
- Each RUN instruction creates a new layer.
- No cleanup of APT cache or temporary files.
- Slower builds and larger images.
Example of Optimized Dockerfile (Fewer Layers and Smaller Image)
# Better practice * fewer layers
FROM ubuntu:20.04
RUN apt-get update && \
 apt-get install -y python3 python3-pip && \
 pip install flask && \
 apt-get clean && \
 rm -rf /var/lib/apt/lists/*
In the above dockerfile:
- Combine related commands using
&&to reduce layers. - Clean up package caches and temporary files during installation.
Use a .dockerignore File
Exclude unnecessary files and directories from the Docker build context to reduce image size and speed up build times.
node_modules
npm-debug.log
.git
.gitignore
Dockerfile
README.md
.env
*.pyc
__pycache__
In the above .dockerignore file:
- Prevents unneeded files from being copied into the image.
- Keeps the image clean and lightweight.
- Speeds up build time by minimizing the context sent to the Docker daemon.
Leverage Docker Build Cache
Docker caches image layers to avoid rebuilding unchanged steps. Structure your Dockerfile to take full advantage of this.
Best practices:
- Place less frequently changing instructions at the top of your Dockerfile.
- Copy dependency files first, install packages, then copy the application source last.
Example of Efficient Caching Structure
FROM node:16-alpine

WORKDIR /app

# Copy dependency files first
COPY package*.json ./

# Install dependencies
RUN npm install

# Copy the source code last
COPY . .

CMD ["node", "app.js"]
In the above Dockerfile:
- Dependency layers are reused unless package*.json changes.
- Source code changes won’t invalidate the cached dependency layers.
- Results in faster builds and smaller diffs in CI/CD pipelines.
Conclusion
You have built your own Docker image using the docker buildx build command and tested your Docker image by running a container. You learned how to create a custom Dockerfile to define your application environment, optimize your Docker images for size and performance. For more information, refer to the Docker documentation.