How to Build an Example Vultr Marketplace Application

Introduction
Vultr Marketplace provides pre-configured applications for quick cloud deployment, covering development tools, CMS, databases, and security. With just a few clicks, users can deploy solutions efficiently, saving time and effort while streamlining cloud infrastructure setup.
This guide explains how to build and publish a sample Vultr Marketplace Application. This sample application is an Ubuntu 24.04 server with MariaDB and Nginx. The deployment scripts create a sample database, a database user, and protect a web server with basic authentication. The web and database passwords use provisioning scripts to create unique passwords for each deployment.
Create an Application Profile
Follow the below steps to create your vendor account and application profile.
Edit your vendor settings.
Create a new application profile.
Edit the general information.
Edit the support information.
Publish the Application Instructions
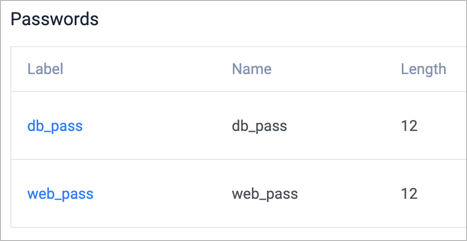
When a customer deploys the application, the Marketplace provides them with the IP address and root password. In addition to these values, customers can also create custom application variables. For the sample application in this guide create the variables
db_passandweb_pass.
Follow the Create Application Variables section in our Vultr Marketplace guide for more details.
Next, publish the instructions for the customer deployment page and include your application variables. Follow the Create the Application Instructions section in our Vultr Marketplace guide for more details.
Add your application's gallery images. Follow the Upload Artwork section in the Vultr Marketplace guide. Your public landing page uses these images to showcase your application.
Build the Application
Once the application profile and variables are defined, we will move ahead with creating an actual application. A workstation like macOS or Linux is required with bash or zsh as we move forward.
Clone the vultr-marketplace GitHub Repository.
console$ git clone https://github.com/vultr/vultr-marketplace.git
Install HashiCorp Packer.
Verify your workstation's IP address is in your Vultr API access control list.
Create an environment variable for Vultr API key.
console$ export VULTR_API_KEY=<vultr-api-key>
To have a debug log, export the two variables below.
console$ export PACKER_LOG=1 $ export PACKER_LOG_PATH=packer.log
Switch to the
sample-appdirectory.console$ cd vultr-marketplace/sample-app
Download the Vultr Packer plugin.
console$ packer init sample-app.pkr.hcl
Use
packer buildto automatically deploy a server, prepare it, make a snapshot, and then destroy the original server.$ packer build sample-app.pkr.hclPacker will create a snapshot in your Vultr account named
Sample App <Date Time>.Assign the created snapshot as the live image. Follow the Build App Image section in our Vultr Marketplace guide for more details.
Provisioning Scripts
The example app in this guide uses two provisioning scripts.
Per-Instance Scripts
Packer installs a deployment script in the snapshot at /var/lib/cloud/scripts/per-instance/setup-per-instance.sh. You can see the script in GitHub here.
The script executes when the customer deploys the server. It is only executed once and will not be re-executed when rebooting a server. Below are the procedures happening each time a new server with the script is deployed.
- The script logs the start date/time to
/var/log/per-instance.log - It captures the marketplace variables
db_passandweb_pass. - It creates a database.
- It also adds
example_userto the database with thedb_passpassword. - Creates an Nginx password for
example_userwith theweb_passpassword. - At the end, it logs the end date/time to
/var/log/per-instance.log.
The lines that capture the Marketplace Password variables use curl to retrieve variables that will be defined in later steps of this guide. The URL endpoint names are based on the variable names you defined earlier in the format:
http://<server-ip>/v1/internal/app-{variable_name}Follow the Create Provisioning Scripts section in our Vultr Marketplace guide for more details.
Per-Boot Script
Packer also installs a per-boot deployment script in the snapshot at /var/lib/cloud/scripts/per-boot/setup-per-boot.sh. You can see the script in GitHub here
The script executes on every boot of the server. When the script runs, it logs the date/time to /var/log/per-boot.log. You can modify this script as needed.
More About Provisioning Scripts
You can run other types of provisioning scripts in addition to these examples. Visit the cloud-init documentation for more information.
Test the Application
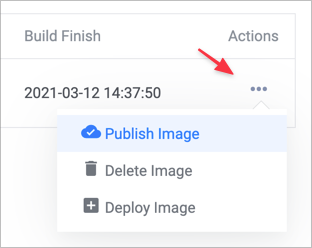
Deploy your Marketplace application from the Marketplace Builds tab. Use the Deploy Image option.

You'll be directed to the server deployment page of the Vultr customer portal, and your Marketplace image is automatically selected as the Server Type.
Once the application is deployed, access your instance using the root password provided on the server information page.
Check the cloud-init provision script log. You should see entries with a recent date and time.
console$ cat /var/log/per-instance.log
Verify the existence of the Nginx password file and the password hash created by the provisioning script.
console$ cat /etc/nginx/.htpasswd
Look up the website password on the server information page. Alternatively, you can also find the password in the
/root/web-password.txtfile.Navigate to the website. The website will prompt you for a username and password. Enter the username
example_userand the password shown on the server information page.Log into the database as
example_userwith the database password shown on the server information page. Alternatively, you can also find the password in the/root/db-password.txtfile.console$ mysql -u example_user -p
Show the database list and confirm the existence of
example_db.
Publish
If you successfully complete the tests, the application will be ready for publication. However, since this is only a sample application, you won't actually be publishing it.
Follow the Publish the Application section in our Vultr Marketplace guide to set your URL slug and submit the application for review.