
How to Deploy a Hashicorp Nomad Cluster on Vultr Cloud Compute Instances

HashiCorp Nomad is a flexible scheduler and workload orchestrator that enables you to deploy and manage diverse workloads of docker containers, non-containerized applications, microservices, and batch jobs in a single, unified workflow. Nomad supports multiple plugins to synchronize with a system's hardware devices, such as GPUs, Field-Programmable Gate Arrays (FPGAs), and storage devices. In addition, Nomad supports cluster linking across regions to deploy jobs while automatically synchronizing policies and resource settings.
Follow this guide to deploy a HashiCorp Nomad cluster on Vultr using multiple instances. You will set up a Nomad cluster with three servers and two clients running Ubuntu 24.04 to run multiple jobs within the cluster.
Prerequisites
Before you begin, you need to:
- Create a Vultr VPC network in a single Vultr location.
- Deploy a Vultr Load Balancer instance and attach it to the VPC network.
- Create a domain A record pointing to the Vultr Load Balancer's public IP address.
Nomad Architecture
Nomad uses the client-server architecture in which servers manage the cluster while clients run applications. Servers and clients use a lightweight protocol for communication, enabling seamless scalability and large-scale orchestration tasks. Within a Nomad cluster:
- Servers: Store the cluster state, schedule tasks, monitor the cluster's health, and ensure tasks are deployed on clients. Nomad servers work together to keep the system in sync using the Raft consensus algorithm.
- Clients: Worker nodes in the cluster that run applications defined in jobs. Nomad Client receive tasks from the Nomad servers, execute them, and report to servers with the task status.
- Job: Defines a user-specified state for a workload. A Job consists of one or more tasks organized into task groups. A Nomad cluster automatically allocates resources to run jobs and verifies that the actual job state matches the desired state.
- Task: A single unit of execution within a job that represents a specific workload. Servers schedule tasks to run on clients, and task drivers such as Docker execute the tasks.
- Allocation: A task that's assigned to a Nomad client. Each allocation represents a specific workload, such as a container or virtual machine, running on a client node within a sandbox environment.
- Region/DC (Data Center): Specifies the application region within a Nomad cluster for multi-region deployments.
- Nomad Enterprise: Adds collaboration and operational capabilities to Nomad. It enhances performance and availability through Advanced Autopilot features such as enhanced read scalability, automated upgrades, and redundancy zones.
Deploy Instances and Install Nomad
Follow the steps below to deploy all Vultr Cloud Compute instances and install Nomad using Cloud-Init to create a new cluster.
Open the Vultr Console.
Select your desired instance type in the Choose Type section.
Choose the Vultr location to deploy your instance.
Select the instance specifications within the Plans section.
Click Configure Software to set up the instance information.
Select Ubuntu 24.04 X64 in the Operating System tab.
Click Limited User Login within the Additional Features section to enable a non-root sudo user.
Click Cloud-Init User-Data.
Add the following configuration to the User Data field. Replace the
NOMAD_VERSIONvalue with the latest version available on the Nomad releases page.cfg#cloud-config # This script installs and configures Nomad as a server and client apt: update: true packages: - unzip - curl runcmd: - sudo ufw disable # Disable UFW if not using for firewall management - NOMAD_VERSION="1.9.3" - curl -sSL https://releases.hashicorp.com/nomad/${NOMAD_VERSION}/nomad_${NOMAD_VERSION}_linux_amd64.zip -o nomad.zip - unzip nomad.zip - mv nomad /usr/local/bin/nomad - chmod +x /usr/local/bin/nomad
Review the instance summary and increase the Quantity value to
5.Click Deploy to deploy the instances and install Nomad.
Attach all instances to the same VPC network as the Vultr Load Balancer.
Configure Nomad Servers and Clients
Follow the steps to set up the required Nomad configurations on all instances including servers and clients.
Access each instance using SSH.
View the installed Nomad version.
console$ nomad version
Output:
Nomad v1.9.3
BuildDate 2024-11-11T16:35:41Z
Revision d92bf1014886c0ff9f882f4a2691d5ae8ad8131c
Create a new Nomad configurations directory.
console$ sudo mkdir -p /etc/nomad.d
Create the Nomad data directory.
console$ sudo mkdir -p /opt/nomad
Enable the
755permissions mode on the Nomad directories to allow global read privileges for all users.console$ sudo chmod 755 /etc/nomad.d /opt/nomad
Create a new Nomad systemd service file.
console$ sudo nano /etc/systemd/system/nomad.service
Add the following configurations to the
nomad.servicefile.ini[Unit] Description=Nomad Agent Documentation=https://www.nomadproject.io/docs/ After=network-online.target Wants=network-online.target [Service] ExecStart=/usr/local/bin/nomad agent -config=/etc/nomad.d ExecReload=/bin/kill -HUP $MAINPID KillMode=process Restart=on-failure LimitNOFILE=65536 [Install] WantedBy=multi-user.target
Save and close the file.
The above configuration creates a new system service to run the Nomad agent binary using
/etc/nomad.das the configurations directory.Reload systemd to apply the service configuration changes.
console$ sudo systemctl daemon-reload
Enable the Nomad service to start at boot.
console$ sudo systemctl enable nomad
Start the Nomad service.
console$ sudo systemctl start nomad
Create the Nomad Server Configurations
Follow the steps below to create the Nomad server configuration on all three servers within the Nomad cluster.
View the IP network information and note the instance's VPC network address.
console$ ip a
Output:
1: lo: <LOOPBACK,UP,LOWER_UP> mtu 65536 qdisc noqueue state UNKNOWN group default qlen 1000 link/loopback 00:00:00:00:00:00 brd 00:00:00:00:00:00 inet 127.0.0.1/8 scope host lo valid_lft forever preferred_lft forever inet6 ::1/128 scope host noprefixroute valid_lft forever preferred_lft forever 2: enp1s0: <BROADCAST,MULTICAST,UP,LOWER_UP> mtu 1500 qdisc fq state UP group default qlen 1000 link/ether 56:00:05:40:83:ce brd ff:ff:ff:ff:ff:ff inet ................................ 3: enp8s0: <BROADCAST,MULTICAST,UP,LOWER_UP> mtu 1450 qdisc mq state UP group default qlen 1000 link/ether 5a:01:05:40:83:ce brd ff:ff:ff:ff:ff:ff inet 10.50.112.5/20 brd 10.50.127.255 scope global enp8s0 valid_lft forever preferred_lft forever inet6 fe80::5801:5ff:fe40:83ce/64 scope link valid_lft forever preferred_lft foreverenp8s0is the VPC network interface with the private IP address10.50.112.5based on the above output.Create a new
nomad.hclfile in the/etc/nomad.d/configurations directory.console$ sudo nano /etc/nomad.d/nomad.hcl
Add the following configurations to the file. Replace the
retry_joinvalues with the actual network addresses for other servers in the Nomad cluster.inidata_dir = "/opt/nomad" bind_addr = "0.0.0.0" advertise { http = "<LOAD_BALANCER_PUBLIC_IP>:4646" } server { enabled = true bootstrap_expect = 3 server_join { retry_join = ["<PRIVATE_IP_SERVER_2>:4648", "<PRIVATE_IP_SERVER_3>:4648"] } } client { enabled = false }
Save and close the file.
The above configuration enables the Nomad agent to listen for connection requests using all network addresses
0.0.0.0. Theadvertisesection specifies the Vultr Load Balancer's public IP address to advertise Nomad cluster requests while theserver_joinsection specifies the private addresses for each server within the Nomad cluster.Restart the Nomad service to apply the configuration changes.
console$ sudo systemctl restart nomad
Allow all network connections on the VPC network interface through the default firewall. Replace
enp8s0with your actual VPC network interface name.console$ sudo ufw allow in enp8s0
Reload UFW to apply the firewall configuration changes.
console$ sudo ufw reload
Create the Nomad Client Configurations
Follow the steps below to create a new Nomad configuration on all clients within the cluster.
Create a new
nomad.hclconfiguration within the/etc/nomad.d/directory.console$ sudo nano /etc/nomad.d/nomad.hcl
Add the following configurations to the
nomad.hclfile. Replace<PRIVATE_IP_SERVER_1>,<PRIVATE_IP_SERVER_2>, and<PRIVATE_IP_SERVER_3>with the VPC network addresses for the respective Nomad servers.inidata_dir = "/opt/nomad" bind_addr = "0.0.0.0" client { enabled = true server_join { retry_join = ["<PRIVATE_IP_SERVER_1>:4647", "<PRIVATE_IP_SERVER_2>:4647", "<PRIVATE_IP_SERVER_3>:4647"] } }
Save and close the file.
The above configuration enables the client configuration to join the Nomad cluster and send keep alive requests to all servers.
Restart the Nomad service to apply the configuration changes.
console$ sudo systemctl start nomad
Allow all network connections from the VPC interface through the firewall.
console$ sudo ufw allow in enp8s0
Reload UFW to apply the firewall changes.
console$ sudo ufw reload
Test the Nomad Cluster
Follow the steps below to test the connectivity and verify the Nomad cluster status on all hosts.
Test the Nomad Cluster Servers
Perform the following steps on each Nomad server.
Run the following command to view the Nomad servers information and status.
console$ nomad server members
Monitor the Leader column and verify the main server in your output similar to the one below.
Name                   Address      Port  Status  Leader  Raft Version  Build  Datacenter  Region
nomad-server-1.global  10.46.112.4  4648  alive   false   3             1.9.3  dc1         global
nomad-server-2.global  10.46.112.5  4648  alive   true    3             1.9.3  dc1         global
nomad-server-3.global  10.46.112.6  4648  alive   false   3             1.9.3  dc1         global
Test the connection to each Nomad server and the client's VPC address using the Ping utility.
console$ ping VPC-address
Test the Nomad Cluster Clients
Perform the following steps on each Nomad client.
Run the following command to view the Nomad clients information and status.
console$ nomad node status
Output:
ID        Node Pool  DC   Name            Class   Drain  Eligibility  Status
3e5ffcd6  default    dc1  nomad-client-2  <none>  false  eligible     ready
dca5daed  default    dc1  nomad-client-1  <none>  false  eligible     ready
Test the connection to each Nomad server and client's VPC address and verify that it's successful.
console$ ping VPC-address
Connect the Vultr Load Balancer to the Nomad Cluster
Follow the steps below to connect your Vultr Load Balancer to all servers in the Nomad cluster.
Access your Vultr Load Balancer instance's management page.
Click Attach Instance and select all Nomad servers to link to the Load Balancer.
Navigate to the Configuration tab.
Click Forwarding Rules on the left navigation menu.
Create a new rule to forward traffic to the TCP port
4646from the Load Balancer to port4646on all Nomad servers.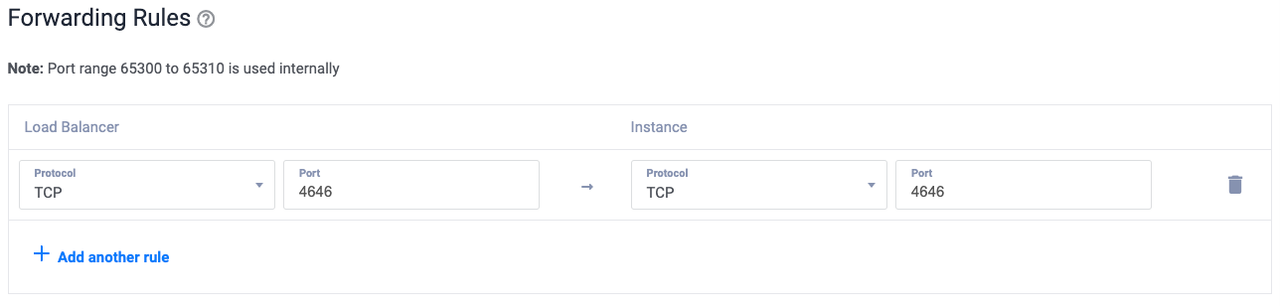
Update the Load Balancer's health checks configuration and set
TCPas the protocol and4646as the port.
Access the Nomad Cluster UI
Follow the steps below to access the Nomad cluster interface and verify the status of all servers and clients.
Access your domain on port
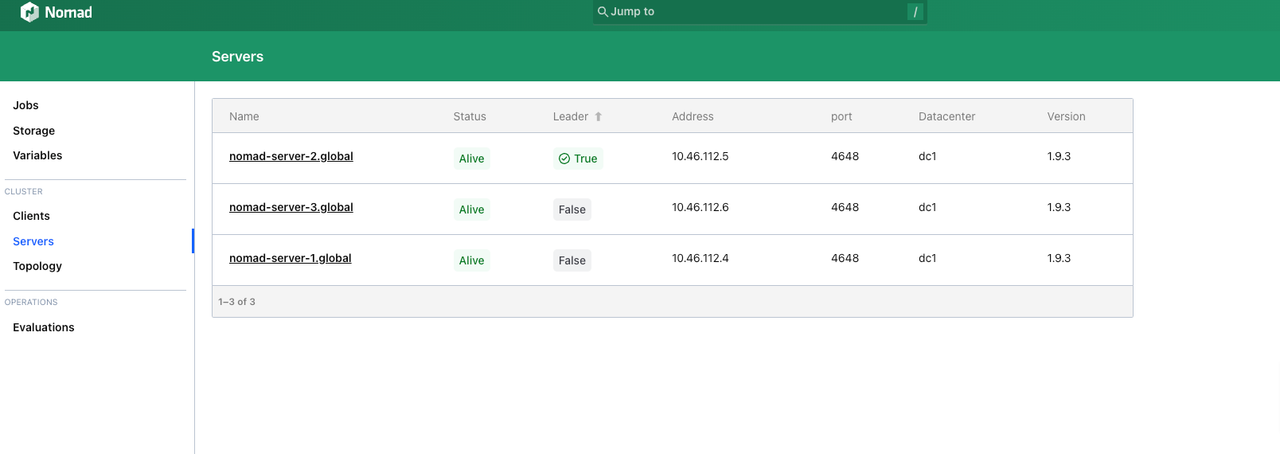
4646or the Vultr Load Balancer IP address in a web browser such as Chrome.http://example.com:4646Click Servers on the left CLUSTER navigation menu to view the status of each Nomad server.
View the Status column and verify that each server is marked as Alive.
Verify the leader server within the Nomad cluster.
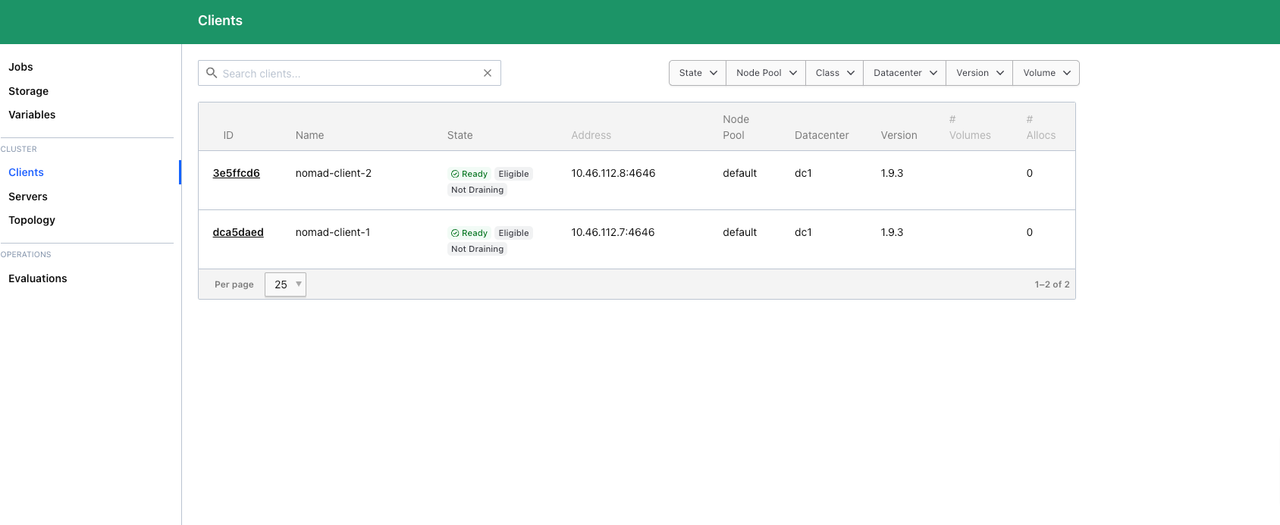
Click Clients and verify the status of all active clients, including the ID, name, state, and number of running tasks or allocations.
View the State column and verify that each client is Ready and able to run jobs.
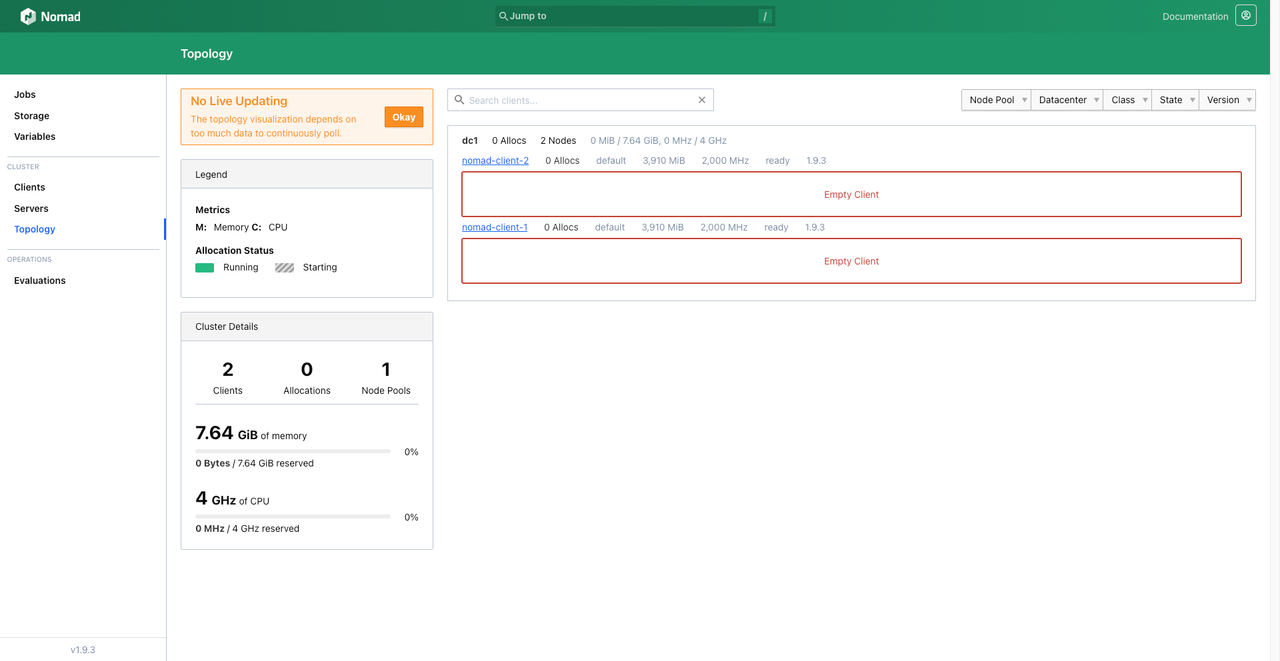
Click Topology to view the cluster details and monitor metrics such as CPU, memory usage, and all active nodes.
Verify the available resources and node capacity to ensure that your cluster can efficiently handle workloads.
Use the topology view to identify cluster issues such as over-provisioned clients and resource shortages.
Create a Sample Job Deployment
Follow the steps below to create a sample job deployment using any active Nomad server in the cluster.
Create a new
hello.nomadfile.console$ sudo nano hello.nomad
Add the following configurations to the file.
inijob "Greetings-from-Vultr" { datacenters = ["dc1"] type = "batch" group "example" { task "hello" { driver = "exec" config { command = "/bin/echo" args = ["Hello, Nomad"] } resources { cpu = 100 memory = 128 } } } }
Save and close the file.
Run the job.
console$ nomad job run hello.nomad
Output:
==> 2025-01-20T00:28:37Z: Monitoring evaluation "33d3b702"
    2025-01-20T00:28:37Z: Evaluation triggered by job "Greetings-from-Vultr"
    2025-01-20T00:28:38Z: Allocation "d9970550" created: node "13fb7086", group "example"
    2025-01-20T00:28:38Z: Evaluation status changed: "pending" -> "complete"
==> 2025-01-20T00:28:38Z: Evaluation "33d3b702" finished with status "complete"
Check the status of the job.
console$ nomad job status Greetings-from-Vultr
Output:
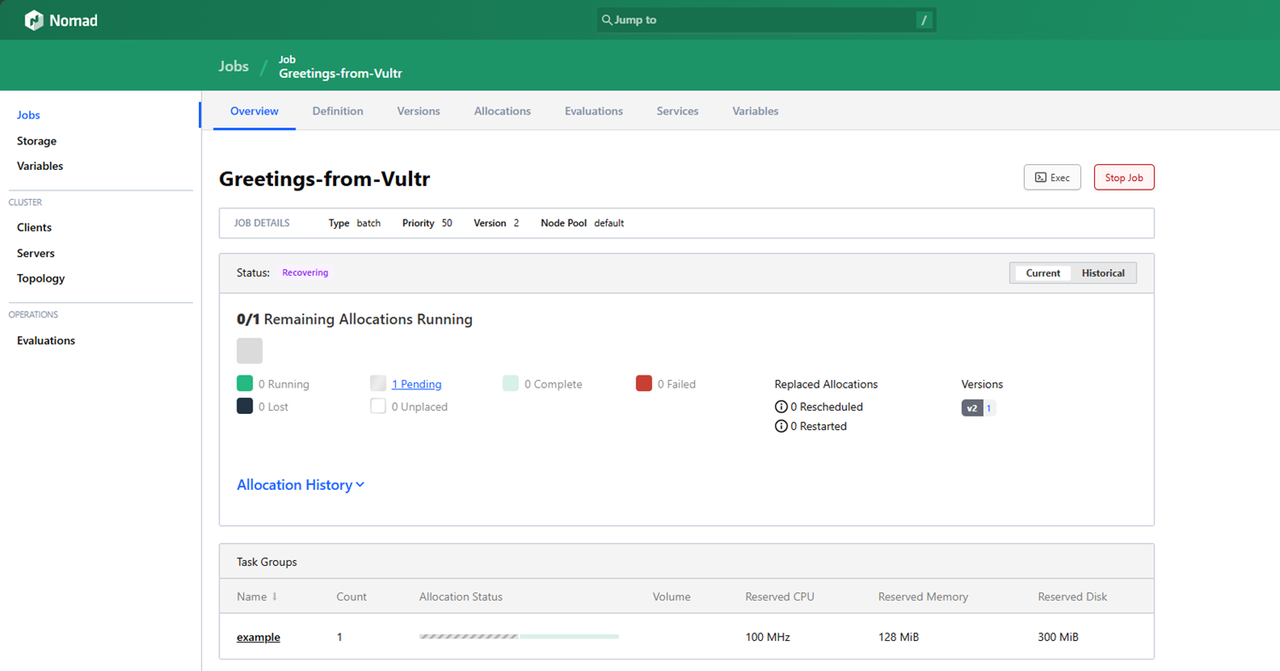
ID            = Greetings-from-Vultr
Name          = Greetings-from-Vultr
Submit Date   = 2025-01-20T00:28:37Z
Type          = batch
Priority      = 50
Datacenters   = dc1
Namespace     = default
Node Pool     = default
Status        = dead
Periodic      = false
Parameterized = false

Summary
Task Group  Queued  Starting  Running  Failed  Complete  Lost  Unknown
example     0       0         0        0       1         0     0

Allocations
ID        Node ID   Task Group  Version  Desired  Status    Created    Modified
d9970550  13fb7086  example     0        run      complete  1m18s ago  1m8s ago
Access the Nomad UI.
Navigate to Jobs and verify that the job is active.
Click the job to open its management page and monitor its runtime information.
Stop the job.
console$ nomad job stop Greetings-from-Vultr
Output:
==> 2025-01-20T00:30:54Z: Monitoring evaluation "f24c2f29"
    2025-01-20T00:30:54Z: Evaluation triggered by job "Greetings-from-Vultr"
    2025-01-20T00:30:55Z: Evaluation status changed: "pending" -> "complete"
==> 2025-01-20T00:30:55Z: Evaluation "f24c2f29" finished with status "complete"
Test the Cluster Resilience
Follow the steps below to run simulations to test the cluster resilience.
Simulate a Leader Server Failure
Follow the steps below to identify the leader server and simulate a failure to verify that the cluster stays operational.
Run the following command on any Nomad server to identify the leader.
console$ nomad server members
Output:
Name Address Port Status Leader Raft Version Build Datacenter Region nomad-server-1.global 10.46.96.4 4648 alive true 3 1.9.3 dc1 global nomad-server-2.global 10.46.96.5 4648 alive false 3 1.9.3 dc1 global nomad-server-3.global 10.46.96.6 4648 alive false 3 1.9.3 dc1 globalnomad-server-1.globalis the leader server based on the above output.Access the leader server and stop the Nomad service.
console$ sudo systemctl stop nomad
Check the Nomad server status using an active server and verify that a new cluster leader is elected.
console$ nomad server members
Output:
 Name                   Address     Port  Status  Leader  Raft Version  Build  Datacenter  Region
 nomad-server-2.global  10.46.96.5  4648  alive   true    3             1.9.3  dc1         global
 nomad-server-3.global  10.46.96.6  4648  alive   false   3             1.9.3  dc1         global
Start the original leader server again.
console$ sudo systemctl start nomad
Verify that the server rejoins as a follower.
console$ nomad server members
Output:
Name                   Address     Port  Status  Leader  Raft Version  Build  Datacenter  Region
nomad-server-1.global  10.46.96.4  4648  alive   false   3             1.9.3  dc1         global
nomad-server-2.global  10.46.96.5  4648  alive   true    3             1.9.3  dc1         global
nomad-server-3.global  10.46.96.6  4648  alive   false   3             1.9.3  dc1         global
Simulate Nomad Client Node Failures
Follow the steps below to simulate a failure of a client node and verify that the cluster stays operational.
Check the client node status on any Nomad server.
console$ nomad node status
Output:
ID        Node Pool  DC   Name            Class   Drain  Eligibility  Status
f87ee7f7  default    dc1  nomad-client-1  <none>  false  eligible     ready
c5585b87  default    dc1  nomad-client-2  <none>  false  eligible     ready
Stop the Nomad service on any client node.
console$ sudo systemctl stop nomad
View the Nomad client status again and verify that its status changes to
down.console$ nomad node status
Output:
ID        Node Pool  DC   Name            Class   Drain  Eligibility  Status
f87ee7f7  default    dc1  nomad-client-1  <none>  false  ineligible     down
c5585b87  default    dc1  nomad-client-2  <none>  false  eligible     ready
Restart the client node.
console$ sudo systemctl start nomad
Verify that the client node status returns to
ready.console$ nomad node status
Output:
ID        Node Pool  DC   Name            Class   Drain  Eligibility  Status
f87ee7f7  default    dc1  nomad-client-1  <none>  false  eligible     ready
c5585b87  default    dc1  nomad-client-2  <none>  false  eligible     ready
Conclusion
You have deployed a Hashicorp Nomad cluster using Vultr Cloud Compute Instances and created a sample job deployment to test its functionality. You can deploy applications in the cluster and set up multiple clients depending on your project needs. Visit the Vultr CSI repository to enable the creation of Vultr Block Storage volumes in your Nomad cluster. For more information and scaling options, visit the Nomad documentation.