
How to Deploy cert-manager and Manage SSL Certificates in Kubernetes
cert-manager is a Kubernetes-native certificate management controller that automates the issuance and renewal of SSL/TLS certificates. It integrates with multiple Certificate Authorities (CAs), including Let's Encrypt, HashiCorp Vault, and private Public Key Infrastructure (PKI) systems. cert-manager stores issued certificates as Kubernetes secrets, enabling seamless integration with Ingress controllers and other cluster workloads for secure TLS connections.
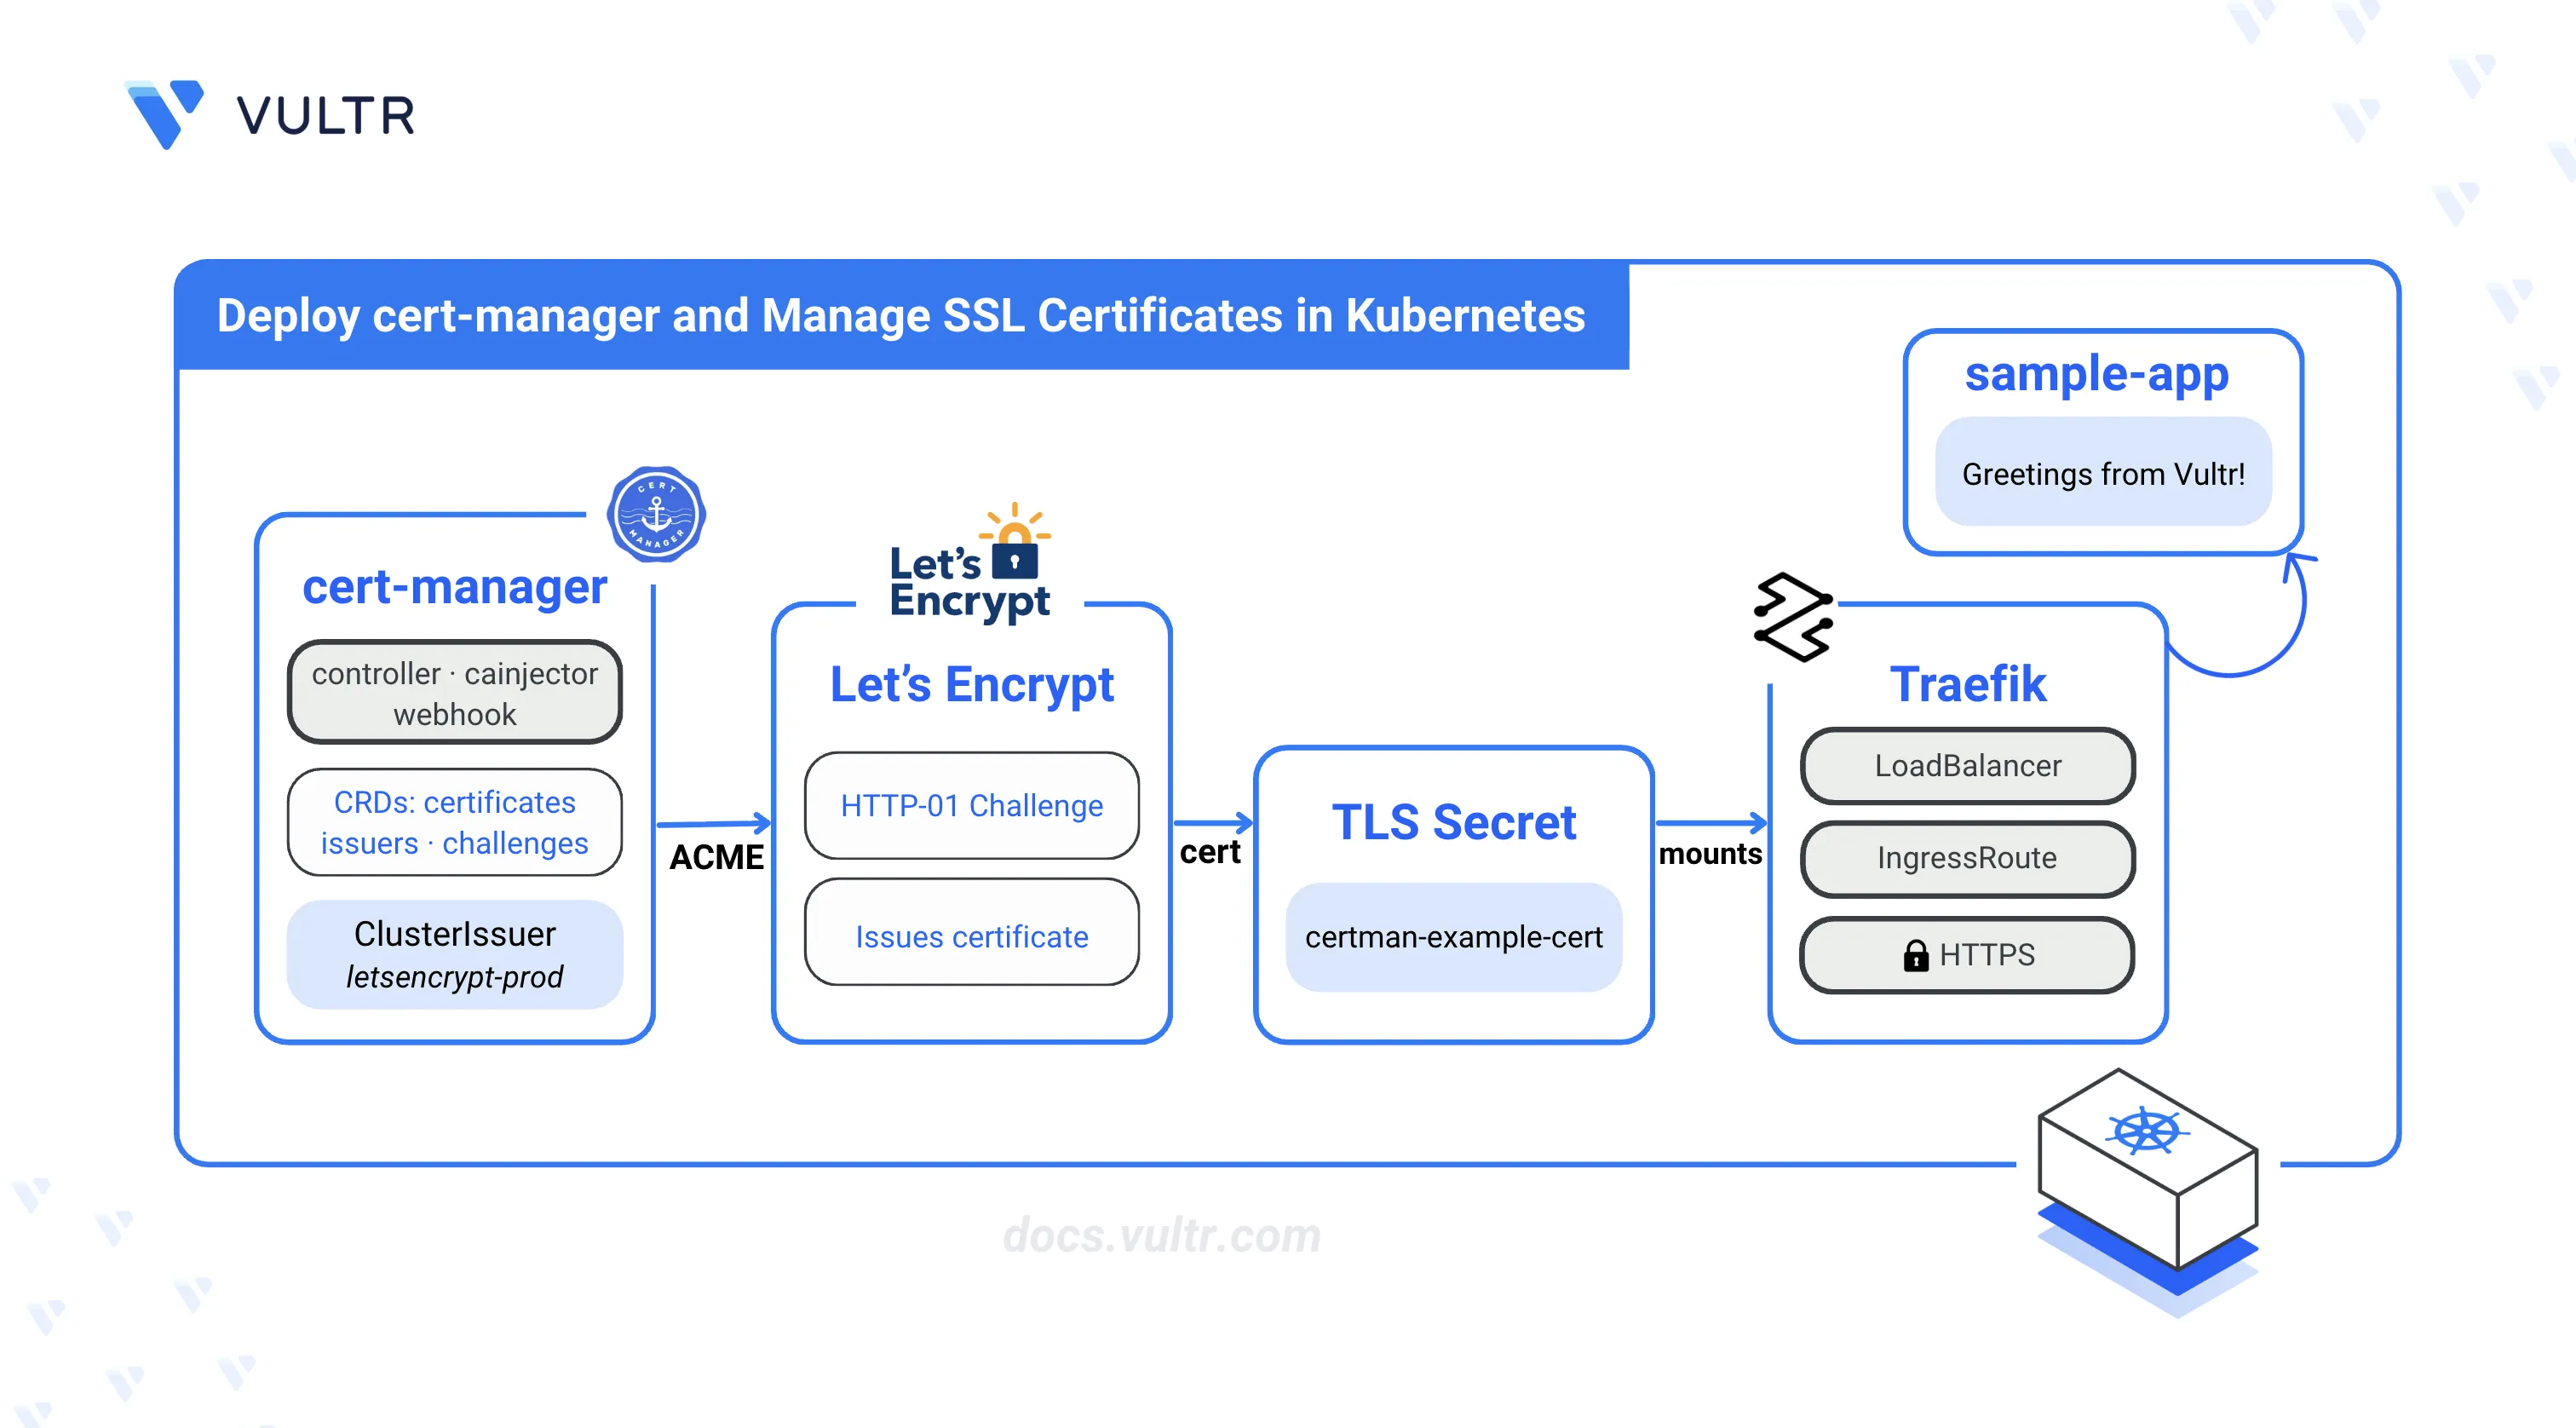
This article explains how to deploy cert-manager in a Kubernetes cluster and manage SSL certificates for securing applications. It covers installation using kubectl or Helm, configuring Issuers and ClusterIssuers, deploying a sample application with Traefik as the Ingress controller, and generating trusted Let's Encrypt SSL certificates.
Prerequisites
Before you begin, you need to:
- Have a Kubernetes cluster with at least 3 nodes and 4 GB RAM per node.
- Install and configure kubectl on your workstation to access your Kubernetes cluster.
- Install Helm on your workstation.
- Install cmctl, the cert-manager command-line tool, on your workstation.
- Have a registered domain name (for example,
certman.example.com).
Install cert-manager
cert-manager requires Custom Resource Definitions (CRDs) to define its certificate-related resources in the cluster. Install the CRDs first, then install cert-manager using either kubectl or Helm.
Install CRDs
Apply the cert-manager CRDs. Replace
v1.20.2with the latest stable version from the cert-manager releases page.console$ kubectl apply -f https://github.com/cert-manager/cert-manager/releases/download/v1.20.2/cert-manager.crds.yaml
Verify the CRDs are registered.
console$ kubectl get crds | grep cert-manager.io
The output lists all cert-manager CRDs including
certificates.cert-manager.io,issuers.cert-manager.io, andclusterissuers.cert-manager.io.
Install cert-manager with kubectl or Helm
Install the cert-manager controller using either of the following methods.
Apply the cert-manager manifest. Replace
v1.20.2with the latest stable version from the releases page.console$ kubectl apply -f https://github.com/cert-manager/cert-manager/releases/download/v1.20.2/cert-manager.yaml
Wait for the cert-manager pods to be ready.
console$ kubectl get pods -n cert-manager --watch
The output shows all pods with
Runningstatus. PressCtrl+Cto exit the watch.Verify that the cert-manager API is available.
console$ cmctl check api
Helm provides more control over installation options and simplifies upgrades. Since the CRDs are already installed, disable automatic CRD installation in the Helm chart.
Add the Jetstack Helm repository.
console$ helm repo add jetstack https://charts.jetstack.io
Update the local Helm repository index.
console$ helm repo update
Install cert-manager. Replace
v1.20.2with the latest stable version.console$ helm install cert-manager jetstack/cert-manager \ --namespace cert-manager \ --create-namespace \ --version v1.20.2 \ --set crds.enabled=false
Verify that all cert-manager pods are running.
console$ kubectl get pods -n cert-manager
The output shows all pods with
Runningstatus.Verify that the cert-manager API is available.
console$ cmctl check api
Create an Issuer
cert-manager uses Issuers to sign and generate SSL certificates using a Certificate Authority (CA). A ClusterIssuer can sign certificates in any namespace, while an Issuer can only sign certificates within its own namespace.
Create a ClusterIssuer
A ClusterIssuer is a cluster-wide resource that can issue certificates to any namespace.
Create a
cluster-issuer.yamlfile.console$ nano cluster-issuer.yaml
Add the following configuration.
yamlapiVersion: cert-manager.io/v1 kind: ClusterIssuer metadata: name: example-issuer spec: ca: secretName: example-ca-secret
Save and close the file.
The above configuration creates a ClusterIssuer that references a CA keypair stored in the
example-ca-secretsecret. The secret must exist in thecert-managernamespace before the ClusterIssuer can issue certificates.Apply the configuration.
console$ kubectl apply -f cluster-issuer.yaml
Verify the ClusterIssuer is created.
console$ kubectl get clusterissuers
The output shows
example-issuerwithFalsein the READY column until the referenced secret is created.
Create an Issuer
An Issuer is a namespace-scoped resource that can only issue certificates within its namespace.
Create an
issuer.yamlfile.console$ nano issuer.yaml
Add the following configuration. Replace
defaultwith your target namespace if different.yamlapiVersion: cert-manager.io/v1 kind: Issuer metadata: name: ca-issuer namespace: default spec: ca: secretName: ca-key-pair
Save and close the file.
The above configuration creates an Issuer in the
defaultnamespace that references theca-key-pairsecret for signing certificates.Apply the configuration.
console$ kubectl apply -f issuer.yaml
Verify the Issuer is created.
console$ kubectl get issuers -n default
The output shows
ca-issuerwithFalsein the READY column until the referenced secret is created.
Create a Sample Application to Secure with SSL Certificates
Deploy a sample application with an Ingress controller to demonstrate SSL certificate usage. Traefik serves as the Ingress controller to handle incoming HTTPS traffic.
Add the Traefik Helm repository.
console$ helm repo add traefik https://traefik.github.io/charts
Update the local Helm repository index.
console$ helm repo update
Install Traefik.
console$ helm install traefik traefik/traefik --wait \ --set ingressRoute.dashboard.enabled=true \ --set ingressRoute.dashboard.matchRule='Host(`dashboard.localhost`)' \ --set ingressRoute.dashboard.entryPoints={web}
Wait at least 3 minutes for the LoadBalancer to provision, then retrieve the external IP address.
console$ kubectl get services traefik
The output displays the
EXTERNAL-IPcolumn with your public IP address. If it shows<pending>, wait a few more minutes.Log in to your DNS provider (such as Vultr DNS) and create a DNS A record pointing your domain (for example,
certman.example.com) to the LoadBalancer's external IP address.Create a
sample-app.yamlfile to define the application deployment and service.console$ nano sample-app.yaml
Add the following configuration.
yamlapiVersion: apps/v1 kind: Deployment metadata: name: sample-app namespace: default spec: replicas: 1 selector: matchLabels: app: sample-app template: metadata: labels: app: sample-app spec: containers: - name: sample-app image: hashicorp/http-echo:latest args: - "-text=Greetings from Vultr!" ports: - containerPort: 5678 --- apiVersion: v1 kind: Service metadata: name: sample-app namespace: default spec: selector: app: sample-app ports: - port: 80 targetPort: 5678
Save and close the file.
The above configuration deploys a simple HTTP echo application that displays "Greetings from Vultr!" when accessed.
Apply the configuration.
console$ kubectl apply -f sample-app.yaml
Verify the deployment is running.
console$ kubectl get deployments -n default
The output shows
sample-appwith1/1in the READY column.
Generate Let's Encrypt SSL Certificates
cert-manager supports Automated Certificate Management Environment (ACME) providers like Let's Encrypt for issuing trusted SSL certificates. The HTTP-01 challenge verifies domain ownership by responding to requests on a well-known path.
Create a
letsencrypt-issuer.yamlfile.console$ nano letsencrypt-issuer.yaml
Add the following configuration. Replace
admin@example.comwith your active email address.yamlapiVersion: cert-manager.io/v1 kind: ClusterIssuer metadata: name: letsencrypt-prod spec: acme: email: admin@example.com server: https://acme-v02.api.letsencrypt.org/directory privateKeySecretRef: name: letsencrypt-prod-key solvers: - http01: ingress: ingressClassName: traefik
Save and close the file.
The above configuration creates a ClusterIssuer that:
- Uses Let's Encrypt as the ACME provider.
- Stores the account private key in a secret named
letsencrypt-prod-key. - Uses HTTP-01 challenges with Traefik as the Ingress solver.
Apply the configuration.
console$ kubectl apply -f letsencrypt-issuer.yaml
Verify the ClusterIssuer is ready.
console$ kubectl get clusterissuers letsencrypt-prod
The output shows
Truein the READY column.Create a
certificate.yamlfile to request an SSL certificate. Replacecertman.example.comwith your domain.console$ nano certificate.yaml
Add the following configuration.
yamlapiVersion: cert-manager.io/v1 kind: Certificate metadata: name: certman-example-cert namespace: default spec: secretName: certman-example-tls dnsNames: - certman.example.com issuerRef: name: letsencrypt-prod kind: ClusterIssuer group: cert-manager.io
Save and close the file.
Apply the configuration.
console$ kubectl apply -f certificate.yaml
Certificate generation may take up to 3-5 minutes while cert-manager completes the ACME challenge. Wait for the certificate to be ready before proceeding.
Verify the certificate is issued.
console$ kubectl get certificates -n default
The output shows
certman-example-certwithTruein the READY column.Create a
sample-app-ingress.yamlfile to route traffic to the application with TLS.console$ nano sample-app-ingress.yaml
Add the following configuration. Replace
certman.example.comwith your actual domain.yamlapiVersion: traefik.io/v1alpha1 kind: IngressRoute metadata: name: sample-app-route namespace: default spec: entryPoints: - websecure routes: - match: Host(`certman.example.com`) kind: Rule services: - name: sample-app port: 80 tls: secretName: certman-example-tls
Save and close the file.
The above configuration routes HTTPS traffic for your domain to the sample application using the generated TLS certificate.
Apply the configuration.
console$ kubectl apply -f sample-app-ingress.yaml
Open a web browser and navigate to
https://certman.example.com. Replacecertman.example.comwith your configured domain.The browser displays "Greetings from Vultr!" with a valid SSL certificate indicated by the lock icon.
Test cert-manager
Validate the cert-manager deployment by testing certificate operations.
Check the certificate status using
cmctl.console$ cmctl status certificate certman-example-cert -n default
The output displays detailed certificate information including the issuer, expiration date, and secret name.
Inspect the certificate details.
console$ kubectl describe certificate certman-example-cert -n default
The output shows the certificate events including issuance and any renewal activity.
Test manual certificate renewal.
console$ cmctl renew certman-example-cert -n default
Verify the certificate secret contains the TLS data.
console$ kubectl get secret certman-example-tls -n default -o jsonpath='{.data.tls\.crt}' | base64 -d | openssl x509 -noout -subject -issuer
Troubleshooting
The following sections cover common cert-manager issues and their solutions.
Certificate stuck in "Issuing" state
Check the certificate request status and events.
$ kubectl describe certificaterequest -n default
$ kubectl get challenges -n default
Common causes include:
- DNS not propagated: Verify your domain resolves to the LoadBalancer IP using
dig certman.example.com. - HTTP-01 challenge failing: Verify Traefik is running and port 80 is accessible from the internet.
- Rate limits: Let's Encrypt enforces rate limits. Check the Let's Encrypt rate limits documentation.
ClusterIssuer shows "Not Ready"
Check the ClusterIssuer status and events.
$ kubectl describe clusterissuer letsencrypt-prod
Common causes include:
- Invalid email address: ACME requires a valid email for account registration.
- Network issues: Verify the cluster can reach
acme-v02.api.letsencrypt.org.
cert-manager pods not starting
Check the pod logs for errors.
$ kubectl logs -n cert-manager -l app=cert-manager
$ kubectl logs -n cert-manager -l app=cainjector
$ kubectl logs -n cert-manager -l app=webhook
Common causes include:
- Insufficient resources: Verify nodes have available CPU and memory.
- CRD installation issues: Reinstall cert-manager with CRDs using
--set crds.enabled=true.
Certificate renewal failures
cert-manager automatically renews certificates 30 days before expiration. Check renewal status.
$ cmctl status certificate certman-example-cert -n default
Force a renewal if needed.
$ cmctl renew certman-example-cert -n default
Conclusion
You have deployed cert-manager in a Kubernetes cluster and configured it to issue SSL certificates using Let's Encrypt. The setup includes a ClusterIssuer for ACME certificate management, a sample application secured with TLS, and Traefik as the Ingress controller for routing HTTPS traffic. cert-manager automatically renews certificates before expiration, ensuring continuous TLS protection for your applications. For advanced configurations including DNS01 challenges, Vault integration, and certificate policies, refer to the official cert-manager documentation.