
How to Deploy Gradio on Ubuntu 22.04
Introduction
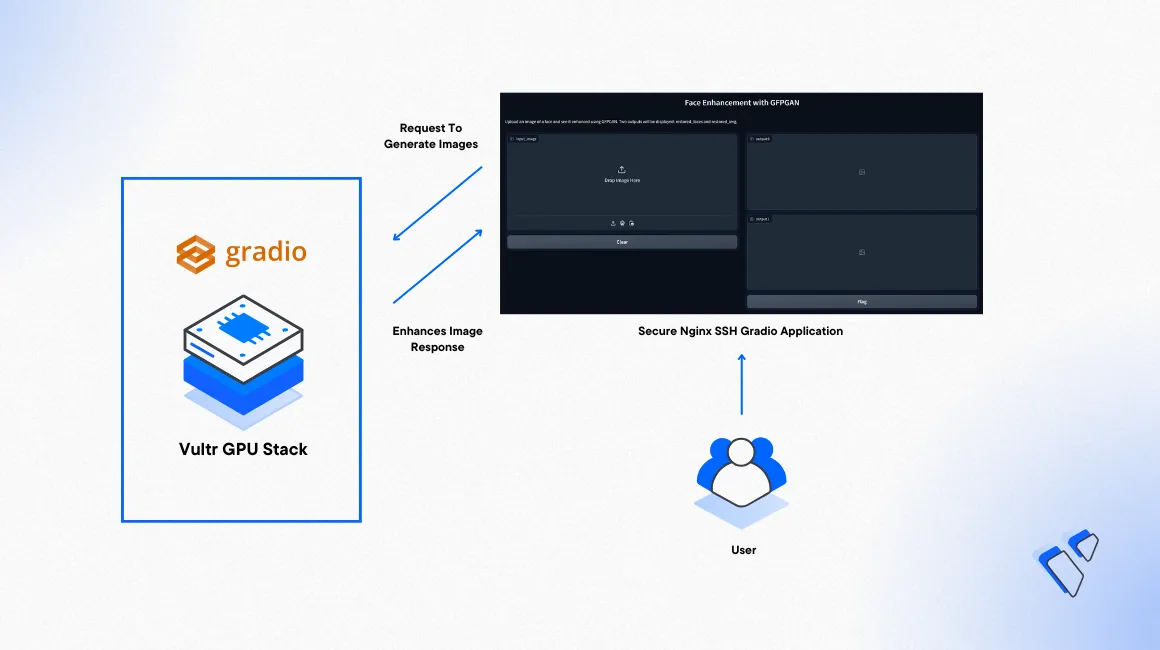
Gradio is a Python library that allows you to create a web interface using any Machine Learning (ML) model of your choice. When intergrated the model is directly deployed as a web application to suite your needs and scale the application depending on your user requirements. This article explains how to deploy Gradio on a Ubuntu 22.04 server and securely expose the application for public access using a domain name.
Prerequisites
Before you begin:
- Deploy a Ubuntu A100 Cloud GPU server.
- Set up a domain A record that points to the server IP address
- Access the server using SSH as a non-root user with sudo privileges
- Update the server
- Install Nginx
Set Up the Server
Install the required model dependency packages.
console$ pip3 install realesrgan gfpgan basicsr gradio
Below is what each of the above packages does:
realesrgan: Handles the model background restoration process.gfpgan: Performs the face restoration processes.basicsr: ImportsRRDBNETwhich is a deep neural network architecture used in super-resolution algorithms and it's utilized by the GFPGAN model.gradio: Creates the model web interface.
The model implementation in this article uses the
pandaslibrary that requiresjinja2version3.1.2or above. Verify the installed version.console$ pip show jinja2
Output:
Name: Jinja2
Version: 3.0.3
Summary: A very fast and expressive template engine.
If the available version is below
3.1, upgrade thejinja2package.$ pip install --upgrade jinja2Create a new Project directory
gradio-webappin a system-wide location such as/opt/to store the application files.console$ sudo mkdir -p /opt/gradio-webapp/
Grant your user group ownership permissions to the directory.
console$ sudo chown -R :$(id -gn) /opt/gradio-webapp/
Set the directory permissions to 775 to allow the user to write and execute files in the directory.
console$ sudo chmod -R 775 /opt/gradio-webapp/
Create a new Gradio Web Application
Create a new Gradio web application that uses an open-source ML model such as GFPGAN used in this section. The model allows you to restore and improve images by uploading a source image that is enhanced with two output copies. Follow the steps below to create the Gradio web application powered by GFPGAN to expose on the internal server port 8080.
Switch to your project directory.
console$ cd /opt/gradio-webapp/
Using a text editor such as
nano, create a new Python application file.console$ nano app.py
Add the following code to the file.
pythonimport gradio as gr from gfpgan import GFPGANer from basicsr.archs.rrdbnet_arch import RRDBNet from realesrgan import RealESRGANer import numpy as np import cv2 import requests def enhance_image(input_image): arch = 'clean' model_name = 'GFPGANv1.4' gfpgan_checkpoint = 'https://github.com/TencentARC/GFPGAN/releases/download/v1.3.4/GFPGANv1.4.pth' realersgan_checkpoint = 'https://github.com/xinntao/Real-ESRGAN/releases/download/v0.2.1/RealESRGAN_x2plus.pth' rrdbnet = RRDBNet(num_in_ch=3, num_out_ch=3, num_feat=64, num_block=23, num_grow_ch=32, scale=2) bg_upsampler = RealESRGANer( scale=2, model_path=realersgan_checkpoint, model=rrdbnet, tile=400, tile_pad=10, pre_pad=0, half=True ) restorer = GFPGANer( model_path=gfpgan_checkpoint, upscale=2, arch=arch, channel_multiplier=2, bg_upsampler=bg_upsampler ) input_image = input_image.astype(np.uint8) cropped_faces, restored_faces, restored_img = restorer.enhance(input_image) return restored_faces[0], restored_img interface = gr.Interface( fn=enhance_image, inputs=gr.Image(), outputs=[gr.Image(), gr.Image()], live=True, title="Face Enhancement with GFPGAN", description="Upload an image of a face and see it enhanced using GFPGAN. Two outputs will be displayed: restored_faces and restored_img." ) interface.launch(server_name="0.0.0.0", server_port=8080)
Save and close the file.
Below is what the above application functions do:
enhance_image(): Stores the model checkpoints and architecture information along with face enhancement model parameters. The model is defined within this parameter because gradio requires a defined function to mark what it should execute in the interface.rrdbnet: Defines the image super-resolution parameters.bg_upsampler: Defines the background enhancement parameters.restorer: Defines the face restoration parameters.interface: Defines how the interface should look.interface.launch(): Specifies the launch command of the interface to create a web app.
Run the application to verify that the model starts correctly.
console$ python3 app.py
When successful, your output should look like the one below:
Running on local URL: http://0.0.0.0:8080To create a public link, set
share=Trueinlaunch().Press Control + C to stop the application process.
Set Up the Gradio Web Application as a System Service
To start the Gradio web application as a system service and enable start, stop, status operations to verify the application processes, set up a new Systemd service. Follow the steps below to create a new system service and test the Gradio web application processes.
Create a new Systemd service file.
console$ sudo nano /etc/systemd/system/my_gradio_app.service
Add the following contents to the file. Replace
example-userwith your actual user account to run the service.ini[Unit] Description=My Gradio Web Application [Service] ExecStart=/usr/bin/python3 /opt/gradio-webapp/app.py WorkingDirectory=/opt/gradio-webapp/ Restart=always User=example-user Environment=PATH=/usr/bin:/usr/local/bin Environment=PYTHONUNBUFFERED=1 [Install] WantedBy=multi-user.target
Save and close the file.
Below is what the above Systemd declarations represent:
Description: A brief summary of the service functionality.ExecStart: Specifies how the service should execute. In the above file, thePython3interpreter is executed to start theapp.pyin your Gradio directory.WorkingDirectory: The active directory where your Python file is located.Restart: Defines the service restart behavior. When set toalwaysthe automatically restart it in case of a failure.User: Specifies the user to run the service as.
Restart the Systemd daemon to save changes.
console$ sudo systemctl daemon-reload
Enable the service to start at boot time.
console$ sudo systemctl enable my_gradio_app
Start the Gradio service.
console$ sudo systemctl start my_gradio_app
Verify the service is running correctly without any error.
console$ sudo systemctl status my_gradio_app
Output:
● my_gradio_app.service - My Gradio App
    Loaded: loaded (/etc/systemd/system/my_gradio_app.service; enabled; vendor preset: enabled)
Active: active (running) since Fri 2023-10-13 13:50:04 UTC; 11s ago
Main PID: 3287 (python3)
Tasks: 4 (limit: 17871)
Memory: 329.6M
CGroup: /system.slice/my_gradio_app.service
        └─3287 /usr/bin/python3 /root/app.py

Oct 13 13:50:04 vultr systemd[1]: Started My Gradio App.
Oct 13 13:50:08 vultr python3[3287]: /usr/local/lib/python3.8/dist-packages/torchvision/transforms/functional_tensor.py:5: UserWarning: The torchvision.transforms.functional_tensor module>
Oct 13 13:50:08 vultr python3[3287]:   warnings.warn()
Oct 13 13:50:08 vultr python3[3287]: Running on local URL:  http://0.0.0.0:8080
Oct 13 13:50:08 vultr python3[3287]: To create a public link, set `share=True` in `launch()`.
Configure Nginx as a Reverse Proxy to Expose the Gradio Web Application
To safely expose the Gradio web application port 8080 to the Internet, configure Nginx as a reverse proxy to forward and handle connection requests from the HTTP port 80. To securely handle incoming traffic, later configure Nginx to handle HTTPS requests with a valid SSL certificate. In this section, create the necessary Nginx configurations and test access to the Gradio web interface.
Create a new Nginx virtual host configuration file in the
sites-availabledirectory.console$ sudo nano /etc/nginx/sites-available/gradio.conf
Add the following contents to the file.
nginxserver { listen 80; listen [::]:80; server_name gradio.example.com; location / { proxy_pass http://127.0.0.1:8080/; } }
Save and close the file.
Link the configuration file to the
sites-enableddirectory to activate the configuration file.console$ sudo ln -s /etc/nginx/sites-available/gradio.conf /etc/nginx/sites-enabled/
Test the Nginx configuration for errors.
console$ sudo nginx -t
Output:
nginx: the configuration file /etc/nginx/nginx.conf syntax is ok
nginx: configuration file /etc/nginx/nginx.conf test is successful
Restart Nginx to apply changes.
console$ sudo systemctl restart nginx
Security
Verify that the default UFW firewall is active on your Ubuntu server.
console$ sudo ufw status
Output:
Status: active

To                         Action      From
--                         ------      ----
22/tcp                     ALLOW       Anywhere
To accept incoming HTTP connections, allow the HTTP port
80through the firewall.console$ sudo ufw allow 80/tcp
Allow the HTTPS port
443.console$ sudo ufw allow 443/tcp
Reload the firewall rules to save changes.
console$ sudo ufw reload
Secure the Gradio Web Application with Trusted SSL Certificates
To securely encrypt your server traffic, generate valid SSL certificates using the Certbot Let's Encrypt Client. When generated, you Gradio web application domain name is protected with HTTPS traffic and a valid SSL certificate. Follow the steps below to install the Certbot client and generate SSL certificates using your Nginx configuration.
Install Certbot.
console$ sudo apt install -y certbot python3-certbot-nginx
Generate a new SSL certificate using your Nginx configurations.
$ sudo certbot --nginx -d gradio.example.com -m admin@example.com --agree-tosVerify that the Certificate auto-renews upon expiry.
$ sudo certbot renew --dry-runIf the above command doesn't throw an error, Certbot auto-renews your SSL certificate after every 90 days.
Test
Using a web browser such as Chrome, visit your Gradio web application domain name.
https://gradio.example.com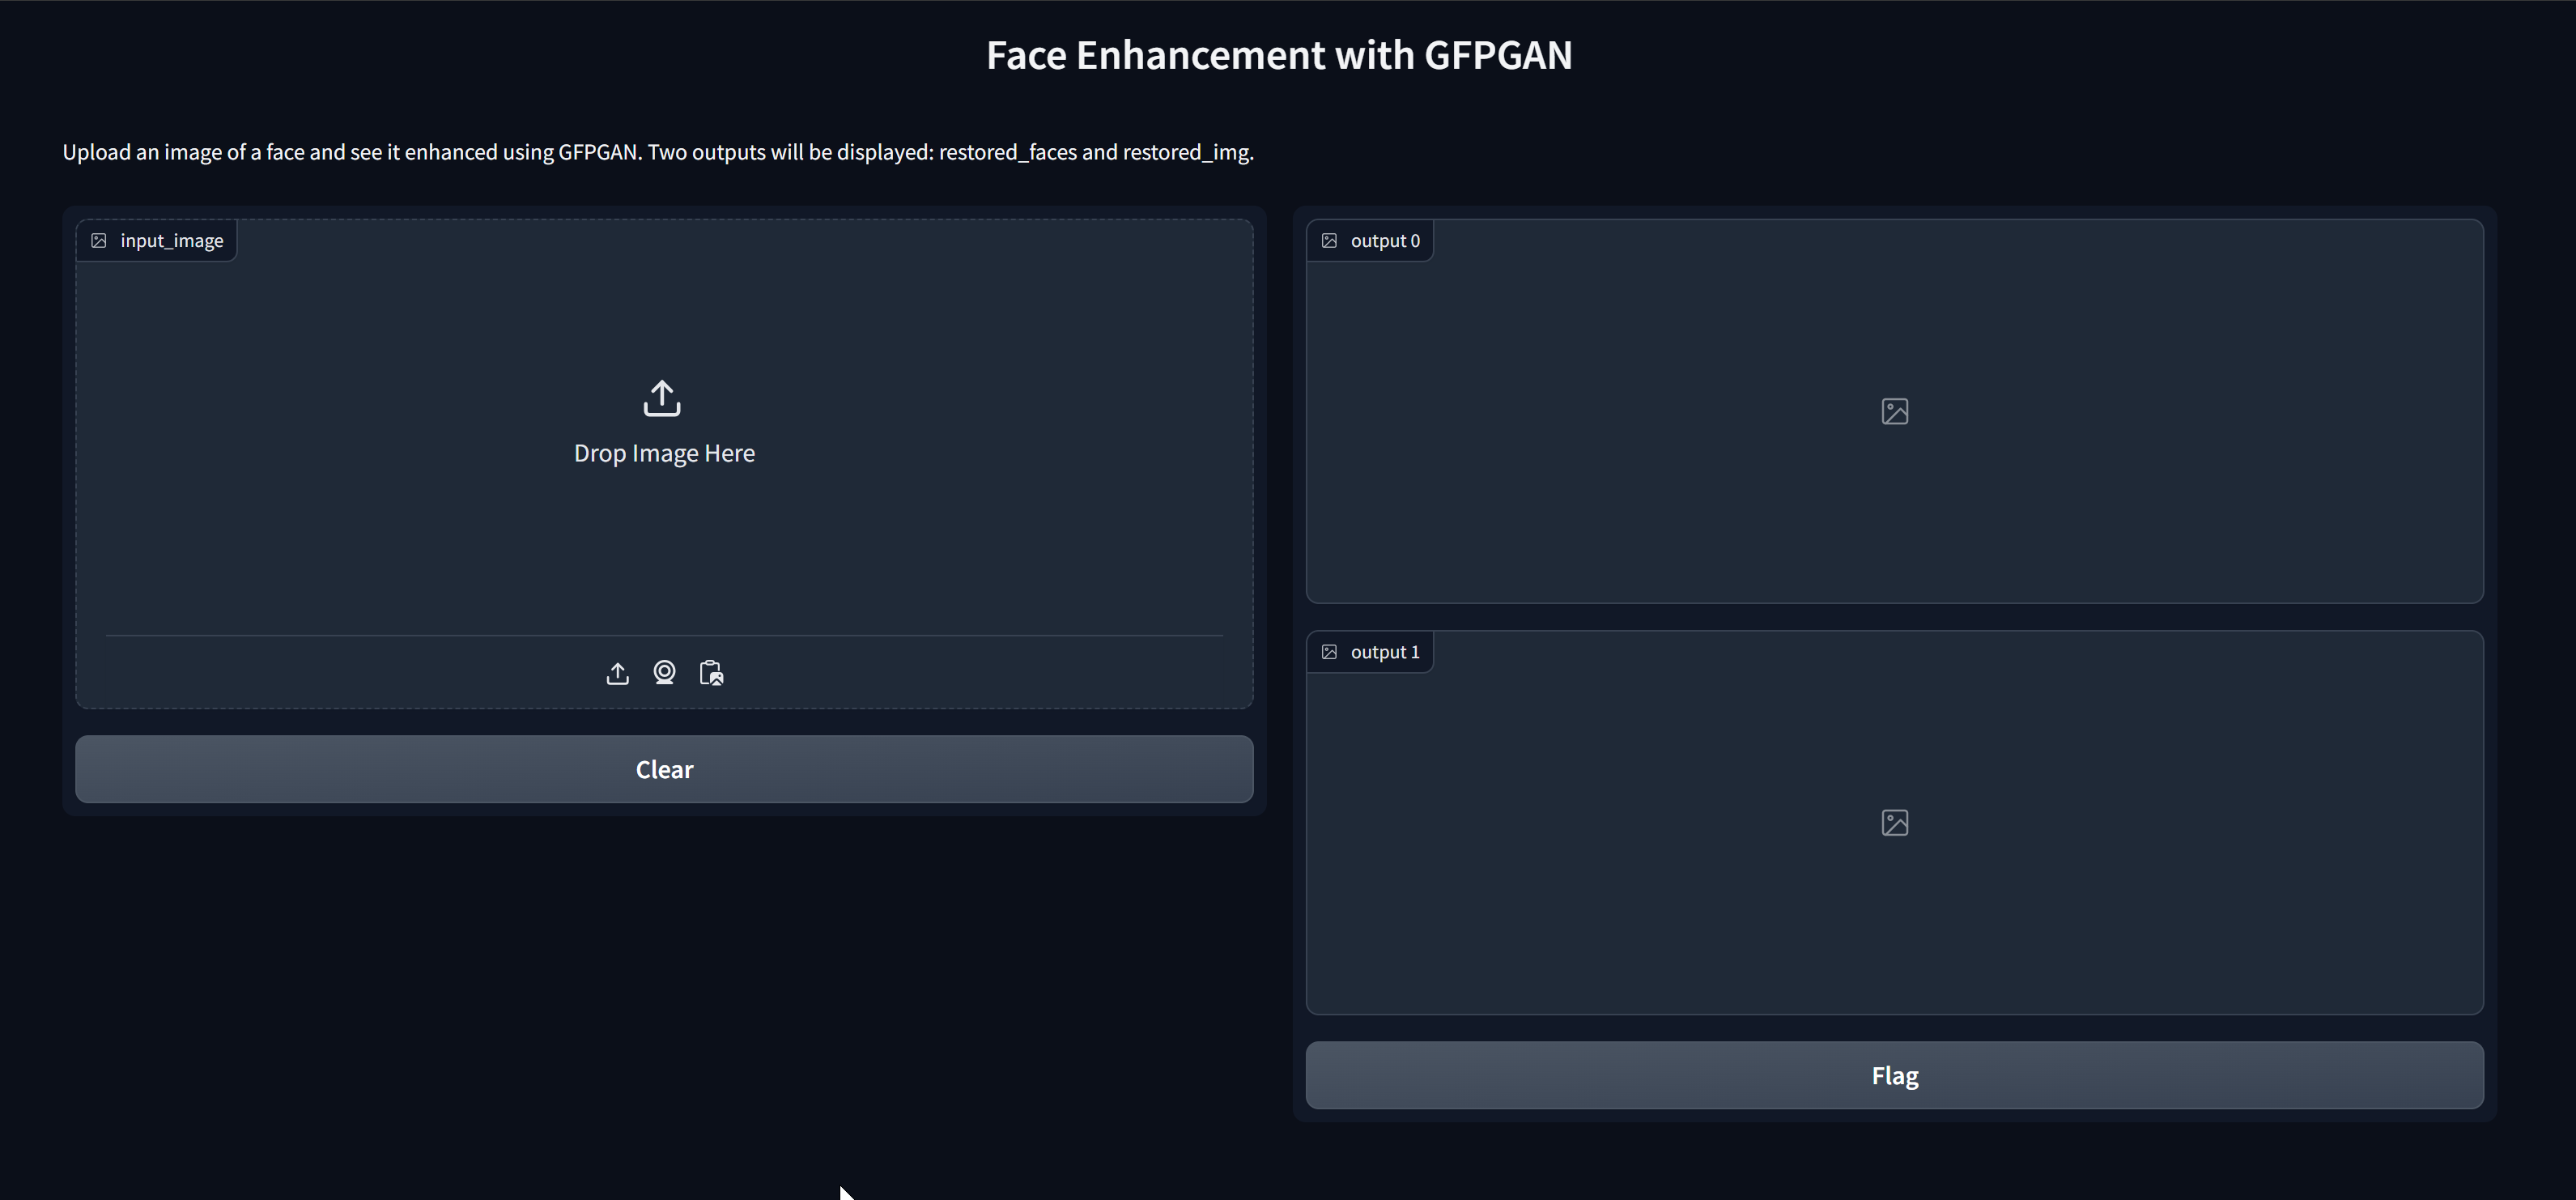
Upload a sample image in the
input_imagesection and verify that the application uses the Vultr GPU Server resources to process the enhanced image output.
Conclusion
You have deployed a Gradio web application on your Ubuntu server and secured it for public access using your domain name. You can modify the application processes with more functionalities to match your user needs. For more information, visit the Gradio web interface documentation. To explore more GFPGAN model functionalites, explore how to perform AI face restoration using GFPGAN on a Vultr Cloud GPU Server.