
How to Build ML Web Apps using Gradio
Introduction
Gradio is a Python package that allows developers to create customizable and interactive interfaces for Machine Learning models. Deployed as a web application, Gradio allows you to build a production-ready application on top of your machine learning model and avail to Internet users using your Server IP address or domain name.
This article explains how to build machine learning web applications using Gradio. You will create a Gradio interface, integrate a working machine learning model into the web application interface, and implement additional interface features using a Vultr Cloud Server.
Prerequisites
Before you begin:
Deploy a Ubuntu A100 Cloud GPU server.
Create a non-root user with sudo privileges. For example
gradio_userSwitch to the sudo user account
# su gradio_user
Create the Gradio Interface
To build a new interface, install Gradio on the server, and set up your application as described in the steps below.
Using the Python
pippackage manager, install the Gradio package$ pip3 install gradioUsing a text editor such as
Nano, create a new Python fileapp.py$ nano app.pyAdd the following code to the file
 import gradio as gr
 def test(name):
     return "Hi " + name + "! Welcome to the App"

 interface = gr.Interface(fn=test, inputs= gr.Textbox(), outputs= gr.Textbox())

 interface.launch(server_name="0.0.0.0", server_port=8080)
Save and close the file
Below is what the application code does:
import: Imports the installed Gradio packagedef test(name): Defines a functiontest()with one parameternamewhich consists of a name given as an input to the function by the userinterface: Defines the function interface which includes:gr.Interface: A Gradio library class used to define and configure user interfacesfn = test: Passes the defined functiontest(). The function can consist of the machine learning model, takes inputs and produces outputsinputs: Specifies the input type the user adds to thetest()function. It's set togr.Textbox()which means the input data is textoutputs="text": Specifies the type of output returned by thetest()function. It's set togr.Textbox()which means the output is text data
interface.launch(): Specifies the Gradio interface launch platforms with the following variables:server_name: Specifies Gradio listening interface. When set to0.0.0.0, Gradio accepts incoming connections from all Server IP Addresses. Set the value to127.0.0.1when using a reverse proxy such as Nginxserver_port: Set the Gradio port8080
To accept incoming connections to the Gradio interface, allow the listening port
8080through the UFW firewall$ sudo ufw allow 8080Restart the firewall to save changes
$ sudo ufw reloadUsing Python, run the Gradio application file
$ python3 app.pyWhen successful, your output should look like the one below:
Running on local URL: http://0.0.0.0:8080Using a web browser such as Firefox, visit your public Server IP Address on port
8080http://SERVER-IP:8080
Verify that the Gradio web application loads successfully. Then, enter your name in the name field and click Submit to view the output. In your terminal session, press Ctrl + C to stop the application.
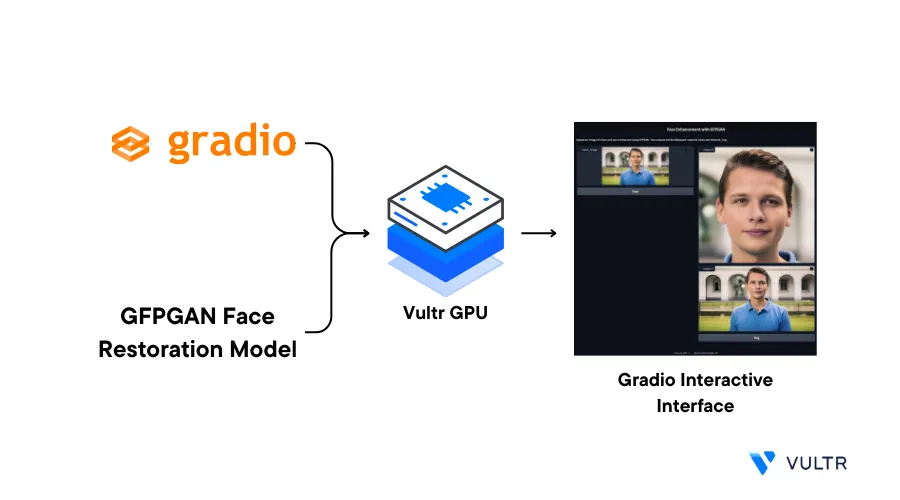
Example: Build an Image Restoration Web Application using Gradio
To leverage the power of your Gradio web application, build and integrate the GFPGAN model to perform image restoration tasks with the ability to upscale any low-resolution image as described below.
Using
pip, install the latest PyTorch package$ pip3 install torch torchvision --index-url https://download.pytorch.org/whl/cu118Install GFPGAN and the model dependency packages
$ pip3 install realesrgan gfpgan basicsrCreate a new Python application file
model.py$ nano model.pyAdd the following code to the file
 import gradio as gr
 from gfpgan import GFPGANer
 from basicsr.archs.rrdbnet_arch import RRDBNet
 from realesrgan import RealESRGANer
 import numpy as np
 import cv2
 import requests

 def enhance_image(input_image):
     arch = 'clean'
     model_name = 'GFPGANv1.4'
     gfpgan_checkpoint = 'https://github.com/TencentARC/GFPGAN/releases/download/v1.3.4/GFPGANv1.4.pth'
     realersgan_checkpoint = 'https://github.com/xinntao/Real-ESRGAN/releases/download/v0.2.1/RealESRGAN_x2plus.pth'

     rrdbnet = RRDBNet(num_in_ch=3, num_out_ch=3, num_feat=64, num_block=23, num_grow_ch=32, scale=2)

     bg_upsampler = RealESRGANer(
         scale=2,
         model_path=realersgan_checkpoint,
         model=rrdbnet,
         tile=400,
         tile_pad=10,
         pre_pad=0,
         half=True
     )

     restorer = GFPGANer(
         model_path=gfpgan_checkpoint,
         upscale=2,
         arch=arch,
         channel_multiplier=2,
         bg_upsampler=bg_upsampler
     )

     input_image = input_image.astype(np.uint8)
     cropped_faces, restored_faces, restored_img = restorer.enhance(input_image)

     return restored_faces[0], restored_img

 interface = gr.Interface(
     fn=enhance_image,
     inputs=gr.Image(),
     outputs=[gr.Image(), gr.Image()],
     live=True,
     title="Face Enhancement with GFPGAN",
     description="Upload an image of a face and see it enhanced using GFPGAN. Two outputs will be displayed: restored_faces and restored_img."
 )

 interface.launch(server_name="0.0.0.0", server_port=8080)
Save and close the file
Below is what the above code does:
import: Imports all the model-specific librariesdef enhance_image(): Stores the model checkpoints and enables the following functions:restorer: Stores the image enhancement model parametersbg_upsampler: Handles background enhancement model parametersinput_image: Handles image preprocessingarch: When set toclean, it uses the clean version without the StyleGAN2-specific compiled CUDA extensionsmodel_name,gfpgan_checkpoint,realersgan_checkpoint: Consists of the URL that points to the checkpointsbg_upsampler: Enables background enhancementrestorer: Allows face enhancementinput_image: Converts the input data type array tonumpy.uint8restorer.enhance(input_image): Stores three input types, a cropped image, restored face, and the restored imagereturn: Returns the two array variable as Gradio output
interface: Specifies the variable that stores thegr.Interface()function and its parameters including:fn: Sets the function name Gradio needs to process. In this case,enhance_imageinputs: Specifies that the input type is an image.outputs: Specifies that the output type is an image. Twogr.Image()functions return two images, a restored face and the restored image.live: Specifies that when an input image loads, it immediately processes the output without the need to click a Submit button.title: Sets the interface headingdescription: Sets the interface description that appears below the title
interface.launch(server_name="0.0.0.0", server_port=8080): Specifies the compilation of the interface and sets the launch code
Run the Python application file
$ python3 model.pyIn a new web browser window, access the Gradio web application interface
https://SERVER-IP:8080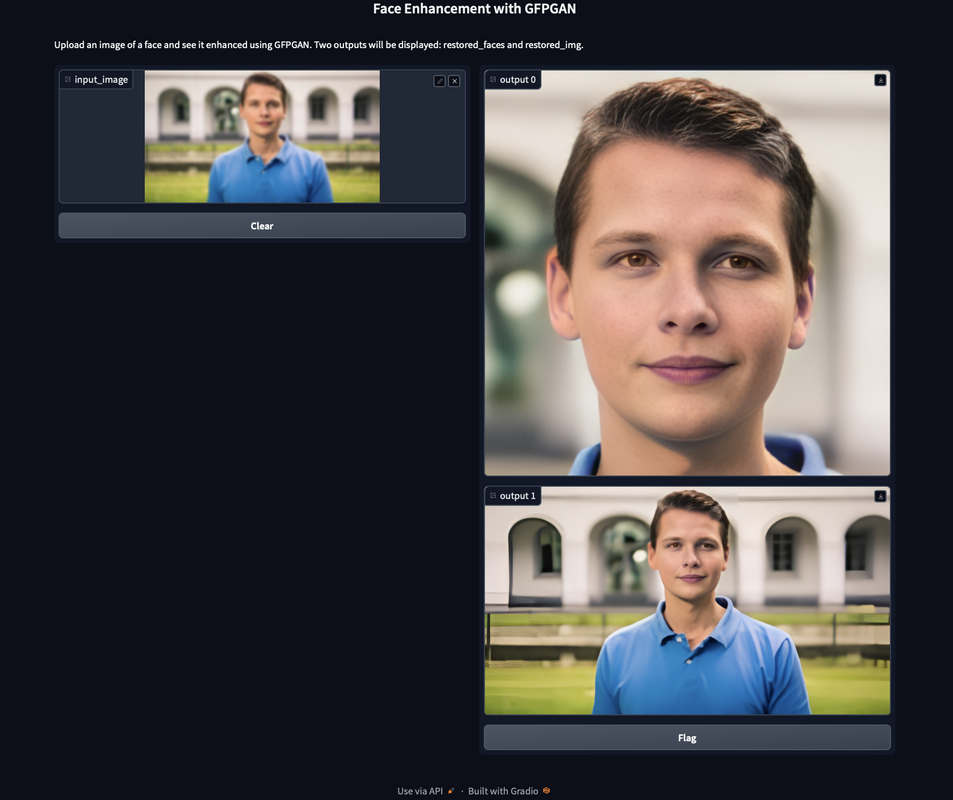
Verify that you can upload an input image and two restored images display in your output.
Customize the Gradio Interface
The example web application in this article uses the image Gradio type to generate the interface. To customize your application, you can implement any of the following supported Gradio input and output functions:
- Text:
gr.Textbox() - Audio:
gr.Audio() - Video:
gr.Video() - Image:
gr.Image()
For example, to implement Text input and output type, apply the function to your respective interface as below:
interface = gr.Interface(
    fn=FUNCTION_NAME,  # Your Desired Function Name
    inputs=gr.Textbox(),
    outputs=gr.Textbox()
)
To implement more than one function in a single interface, set your interface to the following
interface = gr.Interface(
    fn=FUNCTION_NAME,  # Your Desired Function Name
    inputs=[gr.Image(), gr.Audio()],
    outputs=[gr.Video(), gr.Textbox()]
)
Depending on your model requirements, you can change the inputs and outputs types. Before implementing a function, verify if it's available for either input or output. For more input and output types, visit the Gradio Interface documentation.
Conclusion
In this article, you installed Gradio and created a sample image restoration application on a Vultr Cloud GPU server. You can customize your Gradio interface with more models, and server the web application using your domain name by integrating a reverse proxy such as Nginx for public access. To implement login functionality, visit the Gradio login button documentation page.