
AI Generated Videos with Show-1 on Vultr Cloud GPU
Introduction
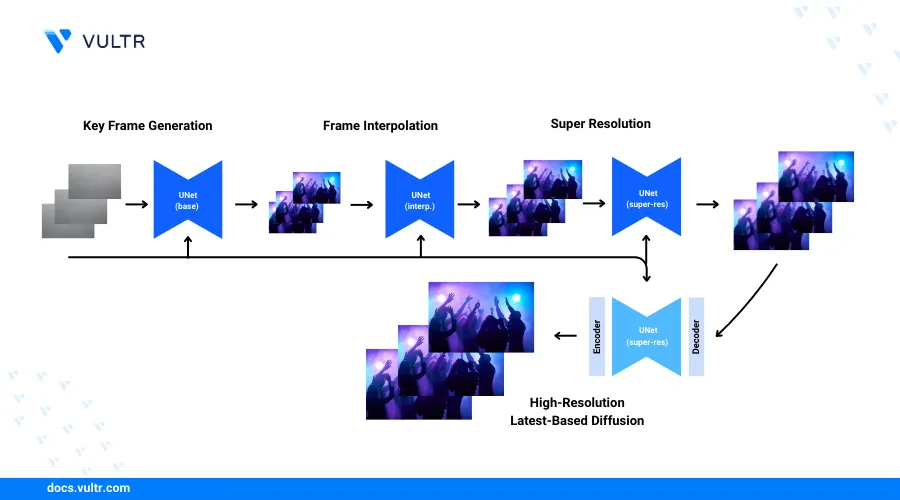
Show-1 is a deep learning model designed to generate realistic videos from text prompts. The model uses both latent-based and pixel-based text-to-video diffusion models (VDMs) to generate videos. While creating videos, the Show-1 model uses the pixel-based VDM to generate a low-resolution video that accurately matches the text prompt and applies the latent-based VDM to increase the video resolution.
This guide explains how to generate AI videos using the Show-1 model on a Vultr Cloud GPU server. You will set up the server environment with the necessary transformers, generative adversarial networks, and optical flow estimation libraries to generate high-quality videos that match your input text prompts.
Prerequisites
Before you begin:
- Deploy a new Ubuntu 22.04 A100 Vultr Cloud GPU server with at least
80 GBof GPU RAM. - Access the server using SSH as a non-root user with sudo privileges.
- Create a Hugging Face account and generate a user access token.
- Connect and allow your Hugging Face account to use the DeepFloyd model.
Set Up the Server
Follow the steps below to install all required Show-1 dependency packages such as Gradio to process multimedia content on the server using the model.
Clone the Show-1 generative-model repository using Git.
console$ git clone https://github.com/showlab/Show-1.git
List your directory files and verify that a new
Show-1directory is available.console$ lsOutput:
Show-1Switch to the
Show-1project directory.console$ cd Show-1/
Install the Python virtual environment package using APT.
console$ sudo apt install python3-virtualenv
Create a new Python virtual environment such as
show1-env.console$ virtualenv show1-env
Activate the virtual environment.
console$ source show1-env/bin/activate
Update the Pip package manager.
console(show1-env)$ pip install --upgrade pip
Install Gradio using Pip.
console(show1-env)$ pip install gradio
Install the OpenCV library to export generated videos.
console(show1-env)$ pip install opencv-python
Back up the original requirements file.
console$ mv requirements.txt requirements_copy.txt
Open the requirements file using a text editor such as Nano.
console$ nano requirements.txt
Add the following contents to the file.
diffusers==0.19.3
bitsandbytes==0.35.4
decord==0.6.0
transformers==4.29.1
accelerate
imageio==2.14.1
torch
torchvision
beautifulsoup4
tensorboard
sentencepiece
safetensors
modelcards
omegaconf
pandas
einops
ftfy
The above configuration removes the version restrictions for
accelerate,torch, andtorchvisionmodules. The original package versions may not be compatible with each other and removing the version specifications allows Pip to solve dependency conflicts.Install all required Python packages using the
requirements.txtfile.console$ pip install -r requirements.txt
Enable Access to the DeepFloyd Super-Resolution Model
The Show-1 AI video generator uses pixel-based VDMs that include a DeepFloyd super-resolution model to transform the initial low-resolution to a high-resolution video. Log in to your Hugging Face account using your access token on the server to enable access to the DeepFloyd model repository.
Log in to your Hugging Face account using the
huggingface-cliTransformers library.console$ huggingface-cli login
Enter your Hugging Face access token when prompted and press Enter to save changes.
Please enter your Hugging Face token (will be stored in a local file for future use):When prompted to add the token as a Git credential, enter N and press Enter to apply changes. When successful, your output should look like the one below.
Your token has been saved to /home/user/.cache/huggingface/token

Login successful
Back up the original model application file
app.py.console$ mv app.py app.ORIG
Create a new Python application file
app.py.console$ nano app.py
Add the following code to the file.
pythonimport gradio as gr import torch from diffusers.utils import export_to_video import os from PIL import Image import torch.nn.functional as F from diffusers import IFSuperResolutionPipeline, VideoToVideoSDPipeline from diffusers.utils import export_to_video from diffusers.utils.torch_utils import randn_tensor from showone.pipelines import TextToVideoIFPipeline, TextToVideoIFInterpPipeline, TextToVideoIFSuperResolutionPipeline from showone.pipelines.pipeline_t2v_base_pixel import tensor2vid from showone.pipelines.pipeline_t2v_sr_pixel_cond import TextToVideoIFSuperResolutionPipeline_Cond # Set HF_HOME to the directory containing your Hugging Face credentials os.environ["HF_HOME"] = "/path/to/your/huggingface/directory" # Base Model pretrained_model_path = "showlab/show-1-base" pipe_base = TextToVideoIFPipeline.from_pretrained( pretrained_model_path, torch_dtype=torch.float16, variant="fp16" ) pipe_base.enable_model_cpu_offload() # Interpolation Model pretrained_model_path = "showlab/show-1-interpolation" pipe_interp_1 = TextToVideoIFInterpPipeline.from_pretrained( pretrained_model_path, text_encoder=None, torch_dtype=torch.float16, variant="fp16" ) pipe_interp_1.enable_model_cpu_offload() # Super-Resolution Model 1 # Image super-resolution model from DeepFloyd https://huggingface.co/DeepFloyd/IF-II-L-v1.0 pretrained_model_path = "DeepFloyd/IF-II-L-v1.0" pipe_sr_1_image = IFSuperResolutionPipeline.from_pretrained( pretrained_model_path, text_encoder=None, torch_dtype=torch.float16, variant="fp16", ) pipe_sr_1_image.enable_model_cpu_offload() pretrained_model_path = "showlab/show-1-sr1" pipe_sr_1_cond = TextToVideoIFSuperResolutionPipeline_Cond.from_pretrained( pretrained_model_path, text_encoder=None, torch_dtype=torch.float16 ) pipe_sr_1_cond.enable_model_cpu_offload() # Super-Resolution Model 2 pretrained_model_path = "showlab/show-1-sr2" pipe_sr_2 = VideoToVideoSDPipeline.from_pretrained( pretrained_model_path, torch_dtype=torch.float16 ) pipe_sr_2.enable_model_cpu_offload() pipe_sr_2.enable_vae_slicing() output_dir = "./outputs" os.makedirs(output_dir, exist_ok=True) def infer(prompt): print(prompt) negative_prompt = "low resolution, blur" # Text embeds prompt_embeds, negative_embeds = pipe_base.encode_prompt(prompt) # Keyframes generation (8x64x40, 2fps) video_frames = pipe_base ( prompt_embeds=prompt_embeds, negative_prompt_embeds=negative_embeds, num_frames=8, height=40, width=64, num_inference_steps=75, guidance_scale=9.0, output_type="pt" ).frames # Frame interpolation (8x64x40, 2fps -> 29x64x40, 7.5fps) bsz, channel, num_frames, height, width = video_frames.shape new_num_frames = 3 * (num_frames - 1) + num_frames new_video_frames = torch.zeros((bsz, channel, new_num_frames, height, width), dtype=video_frames.dtype, device=video_frames.device) new_video_frames[:, :, torch.arange(0, new_num_frames, 4), ...] = video_frames init_noise = randn_tensor((bsz, channel, 5, height, width), dtype=video_frames.dtype, device=video_frames.device) for i in range(num_frames - 1): batch_i = torch.zeros((bsz, channel, 5, height, width), dtype=video_frames.dtype, device=video_frames.device) batch_i[:, :, 0, ...] = video_frames[:, :, i, ...] batch_i[:, :, -1, ...] = video_frames[:, :, i + 1, ...] batch_i = pipe_interp_1( pixel_values=batch_i, prompt_embeds=prompt_embeds, negative_prompt_embeds=negative_embeds, num_frames=batch_i.shape[2], height=40, width=64, num_inference_steps=50, guidance_scale=4.0, output_type="pt", init_noise=init_noise, cond_interpolation=True, ).frames new_video_frames[:, :, i * 4:i * 4 + 5, ...] = batch_i video_frames = new_video_frames # Super-resolution 1 (29x64x40 -> 29x256x160) bsz, channel, num_frames, height, width = video_frames.shape window_size, stride = 8, 7 new_video_frames = torch.zeros( (bsz, channel, num_frames, height * 4, width * 4), dtype=video_frames.dtype, device=video_frames.device) for i in range(0, num_frames - window_size + 1, stride): batch_i = video_frames[:, :, i:i + window_size, ...] if i == 0: first_frame_cond = pipe_sr_1_image( image=video_frames[:, :, 0, ...], prompt_embeds=prompt_embeds, negative_prompt_embeds=negative_embeds, height=height * 4, width=width * 4, num_inference_steps=50, guidance_scale=4.0, noise_level=150, output_type="pt" ).images first_frame_cond = first_frame_cond.unsqueeze(2) else: first_frame_cond = new_video_frames[:, :, i:i + 1, ...] batch_i = pipe_sr_1_cond( image=batch_i, prompt_embeds=prompt_embeds, negative_prompt_embeds=negative_embeds, first_frame_cond=first_frame_cond, height=height * 4, width=width * 4, num_inference_steps=50, guidance_scale=7.0, noise_level=250, output_type="pt" ).frames new_video_frames[:, :, i:i + window_size, ...] = batch_i video_frames = new_video_frames # Super-resolution 2 (29x256x160 -> 29x576x320) video_frames = [Image.fromarray(frame).resize((576, 320)) for frame in tensor2vid(video_frames.clone())] video_frames = pipe_sr_2( prompt, negative_prompt=negative_prompt, video=video_frames, strength=0.8, num_inference_steps=50, ).frames video_path = export_to_video(video_frames, f"{output_dir}/{prompt[:200]}.mp4") print(video_path) return video_path css = """ #col-container {max-width: 510px; margin-left: auto; margin-right: auto;} a {text-decoration-line: underline; font-weight: 600;} .animate-spin { animation: spin 1s linear infinite; } @keyframes spin { from { transform: rotate(0deg); } to { transform: rotate(360deg); } } #share-btn-container { display: flex; padding-left: 0.5rem !important; padding-right: 0.5rem !important; background-color: #000000; justify-content: center; align-items: center; border-radius: 9999px !important; max-width: 15rem; height: 36px; } div#share-btn-container > div { flex-direction: row; background: black; align-items: center; } #share-btn-container:hover { background-color: #060606; } #share-btn { all: initial; color: #ffffff; font-weight: 600; cursor:pointer; font-family: 'IBM Plex Sans', sans-serif; margin-left: 0.5rem !important; padding-top: 0.5rem !important; padding-bottom: 0.5rem !important; right:0; } #share-btn * { all: unset; } #share-btn-container div:nth-child(-n+2){ width: auto !important; min-height: 0px !important; } #share-btn-container .wrap { display: none !important; } #share-btn-container.hidden { display: none!important; } img[src*='#center'] { display: inline-block; margin: unset; } .footer { margin-bottom: 45px; margin-top: 10px; text-align: center; border-bottom: 1px solid #e5e5e5; } .footer>p { font-size: .8rem; display: inline-block; padding: 0 10px; transform: translateY(10px); background: white; } .dark .footer { border-color: #303030; } .dark .footer>p { background: #0b0f19; } """ with gr.Blocks(css=css) as demo: with gr.Column(elem_id="col-container"): gr.Markdown( """ <h1 style="text-align: center;">Show-1 Text-to-Video</h1> <p style="text-align: center;"> A text-to-video generation model that marries the strength and alleviates the weakness of pixel-based and latent-based VDMs. <br /> </p> <p style="text-align: center;"> <a href="https://arxiv.org/abs/2309.15818" target="_blank">Paper</a> | <a href="https://showlab.github.io/Show-1" target="_blank">Project Page</a> | <a href="https://github.com/showlab/Show-1" target="_blank">Github</a> </p> """ ) prompt_in = gr.Textbox(label="Prompt", placeholder="A panda taking a selfie", elem_id="prompt-in") #neg_prompt = gr.Textbox(label="Negative prompt", value="text, watermark, copyright, blurry, nsfw", elem_id="neg-prompt-in") #inference_steps = gr.Slider(label="Inference Steps", minimum=10, maximum=100, step=1, value=40, interactive=False) submit_btn = gr.Button("Submit") video_result = gr.Video(label="Video Output", elem_id="video-output") gr.HTML(""" <div class="footer"> <p> Demo adapted from <a href="https://huggingface.co/spaces/fffiloni/zeroscope" target="_blank">zeroscope</a> by 🤗 <a href="https://twitter.com/fffiloni" target="_blank">Sylvain Filoni</a> </p> </div> """) submit_btn.click(fn=infer, inputs=[prompt_in], outputs=[video_result], api_name="show-1") # Set share=True in launch() to generate a link to access the web interface demo.queue(max_size=12).launch(show_api=True)
Save and close the file.
Below is what the above application functions do:
os.environ["HF_HOME"]: Sets up an environment variable with the Hugging Face home directory where your access token is stored.TextToVideoIFPipeline.from_pretrained(): Initializes a pretrained text-to-video model.enable_model_cpu_offload(): Enables offloading of the model processes to the CPU to reduce the GPU load.TextToVideoIFInterpPipeline.from_pretrained(): Sets up a pretrained model to interpolate between frames in a video based on the input text.IFSuperResolutionPipeline.from_pretrained(): Creates a pipeline to enhance the image resolution using a pretrained super-resolution model.TextToVideoIFSuperResolutionPipeline_Cond.from_pretrained(): Loads a pretrained model for super-resolution video frames based on the input text.VideoToVideoSDPipeline.from_pretrained(): Loads a pretrained model for converting video formats.enable_vae_slicing(): Enables Variational Autoencoder (VAE) model slicing to optimize performance.infer(): Generates a video from a text prompt by encoding the text and creating keyframes from the encoded data.export_to_video(): Exports the final video frames to a video file. The generated video is saved to/outputswithin your project directory.
Set Up Show-1 as a System Service
Follow the steps below to create a new Show-1 system service to securely run and control the application on your server.
Create a new system service file.
console$ sudo nano /etc/systemd/system/show-1.service
Add the following contents to the file. Replace
linuxuserwith your actual user and/home/linuxuser/Show-1/with your project directory.systemd[Unit] Description=My Show-1 Service After=network.target [Service] User=linuxuser Group=linuxuser WorkingDirectory=/home/linuxuser/Show-1 Environment="PATH=/home/linuxuser/Show-1/show1-env/bin" ExecStart=/home/linuxuser/Show-1/show1-env/bin/python /home/linuxuser/Show-1/app.py Restart=always [Install] WantedBy=multi-user.target
Save and close the file.
Reload the systemd daemon to synchronize the service changes.
console$ sudo systemctl daemon-reload
Enable the Show-1 system service file.
console$ sudo systemctl enable show-1
Start the Show-1 system service.
console$ sudo systemctl start show-1
View the Show-1 system service status and verify that it's running.
console$ sudo systemctl status show-1
Output:
● show-1.service - My Show-1 Service
     Loaded: loaded (/etc/systemd/system/show-1.service; enabled; vendor preset: enabled)
     Active: active (running) since Mon 2024-04-22 00:26:12 UTC; 3s ago
   Main PID: 2663 (python)
      Tasks: 6 (limit: 72179)
     Memory: 265.7M
        CPU: 3.875s
     CGroup: /system.slice/show-1.service
             └─2663 /home/hum/Show-1/show1-env/bin/python /home/hum/Show-1/app.py

Apr 22 00:26:12 Show-1 systemd[1]: Started My Show-1 Service.
Wait at least
15 minutesbefore testing access to the Show-1 application to allow the model download process to complete.
Set Up Nginx as a Reverse Proxy To Enable Access to the Show-1 Application
Install Nginx on your server.
console$ sudo apt install nginx -y
Create a new Nginx virtual host configuration
show-1conf.console$ nano /etc/nginx/sites-available/show-1conf
Add the following configurations to the file. Replace
show-1.example.comwith your actual domain.nginxupstream show-1 { server 127.0.0.1:7860; } server { listen 80; listen [::]:80; server_name show-1.example.com; proxy_set_header Host $host; proxy_http_version 1.1; proxy_set_header X-Real-IP $remote_addr; proxy_set_header X-Forwarded-For $proxy_add_x_forwarded_for; proxy_set_header X-Forwarded-Proto $scheme; proxy_set_header Sec-WebSocket-Extensions $http_sec_websocket_extensions; proxy_set_header Sec-WebSocket-Key $http_sec_websocket_key; proxy_set_header Sec-WebSocket-Version $http_sec_websocket_version; proxy_set_header Upgrade $http_upgrade; proxy_set_header Connection "Upgrade"; location / { auth_basic "closed site"; auth_basic_user_file /etc/nginx/.htpasswd; proxy_pass http://show-1; proxy_set_header Upgrade $http_upgrade; proxy_set_header Connection "upgrade"; } }
Save and close the file.
Activate the new virtual host configuration.
console$ sudo ln -s /etc/nginx/sites-available/show-1conf /etc/nginx/sites-enabled/show-1conf
Test the Nginx configuration for errors.
console$ sudo nginx -t
Restart Nginx to apply the configuration changes.
console$ sudo systemctl restart nginx
Allow the HTTP port
80through the default UFW firewall.console$ sudo ufw allow 80/tcp
Reload the UFW table to apply changes.
console$ sudo ufw reload
Access the Show-1 Interface and Generate Videos
The Show-1 model uses Gradio to generate a web interface to run the model and generate videos. Follow the steps below to run the model and generate a sample video from a text prompt.
Access your Show-1 domain using a web browser such as Firefox.
http://show-1.example.comEnter your text prompt in the Prompt field. For example,
a rocket firing up to the sky.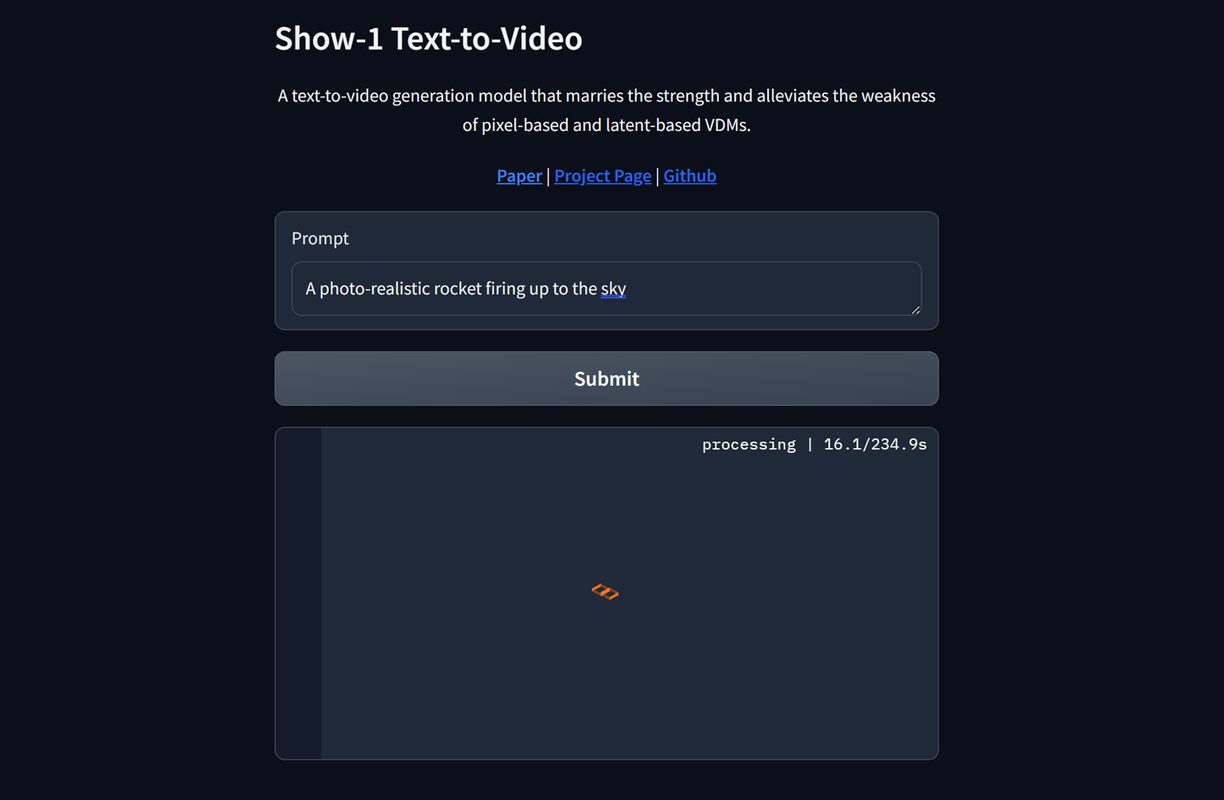
Click Submit to start the video generation process and monitor the model processing time.
Click the Download symbol in the top right corner of the generated video to preview and download the file on your computer.
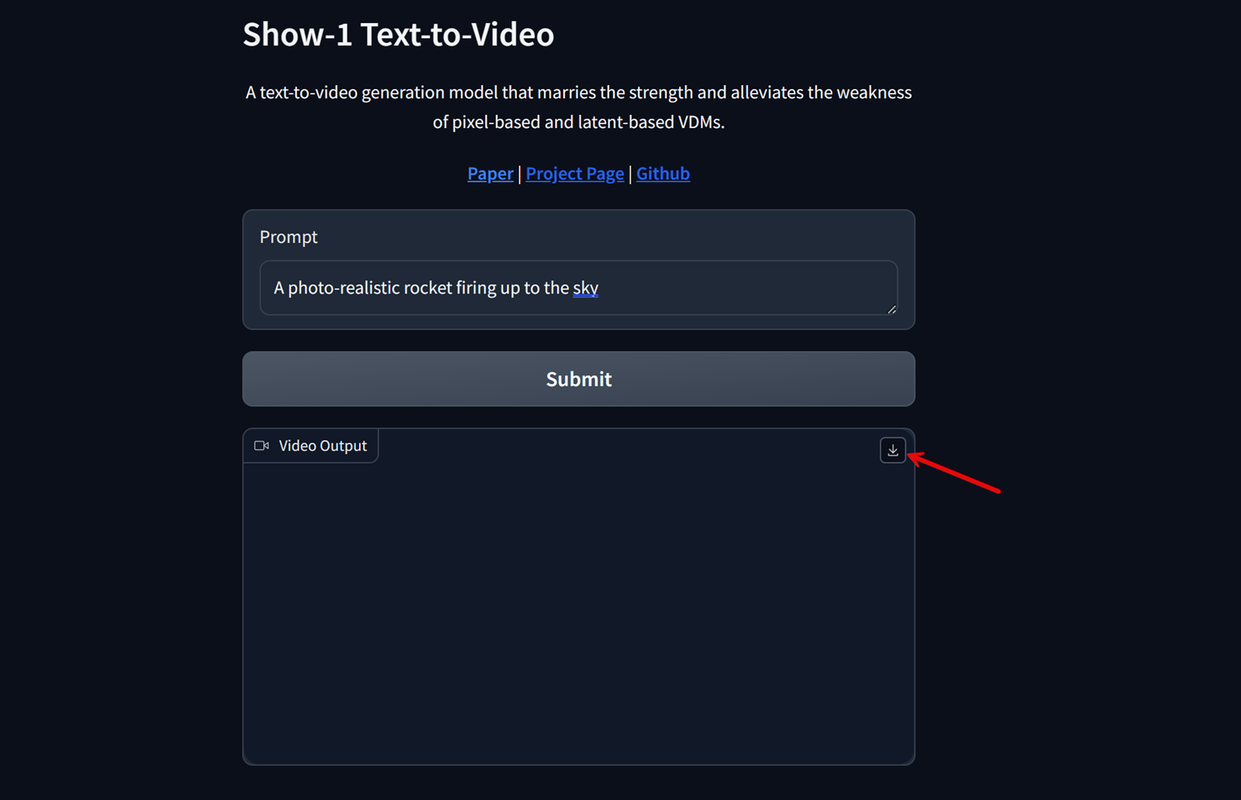
Verify that the model saves your generated videos to the
/outputdirectory in your project files.
Conclusion
You have deployed the Show-1 Video Diffusion Model to generate realistic videos using text inputs on a Vultr Cloud GPU server. You can modify the application code to securely generate videos on your server using Show-1 with the super-resolution DeepFloyd model. For more information, visit the Show 1 project page.